Table of Contents
Advertisement
Advertisement
Table of Contents

Summary of Contents for SWING LOGIC SLX-Hybrid X3
- Page 1 User Manual SWING LOGIC VENTURES...
-
Page 2: Table Of Contents
INDEX Composition Quick Start Guide (QSG) Summary Register Product Using Bluetooth speaker Using Launch monitor Swing detection via multi-sensor Swing with Nano sensor Using audible GPS Using the magnetic mount Charging and using the power bank Using the remote button Nano Button new connecting LCD Display Guide Button and LED Guide... -
Page 3: Composition
Composition SLX-HYBRID X3 model components. Main LCD Screen Power Bank port Charger port Nano Sensor / Remote (only pro model) Nano Charger port Control buttons Dual Speakers Nano Glove Mount Magnet mount Charger Cable Registration Card Protective Travel Pouch SLX-HYBIRD X3 USER MANUAL... -
Page 4: Quick Start Guide (Qsg) Summary
QSG Summary INSTANCE BLUETOOTH REMOTE SWING MAGNET DISPLAY SPEAKER CONTROL SENSOR MOUNT TN LCD 10W STEREO iOS / ANDROID Glove Mount NEODIMUN SLX-Hybrid PRO model only SLX-Hybrid PRO model only POWER WATER SWING AUDIBLE E6 CONNECT BANK PROOF ANAALYSIS COMPATIBLE 6000mAh IP 5X iOS / ANDROID... -
Page 5: Register Product
Register Product Welcome to SLX. Register your product right away. After registration, you will receive an E6 Connect license. Scan QR with Camera App You must register your product and serial number on SwingLogic.us and select the license type to receive your E6 License key. Or navigate to https://register.swinglogic.us Registration STEPS... -
Page 6: Using Bluetooth Speaker
Using Bluetooth speaker SLX-Hybrid features high-quality, high-power dual stereo speakers. For Bluetooth Connection, find the device name "SLX-SPEAKER" and pair it. SLX-SPEAKER Pairing mode LED (blue color) find the device name "SLX-SPEAKER" and pair it. BLE button click Change to SPEAKER mode Speaker bluetooth paired ICON Speaker mode Volumn up/down... -
Page 7: Using Launch Monitor
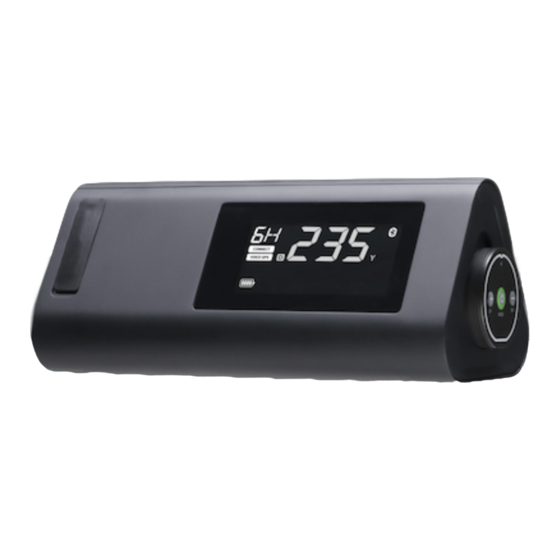
Using Launch Monitor You can quickly check swing results with the LCD Display While using the app, you can audibly hear results through the TTS. Mode Change Club Change Units Change Hybrid Location Install 3~4f horizontally behind the ball in line with intended direction. “The distance is 245 yards. - Page 8 Using Launch Monitor You can use it by applying it according to various places of use. On the Range: “The distance is 245 yards. ” Available clubs: Driver through 9 iron Detection sensor: Radar sensor It is more convenient to connect the SLX app and use it as an earphone through TTS.
-
Page 9: Swing Detection Via Multi-Sensor
Swing detection via multi-sensor Swing analysis is possible with a multi-sensor that combines radar and Micro sensor. (Patent Pending) It can be used in a variety of ways, from short-distance putting to real ball striking. Using only Hybrid (Radar Sensor) When practicing without app Ball speed, head speed detection Putting (head speed) detection... -
Page 10: Swing With Nano Sensor
Swing with Nano sensor Utilizing the Nano Sensor provides more accurate swing results. Golf gloves are required when swinging using the nano sensor. (Nano Sensor may be clipped to watch band or tape on wrist for putting analysis without a glove) Mount the sensor as shown in the figure below and install it vertically in the correct position to increase the accuracy. -
Page 11: Using Audible Gps
Using audible GPS Use the audible GPS function using the SLX-Connect app. You can now easily check the distance from the cart to the pin. Connect speaker and use the nano button to check the remaining distance. SLX-Connect Run Course Enter Tee Box > Select GPS menu Bluetooth Speaker paring SLX-Connect Connect Select round... -
Page 12: Using The Magnetic Mount
Using the magnetic mount Use the strong magnet on the Hybrid base bottom to attach to cart, or rely on the non-slip coating to set in cart seat or cup holder area. You can hear good sound quality without shaking in anywhere Neodymium Magnet Depending on the location of the magnet, it may fall off due to impact. -
Page 13: Charging And Using The Power Bank
Charging and using Power bank Charge your phone during a round of golf with power bank function. Device Charging USB Wall Adapter not included. Hybrid Nano It can be charged with USB-C type using a 5V - 1AmH charging adapter. Hybrid charging time 8 hours, Nano charging time 2 hours Using Power Bank You can charge your phone and Nano button through the USB port. -
Page 14: Using The Remote Button
Using the remote button Utilize the Nano Sensor as a remote control. Button matching Mode Button When the nano power is turned on, it is automatically connected to the hybrid. When connected, the Bluetooth icon is displayed on the LCD. Up/Down Button Launch Monitor mode successful nano sensor connection... -
Page 15: Nano Button New Connecting
Nano Button new connecting Nano Sensor comes paired with Hybrid Unit, however if a new connection is needed or replacement Nano Senor required, they can be paired as follows: NANO Connect checking When Hybrid-Nano is connected, the rear swing icon is activated, and the Nano's LED will be green. -
Page 16: Lcd Display Guide
LCD Display Guide Hybrid provides optimal LCD display in various modes. Optimized for viewing directly behind hitter. Hybrid LCD First Result / Second Result Nano Connect CLUB APP Connection GPS mode Radar power Speaker paired Swing mode Putting mode B : Ball Speed putting mode icon blinks Battery Charging long putting mode. -
Page 17: Button And Led Guide
Button and LED Guide Easy to understand LED lights show connection and unit status. Hybrid Button Speaker mode button Club / Volume Up/Down button Power (ON) / Display Mode button / power off: press for 3 seconds Pause / Unit Change button Hybrid LED Green Blue... -
Page 18: Firmware Update
Firmware Update Connect SLX-CONNECT > Connect menu > Device Select When the firmware of HW is updated, it is activated with a green button. Initial Firmware Updates will require separate Update App. Integration into SLX Connect underway. You can temporarily install and use the SLX-FIRMWARE MANGER app. Direct updates from SLX-CONNECT will be updated later. -
Page 19: Install Slx-Connect And Using
Install SLX-Connect and Using SLX Connect includes Swing Analysis, on-course GPS, Swing Video capture, and mini simulator game. Search “SLX-CONNECT” in app store Support OS : IOS/Android/PC compatible Recommended OS : Window 10 / Android 12 / iOS 12 Support Device : iPad / Tablet / Phone compatible It may not work under the recommended OS or lower. -
Page 20: Calibration At Slx-Connect Setting
Calibration at SLX-Connect Setting User calibration can be done according to the customer's swing and club. (Patent Pending) Connect SLX-CONNECT > SETTING > CALIBRATION MENU Club Select Calibration value select Adjustment Calibration allows each customer to customize the results to fit their specific swing pattern. Calibration is stored and launch monitor optimized for you. -
Page 21: Using E6 Connect (Step 1 ~ 11)
Please install and connect according to each STEP. STEP 1 Create an account and register with Swing Logic Create an account and register with us STEP 1 Find the included Card as depicted below: You can either scan the QR code on your phone's camera or go to : https://register.swinglogic.us... -
Page 22: Troubleshooting
Using E6 Connect STEP 2 Install E6 CONNECT After download, Run the program to install the software. Version: https://portal.e6golf.com/update/e6-connect Version: You will need to download the software from the app store. If you search for “E6 CONNECT” then it will pull up and you will be able to download. STEP 3 Start the E6 Application &... - Page 23 Using E6 Connect STEP 4 License Activation Enter License Key and press the Enter button. STEP 5 Select Tracking System Device Select “SwingLogic -SLX ” SwingLogic - SLX NOTE: Depending on the license type you are redeeming, the list of available trackers will be different.
- Page 24 Using E6 Connect STEP 6 Ensure Bluetooth is on Go to Settings > Bluetooth and Make sure your Bluetooth is turned on in your PC or iPhone/iPad. For iOS, you need to allow "E6 Connect" in Bluetooth settings. Important If your PC does not have Bluetooth, you will need to purchase a dongle.(not inculded) ※...
- Page 25 Using E6 Connect STEP 8 Calibrate sensor Setting - Maximize Accuracy When inside the application's Main Menu. Settings→Simulator→Configure Important! Default Settings Difficulty = Normal, Sensitivity = Normal, Woods/Iron/Putter = Your Choice based on type of clubs you will be installing sensor on. It is best to start with 0% distance "boost"...
- Page 26 Using E6 Connect STEP 10 Club selection control You can change your club selection outside of the E6 Connect Application by click these up and down buttons. Important! On the green, it automatically changes to the target direction. (Club side does not work on green) STEP 11 Target Control In the fairway / driving range, if you click the mode button once, it will change to...
- Page 27 Troubleshooting Check the latest registered information at swinglogic.us/support. Below is a simple troubleshooting guide. Connection Troubleshooting If your sensor does not connect to E6 within 30 seconds of starting application Check to ensure Bluetooth is available on your system & turned on. Charge for to ensure adequate battery power.
- Page 28 Troubleshooting Check the latest registered information at swinglogic.us/support. Below is a simple troubleshooting guide. Replacing and reconnecting the Nano Sensor If the Hybrid and Nano are not connected or if you need to replace the Nano, See the "Nano Sensor Replacement" manual. If you press and hold the "-"...
-
Page 29: Caution And Warning
Caution and Warning You must read and agree to the terms and conditions available on swinglogic.us Usage & Liabilities Before first use, check the battery life status. Do not use the product for purposes other than its intended functions. Do not separate and disassemble the product. Do not subject the product to severe impact, such as one caused by a drop. -
Page 30: Rules
FCC / IC RULES FCC Compliance Statement This device complies with part 15 of the FCC Rules. Operation is subject to the following two conditions : (1) This device may not cause harmful interference, and (2) This device must accept any interference received, including interference that may cause undesired operation. - Page 31 FCC / IC RULES Énoncé d'Industrie Canada(IC) Le present appareil est conforme aux CNR d’Industrie Canada applicables aux appareils radio exempts de licence. L’exploitation est autorisee aux deux conditions suivantes : (1) l’appareil ne doit pas produire de brouillage, et (2) l’utilisateur de l’appareil doit accepter tout brouillage radioelectrique subi, meme si le brouillage est susceptible d’en compromettre le fonctionnement.
- Page 32 SWING LOGIC VENTURES...
Need help?
Do you have a question about the SLX-Hybrid X3 and is the answer not in the manual?
Questions and answers