
Related Manuals for Foss NIRS DA1650


Summary of Contents for Foss NIRS DA1650
- Page 1 NIRS™ DA1650 User Manual 6008 1286 / Rev. 8 Copyright 2020 / All rights reserved FOSS Analytical A/S, Nils Foss Allé 1, DK-3400 Hillerød, Denmark Tel Int +45 7010 3370, Fax +45 7010 3371, E-mail info@foss.dk...
- Page 2 NIRS™ DA1650 Information may be changed or updated without notice. The latest version is found at www.foss.dk. Rev. Date of Issue Revised Material 2011-05-10 First edition 2013-03-25 General update to reflect ISIscan Nova software version 5.2 2013-09-13 General update to reflect ISIscan Nova software version 6.0...
-
Page 3: Table Of Contents
Sample Cups ............2:3 2.3.1 General ................2:3 2.3.2 Radio Frequency Identification System ....... 2:4 2.3.3 Other Cups and Accessories ......... 2:5 NIRS DA1650 Software ......... 2:7 2.4.1 ISIscan Nova ..............2:7 2.4.2 local configuration ............2:7 2.4.3 Routine Operation Software ........2:9 Installation .......... - Page 4 Cleaning the Instrument ........5:1 Cleaning the Touch Screen ........5:1 Cleaning the Sample Cups ........5:1 Replacement of Lamp ........... 5:2 FOSS Preventive Maintenance Agreement ..5:3 Troubleshooting......... General ..............6:1 Recommended Actions ......... 6:2 Error Messages ............6:3 Parts, Accessories and ...
-
Page 5: Safety
NIRS™ DA1650 Safety General Please read the user manual carefully and use the instrument as advised. Follow all safety precautions as instructed. Safety Symbols Explanation of safety symbols used in this manual. Symbol Description General hazard. Hot surface. Safety Terminology Explanation of safety terms used in this manual. -
Page 6: Product Safety
NIRS™ DA1650 Product Safety Caution The instrument is designed and tested for European (CE) compliance. To ensure that this compliance is maintained, connect only CE approved equipment. Connecting equipment that is not CE approved may cause EMC incompatibility and thereby affect the function of the instrument and other equipment. -
Page 7: Disposal Instructions
• the product has not been used for purposes other than those reasonably contemplated by FOSS • the product has not been altered or repaired with non-original FOSS parts or by personnel not authorised by FOSS • only original FOSS consumables and accessories or equivalents recommended by FOSS have been used User Manual 6008 1286 / Rev. -
Page 8: Copyright Of Embedded Software
Your instrument may contain parts that, due to wear during use of the instrument, are expected to have a shorter lifetime than the instrument in general. These parts are listed in the User Manual and/or in the FOSS product software and in the Owner's Guide. -
Page 9: Introduction
NIRS™ DA1650 is a robust, simple-to-use and accurate near-infrared analyzer that is based on diode array technology. NIRS DA1650 is a robust instrument that can be used in a laboratory or at-line environments. The user interface is designed for simple daily routine operation. - Page 10 NIRS™ DA1650 Fig. 2:2Rear view of NIRS DA1650 On/Off switch Ethernet connection Fuse holder USB connection Power cable connection User Manual 6008 1286 / Rev. 8...
-
Page 11: Principle Of Operation
Sample Cups 2.3.1 General All sample cups used with NIRS DA1650 fulfill the requirements of ISO 12099 requiring a quartz window to eliminate drying effects of the interacting sample surface layer. Analysis can be done with a range of different sample cups. The most commonly used are the Small cup and the Large cup. -
Page 12: Radio Frequency Identification System
Small cup holder 2.3.2 Radio Frequency Identification System Radio Frequency Identification (RFID) is a method used by the NIRS DA1650 for identifying each individual sample cup. There is a small RFID chip in each cup with CupType information and a unique CupID. -
Page 13: Other Cups And Accessories
NIRS™ DA1650 2.3.3 Other Cups and Accessories Fig. 2:5Other cups and accessories Large cup extension Lid for large cup Slurry cup Petri dish holder 89 mm Lid for small cup Petri dish holder 58 mm User Manual 6008 1286 / Rev. 8... - Page 14 NIRS Ring Cup A holder that allows for use of the NIRS ring cup is available. This permits scanning of an ISI ring cup on the NIRS DA1650. Primary use is for cross-standardization purposes between NIR platforms. Fig. 2:7NIRS ring cup...
-
Page 15: Nirs Da1650 Software
2.4.1 ISIscan Nova ISIscan Nova is the operating software for the NIRS DA1650. It contains all necessary functionalities for the normal analysis routines: • Select product and start analysis • Enter Sample ID and other sample related information fields •... - Page 16 • Instrument configurations managed remotely by the Network manager using FossManager software. • Routine Operator operates the NIRS DA1650 via ISIscan Nova software via the built-in touch screen. • FossConnect server is used for backup of data and configuration settings. The FossConnect server can either be FOSS hosted or Customer hosted.
-
Page 17: Routine Operation Software
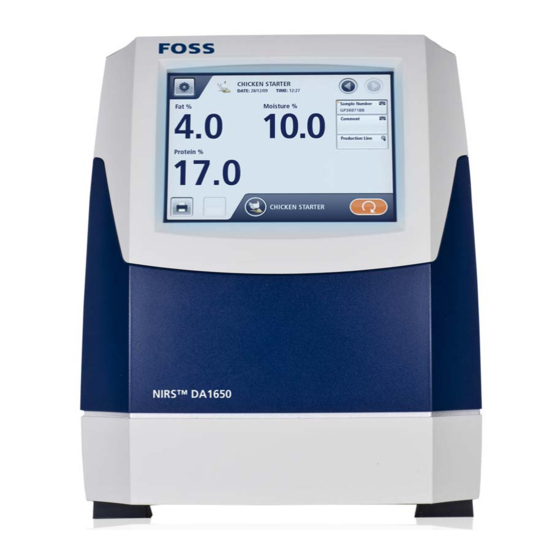
NIRS™ DA1650 2.4.3 Routine Operation Software The NIRS DA1650 analyzer is supplied with software to support all the necessary functions and features to operate the system on a daily basis. Touch Screen Display Fig. 2:10Overview Care Menu Current product Product and sample information... - Page 18 NIRS™ DA1650 Sample registration values These can be lists or free text fields. Lists are indicated with an arrow and free text fields with a keyboard . A star will indicate if the field is mandatory and has to be filled out. Once the sample is synchronised to the FossConnect server it can no longer be edited, which is indicated with a small padlock icon Start/Stop analysis Press to start analysis.
- Page 19 NIRS™ DA1650 Care Menu The Care View Menu contains features not related to routine analysis. They are described in chapter 4 and you need to go through some of them during installation to ensure your instrument is configured correctly. This is also the view you use for some regular or ad hoc activities (e.g.
- Page 20 NIRS™ DA1650 2:12 User Manual 6008 1286 / Rev. 8...
-
Page 21: Installation
An Installation Report is included with the accompanying documentation. Please answer the questions in the Installation Report and return it to FOSS in the enclosed postage paid envelope. If anything is damaged/missing or if you have any questions, please contact your FOSS representative. -
Page 22: Pc Connection For Mosaic Solo
NIRS DA1650 and these are accessible via the PC's browser. Make sure the NIRS DA1650 is switched on and connected to the PC. Start Explorer on the external PC. Enter the IP address or the Name of the internal computer inside NIRS DA1650 like the example below. Fig. 3:1 Press Enter. - Page 23 You can use the Computer name if the instrument is connected to an office network with DHCP and name server otherwise you need to use the IP address of the instrument. A log-in is required to access the internal folder of the NIRS DA1650. • Username: administrator •...
- Page 24 NIRS™ DA1650 Fig. 3:3 You will now see a shared folder in the NIRS DA1650. Open the folder "DA1650Setup.exe". Fig. 3:4 Start installation via "setup.exe". User Manual 6008 1286 / Rev. 8...
- Page 25 NIRS™ DA1650 Fig. 3:5 Click Run. Fig. 3:6 Depending on whether you have had Mosaic installed before or not on this PC, you will see a number of components being installed. At this stage you might get a request to install Crystal Reports Runtime. This happens if you don’t have Crystal Reports installed or if you have an older version on your computer.
- Page 26 NIRS™ DA1650 Fig. 3:7 Press Install to start installation User Manual 6008 1286 / Rev. 8...
- Page 27 NIRS™ DA1650 Fig. 3:8 The installation takes five to fifteen minutes depending on whether you need to have the Crystal Report Runtime installed or not. Fig. 3:9 After the installation, the Mosaic Solo will start automatically. It can also be started via the icon which now should be on your PC desktop. Fig.
- Page 28 NIRS™ DA1650 If installation of Mosic Solo fails In some cases, Windows 10 PC's are not able to connect to Windows Embedded 2009 instrument as the DA1650 / MeatScan / Olivia / Dairy. When this happens SMBv1 needs to be enabled. This is procedure to enable the SMBv1 feature.
-
Page 29: Via Local Area Network
FossConnect server. Printer Connecting a printer to the NIRS DA1650 is done via the USB port on the rear panel. For ticket printers it is required to select a matching printer template to fit the paper size of the printer. Printer template selection is made in FossManager. - Page 30 NIRS™ DA1650 3:10 User Manual 6008 1286 / Rev. 8...
-
Page 31: Operating Instructions
NIRS™ DA1650 Operating Instructions Routine Start-up Turn on the analyzer by pressing the On/Off switch placed at the rear of the instrument. The analyser will now start up, initializing the software. This will take several minutes. Once the software is ready, the instrument will go through the start-up tests. The instrument is ready for analysis when the start-up test has succeeded. -
Page 32: Analysis Procedure
Please wait 5-10 minutes and repeat the selftest by going to the Care menu and select Instrument Diagnostics. If the problem persists, please contact your local FOSS representative and also forward the diagnostic report to them. You can still carry out analysis but every result will be highlighted in yellow, with a warning stating that the Startup test was not completed. -
Page 33: Analysing The Sample
NIRS™ DA1650 4.2.2 Analysing the Sample Instrument should be warmed up 30 minutes prior to first analysis. Choose the appropriate sample cup for the sample. See chapter 2 for information about the different cup types. Carefully prepare your sample and fill the sample cup all way up. Sample types that tend to form voids if simply poured in should be compressed using the back of a spoon or similar. - Page 34 NIRS™ DA1650 Products are installed and configured in FossManager. (Please refer to the Installation Guide for details.) Select a product and press Start to initiate the analysis sequence. Fig. 4:6 The specific cup to use with the selected product can be indicated along with the product name.
- Page 35 NIRS™ DA1650 A progress indicator shows sample analysis progress. Fig. 4:8 Once the analysis is complete, the result is displayed and the lid can be opened. Fig. 4:9 10. Previous results can be viewed by scrolling backward/forward with the arrows in top right corner.
-
Page 36: Multi-Cup Analysis
NIRS™ DA1650 4.2.3 Multi-cup Analysis For some sample types it is desired to split a larger sample volume into sub-samples and report the results as the average of these sub-samples. This is support in NIRS DA1650 via the Multi-cup analysis. In the Operation Profile in FossManager you set the number of sub-samples (repetitions) for the product in question. -
Page 37: Care Menu
NIRS™ DA1650 Care Menu The Care view contains features not related to routine analysis. They are described on the following pages and you need to go through some of them during installation to ensure your instrument is configured correctly. This is also the view you use for some regular or ad-hoc activities (e.g. database backup, instrument diagnostics, FossManager synchronisations for Networked instruments). -
Page 38: Fossmanager Synchronisation
NIRS™ DA1650 4.3.1 FossManager Synchronisation This view looks different when software is installed in Network mode or Solo mode (see section 2.4.2 local configuration and the Installation Guide for information about the two modes). FossManager synchronisation is only applicable if your instrument is installed in Network mode. -
Page 39: Instrument Diagnostics
NIRS™ DA1650 Fig. 4:15 4.3.2 Instrument Diagnostics Running Instrument Diagnostics from the Care menu will carry out the same tests and with the same test limits as during the Start Up test. After the Instrument Diagnostics is completed, you can create and store the Diagnostic Report in the same way as after the Start up test (see section 4.1 Routine Start-up). -
Page 40: Instrument Calibration
4.3.4 Instrument Calibration Instrument Calibration of NIRS DA1650 is a task normally carried out by a FOSS representative at the time of installation and/or at service or Preventive Maintenance visits. NIRS DA1650 is using DDA technology (diode array) which is very stable over time and insensitive against e.g. - Page 41 NIRS™ DA1650 Intensity Correction Place the ERC tool in the instrument with the help of the small cup holder. Insert the ERC USB key in the USB port on the back panel. Select Intensity Correction and press Calibrate. Fig. 4:17 Running instrument calibration requires you to enter the 4-digit password "1234"...
- Page 42 NIRS™ DA1650 Instrument Calibration Place the EWC tool in the instrument with the help of the small cup holder and close the lid. Insert the EWC USB key in the USB port on the back panel. Select Instrument Calibration and press Calibrate. Fig.
-
Page 43: Maintenance
NIRS™ DA1650 4.3.5 Maintenance Maintenance view for: • Manual backup of database (for automatic backup of database, see section 4.3.11 Configuration) • Restore of existing database backup • Deletion of samples Fig. 4:23 Backup Backup will create a backup file, e.g. DA1650_sn26090_v6.0_D20130325T115035 (name includes serial number, date and time) and save this to the destination as set in Configuration view (4.3.11). - Page 44 NIRS™ DA1650 Fig. 4:25 Fig. 4:26 Fig. 4:27 4:14 User Manual 6008 1286 / Rev. 8...
- Page 45 NIRS™ DA1650 Restore Restore will open a view where you are asked to browse to the backup file you want to restore. Press Restore. Fig. 4:28 Note: Restoring a database will erase all existing data and configurations from your ISIscan Nova installation. Press Yes to continue.
-
Page 46: Shut Down
NIRS™ DA1650 Fig. 4:30 Delete now Delete now is a function for manual deletion of samples older than the date specified in the text. This date is determined by settings in FossManager. (Default setting in FossManager is "older than 60 days".) Pressing Delete now will prompt you for the PIN code "1234"... -
Page 47: Upgrade
4.3.7 Upgrade NIRS DA1650 is delivered with the latest available software version (ISIscan Nova) If at a later stage the software needs upgrading to a later version and/or configuration, this requires that a USB with the relevant software package is connected to the instrument. -
Page 48: Instrument Information
Instrument information contains e.g. serial number, software versions, IP-address etc. If you need to report a problem it is recommended that you include this type of info when contacting the FOSS representative. Fig. 4:33Example of instrument information 4.3.9 Remote Support Remote Support is a tool to set up a TeamViewer session to enable a remote support session with a support engineer. -
Page 49: 4.3.10 Export Logs
Typically these log-files contain detailed and traceable information about the instruments operation but they do not contain any sample data or results. This command is used when log-files are requested by your FOSS representative e.g. for support issues. Log files can be exported to the internal hard drive but the recommendation is to export them direct to a USB memory key so they can be forwarded via e-mail or archived elsewhere. -
Page 50: 4.3.11 Configuration
On the FossManager Configuration tab you enter the Address and Port number for the FossManager Network server to be used for this particular instrument. This information will be provided to you by the Network manager or the FOSS representative at time of installation. - Page 51 On the Reporting tab you set the paths for Manual/Automatic reports and for LIMS export. If the NIRS DA1650 is not connected to a local network, then the recommendation is to set these paths to point to a USB memory connected to the instrument, allowing easy access to the reports and exported files.
-
Page 52: Check Samples
For info about the artificial FOSS Check Sample please see section 4.4.2 FOSS Check Sample. A Check Sample (or Control Sample) is measured on a regular basis to validate the stability of the analyzer and everything around it that affects its performance (environment etc.). - Page 53 NIRS™ DA1650 Before running the check sample you must create a check sample Product in FossManager. Import the prediction model(s) you intend to use for your check sample and link a Parameter profile. (Create a new Parameter profile if needed.) Create an Operation profile with Cup Type = “Check sample (sealable)”...
- Page 54 NIRS™ DA1650 • Absolute limits • Relative limits with a defined target • Relative limits without a defined target 4:24 User Manual 6008 1286 / Rev. 8...
- Page 55 NIRS™ DA1650 Absolute limits If Absolute limits are defined in FossManager for your check sample then the target has no meaning. The check sample test will give a Warning or Error based on the defined absolute limits. Example: • Error Low: 8 %; Warning Low: 9.5 %; Warning High: 12.5 % ; Error High: 14% Running a check sample definition is then not necessary as no target value is needed.
- Page 56 NIRS™ DA1650 Press Start and enter pin code “1234” to run the check sample definition. Fig. 4:43 The check sample will now go through a series of analysis. ISIscan Nova may ask you for a Sample number (depending on settings in Operation profile. A Sample number is not required, but if you have more than one check sample it could be wise to enter the Serial number of the check sample in this field for future reference.
-
Page 57: Foss Check Sample
4.4.2 FOSS Check Sample This refers to the artificial FOSS check sample. For info about the empty check sample cell please see section 4.4.1 Check Sample. The FOSS check sample supplied with NIRS DS2500 and NIRS DA1650 is an artificial type check sample intended for regular control of instrument stability. - Page 58 NIRS™ DA1650 Create a Product and call it e.g. Check Sample FOSS. In the different tabs you: • Link the operation profile you just created above • Link the prediction model(s) you imported above • Add the Instrument Group where the instrument in question is registered.
- Page 59 NIRS™ DA1650 Example: Fig. 4:47 Running a Check Sample definition (ISIscan Nova) The check sample definition will every time it is performed re-define the target for the check sample but it will not change the limit-settings (these can only be changed in FossManager).
- Page 60 (from Care view) may give you an indication if something has changed inside the instrument. Should the Instrument Diagnostics fail, then our recommendation is to contact your local FOSS representative for assistance. 4:30 User Manual 6008 1286 / Rev. 8...
-
Page 61: Maintenance
NIRS™ DA1650 Maintenance A NIRS DA1650 requires little maintenance. The instrument enclosure is sealed to prevent contamination of critical modules, which keeps maintenance to a minimum. DO NOT attempt to open the instrument enclosure. There are no user-serviceable parts inside the instrument enclosure. Damage is not covered under warranty. -
Page 62: Replacement Of Lamp
NIRS™ DA1650 Replacement of Lamp The instrument should be well cleaned before replacement of the lamp to prevent dust from damaging the reflector. The replacement should be performed in a clean environment. Warning The lamp module can be very warm if the operating temperature is high. -
Page 63: Foss Preventive Maintenance Agreement
Contact your local FOSS representative for preventive maintenance. FOSS offers a wide range of local support products and training adapted to your market requirements. Please contact the local FOSS representative for a tailor-made package to fit your specific needs. - Page 64 NIRS™ DA1650 User Manual 6008 1286 / Rev. 8...
-
Page 65: Troubleshooting
NIRS™ DA1650 Troubleshooting General The NIRS DA1650 analyzer is designed to be a dependable, trouble-free instrument with many years of use. In spite of the rugged design, problems may arise that require attention. There are no user-serviceable parts inside the instrument enclosure except the lamp. -
Page 66: Recommended Actions
Check the Power Supply Check the fuse Restart the instrument. Turn off if problem Unfamiliar internal noise persists Display is black Contact your FOSS representative Touch screen doesn't work Contact your FOSS representative User Manual 6008 1286 / Rev. 8... -
Page 67: Error Messages
Too much light - Sample too Check sample cup light Too little light - Sample too dark Check sample cup Internal error: Inconsistent Please restart instrument. Contact your FOSS measurements representative if problem persists Internal error: Invalid Contact your network administrator for a... - Page 68 NIRS™ DA1650 User Manual 6008 1286 / Rev. 8...
-
Page 69: Parts, Accessories And Consumables
NIRS™ DA1650 Parts, Accessories and Consumables See the Owner’s Guide. User Manual 6008 1286 / Rev. 8... - Page 70 NIRS™ DA1650 User Manual 6008 1286 / Rev. 8...
-
Page 71: Technical Specifications
0.19 G at 10-150 Hz to IEC 60068-2-64 spectra Vibrations, random 0.19 G at 10-1250 Hz to FOSS internal spectra (two different spectras) (more information available on request) *) Mains supply voltage fluctuations not exceeding ±10 % of the rated voltage. -
Page 72: Prformance Data
NIRS™ DA1650 Prformance Data ™ NIRS DA1650 Measurement mode Reflectance or transflectance (for liquids) Wavelength range 1100-1650 nm Detector 256 pixel InGaAs diode array Optical bandwidth 10.44 ±0.5 nm Number of data points 1100 Absorbance range Up to 2 AU Default: 7 for analysis in Small Cup;...
Need help?
Do you have a question about the NIRS DA1650 and is the answer not in the manual?
Questions and answers