Rhotheta RT-800 User Manual
Hide thumbs
Also See for RT-800:
- User manual, installation & operation (75 pages) ,
- Installation and configuration manual (32 pages) ,
- Installation and configuration manual (36 pages)
Table of Contents
Advertisement
Quick Links
Advertisement
Table of Contents

Subscribe to Our Youtube Channel
Related Manuals for Rhotheta RT-800


Summary of Contents for Rhotheta RT-800
- Page 1 User Manual RT-800...
- Page 2 All rights reserved Issue: 2022/07/12 [Rev 3.01.b] Document-ID: 12-9-1-0003-3-1-61 Valid for RT-800 systems with revision [Rev 3.00] or higher Note The manufacturer reserves the right to make modifications to the product described here at any time and without previous information.
-
Page 3: Table Of Contents
RHOTHETA User Manual RT-800 Content Legend of Signal Words ....................10 Safety ..........................10 General Safety Information ........................10 Basic Safety Instructions ........................11 Legal Information ......................11 Declaration of Conformity (EU) ......................11 Legal Limitations of Use within the EU ....................12 FCC Information (USA)......................... - Page 4 RHOTHETA User Manual RT-800 6.5.1 Standby Mode ........................153 6.5.2 Adjusting the Volume ......................153 6.5.3 Adjusting of the Squelch ......................154 6.5.4 Dimming and Day/Night Mode ....................155 Interfaces and Installation................... 158 Power & I/O ............................158 Antenna Unit (Connecting Cable DCU AU) ................... 159 7.2.1...
- Page 5 RHOTHETA User Manual RT-800 10 Disposal within the European Union ................. 184 11 Disposal outside the European Union ............... 184 12 Maintenance and Cleaning..................184 12.1 Maintenance ............................184 12.2 Cleaning .............................. 184 13 Appendix ........................185 13.1 Error Messages ..........................185 13.2 Warnings .............................
- Page 6 RHOTHETA User Manual RT-800 List of figures Fig. 1 Front View – DCU ......................14 Fig. 2 Front View – Buttons and Display ................. 15 Fig. 3 Rear view ........................18 Fig. 4 Basic structure of pages ....................20 Fig. 5 Bearing display ......................21 Fig.
- Page 7 RHOTHETA User Manual RT-800 Fig. 50 Confirming of leaving the scan mode ................67 Fig. 51 SAR scan. Edit scan settings ..................68 Fig. 52 Alternating hotkeys ..................... 68 Fig. 53 Scan List. Indication of frequencies ................69 Fig. 54 "Scan List" is activated ....................70 Fig.
- Page 8 RHOTHETA User Manual RT-800 Fig. 101 Selecting the night mode settings ................106 Fig. 102 "Night Mode Settings" dialog .................. 107 Fig. 103 Turning on/off the automatic activation of night mode ..........107 Fig. 104 Selecting the „Activation Threshold“ for editing the value ........108 Fig.
- Page 9 Fig. 177 Audio streaming to LAN connector ................. 172 Fig. 178 Example of complete Network scenario ..............177 Fig. 179 RT-800, mechanical dimensions (built-in version) ..........180 Fig. 180 RT-800, mechanical dimensions (tabletop version) ..........181 Fig. 181 Antenna Unit, mechanical dimensions ..............182 Fig.
-
Page 10: Legend Of Signal Words
The manufacturer takes no responsibility for the misuse of the product. The manufacturer is not liable beyond the scope of legal rules! This guide is part of the product RT-800 and must be kept with the product throughout its lifetime. Page 10 of 192... -
Page 11: Basic Safety Instructions
3 Legal Information 3.1 Declaration of Conformity (EU) Hereby RHOTHETA Elektronik GmbH declares that the product RT-800 complies with the essential requirements and other relevant provisions of: • Directive 2014/53/EU relating to radio equipment (relevant for RT-800 AU) •... -
Page 12: Legal Limitations Of Use Within The Eu
(RHOTHETA) could void the user's authority to operate the equipment. Note RT-800 AU has been tested and found to comply with the limits for a Class B digital device, pursuant to part 15 of the FCC Rules. These limits are designed to provide reasonable protection against harmful interference in a residential installation. -
Page 13: General Description
External devices (speaker, audio / line out, compass etc.) can be connected to the RT-800 DCU. Data in- and export is possible by various interfaces including remote control over IP and IP-based audio transmission. -
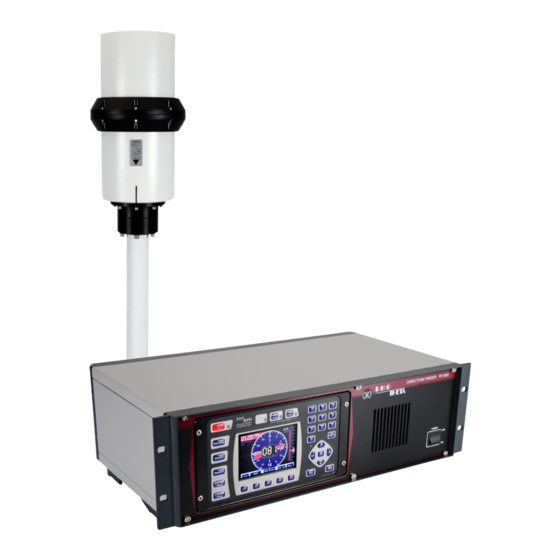
Page 14: Overrview
RHOTHETA User Manual RT-800 5 Overrview 5.1 Front View (DCU) Fig. 1 Front View – DCU Front Control Elements Pos. Element Function Description Control Panel Display of bearing data; local control of the direction finder Audio speaker for received signal (volume is adjustable with... -
Page 15: Front View (Control Panel)
RHOTHETA User Manual RT-800 5.2 Front View (Control Panel) Fig. 2 Front View – Buttons and Display Front Control Elements Pos. Element Function Description Switches the control panel on/off. When the control panel is turned on, the key is highlighted in green. - Page 16 RHOTHETA User Manual RT-800 The mute-status is indicated by the orange highlight of the button. The volume can be turned on by pressing the same button again. While the mute function is activated, it is still possible to increase or decrease the volume without producing any sound (using the button for volume adjustment, s.
- Page 17 RHOTHETA User Manual RT-800 Numeric keys for direct numeric input. Navigation keys for switching between the pages. Within the “Setup” page, the navigation keys have different functions due to the large number of possible settings. Table 3 Buttons and display...
-
Page 18: Rear View
Connector port for antenna unit (AU) Connection between DCU and AU via cable For more information s. chapter 7.2. Antenna Unit Note The RT-500-M antenna unit is not compatible with the RT-800 direction finder and vice versa. Page 18 of 192... - Page 19 RHOTHETA User Manual RT-800 Communication port NMEA 0183 Bus (RS422 / RS232): • Connection for input of external data, such as compass, GPS, remote control, etc. • Connection for output of bearing data, e.g., for map plotter, COM 1 PC etc.
-
Page 20: Operation
RHOTHETA User Manual RT-800 6 Operation The RT-800 is operated from the control panel (display unit) using the keys placed around the display. In normal bearing mode, the keys call up common functions directly, opening the corresponding dialog window. The basic structure of a page is as follows: Fig. -
Page 21: Bearing Page
RHOTHETA User Manual RT-800 6.1 Bearing Page The bearing page is the main page of the RT-800 display unit as it provides the bearing information, settings and status reports at a glance. This page can be opened by pressing the button “HOME” from any other page or dialog. - Page 22 RHOTHETA User Manual RT-800 displayed. Alarms / Errors / Section for indicating any faults in the system, alarms and/or Warnings warnings (s. 6.1.2.1). Pressing the “Feq.Ch.” hotkey will activate the frequency/channel input dialog (s. 6.1.2.2). Frequency / If no input is detected for about 10 seconds, the dialog will be Channel hotkey closed automatically.
- Page 23 RHOTHETA User Manual RT-800 “OK” button If no dialog is open, the “OK“- button will not have any effect on the “Bearing” page. Whereas inside a dialog this button is used to confirm an input and close the dialog. Section for indicating additional data, such as activated or deactivated additional hardware or elapsed time indication for the next awaited Cospas-Sarsat pulse.
- Page 24 RHOTHETA User Manual RT-800 Current squelch level in [%] or [dBm]: o The squelch level can be set manually. In this case the numerical value is shown inside the indicator. Indication of No signal is received (squelch level > signal level).
- Page 25 RHOTHETA User Manual RT-800 The indication is in [km] or [NM], depending on the configuration in the “Setup” menu or configuration file. o GPS True Bearing: indication in degrees Shows the calculated bearing angle from the current GPS position to the stored GPS position.
-
Page 26: Bearing Operation
RHOTHETA User Manual RT-800 The 360° display/compass rose stays fixed in this position also regardless of the “Antenna North Adjustment” setting (s. under Setup/System). The GPS arrow relates to the GPS position. Therefore, this indication is only possible, if GPS data is available. -
Page 27: Fig. 6 Digital Bearing Display (Active Signal Reception)
RHOTHETA User Manual RT-800 mobile application, presupposed the antenna is installed correctly) or one of the north pole positions (magnetic or geographic): • in a fixed antenna installation (presupposed the antenna is installed correctly to the magnetic or geographic North Pole) •... -
Page 28: Fig. 7 Digital Bearing Display (Signal Reception Ended 2 Seconds Ago)
RHOTHETA User Manual RT-800 If the signal stops being received, the last bearing value will be displayed as a transparent arrow for two seconds (default time value). This value is called “Bearing Hold Time” and can be changed in “Setup” (s. 6.4.2.1). - Page 29 RHOTHETA User Manual RT-800 Alarms/ Errors/ Warnings Indication Example Meaning Alarm: An emergency signal has been detected. The source, the counter of the elapsed time since the last alarm, and the related frequency are shown beside the actual alarm indication.
- Page 30 RHOTHETA User Manual RT-800 List of Elements Element Function Numeric keys for direct input of the frequency or channel number Note The input of invalid or not licensed frequency values will not be accepted. This button deletes all digits in the input field.
- Page 31 RHOTHETA User Manual RT-800 This indication appears when the entered frequency belongs to the optional extended range that is not licensed in the given direction finder system (s. Table 1). In the drop-down menu for Selecting Cospas-Sarsat Frequency Groups, pressing this button selects the currently marked frequency group.
-
Page 32: Fig. 8 Input Of A New Frequency
RHOTHETA User Manual RT-800 Thus, one of them is always active and the other one can be set to “active” at one button press, whereby the previously active frequency becomes the “standby” frequency instead. Fig. 8 Input of a new frequency The currently selected digit is indicated by a green-colored frame. -
Page 33: Fig. 9 Swap Frequencies
RHOTHETA User Manual RT-800 Following actions are possible: o Pressing skips to and marks the next digit, left to the previous one. The button returns to the previous digit position / marks the next digit to the right. o The “DEL” button (s. Fig. 8, position 7) deletes the whole input. - Page 34 RHOTHETA User Manual RT-800 If a Cospas-Sarsat frequency is entered, the value will be automatically converted to an input in the 8.33 kHz grid (s 6.1.2.5). The inputs will be set to the following values: 406.025000 MHz = Channels: A (...
-
Page 35: Fig. 10 Input Of A New Channel
RHOTHETA User Manual RT-800 Fig. 10 Input of a new channel However, there are two additional hotkeys: “Coast” and “Ship” (s. Fig. 10, positions 1 and 2), which allows switching between “ship”- and “coast”- frequencies in the case of a duplex channel. -
Page 36: Fig. 12 Switching To "Channel" When "Standby" Frequency = 121.500 Mhz
RHOTHETA User Manual RT-800 Switching from “Frequency” input to “Channel” input dialog variant when the “Standby” frequency does not belong to marine band, will show the empty “Standby” field and a warning (s. Fig. 12). The warning will disappear as soon as a valid channel number is entered in the “Standby”... -
Page 37: Fig. 14 Input Of A New Cospas-Sarsat Frequency
RHOTHETA User Manual RT-800 Fig. 14 Input of a new COSPAS-SARSAT frequency With hotkeys “Frequency” or “Channel” (s. Fig. 14, positions 1 and 2) the corresponding variant of the input dialog is selected. As a result of the 8.33 kHz grid of the AU, after selecting any channel group, the indication on the “Bearing”... -
Page 38: Fig. 15 Memory Dialog. Top Level
RHOTHETA User Manual RT-800 Inside the “memory” dialog, the sub-dialogs can be opened, e. g. frequency name editing dialog. Note The “List of stored frequencies” of the memory dialog is internally linked to the list of frequencies of “Fast Channel Scan” (s. 6.2.3.3). This only applies to frequencies that are marked for scanning (s. - Page 39 RHOTHETA User Manual RT-800 This hotkey marks the currently selected frequency for the function “Fast channel scan”. That means, when “Fast channel scan” is activated, this marked frequency will be scanned as one of the eight possible frequencies for this “Scan Yes/No”...
-
Page 40: Fig. 16 Editing The Frequency Name
RHOTHETA User Manual RT-800 Pressing the “down” arrow until the green frame reaches the “Save” button and confirming with “OK” will save all previously made modifications within the “memory” dialog (editing frequencies, names etc.). Once done, the dialog “Save” can be closed by pressing “ESC”, all changes will remain saved. -
Page 41: Function Channel 16
RHOTHETA User Manual RT-800 The “End of User Input” is used to confirm the whole text in the input field. By confirming this button with “OK”, the edit name sub-dialog will be closed, adopting the new name for the frequency which can be seen in the control field above (here: “Edit Name of Frequency”... -
Page 42: Function Clear
RHOTHETA User Manual RT-800 The last valid bearing data will be shown for 2 seconds (by default) after pressing the “Repeat” hotkey. This hold time can be changed on the “Setup” page (“Bearing Indication Hold Time”, s. 6.4.2.1). The repeat function during a scan is displayed differently depending on the current scan procedure. - Page 43 RHOTHETA User Manual RT-800 When bearing a Cospas-Sarsat frequency this hotkey is designated as “Manual”/ “Automatic”, which allows switching between these squelch adjustment possibilities. For further information please refer to chapter 6.5.3. If any scan algorithm is activated, this hotkey is designated with “Squelch”, or is empty (s.
-
Page 44: Scan Page
RHOTHETA User Manual RT-800 6.2 Scan Page The “Scan” page enables starting scanning modes as simply and quickly as possible. Various scan modes are shown as a list with the currently activated mode highlighted in green. If no scan is currently active, all scan modes in the list are displayed in gray, where one of the scan modes is marked by a green frame. - Page 45 RHOTHETA User Manual RT-800 scan, pressing this hotkey will deselect this option and the “Exclude List” will not be regarded during the scan. This hotkey appears only when the “Marine Scan” or “Scan List” is marked. “Edit Exclude” By pressing this hotkey, the dialog for editing the “Exclude List”...
-
Page 46: Cospas-Sarsat Scan
RHOTHETA User Manual RT-800 marked in the list or not. Inside the settings dialogs, the “DEL” button is used to clear the whole input at once. Numeric keys are used to enter the numerical characters inside the dialogs. On the top level of the “Scan” page, they have no function. -
Page 47: Fig. 21 Cospas-Sarsat Scan Indication On The "Bearing" Page
RHOTHETA User Manual RT-800 Fig. 21 Cospas-Sarsat Scan indication on the "Bearing" page After a Cospas-Sarsat frequency has been detected, the scan mode stops automatically and the direction finder changes to the normal bearing mode on this frequency (s. Fig. 21, field B). -
Page 48: Monitoring
This hotkey appears only if there is a result for this scan. 6.2.2 Monitoring The DF-system RT-800 can receive only one frequency at a given time. For simultaneous surveillance of the emergency frequency and any other frequency/channel, this monitoring function can be used. -
Page 49: Fig. 24 "Monitoring" Mode. Indication Of Frequencies
RHOTHETA User Manual RT-800 Designation of the currently active scan mode Main bearing frequency (currently active) Monitoring frequencies Fig. 24 “Monitoring” mode. Indication of frequencies If the Monitoring (normal) function is activated, the DF system switches alternating from the main bearing frequency to the selected monitoring scanning frequencies (s. 6.2.2.1). -
Page 50: Fig. 26 "Monitoring Cp-Ss" Mode. Example Views Of The "Bearing" Page
RHOTHETA User Manual RT-800 frequency, that receives a valid signal at the moment of pressing the “OK” button, will be adopted as the main frequency, and the system will change to a normal bearing mode. “Monitoring” On “Monitoring” On Active frequency:... -
Page 51: Fig. 27 Example: Timing Normal Monitoring
RHOTHETA User Manual RT-800 Fig. 27 Example: Timing normal monitoring Note Receiving on the monitoring frequencies can be triggered by the wrong adjustment of the squelch level! Please always prove the correctness of the squelch adjustment on the scan frequencies. -
Page 52: Fig. 29 "Monitoring" Has Been Activated
RHOTHETA User Manual RT-800 Fig. 29 "Monitoring" has been activated o Pressing the hotkey “Stop Scan” (s. Fig. 29, position 2) will terminate the current scan mode and change to the bearing of the frequency that was set before the scan mode has been activated. -
Page 53: Fig. 31 Monitoring Mode Settings
RHOTHETA User Manual RT-800 Fig. 31 Monitoring mode settings o The hotkey “Edit Freq.” (s. Fig. 31, position 1) opens the dialog which allows the modification of the currently marked frequency. Type the new value in the input field “New Frequency” using the keyboard of the DCU. -
Page 54: Fast Channel Scan
▪ 121.650 MHz 6.2.3 Fast Channel Scan The DF-system RT-800 can receive only one frequency at a given time. For simultaneous surveillance of several frequencies/channels, this scan mode can be used. 6.2.3.1 Fast Channel Scan Operation In this scan mode, it is possible to scan up to eight freely selectable frequencies/channels across all the specified bands (available frequency bands are visible in the “Frequency... - Page 55 RHOTHETA User Manual RT-800 Note If the fast channel scan is running, the hotkey “memory” does not react on pressing. Memory dialog is available after the fast channel scan mode is terminated. Note The “List of stored frequencies” of the “Memory” dialog (s. 6.1.2.6) internally linked to the list of frequencies of “Fast Channel Scan”...
-
Page 56: Fig. 34 Fast Channel Scan Indication On The "Bearing" Page
RHOTHETA User Manual RT-800 “Fast channel scan” = On “Fast channel scan” = On Active frequency = 243.300 MHz Active frequency = 121.500 MHz Signal is not present. Signal is present. Fig. 34 Fast channel scan indication on the "Bearing" page In case that an unwanted signal is found, the scanning process can be proceeded immediately by pressing the “ESC”... -
Page 57: Fig. 35 Activating The "Fast Channel Scan
RHOTHETA User Manual RT-800 6.2.3.3 Fast Channel Scan Settings o To start the “Fast Channel Scan” mode select the corresponding line on the “Scan” page and press “OK” or the hotkey “Start Scan” (s. Fig. 35, position 1). Fig. 35 Activating the “Fast Channel Scan”... -
Page 58: Fig. 37 Fast Channel Scan Settings
RHOTHETA User Manual RT-800 This hotkey appears only if there is a result for this scan. o Pressing the hotkey “Edit Scan” (s. Fig. 35, position 4) will open the dialog for changing the settings of the fast channel scan (s. Fig. 37). -
Page 59: Marine Scan
RHOTHETA User Manual RT-800 o Pressing the hotkey “Default SNR” (s. Fig. 37, position 5) will set the SNR value of the currently marked frequency to the default value, which can be defined on the “Setup” page (s. 6.4.3.13). o Pressing the hotkey “ID only” (s. Fig. 37, position 6) activates or deactivates the feature “ID Only”... -
Page 60: Fig. 40 Marine Scan Indication On The "Bearing" Page
RHOTHETA User Manual RT-800 If the signal was lost during the scan mode, the scanning process continues with the next frequency / channel after up to 30 seconds (depending on the setting of the bearing indication time, and how many seconds of the indication-time has already elapsed until the signal was interrupted). -
Page 61: Fig. 41 Marine Scan Is Activated
RHOTHETA User Manual RT-800 Fig. 41 Marine scan is activated o The hotkey “Excl. On/Off” is only visible, if “Marine scan” or “Scan List” is marked (s. Fig. 41, position 3). By pressing this hotkey, the currently marked scan mode will proceed the “Exclude List”... -
Page 62: Fig. 43 „Exclude List" Configuration
RHOTHETA User Manual RT-800 o “Time (def.)” hotkey (s. Fig. 42, position 1) defines the behavior of the marine scan algorithm if the active frequency (signal level > squelch level) has been found. If this hotkey is pressed, the default time of 30 seconds will be adopted after confirming this setting with “OK”. -
Page 63: Sar Scan
RHOTHETA User Manual RT-800 be opened (s. Fig. 38 and its description in 6.2.3.3), where you can input any desired frequency. In order to define a scope of frequencies “from … to …”, it is necessary to input any new frequency first. Then it is possible to proceed with editing the start- and stop- frequencies. -
Page 64: Fig. 44 Sar Scan. Indication Of Frequencies
RHOTHETA User Manual RT-800 For the case that the exact COSPAS-SARSAT frequency of the emergency beacon is not known, there is a possibility to set “All CP-SS” in place of the main frequency, which will then trigger the COSPAS-SARSAT scan as the first step of this scan algorithm. -
Page 65: Fig. 45 "Sar Scan" Mode. Example Views Of The "Bearing" Page
RHOTHETA User Manual RT-800 “SAR scan” On “SAR scan” On Active frequency: Active frequency: “ ” Scan frequency = 243.000 MHz Main bearing frequency = All CP-SS Signal is present. The system performs the COSPAS- The system recognized a sender on SARSAT scan in order to determine the 406.058 MHz frequency, which is... -
Page 66: Fig. 47 Example: Timing Sar Scan, If Only Cospas-Sarsat Frequency Is Detected
RHOTHETA User Manual RT-800 scan frequencies. So if the pulse is detected at the beginning of the 60 seconds cycle, this cycle shortens down to 3 seconds. If the COSPAS-SARSAT pulse is not detected, after elapsing of 60 seconds, the total time for scanning of the scan frequencies is 30 seconds, which enables the faster run-through of them. -
Page 67: Fig. 49 Selecting Sar Scan
RHOTHETA User Manual RT-800 Fig. 49 Selecting SAR scan o Pressing the hotkey “Stop Scan” (s. Fig. 49, position 2) will terminate the current scan mode and change to the bearing of the frequency, that was set before the scan mode has been activated. -
Page 68: Fig. 51 Sar Scan. Edit Scan Settings
RHOTHETA User Manual RT-800 Fig. 51 SAR scan. Edit scan settings o The hotkey “Edit Freq.” (s. Fig. 52, position A) is only visible if the COSPAS-SARSAT frequency (top frequency) or one of the free selectable frequencies is marked. Fig. 52 Alternating hotkeys The hotkey “Edit Freq.”... -
Page 69: Scan List
RHOTHETA User Manual RT-800 If this hotkey is pressed, the scan algorithm will stay on an active frequency as long as the user terminates the scan mode or skips the actual frequency. o Pressing the hotkey “ID only” (s. Fig. 51, position 4) activates or deactivates the feature “ID Only”... -
Page 70: Fig. 54 "Scan List" Is Activated
RHOTHETA User Manual RT-800 The scan algorithm in the “Result List” mode starts the scan procedure, which runs only around the searched frequencies (last results). If the gap between the two frequencies is too large, the scan procedure will slightly slow down. -
Page 71: Fig. 55 Result List Settings
RHOTHETA User Manual RT-800 Fig. 55 Result List Settings ▪ Pressing the hotkey “Go to Freq.” (s. Fig. 55, position 1) adopts the currently marked frequency as main bearing frequency and switches to the normal bearing mode on the “Bearing” page. - Page 72 RHOTHETA User Manual RT-800 ▪ Pressing the hotkey “New Freq.” (s. Fig. 56, position 1) generates a new line in the “Search List” and opens the dialog for frequency/channel input (s. Fig. 32 and its description in 6.2.2.4). When entering a new start frequency, the stop frequency is automatically set to the same value as the start frequency.
-
Page 73: Fig. 57 "Scan List Conditions" Dialog
RHOTHETA User Manual RT-800 Fig. 57 "Scan List Conditions" dialog ▪ “Time (def.)” hotkey (s. Fig. 57, position 1) defines the behavior of the “Scan List” algorithm if the active frequency (signal level > squelch level) has been found. If this hotkey is pressed, the default time of 30 seconds will be adopted after confirming this setting with “OK”. -
Page 74: Decode Page
RHOTHETA User Manual RT-800 6.3 Decode Page The “Decode” page manages the decoded COSPAS-SARSAT data. It does not only display the decoded COSPAS-SARSAT information but also stores the messages over time and calculates the true bearing and distance to the emergency beacon if the GPS data is available in the message. - Page 75 RHOTHETA User Manual RT-800 Pressing this hotkey will activate the view for “COSPAS- “C/S Bearing“ SARSAT Bearing”. Pressing this hotkey will activate the view for “Bearing&List”. “Bearing&List” Pressing this hotkey deselects the currently marked line. “Deselect” Deselected lines are indicated by gray text.
-
Page 76: Selecting A Cospas-Sarsat Frequency
RHOTHETA User Manual RT-800 6.3.1 Selecting a COSPAS-SARSAT frequency In order to receive a COSPAS-SARSAT data pulse and to decode its content, the main frequency has to be adjusted to a COSPAS-SARSAT frequency. This can be done on the “Bearing” page or directly on the “Decode” page using the hotkey „406.025“ (s. Fig. 58, position 1). -
Page 77: Cospas-Sarsat Bearing View
RHOTHETA User Manual RT-800 Press “DEL” button of the keypad to delete a selected message. Press hotkey “Delete All” in order to delete all COSPAS-SARSAT messages. A detailed explanation of all hotkeys can be found in the next chapters. Area “C” indicates the time when the next COSPAS-SARSAT pulse is expected. If after one minute no COSPAS-SARSAT pulse is received, the bar-graph-indicator is fully filled and shows the text “--:--“. -
Page 78: Fig. 61 Decode Page: Bearing View
RHOTHETA User Manual RT-800 Fig. 61 Decode Page: Bearing View o Change the active COSPAS-SARSAT frequency by using the hotkey “406.025” (s. Fig. 61, position 1). o Pressing the hotkey “C/S List” (s. Fig. 61, position 2) will open to the “COSPAS- SARSAT List”... -
Page 79: Cospas-Sarsat Bearing And List
The calculated bearing of an emergency beacon, which is based on the decoded GPS position, can be exported to the “Bearing” page by pressing the hotkey “Export” (s. Fig. 61 or Fig. 63, position 4). In this case, the RT-800 is operating on the selected COSPAS-SARSAT frequency in the normal bearing mode. -
Page 80: Fig. 64 Indication Of The Gps Based Bearing On The Bearing Page
RHOTHETA User Manual RT-800 Fig. 64 Indication of the GPS based bearing on the Bearing page In order to remove the indication of the “GPS Arrow” from the “Bearing” page, keep the “Clr” hotkey pressed for a few seconds until the arrow disappears (the indication of GPS true bearing as well as the calculated distance will disappear together with the arrow). -
Page 81: Setup Page
ELT signal will be detected and the alarm will be provided. Note Incorrect settings may lead to considerable malfunctions of the DF system RT-800. Therefore, sensitive parameters concerning the bearing operation are password-protected against not authorized alterations. Any changes of settings, which require password approval, are to be made only by instructed personnel. -
Page 82: Fig. 65 Setup Page. General Settings (Administrator View)
RHOTHETA User Manual RT-800 Fig. 65 Setup page. General settings (administrator view) Indication on Setup Page, General Settings Pos. Element Meaning / Description Switches between two states: „Set Operator” / Access level: operator „Set Admin” Access level: administrator Pressing this hotkey will lead to the dialog for changing the password for the “Administrator”... - Page 83 RHOTHETA User Manual RT-800 When there is a dialog opened, pressing this button will close the dialog without adopting new values. When there is no dialog opened, pressing this button will go back to the last activated page. The Bearing Page is the end- point.
-
Page 84: Fig. 66 Setup Page, General Settings Appearance For The Access Level "Operator
The Administrator has the maximum access to the possible settings (except a set of settings, which are predefined for RHOTHETA specialists for maintenance and support purposes). After powering on the system for the first time, the device will be started with the default access level “Administrator”. -
Page 85: Fig. 68 Accessing The Administrator Level
“Audio Line Output”). Audio line exit has a determined output level and is independent of the volume adjustment. 6.4.1.4 Audio Speaker The RT-800 DCU has an internal speaker that can be used to monitor the audible signals or acoustic alarms. Alternatively, the external speaker can be used e.g., for release an alarm on the ship. -
Page 86: Fig. 69 Changing Password
RHOTHETA User Manual RT-800 If the password is valid, by confirming with “OK” the administrator access level will be achieved. 6.4.1.6 Change Password Dialog Pressing the hotkey “Change PW” (s. Fig. 69) will open the dialog for changing the current (or default) administrator access level password. -
Page 87: Fig. 71 Edit Value Dialog For Access Level
RHOTHETA User Manual RT-800 6.4.1.7 Edit Value Dialog Depending on the currently marked line, pressing the hotkey “Edit Value” (s. Fig. 65, position 5) will lead to the corresponding dialog. Edit value for setting “Access Level /Login” Choosing the administrator access... -
Page 88: Fig. 73 Editing The Value For The Audio Beeper
RHOTHETA User Manual RT-800 Edit value for setting “Audio Beeper” Fig. 73 Editing the value for the audio beeper 1. Pressing the hotkey “Beeper On” or “Beeper Off” will write the corresponding message into the “New Setting for key pressing”. -
Page 89: Fig. 75 Edit Value For The Speaker
“Available”. o The frequency ranges designated with “F1 ... F4” are optional extended ranges. In the standard version of RT-800, they are not licensed and thus marked as “Not available”. These optional frequency bands can be acquired separately (please contact RHOTHETA Elektronik GmbH). -
Page 90: Fig. 77 Locked Frequencies. Operator View
RHOTHETA User Manual RT-800 The operator can only view the frequencies which have been locked by the administrator. Fig. 77 Locked frequencies. Operator view Locked frequencies can be viewed in the embedded separate dialog, which is available over the hotkey “See locks” (s. Fig. 76). -
Page 91: Fig. 79 "System Info" Dialog
RHOTHETA User Manual RT-800 Note Pressing this hotkey will delete the marked frequency immediately without asking for confirmation! 5) To unlock the whole list of frequencies, use the hotkey “Delete All”. The difference to deleting the single frequency or frequency band is that for leaving the dialog the action has to be confirmed with “OK”. -
Page 92: Display
RHOTHETA User Manual RT-800 6.4.2 Display On the “Setup” page, the “Display” menu can be selected via the administrator access level only (by pressing the “Display” hotkey on the navigation line, s. Fig. 80, position 11). The “Display” page enables modifying of settings that affect the graphical representation of the application. - Page 93 RHOTHETA User Manual RT-800 Sets the bearing reference direction to “MAGNETIC” without opening the corresponding dialog (s. Table 6. Bearing “Mag. Bearing” reference directions). Sets the bearing reference direction to “RELATIVE” without “Rel. Bearing” opening the corresponding dialog (s. Table 6. Bearing reference directions).
-
Page 94: Fig. 81 Editing The Bearing Indication Hold Time
RHOTHETA User Manual RT-800 6.4.2.1 Bearing Indication Hold Time The “bearing indication hold time” defines how long the bearing value is indicated after the signal fell under the squelch level. If there is no more valid bearing information available, the last bearing data (bearing arrow, life values and digital bearing display) is displayed on the “Bearing”... -
Page 95: Fig. 82 Bearing Reference Direction Dialog
RHOTHETA User Manual RT-800 Choosing the “Magnetic” reference direction Choosing the “True” reference direction Choosing the “relative” reference direction Choosing the default reference direction (“True”) Fig. 82 Bearing reference direction dialog o Press the hotkey “True Bearing“ to set the bearing reference direction relative to true (geographic) north (only if compass data is available). -
Page 96: Fig. 83 Bearing Scale Offset Editing Dialog
6.4.2.4 Bearing Scale Orientation The bearing scale orientation is another setting for the graphical representation of the bearing value, which is convenient for the two different types of use of the RT-800 DF system: mobile use or fixed (permanent) installation (s. 6.4.3.4). -
Page 97: Fig. 85 Types Of The Frequency/Channel Indication
RHOTHETA User Manual RT-800 o Press the hotkey “Set Default” to set the default value for the bearing scale orientation (“Compass”). o Confirm the changed value with “OK” or press “ESC” to leave the dialog without changing the previous value. -
Page 98: Fig. 87 Changing The Distance Unit
RHOTHETA User Manual RT-800 ▪ “Channel” (s. Fig. 86, position 1): the corresponding appearance on the “Bearing” page will be as shown in Fig. 85, field C. ▪ “Frequency” (s. Fig. 86, position 2): the corresponding appearance on the “Bearing” page will be as shown in Fig. 85, field B. -
Page 99: Fig. 88 Changing The Level Unit
RHOTHETA User Manual RT-800 Choosing dBm as level indication unit Choosing percent as level indication unit Choosing the default setting for level indication (%) Fig. 88 Changing the level unit o Press the hotkey “Set [%]” to set the level unit to “[%]” (percent). Each level indication in the DCU application will be indicated in percent. -
Page 100: Fig. 90 Changing The Minimum Range Value Of The Light Sensor
RHOTHETA User Manual RT-800 o Leaving the top level dialog (s.Fig. 89) always press “OK” for the second time (after confirming the actual setting), otherwise, the changed settings will not be adopted. Minimum Range The minimal value of the light sensor is “0” (default value). -
Page 101: Fig. 92 Changing The Time Delay Value For The Light Sensor
RHOTHETA User Manual RT-800 Time Delay This setting determines how fast the system brightness reacts to the changing of ambient brightness. The adjustable range is between 0 s and 999 s. Recommended value is the default value of 20 seconds, which ensures that e.g. the shadow of a person that quickly passes by, influences the brightness of the system. -
Page 102: Fig. 94 Adjusting The Standby Brightness
RHOTHETA User Manual RT-800 Note If you press "OK" in this view, the current settings will be interpreted as the ones to be saved, which will cause the dialog to close, saving these values. In order to change the single settings always use the “Edit Value” hotkey (s. Fig. 93, position 1). -
Page 103: Fig. 95 Changing The Standby Key Illumination Setting
STNBY Deactivation This setting defines, which event can return the RT-800 device from the standby mode to the normal operation. ▪ If “Automatic” is set, the device will get back to the normal operation by the occurrence of an event, e.g. -
Page 104: Fig. 96 Changing The Standby Deactivation Setting
RHOTHETA User Manual RT-800 Note Do not use the “Power” button in order to return the DCU from the “Standby Mode” into normal operation! Pressing the “Power” button for about 2 seconds leads to switching off the DCU and after restarting the device, it works in the normal operation mode (with normal display brightness). -
Page 105: Fig. 98 Manual Deactivation Of The Standby Mode Is Turned On
RHOTHETA User Manual RT-800 If this variant of “Dark Mode” is activated, the “STNBY Mode Settings” line on the “Display” page will show the current settings of the “Display Brightness” and “Key Illumination” (s. Fig. 98). The result on the “Display” page after pressing “OK” will be as shown in the Fig. 98. -
Page 106: Fig. 100 Dark Mode Indication On The "Display" Page
RHOTHETA User Manual RT-800 Fig. 100 Dark mode indication on the "Display" page 6.4.2.10 Night Mode Settings The night mode settings allow the adjustment of the night mode behavior. To change these settings, press the hotkey “Edit Value”, while the line “Night Mode Settings”... -
Page 107: Fig. 102 "Night Mode Settings" Dialog
RHOTHETA User Manual RT-800 Fig. 102 "Night Mode Settings" dialog Note If you press "OK" in this view, the current settings will be interpreted as the ones to be saved, which will cause the dialog to close again, saving these values. -
Page 108: Fig. 104 Selecting The „Activation Threshold" For Editing The Value
RHOTHETA User Manual RT-800 o Press the hotkey “On” (s. Fig. 103, position 1) in order to enable the automatic night mode activation (at the ambient brightness level adjusted in the “Activation Threshold” setting). o Use the “Off” hotkey to disable the automatic activation of the night mode. -
Page 109: Fig. 105 Changing The Value For The Night Mode Activation Threshold
RHOTHETA User Manual RT-800 Fig. 105 Changing the value for the night mode activation threshold o Enter the new value for the night mode activation threshold in the “New Setting” input field, using the numeric buttons of the DCU keypad. -
Page 110: System
RHOTHETA User Manual RT-800 6.4.3 System The “System” settings page contains a number of the internal system settings, which are only available over the administrator access level. All settings are organized alphabetically in order to improve the handling of the page. - Page 111 RHOTHETA User Manual RT-800 The “System” settings page contains multiple settings that are represented by textual lines. Keep pressing the “Up” or “Down” arrow buttons of the DCU keypad to switch to the next page with the next settings. Indication on Setup Page, Display Settings Pos.
-
Page 112: Fig. 107 Alarm Pulse Settings
RHOTHETA User Manual RT-800 In order to facilitate the alarm function using the DCU (in combination with the alarm system that is used on the vessel), the DCU settings are changeable. By pressing the “OK button or the hotkey “Edit Value”, while the setting “Alarm Pulse” is marked by the green frame, the following dialog is opened. -
Page 113: Fig. 109 Alarm Mode Dialog
RHOTHETA User Manual RT-800 o Pressing the ”High active” hotkey sets the active direction of the alarm pulse to “LOW”. That means, the default state of the alarm output is high and an alarm is indicated by the low state. -
Page 114: Fig. 110 Time Off Dialog
“ESC”. 6.4.3.2 Antenna Unit The RT-800 dipole antenna unit can only be mounted in the vertical position. For standard mounting (which is the default setting), the mounting flange points to the ground in a fixed installation (bottom of the vessel/vehicle for mobile use). -
Page 115: Fig. 112 Antenna Unit (Mounting Position) Dialog
RHOTHETA User Manual RT-800 o By pressing the “OK” button or the hotkey “Edit Value” (s. Fig. 106), while the setting “Antenna Unit” is marked by the green frame, the following dialog is opened. Choosing the “Upside Down” mounting position... -
Page 116: Fig. 114 Antenna Installation Dialog
6.4.3.4 Antenna Installation This setting can be used to determine which type of installation is used for the DF system. RT-800 direction finder system can be used for fixed (permanent) as well as mobile applications. o By pressing the “OK button or the hotkey “Edit Value” (s. Fig. 106), while the setting “Antenna Installation”... -
Page 117: Fig. 115 Au Calibration Dialog
RHOTHETA User Manual RT-800 Setting the AU calibration to “Calibration On” Setting the AU Selecting the calibration to default value “Calibration Off” Fig. 115 AU calibration dialog o Including the AU calibration values into the bearing calculation is done by pressing the hotkey “Calib. -
Page 118: Fig. 117 Dialog For The Upper Frequency (Beep Tone Decoding)
RHOTHETA User Manual RT-800 High” or the “Edit Value” hotkey (s. Fig. 116, positions 1 and 4), both of these hotkeys will open the same dialog. Fig. 117 Dialog for the upper frequency (Beep Tone Decoding) o Type the new value for the upper frequency into the “New Setting” field, using the DCU number keys. -
Page 119: Fig. 119 Decoding Time Dialog
RHOTHETA User Manual RT-800 Fig. 119 Decoding time dialog o Type the new value for the decoding time into the “New Setting” field, using the DCU number keys. o Press the hotkey “Set Default” to use the default value (200 ms). -
Page 120: Fig. 121 Locked Frequencies List. Administrator View
RHOTHETA User Manual RT-800 6.4.3.8 Lock/Unlock Frequencies It is possible to lock or unlock particular frequencies as well as entire frequency bands from the licensed frequency ranges. After a frequency has been locked, it will not be possible to set this frequency for the bearing operation on the “Bearing”... -
Page 121: Fig. 122 Input Of The Magnetic Variation Value
RHOTHETA User Manual RT-800 Fig. 122 Input of the magnetic variation value o Type the new value into the “New Setting” field, using the DCU number keys. The entry format is a value with one position after decimal point. For entering e.g. “5.5°” press the key “5”... -
Page 122: Fig. 124 Own Gps Position Dialog
6.4.3.11 Own Position For the fixed (permanent) installation of the RT-800 system, it is possible to enter the GPS coordinates of the location (own position). Entry in two formats is possible (DMS and DD). This setting has no default value, respectively it is set to “Disabled”. -
Page 123: Fig. 125 Own Position In Dd Format
This setting defines whether the compass data should be used to compensate the “Contouring Error” inside the AU. This setting is relevant for the mobile installation of RT-800 DF system (on a vessel or vehicle). Fast changes of the vessel’s course can lead to a “Contouring Error” of the bearing indication, which manifests in quite slow changing of the direction on the bearing page compared to the vessel’s direction change. -
Page 124: Fig. 127 Ps Ram Compensation Dialog
RHOTHETA User Manual RT-800 If an external compass is connected, the bearing value determination can be done by a special, improved compensating procedure (the “PS Ram compensation”), which eliminates the contouring error. For a compass of minor quality (e.g., heavy and quick variations) it may be necessary, to switch off the “PS Ram compensation”. -
Page 125: Fig. 128 S/N Ratio For Auto Squelch Function
RHOTHETA User Manual RT-800 Fig. 128 S/N Ratio for auto squelch function o Use the number keys of the DCU keypad to enter the new value for the “S/N Ratio”. o Press the hotkey “Set Default” to use the default value of “6”. -
Page 126: Fig. 130 Selecting The Time Settings
RHOTHETA User Manual RT-800 6.4.3.15 Time Settings This setting allows to select between the local and UTC time for operating the DF-system. Any time-related indication in the DCU will be shown depending on this setting. To change this setting press the hotkey “Edit Value” while the “Time Settings” line is marked (s. -
Page 127: Fig. 132 Changing The Utc Time
RHOTHETA User Manual RT-800 To change the UTC time value, press the hotkey “Edit Value”, while “Current UTC Time” is marked (s. Fig. 131, position 1). Following dialog appears (s. Fig. 132). Fig. 132 Changing the UTC time o Enter the new value for the UTC time in the “New Setting” input field, using the numeric buttons of the DCU keypad (“hh:mm”). -
Page 128: Fig. 133 Selecting Time Zone Setting
RHOTHETA User Manual RT-800 Fig. 133 Selecting time zone setting Following dialog appears. Fig. 134 "Select Timezone" dialog o Choose the proper time difference (local time) to the UTC time using the drop down dialog (s. Fig. 134). o Use the “Reset Values” hotkey to reset the value to the default value (UTC +00:00). -
Page 129: Fig. 135 Selecting The "Display Time" Setting
RHOTHETA User Manual RT-800 Fig. 135 Selecting the "Display Time" setting Following dialog appears. Fig. 136 Changing the "Display Time" setting o Choose the “Local” or “UTC” hotkey to set the desired variant of the time indication (s. Fig. 136, positions 1 or 2). -
Page 130: Fig. 137 Selecting Summer Time Setting
RHOTHETA User Manual RT-800 Fig. 137 Selecting summer time setting Following dialog appears. Fig. 138 Changing summer time setting o Choose the “On” or “Off” hotkey to set the desired variant of the time indication (s. Fig. 138, positions 1 or 2). -
Page 131: Interface
RHOTHETA User Manual RT-800 6.4.4 Interface The setup menu “Interface” contains critical settings that influence important system parameters, therefore it is password protected and can be used by the administrator only. This page enables the user to configure the interfaces to external devices. - Page 132 RHOTHETA User Manual RT-800 When there is a dialog opened, pressing this button will close the dialog without adopting new values. When there is no dialog opened, pressing this button will go back to the last activated page. The “Bearing” page is the endpoint.
-
Page 133: Fig. 140 Com Monitoring Dialog
To close the dialog press the “ESC” button. 6.4.4.2 NMEA DF Remote It is possible to operate the RT-800 direction finder remotely using the NMEA communication protocol. For this purpose, a control unit (e.g., ECDIS) can be connected to the NMEA interface of the DCU. -
Page 134: Fig. 141 Nmea Df Remote Control Configuration
RHOTHETA User Manual RT-800 Fig. 141 NMEA DF remote control configuration The NMEA DF remote configuration is accomplished by the following settings: Port Baudrate Remote Address ID Pressing the hotkey “Reset Values” (s. Fig. 141, position 6) will set all menu items to default values. -
Page 135: Fig. 142 Remote Communication Port Configuration
Defines the speed of NMEA interface data transfer. The default value for the baud rate of the NMEA remote control is 4800. The baud rate can be changed using this menu item. For further information please see the document “NMEA Protocol Description RT-800”. Page 135 of 192... -
Page 136: Fig. 143 Remote Control Baud Rate Configuration
The DF only reacts to the NMEA request sentences, if the address ID in the sentence is equal to the address, which is selected via this setting (or has the value 255, if the ID was not set). For further explanation please refer to the document “NMEA-Protocol Description RT-800”. Note When using address ID = 255, then all connected DF systems are addressed, independent of their internal IDs. -
Page 137: Fig. 145 Lan Configuration Menu
“ESC”. 6.4.4.3 LAN Configuration The RT-800 DCU can be connected to the Local Area Network as well as the netmask and gateway for remote control can be configured. To perform the network configuration of the DCU use the menu item “LAN Configuration”. -
Page 138: Fig. 146 Changing The Mode Of The Ip Address Assignment
RHOTHETA User Manual RT-800 Mode The mode of the IP address assignment can be static or dynamic. If the mode is changed to “dynamic”, then the IP address is assigned dynamically by the DHCP server, which means that the DCU gets a random IP address that is currently free. It also means that the IP address can change at any time. -
Page 139: Fig. 147 Setting The New Ip Address
RHOTHETA User Manual RT-800 Fig. 147 Setting the new IP address o Use the number keys of the DCU keypad to enter the new value for the “IP Address” setting. o Press the hotkey “Set Default” to use the default value “192.168.77.208”. -
Page 140: Fig. 149 Changing The Gateway Value
RHOTHETA User Manual RT-800 Fig. 149 Changing the gateway value o Use the number keys of the DCU keypad to enter the new value for the “Gateway” setting. o Press the hotkey “Set Default” to use the default value “192.168.77.1”. -
Page 141: Fig. 151 Changing The Tcp Port
RHOTHETA User Manual RT-800 Fig. 151 Changing the TCP port o Use the number keys of the DCU keypad to enter the new value for the “Local TCP Port” setting. o Press the hotkey “Set Default” to use the default value “9999”. -
Page 142: Fig. 153 Compass Connector Setting
RHOTHETA User Manual RT-800 Baudrate NMEA header Pressing the hotkey “Reset Values” (s. Fig. 152, position 5) will set all menu items to default values. To go out of dialog confirming all changes, which have been made within the sub-dialogs for the single settings, press “OK”. -
Page 143: Fig. 154 Compass Baud Rate Setting
NMEA 0183, version 3.01. The baud rate can be changed using this menu item. For further information please see the document “NMEA-Protocol Description RT-800”. o To change the baud rate, press the hotkey “Edit Value” while the menu item “Baudrate”... -
Page 144: Fig. 155 Compass Header Setting
RHOTHETA User Manual RT-800 Fig. 155 Compass header setting o Choose the new setting using one of the hotkeys (s. Fig. 155), which will then appear in the “New Setting” field: Selecting the “$xxHDG” (heading, deviation and variation) header (position Selecting the “$xxHDT”... -
Page 145: Fig. 156 Nmea Gps Configuration Settings
RHOTHETA User Manual RT-800 6.4.4.5 NMEA GPS The RT-800 DCU is able to read external GPS data via a defined NMEA protocol. RT-800 supports only the following GPS input sentences: • GNRMC • GPRMC • GPGGA • GPDTM Note The “--RMC” sentence has priority over the “--GGA” sentence. -
Page 146: Fig. 157 Nmea Gps Communication Port Settings
The default value for the baud rate of the NMEA GPS communication is 4800. The baud rate can be changed using this menu item. For further information please see the document “NMEA-Protocol Description RT-800”. o To change the baud rate, press the hotkey “Edit Value” while the menu item “Baudrate”... -
Page 147: Fig. 158 Changing The Nmea Gps Baud Rate Setting
RHOTHETA User Manual RT-800 Fig. 158 Changing the NMEA GPS baud rate setting o Choose the new baud rate value in the drop-down menu. o Press the hotkey “Reset Values” to use the default value of “4800”. o Confirm the setting with “OK” or leave the dialog without adopting the new value by pressing “ESC”. -
Page 148: Fig. 160 Assigning A Function To The Input Pin
RHOTHETA User Manual RT-800 o To configure the programmable input pin, press the hotkey “Edit Value”, while the setting “Input (Pin 2)” is marked. Assigning the “PTT” signal to the input pin Assigning “No Selecting the Function” default value signal to the input pin Fig. -
Page 149: Fig. 161 Assigning A Function To The Output Pin
RHOTHETA User Manual RT-800 Fig. 161 Assigning a function to the output pin o Choose the new setting using one of the hotkeys (s. Fig. 161), which will then appear in the “New Setting” field. o Press the hotkey “Set Default” (s. Fig. 161, position 5) to use the default value (“Alarm Out”). -
Page 150: Service
RHOTHETA internal use). “Input License” Opens a dialog to input a new license code (s. 6.4.5.1). Opens a dialog to export log files to USB (only for RHOTHETA “Export Log” internal use). Opens a dialog to import configuration files from USB (only for “Load Config”... -
Page 151: Fig. 163 Input License Dialog
6.4.5.1 Input License If a new license code has been provided to you by RHOTHETA, you can input it using this dialog. The “Input License” dialog is opened by pressing the corresponding hotkey when the service menu is opened (s. -
Page 152: Fig. 164 Input Of A New License
RHOTHETA User Manual RT-800 Fig. 164 Input of a new license o After confirming the new valid license with “OK”, a dialog opens, which requests the restart of the system. (s. Fig. 165). Fig. 165 New license adopted Page 152 of 192... -
Page 153: Other Operational Functions
6.5 Other Operational Functions 6.5.1 Standby Mode The RT-800 provides a “Standby” mode. By pressing the button (s. Fig. 2, position 2), the standby mode is activated, and the button is highlighted in orange. The colored illumination intensity of this button (as well as the “Power”... -
Page 154: Adjusting Of The Squelch
RHOTHETA User Manual RT-800 Fig. 166 "Adjust External Speaker Volume” dialog o Use hotkey “Min.” (s. Fig. 166, position 1), “Medium” (Fig. 166, position 2) and “Max.” (Fig. 166, position 3) in order to set an appropriate volume. o Use hotkey “Test On/Off” (Fig. 166, position 4) in order to test volume. -
Page 155: Dimming And Day/Night Mode
RHOTHETA User Manual RT-800 Fig. 167 Squelch dialog o Pushing the arrow keys allows switching between the frequencies (green frame indicates the currently chosen frequency). With the arrow keys the squelch can be adjusted manually to the desired level in one-percent-steps. -
Page 156: Fig. 168 "Adjust Brightness" Dialog
Further, the dialog shows the current level of the light sensor. The RT-800 DCU has a “Night” mode available, which facilitates a quick change to the darker color scheme of the display at the push of a button, or automatically, depending on the chosen settings (for night mode settings please see the chapter 6.4.2.10). - Page 157 RHOTHETA User Manual RT-800 o The hotkey “Off” (s. Fig. 168, position 2) is only available if “Legends” is selected. Pressing this hotkey deactivates the illumination of the legends. o Use the hotkey “Min.” (s. Fig. 168, position 3), “Medium” (s. Fig. 168, position 4) and “Max.”...
-
Page 158: Interfaces And Installation
RHOTHETA User Manual RT-800 7 Interfaces and Installation 7.1 Power & I/O S. Fig. 3, position 10. Contact / Pin Signal +12 V to +30 VDC Input power supply DC Caution GND (Ground) No connection required (internally connected)! Optional input: external power on... -
Page 159: Antenna Unit (Connecting Cable Dcu Au)
RHOTHETA User Manual RT-800 Optional programmable output (open collector): Alarm Programmable Status (Electrical identical Squelch to Squelch Out) No function Max. current 200 mA. Table 17 Power & I/O Connector 7.2 Antenna Unit (Connecting Cable DCU AU) 7.2.1 Pinning Antenna Unit Connector S. -
Page 160: Connecting Cable Dcu Au
RHOTHETA User Manual RT-800 7.2.2 Connecting Cable DCU AU RHOTHETA Art. No. X-1067 connecting cable 6-poled with shield Connection Connection Antenna Unit Display Control Unit Connector type: Connector type: length 1 to100 m: cross -section of conductor min. RHOTHETA SubD 9-poled male 6 x 0.50 mm... -
Page 161: Lan Interface
RHOTHETA User Manual RT-800 NMEA 0183 RX RS422 Rx / B Not connected Power supply for GPS / compass (12V) Note Power Fuse F3 (T315mA) covers the power supply for all COM interfaces. Table 19 Pinning of NMEA Connectors Note COM3 is internally connected to MOXA for remote control purposes. -
Page 162: Remote Control And Ip-Audio Encoder Ports
RHOTHETA User Manual RT-800 7.5 Remote Control and IP-Audio Encoder Ports Item Marking Status LED Blinks during the boot process of the IP Audio Encoder (red) Blinking: IP Audio Encoder is sending Status LED (green) IP Audio Encoder is not sending... -
Page 163: Power Supply
RHOTHETA User Manual RT-800 7.6 Power Supply Item / Marking (Neutral) IEC 60320 / C14 inlet for use of power cords with IEC 60320 / C13 plugs. (protective earth) 115 – 230 Volts / 1.0 – 0.5 Ampere / 50 – 60 Hz... -
Page 164: Installation And Configuration
For this purpose, the antenna unit has to be calibrated in order to compensate minor unbalances in rotation (the RT-800 antenna unit is already calibrated bevore delivery), but especially the antenna position at the installation site has to be chosen properly. -
Page 165: Line Of Sight And Fresnel Zone
RHOTHETA User Manual RT-800 Fig. 170 Example of optimal antenna position 8.3 Line of Sight and Fresnel Zone There must be a direct line of sight between the transmitter (ship) and the antenna unit. Furthermore, the fresnel zone must be free of any obstacles. -
Page 166: Reduced Bearing Accuracy Caused By Reflections
RHOTHETA User Manual RT-800 8.4 Reduced Bearing Accuracy Caused by Reflections Big natural reflectors in the antenna unit’s surrounding are especially critical (e. g. mountains in the back-side of the antenna, sharp rocky coasts or forests). Especially if the directly arriving wave field is very weak due to a remote transmitter, high mountains can cause reflections by receiving the signal better (due to their height) and therefore also causing stronger reflections. -
Page 167: Lightning Protection
Manual of Lightning Protection Rod. 8.7 Antenna Alignment Bearing values of RT-800 are always displayed and output relatively to the “North / 0°” marking of the antenna unit (s. Fig. 175). This implies that the north marking must be aligned to North in order to display absolute, north related values. -
Page 168: Antenna Connection
RHOTHETA User Manual RT-800 Fig. 175 North / 0° marking of Antenna Unit 8.8 Antenna Connection For details about the connection between the RT-800 DCU and AU please refer to chapter 7.2. 8.9 DCU Configuration 8.9.1 Interface Configuration For details about the DF configuration for remote control please refer to chapter 6.4.4.2. -
Page 169: Antenna Unit Configuration
“Antenna Unit” (s. 6.4.3.2). If a bearing offset is present after mechanical installation of the RT-800 AU (antenna unit is not exactly aligned to North), this offset can be compensated using the “Antenna Mechanical Correction”... -
Page 170: Ip Network Settings & Web Console Connection Using Moxa
• Connect the RT-800 NMEA/Ethernet port to your local LAN network. • If a DHCP server is available in your network, the RT-800 will get an initial IP address depending on your DHCP router settings. You can use an IP scanner or just look at your router configuration console or as example windows DHCP server at the new clients table to see the actual RT-800/MOXA IP address. - Page 171 MAC address info: Fixed MAC address of the RT-800 / MOXA device. Used for DHCP router reservation table. Basic Infos: Name of RT-800 / MOXA device. Internal serial Settings Attention: Any change of this values will result in no more proper operation of the RT-800.
-
Page 172: Configuration Of Audio Over Ip (Streaming Into Lan)
See also 8.13 Example of complete Network Scenario. 8.11.1 General The RT-800 display control unit is already prepared to be connected via the AUDIO/Ethernet connector, for streaming the audio signal to the Ethernet LAN (voice over IP). The RT-800 DCU contains an industrial audio streaming device / live IP audio encoder (BARIX Instreamer) for this purpose. -
Page 173: Ip Network Settings & Web Console Connection
➢ If NO DHCP server is available and no static IP mode is configured, it can take up to 4 minutes before the IP address will be announced over the speaker. The actual RT-800 audio IP address will be announced after Power On of the RT-800 over the headphone connector near the Audio/LAN connector on the back side. - Page 174 RHOTHETA User Manual RT-800 “0.0.0.0” for automatic DHCP mode or any valid static IP address Valid Gateway address if routing/streaming to other devices outside the local network. Audio configuration: recommended audio settings Streaming configuration: recommended settings Individual port value for BRTP protocol...
-
Page 175: Configuration Of Audio Exstreamer (Streaming From Lan)
See also 8.13 Example of complete Network Scenario. For the remote control site audio generation, this optional additional small stand alone device is the recommended solution and provided by RHOTHETA. This device (Exstreamer) decodes audio streams and play out the received audio signals to amplifiers or speakers. -
Page 176: Configuration Of Extreamer At Remote Site
The IP address fo this Exstreamer is preconfigured to DHCP Please input here the Gateway address if the RT-800 is not In this LAN Please input here the accurate Source IP address of the RT- 800 and the used Port. -
Page 177: Example Of Complete Network Scenario
RHOTHETA User Manual RT-800 8.13 Example of complete Network Scenario In this example a complete network scenario is shown. A public Internet connection with port forwarding is used. For professional uses, with e.g. VPN connection, no port forwarding is necessary because... -
Page 178: Technical Data
RHOTHETA User Manual RT-800 9 Technical Data 9.1 Electrical Characteristics System Characteristics Parameter Condition Data Method of Bearing Doppler (3 kHz rotation frequency) Bearing Accuracy ≤ 2° RMS Display Resolution 1° Minimum Signal Duration ≤ 100 ms 118.000 – 124.000 MHz VHF Air Band 118.000 –... - Page 179 RHOTHETA User Manual RT-800 System Characteristics Parameter Condition Data Bearable Types of A3E, F3E, A3X (distress signal modulation) Modulation Polarization Vertical Multiple scanning and monitoring functions Scanning available o Scanning of all 19 COSPAS-SARSAT channels COSPAS-SARSAT o Decoding of COSPAS-SARSAT Message:...
-
Page 180: Mechanical Characteristics
RHOTHETA User Manual RT-800 9.2 Mechanical Characteristics 9.2.1 DCU Dimensions (built-in version) Measuring units: [mm] millimeters Fig. 179 RT-800, mechanical dimensions (built-in version) Page 180 of 192... -
Page 181: Dcu Dimensions (Tabletop Version)
RHOTHETA User Manual RT-800 9.2.2 DCU Dimensions (tabletop version) Measuring units: [mm] millimeters Fig. 180 RT-800, mechanical dimensions (tabletop version) 9.2.3 DCU Mechanical Characteristics Weight Approx. 5900 g Permitted operating temperature -20 °C to +60 °C Permitted storage temperature -30 °C to +80 °C... -
Page 182: Antenna Unit Dimensions
RHOTHETA User Manual RT-800 9.2.4 Antenna Unit Dimensions Measuring units: [mm] millimeters Fig. 181 Antenna Unit, mechanical dimensions Page 182 of 192... -
Page 183: Antenna Unit Mast Flange
RHOTHETA User Manual RT-800 9.2.5 Antenna Unit Mast Flange Measuring units: [mm] millimeters 1 2 0 1 0 5 4 0 . 7 6 . 3 Fig. 182 Antenna Unit, mast flange (mechanical dimensions) 9.2.6 Antenna Unit Mechanical Characteristics Weight Approx. -
Page 184: Disposal Within The European Union
12 Maintenance and Cleaning 12.1 Maintenance UV irradiation can age the front foil of the RT-800 DCU with time, which can lead to brittleness of the front foil. Depending on the operating conditions of the RT-800 DCU, there is the possibility that moisture can penetrate through small hairline cracks in the front foil. -
Page 185: Appendix
RHOTHETA User Manual RT-800 13 Appendix 13.1 Error Messages Error message Error location Cause Antenna Unit: Error 01 Defective receiver circuit board in AU Receiver AU No Receiver Error 04 Antenna Unit Error in receiver synthesizer oscillator in AU AU Rec. No PLL... -
Page 186: Setup Tree View (Settings)
RHOTHETA User Manual RT-800 13.3 Setup Tree View (Settings) Page 186 of 192... -
Page 187: Default / User System Configuration Table
RHOTHETA User Manual RT-800 13.4 Default / User System Configuration Table System Configuration Setting / Parameter Default Value User Value SETUP -> GENERAL Access Level / Login Administrator Audio Beeper Beeper Key Pressing On Audio Line Output Audio Speaker External SETUP ->... - Page 188 RHOTHETA User Manual RT-800 System Configuration Setting / Parameter Default Value User Value Frequency High: 900 Hz Beep Tone Decoding Frequency Low: 700 Hz Decoding Time: 200 ms Frequency Input Dialog Time 10 sec Lock / Unlock Frequencies No Frequencies Locked...
-
Page 189: Scan Page Tree View (Settings)
RHOTHETA User Manual RT-800 13.5 Scan Page Tree View (Settings) Page 189 of 192... -
Page 190: Frequencies Of Channels On Maritime Band
RHOTHETA User Manual RT-800 13.6 Frequencies of channels on maritime band Channel frequency (ship - station) Frequency (coast - station) 156,000 MHz 160,600 MHz 156,050 MHz 160,650 MHz 156,100 MHz 160,700 MHz 156,150 MHz 160,750 MHz 156,200 MHz 160,800 MHz... -
Page 191: Channel Spacing Uhf / Vhf Air Band
RHOTHETA User Manual RT-800 13.7 Channel Spacing UHF / VHF Air Band The frequency input has to be performed according to ICAO Annex 10 Volume V clause 4.1.2.4 table 4.1. Please note that it is possible to work on channel spacing: 8.33 as well as 25 kHz. -
Page 192: Abbreviations
RHOTHETA User Manual RT-800 Frequency Setting / Channel Spacing Bandwidth Receiving -Display [MHz] Frequency [MHz] xxx,x50 25 kHz wide xxx,x500 xxx,x55 8,33 kHz narrow xxx,x500 xxx,x60 8,33 kHz narrow xxx,x583 xxx,x65 8,33 kHz narrow xxx,x667 xxx,x70 Not valid xxx,x75 25 kHz...
Need help?
Do you have a question about the RT-800 and is the answer not in the manual?
Questions and answers