Table of Contents
Troubleshooting

Subscribe to Our Youtube Channel
Summary of Contents for Teledyne Dock Server
- Page 1 Revision 7.10 2/28/2012 Dock Server User Guide February 2012 Glider Mission Control Software Teledyne Webb Research 82 Technology Park Drive E. Falmouth, MA 02536 USA www.WebbResearch.com (508) 5482077 GliderSupport@WebbResearch.com...
-
Page 2: Table Of Contents
Revision 7.10 2/28/2012 Table of Contents 1. Dock Server out of the Box Setup ................. 7 1.1 Connecting Dock Server Hardware .................. 8 1.2 Configuring Dock Server for the Network ................ 10 1.3 Shipped Modem Configuration ................... 16 ... - Page 3 Revision 7.10 2/28/2012 4.5 Receiving Glider Email ....................... 58 4.6 Advanced File Transfer to a Glider – dockzr Command ............. 60 4.7 Menu Bar Functions ...................... 62 4.7.1 File Menu ........................ 62 4.7.2 Edit Menu ...
- Page 4 Revision 7.10 2/28/2012 7.1 Starting Data Server ...................... 99 7.2 Checking that Data Server is Running ................ 100 7.3 Stopping Data Server ...................... 101 7.4 Monitoring Data Server while it's Running ............... 102 ...
- Page 5 Revision 7.10 2/28/2012 12.2 Pros and Cons ........................ 138 12.2.1 Reliability ........................ 139 12.2.2 Data Rate ........................ 139 12.2.3 Ease of Initial Setup .................... 139 ...
- Page 6 Revision 7.10 2/28/2012 A.1.1 Dock Server Startups .................... 179 A.1.2 Glider Connects, Disconnects, and Redirects ............ 181 A.1.3 Glider Commands ...................... 183 A.1.4 File Transfers to / from Gliders ................. 183 ...
-
Page 7: Dock Server Out Of The Box Setup
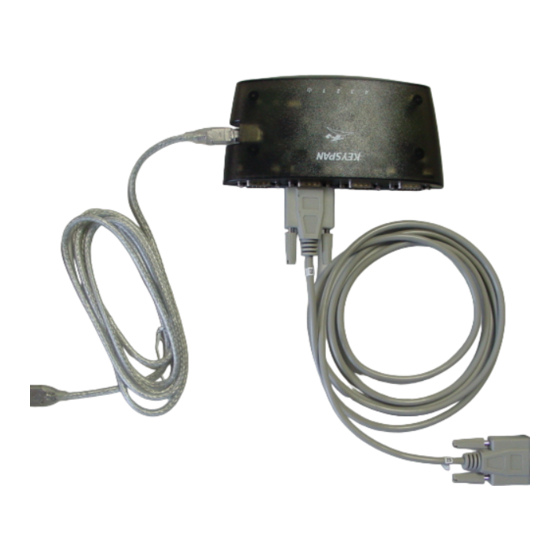
Revision 7.10 2/28/2012 1. Dock Server out of the Box Setup Each Dock Server ships with the following components. 1. Laptop computer with USB connectors. 2. A 4Port USB Serial Adapter (Keyspan or Edgeport). 3. U.S. Robotics Courier 56K Business Modem (Model 3453B) – contains a 25pin to 9pin serial cable and an RJ11 phone cable. 4. Optical Mouse. 5. PC Card Compact Flash Adapter. 6. Straight through Serial Cable 9pin male to 9pin female. 7. RJ45 Ethernet Cable Additional hardware used by Dock Server but shipped with a glider include a Freewave wireless data transceiver. Note that each glider ships with one of two possible 4port USB serial adapters: a Keyspan or an Edgeport. This document uses the term “4port USB serial adapter” to refer to the model shipped with your glider. Dock Server has been installed on the laptop and configured to monitor the internal serial port (if any) and the 4port serial adapter’s ports for glider communications. The modem has been configured for use with Dock Server. The Freewave device has been configured to communicate only with its shipped glider. To use Dock Server out of the box, its hardware components must be connected and the laptop machine must be configured for your network environment. Follow the steps in section 1.1 then section 1.2 to complete the Dock Server setup. Page 7 of 228... -
Page 8: Connecting Dock Server Hardware
Revision 7.10 2/28/2012 1.1 Connecting Dock Server Hardware To connect the Dock Server hardware, follow the steps in this section. 1. If turned on, turn off the laptop, the modem, and the Freewave. 2. Connect the 4port USB serial adapter to a USB port on the laptop using the cable supplied with the adapter. 3. Connect the Freewave transceiver to serial port two on the 4port USB serial adapter using the shipped 9pin to 9pin serial cable. 4. Connect the U.S. Robotics modem to the internal serial port on the laptop using the 25 pin to 9pin cable supplied with the modem. If the laptop does not have an internal serial port, then connect the modem to port one on the 4port USB serial adapter. Important Note: Dock Server treats modems and Freewaves differently. It must be told which device is connected to each serial port. Dock Server’s factory configuration expects a modem to be connected to the laptop’s internal serial port. Or, if no internal serial port exists, then Dock Server expects a modem to be connected to port one on the 4port serial adapter. Dock Server expects a Freewave to be connected to port two on the adapter. To change this configuration, refer to section 2.6. 5. Connect the U.S. Robotics modem to the iridium phone line using the RJ11 phone cable supplied with the modem. On the modem, the plug labeled “JACK” should be used (the plug closest to the 25pin connector). Figure 11 shows this modem connection. Figure 12 shows all hardware connections. 6. Power on the modem, Freewave, and laptop in any order. Page 8 of 228... - Page 9 Revision 7.10 2/28/2012 Figure 11. Modem connections to the computer’s serial port and iridium phone line. Page 9 of 228...
-
Page 10: Configuring Dock Server For The Network
Revision 7.10 2/28/2012 Figure 12. All Dock Server Hardware connections. The Dock Server hardware is ready for use. To connect the Dock Server machine to a network, refer to the next section. To start the Dock Server application, refer to section 2.1. 1.2 Configuring Dock Server for the Network While the Glider Terminal application can run on the Dock Server machine, Glider Terminal can also run from any machine networked to the Dock Server machine. To configure the Dock server machine for a network, follow the steps in this section. 1. Collect the following information from the network administrator. a) A fixed IP address for the Dock Server. b) The subnet mask for this IP address. c) The default gateway IP address. d) The primary and secondary (if one) DNS IP addresses. Page 10 of 228... - Page 11 Revision 7.10 2/28/2012 e) The hostname for the Dock Server machine. The domain name for the Dock Server machine. For example, a hostname could be “dock”. A domain name could be “webb.com”. This hostname and domain name would combine to make a fully qualified domain name of “dock.webb.com”. 2. Log on to the Dock Server machine as user “localuser”. The factory delivered password for this account is “WideOpen” (see Appendix D). 3. Select “Applications / System Settings / Network” from the menu in the upper lefthand corner of the desktop. 4. Enter the root password and click the OK button. The “Network Configuration” dialog opens (Figure 13). Appendix D specifies the factory delivered root password for your Dock Server. Figure 13. The Network Configuration Dialog. Page 11 of 228...
- Page 12 Revision 7.10 2/28/2012 5. Select the “Hosts” tab. Select the one host entry in the table and delete it by clicking the “Delete” button. Figure 13 shows the one host entry selected. Note, the host entry shown in this figure may not match the one in your Network Configuration dialog. 6. Create a new host entry by clicking the “New” button. In the hosts entry dialog (Figure 14), enter the information collected in step 1. Use the fixed IP address as the “Address”, the fully qualified domain name as the “Hostname”, and the hostname as the “Aliases”. Click the OK button. 7. Select the “DNS” tab on the Network Configuration dialog. Enter the following information collected in step 1. Figure 15 shows the “DNS” tab with Figure 14. New Hosts Entry Dialog. example information entered. a) The fully qualified domain name as the “Hostname”. b) The primary DNS IP address as the “Primary DNS”. c) The secondary DNS IP address (if one) as the “Secondary DNS”. d) The domain name as the “DNS search path”. Page 12 of 228...
- Page 13 Revision 7.10 2/28/2012 Figure 15. The DNS tab of the Network Configuration Dialog. 8. Select the “Devices” tab in the Network Configuration dialog. Figure 16 shows the one device entry selected on the Devices tab. Page 13 of 228...
- Page 14 Revision 7.10 2/28/2012 Figure 16. The Device tab of the Network Configuration Dialog. 9. Select the one device entry in the table and edit it by clicking the “Edit” button. Figure 17 shows the Ethernet Device dialog for editing the device’s configuration. Page 14 of 228...
- Page 15 Revision 7.10 2/28/2012 Figure 17. The Ethernet Device Dialog. 10. If not already selected, select the “Statically set IP addresses” option and enter the following information collected in step 1. a) The dockserver’s fixed IP address as the “Address”. b) The collected subnet mask as the “Subnet mask”. c) The collected gateway address as the “Default gateway address” 11. Click the OK button on the Ethernet Device dialog. 12. Select “File / Save” from the menu on the Network Configuration dialog. 13. Select “File / Quit” from the menu on the Network Configuration dialog. Page 15 of 228...
-
Page 16: Shipped Modem Configuration
Revision 7.10 2/28/2012 14. Connect the Dock Server machine to the network using the supplied RJ45 Ethernet Cable. 15. Reboot the Dock Server machine. The Dock Server’s client tools (e.g., Glider Terminal and gmcFTP) are now available to remote machines on the network. To install these tools on remote machines, refer to section 3.1 for Glider Terminal and section 5.1 for gmcFTP. 1.3 Shipped Modem Configuration The U.S. Robotics modem shipped with Dock Server has been factory configured for iridium communication between the Dock Server and gliders; it requires no out of the box configuration. This section details the modem’s shipped configuration. The modem’s configuration involves two parts. One, setting the DIP switches on the modem’s bottom. And two, configuring the modem’s NVRAM to load the appropriate settings upon power up. Dock Server never sends AT commands to the modem. Upon power up, the modem is expected to autoanswer incoming glider calls and to negotiate the incoming baud rate. It should communicate with its host (i.e., Dock Server) at a fixed baud rate of 115,200 (DTE serial port speed). The modem's host connection should be configured with hardware handshake (RTS/CTS), and should provide a CD (carrier detect) signal continuously to reflect its current incall state. Figure 18 shows the modem’s DIP switches. Their setting, as described on the modem’s bottom, follows. Switch Position Meaning DTR normal Verbal result codes Display result codes Echo offline commands Auto answer on ring Normal carrier detect Display all result codes Page 16 of 228... - Page 17 Revision 7.10 2/28/2012 Enable AT command set Disconnect with +++ Load NVRAM defaults Figure 18. Modem DIP Switch Settings. Figure 19 shows the modem’s NVRAM settings. Upon power up, the modem initializes itself with these settings. To communicate with the modem using minicom, open a terminal window and type “minicom s0” at the command prompt. Enter the desired modem AT commands. Page 17 of 228...
- Page 18 Revision 7.10 2/28/2012 Figure 19. Modem settings saved in NVRAM and loaded upon power up. Note that upon power up the DTE port speed is configured to 115,200 baud. However, once the modem is powered up, it continuously monitors for changes in the port speed by watching for AT commands and autoadjusts itself to any new detected speed. This autoadjusting can cause Dock Server to stop communicating with the modem. For example, many terminal emulation applications (e.g., minicom, Kermit, and Procomm) send initialization AT commands when the application first communicates with the modem. If the computer’s serial port speed is set to 9600 baud when the AT commands are sent, then the modem will adjust its DTE port speed to 9600. When Dock Server launches, it sets the computer’s serial port to 115,200 but never sends any AT commands. Since the modem has not sent any AT commands, it never detects and adjusts its DTE port speed. Thus, the modem sends glider character traffic to the Dock Server at 9600 baud, but the Dock Server is expecting it at 115,200 baud. These mismatched baud rates result in glider output appearing garbled in Glider Terminal. Page 18 of 228...
-
Page 19: Shipped Serial Port Configuration
Revision 7.10 2/28/2012 Thus, users should be very careful when using Dock Server and other communication applications on the same serial ports. To return the modem to settings compatible with Dock Server, stop Dock Server, cycle the modem’s power, and restart Dock Server. 1.4 Shipped Serial Port Configuration The serial ports shipped with Dock Server have been factory configured as detailed in this section. It is rare that the shipped configuration needs to be changed. The file dockServerState.xml in the folder /var/opt/gmc stores Dock Server’s serial port configuration. For laptop machines, the internal serial port and all ports of the shipped 4port USB serial adapter are configured for Dock Server management as shown in Table 11. Flow Port Baud Control Data bits Stop bits Parity /dev/ttyS0 115,200 RTS/CTS None /dev/ttyUSB0 115,200 RTS/CTS None /dev/ttyUSB1 115,200 RTS/CTS None /dev/ttyUSB2 115,200 RTS/CTS None /dev/ttyUSB3 115,200 RTS/CTS None Table 11. Shipped Laptop Serial Port Configuration. Dock Server treats modems and Freewaves differently. Since Dock Server can not ... -
Page 20: Troubleshooting Communication Issues
Revision 7.10 2/28/2012 USB to Serial Serial Port Device Port Hub /dev/ttyS0 modem (Iridium) /dev/ttyUSB0 modem (Iridium) /dev/ttyUSB1 freewave /dev/ttyUSB2 freewave /dev/ttyUSB3 direct Table 12. Shipped Serial Port – Device Type Assocations. If the user changes the physical attachment of device types to serial ports, he or she must make corresponding changes to the dockServerState.xml file (see section 2.6). 1.5 Troubleshooting Communication Issues Communication problems can arise when unplugging and plugging USB cables attaching the Dock Server to Keyspan or Edgeport USB serial adapters. For example, the Dock Server device numbers specified by /dev/ttyUSB0 thru /dev/ttyUSB3 can change, preventing communication. Alternatively, the wrong number of specified devices can result, or even a complete computer lockup requiring a hard reboot. To avoid these problems, it is recommended that the following procedures be adhered to: 1. Do not use any USB hub to enable sharing a notebook USB port between the USB serial ports and any other USB device or devices. 2. When plugging in the USB cable, wait 30 seconds before starting any process which uses the serial ports (e.g., minicom, dockserver, kermit, etc). 3. Before unplugging the USB cable, make sure to first stop all processes which are using the serial ports. Failure to do so can result in too many /dev/ttyUSB* devices (some of them phantoms) or even the system freezing. These problems can happen either after a period of time, or when plugging the USB cable back in, and may require a hard reboot. 4. Before plugging the USB cable back in after unplugging it, first wait at least 30 seconds with the cable unplugged. Failure to do so can result in the wrong /dev/ttyUSB* device Page 20 of 228... - Page 21 Revision 7.10 2/28/2012 numbers showing up either momentarily or permanently, and occasionally even the wrong number of devices. When plugging and unplugging the USB cable, in case of any doubts, it can be helpful to have the following command running in a shell window in order to watch the /dev/ttyUSB* devices appearing and disappearing: watch n 1 'ls /dev/ttyU* 2>/dev/null' This introduces only a very small system load and could even be left running. Other useful tools include the "mess" shell command, or the "systemmessages" desktop launch button. Page 21 of 228...
-
Page 22: How To Use The Dock Server Application
Revision 7.10 2/28/2012 2. How to use the Dock Server Application The Dock Server application provides the following services: 1. Monitors the serial ports used to communicate with gliders. Typically, these ports are attached to a modem for iridium communication or a Freewave device for radio communication. When a glider contacts its Dock Server machine, the Dock Server determines the glider’s name and notifies all clients that the glider has “docked” – i.e., it is at the surface and available to receive commands. 2. Services requests from a Glider Terminal client to interact with a glider. That is, relay GliderDOS commands from the client to the glider and send glider console output to the client for display. 3. Runs scripts that autonomously interact with connected gliders. 4. Sends notifications of selected glider event occurrences by email to subscribers. Such events include glider mission aborts and glider is at the surface. 5. Saves all Dock Server interactions with gliders and clients to log files. Once configured and started, the Dock Server application is intended to run continuously without human intervention. Note that the Dock Server application is factory configured to monitor the laptop’s internal serial port and the ports of the 4port USB serial adapter. The following sections describe configuring and running the Dock Server application. 2.1 Starting Dock Server To start the Dock Server application, follow the steps in this section. 1. Log on to the Dock Server machine as user “localuser”. The factory delivered password for this account is “WideOpen” (see Appendix D). Figure 21 shows the desktop for localuser. Icons on the desktop identify Dock Server functions. Page 22 of 228... - Page 23 Revision 7.10 2/28/2012 startdockserver icon Figure 21. Dock Server desktop for localuser account. 2. Double click the desktop icon labeled “startdockserver”. A shell window opens that shows the Dock Server application’s process information (Figure 22). This information confirms that the application is running. Important Note: When Dock Server launches, it opens serial ports and network sockets. At any time, these resources can be owned by only a single process. Thus, before starting Dock Server be sure that no other process owns the serial ports or the TCP/IP socket used by Dock Server. For the same reason, do not start more than once instance of the Dock Server application at any time. Once Dock Server has started, the 4port USB serial adapter’s LED(s) should be solid green or flashing green. This LED flashes on / off as data is communicated via the serial ports. Page 23 of 228...
-
Page 24: Checking That Dock Server Is Running
Revision 7.10 2/28/2012 Dock Server process information Figure 22. Shell window confirming that Dock Server is running. 3. Type the enter key to close the shell window. 2.2 Checking that Dock Server is Running To check that the Dock Server application is running, follow the steps in this section. 1. Log on to the Dock Server machine as user “localuser”. The factory delivered password for this account is “WideOpen” (see Appendix D). 2. Double click the desktop icon labeled “seedockserver”. A shell window opens that shows the Dock Server application’s process information (Figure 22). If the application is not running, no process information appears in the window. Important Note: If more than one line of process information appears, then more than one Dock Server is running. Stop both Dock Servers and restart just one Dock Server instance. 3. Type the enter key to close the shell window. 2.3 Stopping Dock Server To stop the Dock Server application and shutdown the Dock Server machine, follow the steps in this section. 1. Log on to the Dock Server machine as user “localuser”. The factory delivered password for this account is “WideOpen” (see Appendix D). Page 24 of 228... -
Page 25: Monitoring Dock Server While It's Running
Revision 7.10 2/28/2012 2. Double click the desktop icon labeled “stopdockserver”. A shell window opens that shows column headings for process information but no process information appears (Figure 23). This function stops all running Dock Servers on the machine. 3. Type the enter key to close the shell window. 4. Select “Actions / Log Out” from desktop menu bar. 5. Select the “Shut down” radio button option on the open dialog window and click the “OK” Figure 23. Shell window confirming that no Dock Server is running. button to shut down the Dock Server machine. 2.4 Monitoring Dock Server while it's Running To view Dock Server’s interactions with clients and gliders in realtime, follow these steps. 1. Log on to the Dock Server machine as user “localuser”. The factory delivered password for this account is “WideOpen” (see Appendix D). 2. Double click the desktop icon labeled “inspectdockserver”. A shell window opens that shows the Dock Server application’s “console.log” file and any additions made to it in realtime. This function uses the “less” utility to view the log file. You may use any of its commands to view other parts of the log file. Figure 24 shows the results of using inspectdockserver just after starting up the Dock Server application. Page 25 of 228... -
Page 26: Accessing Dock Server Glider Files
Revision 7.10 2/28/2012 Figure 24. Result of running the inspectdockserver function. The inspectdockserver function is the primary method for monitoring Dock Server’s behavior and the place to start when diagnosing Dock Server problems. Refer to Appendix A for tips on reading Dock Server log files. 3. Type controlC followed by the Q key to stop the realtime display of the log contents and close the shell window. 2.5 Accessing Dock Server Glider Files To access glider related files from the user localuser's desktop, follow the steps in this section. To access glider related files from a remote machine, see “How to Use the GMC FTP Application” (chapter 9). 1. Log on to the Dock Server machine as user “localuser”. The factory delivered password for this account is “WideOpen” (see Appendix D). 2. Double click the desktop icon labeled “gliderfiles”. A file browser window opens as shown in figure 25. The “gliders” folder contains a folder for each glider; this folder has the same name as the glider. Files transferred from a glider appear in that glider's “fromglider” sub folder. For example, SBD, DBD, and MLG files transferred by z modem would appear in this sub folder. Files sent to a glider Page 26 of 228... -
Page 27: Configuring Gliders Managed By Dock Server
Revision 7.10 2/28/2012 are placed in that glider's “toglider” sub folder. A glider's sub folder, “logs”, contains a glider's console dialog. This log's content is similar to a glider's MLG file. Dock Server's log files appear in the “log” folder. The “serialPorts” folder contains a log file for each serial port managed by Dock Server. These logs files contain all characters sent and received over a serial port. The maps available for Glmpc Terminal reside in the “maps” folder. All user custom Dock Server scripts should be placed in the “scripts” folder; the “factoryscripts” folder contains factory delivered Dock Server scripts and may be overwritten by a Dock Server upgrade. Figure 25. Result of clicking the gliderfiles desktop icon. 2.6 Configuring Gliders Managed by Dock Server Typically, a user does not manually configure the gliders managed by a Dock Server. When Dock Server is started, it assumes the folders in /var/opt/gmc/gliders represent gliders it should manage and that the folders’ names are the gliders’ names (as configured in a glider’s autoexec.mi file). The first time a new glider connects to Dock Server, it automatically begins managing that glider by creating a folder with the glider’s name in the directory /var/opt/gmc/gliders. This new folder contains folders for files sent to the glider, “to glider”, files received from the glider, “fromglider”, and log files for that glider, “logs”. All Page 27 of 228... -
Page 28: Removing A Glider From Dock Server Management
Revision 7.10 2/28/2012 gliders managed by a Dock Server are displayed in Glider Terminal’s lefthand side (refer to section 3.4). While Dock Server automatically manages new gliders, it never stops management of any glider. Gliders must be manually removed from Dock Server management. 2.6.1 Removing a Glider from Dock Server Management To manually remove a glider from Dock Server management, follow the steps in this section. 1. Stop the Dock Server application by following the steps in section 2.3. 2. Open a shell window on the Dock Server machine by right clicking on the desktop’s background and selecting “Open Terminal” from the popup menu. Log on as user “root” by entering the following shell command. Refer to Appendix D for this user’s factory delivered password. Figure 26 shows a shell window with user dockserver logged in. Figure 26. Open shell window on Dock Server machine. 3. Make /var/opt/gmc/gliders the current directory by entering the following shell command. Page 28 of 228... -
Page 29: Configuring Serial Ports Managed By Dock Server
Revision 7.10 2/28/2012 cd /var/opt/gmc/gliders 4. Backup the data associated with any glider(s) to be removed. This data includes the contents of the folder named after the glider and any descendant subfolders. For example, assume that the backup folder is /var/opt/gmc/archive/gliders. To copy glider ann’s data to /var/opt/gmc/archive/gliders/ann, enter the following shell command. cp –r ann /var/opt/gmc/archive/gliders/ann 5. Remove the folder(s) named after the glider(s) you wish to remove from Dock Server management. For example, to remove the glider named “ann”, enter the following shell command. rm –r ann 6. Start the Dock Server application by following the steps in section 2.1. As Glider Terminals connect to the Dock Server, the removed gliders should not appear in the displayed list of managed gliders (refer to section 3.4). 2.7 Configuring Serial Ports Managed by Dock Server A managed serial port is one that Dock Server monitors for glider or simulator traffic. Typically, a user does not configure the serial ports managed by a Dock Server. A Dock Server is factory configured to manage the machine’s internal serial ports (if any) and any serial ports shipped with the machine. For laptops, this includes the four ports of the 4port USB serial adapter. For rack mounted machines, this includes the ports on any serial port expansion boards. The shell command, portdockserver, allows a user to configure the serial ports managed by Dock Server and, if used, the Iridium RUDICS. The portdockserver command usage follows. Examples are shown after usage description. portdockserver port_command [command_options] port_identifier Where: Page 29 of 228... - Page 30 Revision 7.10 2/28/2012 port_command The configuration task to perform: add Adds the specified serial port to Dock Server management. del Deletes the specified serial port from Dock Server management. mod Modifies the specified, Dock Server managed serial port. net – Modifies the Iridium RUDICS configuration. display Displays the current configuration of a Dock Server managed port. auth – Modifies the glider authentication configuration. command_options add and mod port_command options: t, desktop Add a desktop icon to all group localuser members that launches minicom on the specified port_identifier. Default is to not add a desktop launcher. T, nodesktop Delete the desktop icon from all group localuser members that launches minicom on the specified port_identifier. c, device <direct | iridium | freewave> Device type of the specified port_identifier. For port command add, default is freewave. Table 21 details the device types accepted by Dock Server. n, arity <single | multiple> Glider arity. For port_command add, default is multiple for iridium and single for direct and freewave. For a detailed explanation of glider arity, see the end of this section. net port_command options: p, ports max_number_of_ports Number of Iridium RUDICS network ports to open. s, socket socket_number TCP/IP Socket for RUDICS traffic. auth port_command options: Page 30 of 228...
- Page 31 Revision 7.10 2/28/2012 s, serial Glider authentication over serial port connections IS required. S, noserial Glider authentication over serial port connections is NOT required. r, rudics Glider authentication over RUDICS connections IS required. R, norudics Glider authentication over RUDICS connections is NOT required. port_identifier Serial port identifier of port to add, del, mod, or display e.g., ttypa00. If not specified for display command, all Dock Server managed ports are displayed. For display command, specifying net displays the Iridium RUDICS configuration. c, device parameter used Device attached to Serial Port in portdockserver on the Dock Server Machine command Iridium modem – U.S. Robotics Courier 56K Business Modem or U.S. Robotics MP/8 or MP/16 modem bank. iridium Freewave Wireless Data Transceiver. freewave Direct serial cable connection between the Dock Server machine and a glider simulator. direct Table 21. Dock Server Serial Port Device Options. To change the serial ports managed by a Dock Server, log on as user “localuser” and open a shell window on the Dock Server machine by right clicking on the desktop's background and selecting “Open Terminal” from the popup menu. Note that the port dockserver command will stop the Dock Server application before modifying its serial port configuration and start this application after the modification is complete. Examples of portdockserver usage follows. portdockserver add t c freewave n single ttyUSB1 Page 31 of 228...
- Page 32 Revision 7.10 2/28/2012 Add serial port /dev/ttyUSB1 to Dock Server management. Dock Server expects a freewave device to be attached to this port and that the same (single) glider will always communicate on this port. portdockserver add ttyUSB2 Add serial port /dev/ttyUBS2 to Dock Server management. Device type defaults to freewave and glider arity defaults to single. portdockserver del ttyUSB1 Remove serial port /dev/ttyUSB1 from Dock Server management. portdockserver mod c iridium ttyUSB2 Change the device type connected to serial port ttyUSB2 to Iridium. portdockserver net p 5 a Change the Iridium RUDICS configuration to open 5 connections and require glider authentication. portdockserver display Display Dock Server's configuration of all physical serial ports and Iridium RUDICS. To verify changes made using the portdockserver command, use the portdockserver port_command display or examine the contents of console.log using the inspect dockserver desktop icon. When the Dock Server application starts up, it writes its serial port and Iridium RUDICS configuration in the log file console.log. Refer to appendix A for how to read a Dock Server log file. By default, Dock Server logs all data received by a serial port to that port’s log file. Refer to appendix A.5 for serial port data logging details. Page 32 of 228...
- Page 33 Revision 7.10 2/28/2012 The glider arity option, n, arity <single | multiple>, specifies how many gliders are expected to connect on the associated serial port. The two possible values are single and multiple. The value single indicates that once a glider has connected to this serial port, Dock Server can assume subsequent connections to the port are by this same glider. This assumption allows Dock Server to skip the glider identification phase at the start of every connection (refer to section 9.4). Thus, this glider connects faster and the user sees its connect indicator turn green sooner. For example, the portdockserver command: portdockserver mod n single ttyUSB0 Configures Dock Server to treat every subsequent connection on serial port ttyUSB0 as if it’s from the same glider as the one that first connects. If the first glider that connects is identified as “Darwin” (using the process detailed in section 9.4), then all subsequent connections to the associated serial port are assumed to be the glider Darwin. Dock Server clears the association between a glider and serial port when Dock Server is restarted or when the serial port’s Data Set Ready line transitions high to low (occurs when a serial cable is unplugged from a serial port). If at any time, Dock Server detects that a connected glider is not the assumed glider, Dock Server switches to the detected glider. The value multiple indicates that more than one glider may connect to this serial port. Thus, Dock Server always attempts to identify the glider with each connection as described in section 9.4. For example, the portdockserver command: portdockserver mod n multiple ttyS0 Configures Dock Server to treat each connection to port ttyS0 as if it could be from a different glider. Thus, Dock Server attempts to identify the connecting glider each time carrier detect goes high. Table 22 shows the default glider arity option values for each device type. Page 33 of 228...
-
Page 34: Dock Server General Configuration
Revision 7.10 2/28/2012 Device attached to Serial Port on the Dock Server Machine Default Glider Arity Value Iridium modem – U.S. Robotics Courier 56K Business Modem or U.S. Robotics multiple MP/8 or MP/16 modem bank. Freewave Wireless Data Transceiver. single Direct serial cable connection between the Dock Server machine and a glider single simulator. Table 22. Default glider arity option values for devices. Dock Server General Configuration Dock Server's configuration file is /etc/opt/gmc/dockserver.conf. This file controls the following aspects of the Dock Server application. The Dock Server identifier used in log filenames. ● The TCP/IP socket Dock Server listens on for Glider Terminal requests. ● Various paths Dock Server uses to find GLMPC maps, user and factory scripts, ● and glider directories, and to store log files. Location of Dock Server's dynamic state file. ● RUDICS connections. ● Glider authentication over RUDICS and serial port connections. ● This configuration file is only read during Dock Server application startup. To make a change to this file effective, the Dock Server application must be restarted after the file has been changed. Figure 27 shows the factory delivered dockserver.conf file. Page 34 of 228... - Page 35 Revision 7.10 2/28/2012 Client listening socket Log file identifier Various Dock Server paths Dock Server dynamic state file Glider authentication configuration for RUDICS Figure 27. Contents of the dockserver.conf file. To edit the dockserver.conf file, follow these steps: 1. Stop the Dock Server application by following the steps in section 2.3. 2. Open a shell window on the Dock Server machine by right clicking on the desktop’s background and selecting “Open Terminal” from the popup menu. Log on as user “root” by entering the following shell command. Refer to Appendix D for root’s factory delivered password. su – Page 35 of 228...
- Page 36 Revision 7.10 2/28/2012 3. Make /etc/opt/gmc the current directory by entering the following shell command. cd /etc/opt/gmc 4. Open the file dockserver.conf (NOT dockServerState.xml) using gedit by entering the following shell command. gedit dockserver.conf 5. Edit the XML element corresponding to the desired configuration changes. Please refer to subsequent text to change a specific setting. 6. Save the modified dockserver.conf file. 7. Log off as user root. 8. Start the Dock Server application by following the steps in section 2.1. The Dock Server application saves all glider and Glider Terminal traffic in a set of log files. These files are stored in the directory given by the XML attribute “logsHome” of the “paths” element and is “/var/log/gmc” by default. Log files are very useful for monitoring Dock Server’s behavior. Dock Server starts a new log file at the beginning of each day. To distinguish one Dock Server’s logs from another Dock Server’s logs and to associate logs with the time period they cover, files are named by appending the date covered by the file to a Dock Server unique identifier. The XML attribute “name” of the element “dockConfiguration” specifies this identifier. For example, if the XML name attribute is “WebbDock”, then the log file, WebbDock_20060817.log, contains all glider and Glider Terminal traffic that occurred on August 17, 2006 on the Dock Server “WebbDock”. The XML attribute “socket” of the “dockConfiguration” element defines the TCP/IP socket the Dock Server application listens on for client requests (e.g., Glider Terminal). By default, this socket is 6564. Note that this is different from the TCP/IP socket used for Iridium RUDICS connections (see section 12.3). The XML attributes of the “paths” element define the locations the Dock Server application uses to find various files and to store log files. The “mapsHome” attribute Page 36 of 228...
-
Page 37: Upgrading To The Latest Dock Server Release
Revision 7.10 2/28/2012 specifies where maps used by the GLMPC client are stored. The “glidersHome” attribute indicates where all glider related files are located. These files include each glider's logs and files transferred to and from a glider using zmodem. All Dock Server application's user defined scripts are stored in “scriptsHome” and all factory delivered scripts are stored in “factoryScriptsHome”. The “logsHome” attribute indicates where all Dock Server application log files are stored (e.g., console.log and daily activity logs). As the Dock Server application runs, it saves its dynamic state to the file specified in the XML attribute “dynamicStateFile” of the “files” element. This file specifies email notifications and serial port configurations. Please refer to section 2.7 for an explanation of this file's contents. The XML attributes of the “networkSerialPorts” element configure RUDICS connections used by gliders. The “max_num” attribute determines how many gliders can simultaneously connect to Dock Server over RUDICS. The “tcp_port” attribute defines the TCP/IP socket that Dock Server listens to for RUDICS traffic. Finally, the “glider_must_authenticate” attribute indicates weather or not a glider must authenticate upon connecting to the Dock Server machine. Refer to chapter 12 for the details of RUDICS configuration and glider authentication. The XML attributes of the “serialPorts” element (not shown in figure 27) configure glider authentication over iridium, freewave, and direct connections. To require glider authentication, set the “glider_must_authenticate” attribute to “true”. Refer to chapter 12 for the details of configuring glider authentication. 2.9 Upgrading to the Latest Dock Server Release Dock Server upgrades are available over the internet for versions 3.6 and later. To upgrade earlier versions, please contact glider support email at glidersupport@webbresearch.com. Each time a new version of Dock Server is available, Webb Research notifies all customers by email. Note that Glider Terminal, Data Server, GLMPC Terminal, and Data Visualizer application upgrades are part of a Dock Server upgrade. 2.9.1 Upgrading from Release 3.6 through 6.36 to the Latest Release To upgrade Dock Server (and all other GMC applications), follow these steps. Page 37 of 228... - Page 38 Revision 7.10 2/28/2012 1. If upgrading from CD media, insert the Dock Server install CD and skip to step 4. If access to TeledyneWebb Research’s glider server has not been requested, please contact TeledyneWebb Research for access. 2. Move any Dock Server scripts in the factoryscripts directory that you have modified or that you use in operations to the scripts directory. The upgrade may modify the contents of the factoryscripts directory. Refer to section 3.8.1 for appropriate use of the factory scripts and scripts directories. 3. Connect the Dock Server to the Internet (refer to section 1.2). 4. Log on as user “root” from the Dock Server machine’s “boot up” window (i.e., do not open a terminal window and log on as root from within a user account). Refer to Appendix D for the root password. 5. If upgrading from TeledyneWebb Research's application repository, browse to the URL ftp://dockserverrpmrepositories.webbresearch.com/glider/rpmrepository. Right click on the file “gmc.repo” and select “Save Link As…” Using the SaveAs dialog, save gmc.repo in the folder /etc/yum.repos.d. If upgrading from CD media, copy the file gmc.repo from the CD's rpmrepository folder to the folder /etc/yum.repos.d. 6. Open a terminal window by selecting Applications / System Tools / Terminal from the menu bar. 7. If upgrading from TeledyneWebb Research's application repository, enter the following commands at the terminal window prompt. Type the enter key after each command. #yum disablerepo=* enablerepo=GMC install gmcoutofbandtools #gmcinstall nojava production If upgrading from CD media, enter the following commands at the terminal window prompt. Type the enter key after each command. #yum disablerepo=* enablerepo=GMCmediacd install gmcoutofbandtools #gmcinstall nojava production Page 38 of 228...
-
Page 39: Upgrading From Release 6.37 And Later To The Latest Release
Revision 7.10 2/28/2012 8. Once the installs have completed, close the terminal window by entering “exit” followed by the enter key. 2.9.2 Upgrading from Release 6.37 and Later to the Latest Release To upgrade Dock Server (and all other GMC applications), follow these steps. 1. If upgrading from CD media, insert the Dock Server install CD and skip to step 4. If access to TeledyneWebb Research’s glider server has not been requested, please contact TeledyneWebb Research for access. 2. Move any Dock Server scripts in the factoryscripts directory that you have modified or that you use in operations to the scripts directory. The upgrade may modify the contents of the factoryscripts directory. Refer to section 3.8.1 for appropriate use of the factory scripts and scripts directories. 3. Connect the Dock Server machine to the Internet (refer to section 1.2). 4. Log on as “root” from the Dock Server machine’s “boot up” window (i.e., do not open a terminal window and log on as root from within a user account) When prompted, enter the root password. Refer to Appendix D for the root password. Open a terminal window by selecting Applications / System Tools / Terminal from the menu bar. Refer to the dockserver release README. If the README specifies entering the following command, then do so at the terminal window prompt. Note, it does no harm to enter this command during every upgrade. #yum disablerepo=* enablerepo=GMC install gmcoutofbandtools At the terminal window prompt, enter the following commands. #gmcswitchto nojava production This command stops Dock Server and Data Server, uninstalls the current Dock Server and Data Server, and installs the latest production release of Dock Server and Data Server. Page 39 of 228... -
Page 40: Rolling Back To A Previous Dock Server Release
Revision 7.10 2/28/2012 8. Once the update has completed, close the terminal window by entering “exit” followed by the enter key and log off as user “root”. 9. Start Glider Terminal, GLMPC Terminal, and Data Visualizer (from the Dock Server web page or otherwise) on each client machine to initiate a client application upgrade. As part of each Dock Server upgrade, a client tools upgrade (Glider Terminal, GLMPC Terminal, and Data Visualizer) is installed on the Dock Server machine. Using Java’s Web Start technology, these client tools are upgraded on client machines by starting the old installed release of each tool. Each time a client tool is started, Web Start checks the originating Dock Server machine for a tool upgrade. The machine used for the initial install of each client tool is the originating machine. If an upgrade is found within a time out period, Web Start upgrades the tool on the client machine and launches the upgraded version. If no upgrade is found within the timeout period, Web Start launches the already installed release of tool and continues to search for an upgrade. If Web Start finds an upgrade after it has launched an old release, it caches the fact that an upgrade exists but does not perform the upgrade until a subsequent launch of that client tool. This upgrade behavior can be confusing to users. It can result in launching an old client tool release even though a new release is on the Dock Server machine. Thus, it is important to check that the release displayed in the client tool’s title bar is the one you expect. If it is not the new release, let the old release run for five or more minutes, shut it down, and then restart it. The five minute wait should give Web Start enough time to find an upgrade if there is one. Thus, upon restarting the client tool, a dialog similar to figure 31 should appear to indicate that the upgrade is inprogress. Note that the upgrade can take several minutes to complete. 2.10 Rolling back to a Previous Dock Server Release Dock Server roll backs are available over the internet for versions 6.31 and later. Note that rolling back Dock Server also rolls back all client tools (Glider Terminal, GLMPC Terminal, and Data Visualizer). To rollback a Dock Server install to an earlier release, follow these steps. 1. If access to TeledyneWebb Research’s glider server has not been requested, please contact TeledyneWebb Research for access. Page 40 of 228... - Page 41 Revision 7.10 2/28/2012 2. Move any Dock Server scripts in the factoryscripts directory that you have modified or that you use in operations to the scripts directory. The rollback may modify the contents of the factoryscripts directory. Refer to section 3.8.1 for appropriate use of the factory scripts and scripts directories. 3. Connect the Dock Server machine to the Internet (refer to section 1.2). 4. Log on as “root” from the Dock Server machine’s “boot up” window (i.e., do not open a terminal window and log on as root from within a user account) When prompted, enter the root password. Refer to Appendix D for the root password. 5. Open a terminal window by selecting Applications / System Tools / Terminal from the menu bar. 6. At the terminal window prompt, enter the following command. #gmcswitchto nojava <old release number> where <old release number> is the rollback Dock Server release number. For example, to rollback to release 6.32, enter the following command. #gmcswitchto nojava 6.32 7. Once the rollback has completed, close the terminal window by entering “exit” followed by the enter key and log off as user “root”. 8. Restart the Dock Server and, if applicable, Data Server applications (refer to sections 2.1 and 7.1 respectively) and check that the rollback release is running (refer to appendix A.1). Start Glider Terminal, GLMPC Terminal, and Data Visualizer (from the Dock Server web page or otherwise) on each client machine to initiate a client tool rollback. All available Dock Server releases for roll back purposes can be seen by browsing to the following URL using a Web browser. ftp://dockserverrpmrepositories.webbresearch.com/glider/rpmrepository Page 41 of 228...
-
Page 42: Uninstalling A Dock Server Release
Revision 7.10 2/28/2012 2.11 Uninstalling a Dock Server Release Dock Server versions 6.31 and later can be uninstalled from a dock server machine. The uninstall process does not remove files in the gliders folder or any of its subfolders, GLMPC maps, or Dock Server scripts stored in the user script folder. To uninstall Dock Server, follow these steps. 1. Move any Dock Server scripts in the factoryscripts directory that you have modified or that you use in operations to the scripts directory. Uninstalling Dock Server will remove the factoryscripts folder. Refer to section 3.8.1 for appropriate use of the factoryscripts and scripts directories. 2. Log on as user “root”. Refer to Appendix D for the root password. 3. Open a terminal window by selecting Applications / System Tools / Terminal from the menu bar. 4. At the terminal window prompt, enter the following three commands. Type the enter key after each command. #gmcexpunge #yum erase gmcoutofbandtools 5. Once the uninstall has completed, close the terminal window by entering “exit” followed by the enter key. 2.12 Installing a Dock Server Release for the First Time This section details installing the latest release of Dock Server on a new machine. To install Dock Server for the first time, follow these steps. 1. If upgrading from CD media, insert the Dock Server install CD and skip to step 4. If access to TeledyneWebb Research’s glider server has not been requested, please contact TeledyneWebb Research for access. 2. Connect the Dock Server to the Internet (refer to section 1.2). 3. Log on as user “root”. Refer to Appendix D for the root password. Page 42 of 228... - Page 43 Revision 7.10 2/28/2012 4. If upgrading from TeledyneWebb Research's application repository, browse to the URL ftp://dockserverrpmrepositories.webbresearch.com/glider/rpmrepository. Right click on the file “gmc.repo” and select “Save Link As…” Using the SaveAs dialog, save gmc.repo in the folder /etc/yum.repos.d. If upgrading from CD media, copy the file gmc.repo from the CD's rpmrepository folder to the folder /etc/yum.repos.d. 5. Open a terminal window by selecting Applications / System Tools / Terminal from the menu bar. 6. If upgrading from TeledyneWebb Research's application repository, enter the following commands at the terminal window prompt. Type the enter key after each command. #yum disablerepo=* enablerepo=GMC install gmcoutofbandtools #gmcinstall nojava production If upgrading from CD media, enter the following commands at the terminal window prompt. Type the enter key after each command. #yum disablerepo=* enablerepo=GMCmediacd install gmcoutofbandtools #gmcinstall nojava production 7. Once the installs have completed, close the terminal window by entering “exit” followed by the enter key. Page 43 of 228...
-
Page 44: Getting Started With The Glider Terminal Application
Revision 7.10 2/28/2012 3. Getting Started with the Glider Terminal Application The Glider Terminal application allows a user to interact with gliders that are monitored by the Dock Server application. Glider Terminal can run on any machine that is networked to a Dock Server machine and has Java JRE 1.4.2 or later and Java Web Start (typically part of the JRE) installed. 3.1 Installing Glider Terminal For a first time install of Glider Terminal, follow the steps in this section. After the initial install, Glider Terminal upgrades are automatically distributed after a Dock Server upgrade. 1. Open a web browser and browse to the URL dock.webb.com where your Dock Server’s fully qualified domain name would replace dock.webb.com. NOTE: It can take from a few minutes to a few days for the Dock Server’s fully qualified domain name to be known across the internet. If the browser cannot find the Dock Server, then use the Dock Server’s IP address in place of its fully qualified domain name. For example, if 192.168.0.100 is Dock Server’s IP address, then enter “192.168.0.100” in the browser. 2. Click on the link labeled “Click here to install and run Glider Terminal”. The following dialog should appear with your Dock Server domain name. Figure 31. Java Web Start Glider Terminal Install Dialog. Page 44 of 228... - Page 45 Revision 7.10 2/28/2012 3. After a few seconds to a few minutes, the following dialog should appear. Click the “Start” button. Figure 32. Web Start Security Warning Dialog. 4. When the following dialog appears, click the “Yes” button to add a Glider Terminal to your desktop or configure as you like. Figure 33. Web Start Desktop Integration Dialog. Once added to your desktop, the Glider Terminal application launches and its main window appears. Page 45 of 228...
-
Page 46: Starting Glider Terminal
Revision 7.10 2/28/2012 Figure 37. Expanded Dock Server Node showing managed gliders. Figure 34. Glider Terminal Main Window. 3.2 Starting Glider Terminal To launch Glider Terminal after an initial install, follow the steps in this section. Page 46 of 228... -
Page 47: Stopping Glider Terminal
Revision 7.10 2/28/2012 Double click the desktop icon labeled “Glider Terminal” or select the item labeled “Glider Terminal” from the “All Programs” menu (Windows XP). The Glider Terminal window should appear (Figure 34). NOTE: Each time Glider Terminal is launched, the Dock Server machine of the initial Glider Terminal install is checked for a new version of Glider Terminal. If a new version is found, it is installed and launched. During this time you may see the dialog shown in Figure 31. A new version of Glider Terminal is placed on the Dock Server machine each time the Dock Server application is upgraded. 3.3 Stopping Glider Terminal To stop Glider Terminal, follow the steps in this section. Select File/Exit from Glider Terminal’s menu bar or click the window’s close button in the upper right corner (red with a white X). The Glider Terminal window will close. 3.4 Browsing a Dock Server To view and control gliders managed by a Dock Server, follow these steps. In the GMC Site field, enter the fully qualified domain name of the Dock Server machine you wish to browse. For example, Figure 35 shows a Glider Terminal window with expose.dinkumsoftware.com entered in the GMC Site field. After the name is entered and the return key pressed, the Dock Server shows up in the glider tree (Figure Figure 35. GMC Site Field. 36). In place of a fully qualified domain name, a Dock Server machine IP address can be entered in the GMC Site field. For example, entering 192.168.1.100 followed Dock Server node Page 47 of 228 Figure 36. Dock Server in glider tree and connected. -
Page 48: Glider Terminal Perspectives
Revision 7.10 2/28/2012 by the return key would browse Glider Terminal to a Dock Server machine with that IP address. When browsing a Dock Server, the default TCP/IP socket 6564 is used. To specify a particular TCP/IP socket number, add a colon followed by the desired fourdigit socket number to the domain name or IP address entered in the GMC Site field. For example, entering 192.168.1.100:4321 would browse the Dock Server machine 192.168.1.100 on socket 4321. Note that for sockets other than the default, the browsed Dock Server must be configured to listen for Glider Terminal requests on that socket (refer to section 2.7). If Glider Terminal successfully connects to the entered Dock Server, the server’s icon in the glider tree appears green. A red icon means the Dock Server machine was not found on the network. Managed Glider node To browse additional Dock Servers, enter their domain name in the GMC site field. (three total) They will appear as Dock Server nodes under the node labeled Docks. If a malformed expression is accidentally entered in the GMC Site field (such as expose.dinkumsoftware.com:656B) and the return key pressed, the GMC Site field will turn yellow and display the text “Malformed IP address:” followed by the expression. Also, no Dock Server using the expression will be added to the glider tree. Correcting the malformed expression in the GMC Site field and pressing the return key will return the field to its original white background, as well as add the Dock Server to the glider tree. To stop browsing a Dock Server, right click its Dock Server node and select remove from the popup menu. 2. To browse the gliders managed by a Dock Server, click on the lollipop icon to the left of the Dock Server node in the glider tree. Figure 37 shows an expanded Dock Server after clicking its lollipop icon. 3.5 Glider Terminal Perspectives Glider Terminal’s user interface supports two user interfaces for interacting with gliders connected to a serial port managed by Dock Server. First, the glider perspective is a view that assumes devices attached to serial ports are Webb Research’s Slocum gliders. This assumption allows Glider Terminal and Dock Server to provide glider specific features like scripts for autonomous glider operations, email notifications of Page 48 of 228... - Page 49 Revision 7.10 2/28/2012 glider events, and automatic handling of glider data files (SBD, DBD, MLG, etc…). Upon launch, Glider Terminal shows this perspective. Chapter 4, How to Use Glider Terminal’s Glider Perspective, details this perspective’s use. Second, the serial port perspective makes no assumptions about the devices connected to serial ports. This perspective is analogous to terminal emulator programs like ProComm, HyperTerminal and Minicom. The serial port perspective allows Glider Terminal users to communicate with any serial device across a local network or the Internet. This perspective is useful for communicating with serial devices embedded in a glider e.g., the Iridium phone or the GPS unit. Chapter 5, How to Use Glider Terminal’s Serial Port perspective, explains this perspective’s use. While Glider Terminal shows only one perspective at any time, user’s can switch between the glider and serial port perspectives at will. Page 49 of 228...
-
Page 50: How To Use Glider Terminal's Glider Perspective
Revision 7.10 2/28/2012 4. How to Use Glider Terminal’s Glider Perspective The glider perspective is Glider Terminal’s primary user interface to gliders. This interface treats devices connected to Dock Server’s serial ports as if they are Webb Research Slocum gliders. This assumption allows Glider Terminal and Dock Server to provide glider specific features like scripts for autonomous glider control, email notifications of glider events, and automatic handling of glider related files (SBD, DBD, MLG, etc…). Glider Terminal shows this perspective upon launching. The user can switch to this perspective at any time by clicking the glider perspective button shown in figure 41. The following sections detail the glider perspective’s user interface and features. Glider Perspective Button Figure 41. Glider Perspective Button. 4.1 Interacting with a Glider To view glider character output and send commands to the glider, follow the steps in this section. 1. Click the glider perspective button to show that perspective. If not connected to a Dock Server, follow the steps in section 3.4 Browsing a Dock Server to show gliders in the glider tree. 2. Pick a glider and click on its glider tree node. This action opens a glider tab that displays characters received from the glider and allows users to send commands to the glider. For example, figure 42 shows Glider Terminal after clicking on the sim012 node in the glider tree. A glider tab labeled sim012 opens and shows a single channel tab. Channel tabs represent physical communication lines between the Dock Server and the glider. They automatically open as physical communication lines are established. A channel Page 50 of 228... - Page 51 Revision 7.10 2/28/2012 tab’s label describes the physical line. For the tab shown, sim012 is communicating by freewave on serial port /dev/ttyG0_04. If sim012 had been communicating by iridium as well as freewave, a second channel tab would open to show iridium traffic. A green icon next to a glider indicates it is in communication with the Dock Server. Red indicates the glider is not in communication with the Dock Server and yellow indicates no network communication between the Glider Terminal and Dock Server. In addition to visual glider status cues, Glider Terminal sounds audio alarms when a glider surfaces and when a glider aborts a mission (refer to section 4.9 for audio alarm details). Glider Tab for glider sim012 Channel Tab showing freewave communications Glider output shown in upper pane. Glider commands entered in lower pane. Figure 42. Glider and Channel Tabs for sim012. 3. Enter glider commands followed by the enter key in the lower pane of a channel tab. Commands can be entered only in a channel tab whose label has a green icon. Page 51 of 228...
- Page 52 Revision 7.10 2/28/2012 A channel tab’s upper pane shows glider output over that physical line. Commands sent to a glider are entered in the tab’s lower pane. To send commands over a particular physical line, click on that line’s channel tab and then enter commands in the tab’s lower pane. The following key strokes effect the text shown in channel tabs. These keys also control scroll lock in the glider output pane. When text other than the latest output pane’s worth is shown, scroll lock is automatically turned on. When the latest pane’s worth is shown, scroll lock is turned off. A red scroll bar indicates that scroll lock is on; a grey scroll bar indicates scroll lock is off. Up Arrow Scrolls the displayed text to show the line of text before the current line. If the previous line is already visible, no scrolling occurs. Down Arrow Scrolls the displayed text to show the line of text after the current line. If the subsequent line is already visible, no scrolling occurs. Page Up Scrolls the displayed text to show a pane’s worth of text before the currently visible text. Page Down Scrolls the displayed text to show a pane’s worth of text after the currently visible text. Altu Clear all text (shown and not shown) from the channel tab’s output pane. Scrolls the channel tab’s output pane to show the latest glider output. CtrlC If text is selected in the glider output or glider input panes, then copy that text to the system clipboard. If no text is selected and the glider input pane has focus, then send a CtrlC to the glider. CtrlV If the glider input pane has focus, then paste the contents of the system clipboard to the glider input pane. Altq If the glider input pane has focus, then recall the previous glider command from the command history. Each Altq moves 'back' in the command history. Page 52 of 228...
-
Page 53: Sending Files To A Glider
Revision 7.10 2/28/2012 Alta If the glider input pane has focus, then recall the next glider command from the command history. Each Alta move 'forward' in the command history. 4.2 Sending Files to a Glider To send mission files (mi), mission argument files (ma), or other files to a glider, follow the steps in this section. 1. Transfer the files to the destination glider’s “toglider” directory on the Dock Server machine. For example, to send the mission file lastgasp.mi to glider simbond, transfer the file to the directory /var/opt/gmc/gliders/simbond/toglider on the Dock Server machine that manages simbond. Any transfer method can be used. Webb supplies the application gmcFTP (section 7.0); however, any FTP client can be used. When using a method other than gmcFTP, use the username “dockserveruser” and password “dockserveruser”. 2. On the destination glider’s channel tab within Glider Terminal, enter the appropriate “dockzr” command followed by the enter key. Figure 43 continues the example, to send lastgasp.mi to simbond, enter the following command: dockzr lastgasp.mi This command transfers lastgasp.mi to simbond using the zModem protocol. Once successfully transferred, the file is deleted from simbond’s “toglider” directory. Page 53 of 228... -
Page 54: Receiving Files From A Glider
Revision 7.10 2/28/2012 simbond’s channel tab freewave connection via serial port /dev/ttyUSB0 Enter dockzr command Figure 43. Transferring files from the Dock Server machine to a glider. The dockzr command can transfer files from any directory on the Dock Server machine and can leave the transferred files on the Dock Server machine. Refer to section 4.6 for a complete description of dockzr command’s features. Once a zModem file transfer between the glider and Dock Server machine starts, it can be canceled by entering the “zcancel” command from the glider perspective. 4.3 Receiving Files from a Glider To transfer files from a glider to a specific machine, follow the steps in this section. 1. On the source glider’s channel tab within the glider perspective, enter the appropriate file transfer command (i.e., “s” from a surface dialog; “send” from GliderDOS; “zs” from PicoDOS). For example, to transfer SBD data files from simbond at a GliderDOS prompt to the Dock Server machine, enter the following command in simbond’s channel tab followed by the enter key. Page 54 of 228... - Page 55 Revision 7.10 2/28/2012 send *.sbd This command transfers up to the latest 30 SBD files from the glider to the directory /var/ opt/gmc/gliders/simbond/fromglider on the Dock Server machine. See figure 44. NOTE: The “send” command can only transfer files located in “\logs” on the glider to the Dock Server machine. Use the “zs” command at a GliderDOS prompt to transfer files located in other directories on the glider to the Dock Server machine. At a PicoDOS prompt, you must specify the complete pathname of the file to transfer when using the “zs” command. Files transferred to Dock Server Enter send *.sbd command Figure 44. Transferring files from a glider to the Dock Server machine. 2. Transfer the files from the glider’s “fromglider” directory on the Dock Server machine to the desired destination machine. For example, to move simbond’s SBD files from the Dock Server machine to another machine, the Webb application gmcFTP (section 7.0) can be used. Any file transfer Page 55 of 228...
-
Page 56: Controlling Dock Server Scripts
Revision 7.10 2/28/2012 method or FTP client can be used. When using a method other than gmcFTP, use the username “dockserveruser” and password “dockserveruser”. 4.4 Controlling Dock Server Scripts Dock Server scripts allow gliders to be controlled from a Dock Server machine without human attendance. To manipulate a Dock Server script, follow the steps in this section. To author a Dock Server script, please refer to Appendix C. Scripts represent sequences of gliderDOS and picoDOS commands. A user selects the glider to receive a script’s commands by activating that glider’s tab (i.e., opening that glider’s tab or clicking on it) and then manipulating the script control buttons. Figure 45 shows the script control buttons in the glider perspective. Each glider has a script queue where scripts added by the user await execution. Scripts in the queue are executed in order of their priority. The user can add scripts to this queue, remove them from the queue, pause the entire queue, and resume the queue. The running script , its current state, and its priority appear in the field illustrated. As different glider tabs are activated, the script control buttons and script field change to reflect the corresponding glider’s script queue status. Script queue control buttons Script status field Active glider tab Figure 45. Dock Server script controls. 4.4.1 Adding a Script to a Glider's Script Queue To add a Dock Server script to the script queue, follow these steps. Activate the appropriate glider tab and click the addscript button in the script queue control area. Script type tabs Page 56 of 228... -
Page 57: Remove A Script From A Glider's Script Queue
Revision 7.10 2/28/2012 2. From the Add Script dialog (figure 46), click the tab corresponding to the type of script, User or Factory. User scripts are stored on the Dock Server machine in the directory /var/opt/gmc/scripts. All scripts used and created by customers should be stored in this directory. Selected script Factory scripts are stored on the Dock Server machine in the directory /opt/gmc/factory scripts. This directory contains TeledyneWebb supplied scripts that are installed when the Dock Server application is installed or Figure 4-6. Add Script Dialog. upgraded. This directory’s contents can change with each Dock Server upgrade. Customers should not store scripts in this directory that they wish to keep. Select the script to add from the tab’s list and its priority from the pulldown list. A script's priority determines its order in the script queue. Higher priority scripts are executed before lower priority scripts. Enter any script arguments in the text box adjacient to priority selection. Arguments are space delimited. If an argument contains a space, then choose a delimiting character that does not appear in the argument and insert it immediately before and after the argument. Click the Open button to insert the script in the script queue. Dock Server will execute the script when its priority becomes the highest in the script queue. To cancel adding a script, click the Cancel button. Figure 46 shows the factory script “allfilesToDock.xml” being added. 4.4.2 Remove a Script from a Glider's Script Queue To remove a script from the Dock Server script queue, follow these steps. 1. Activate the appropriate glider tab and click the remove script button in the scripts control area. This action removes the script from the script queue. Dock Server will start the next script in the queue. 4.4.3 Pausing a Glider's Script Queue To pause a selected glider's script queue (and thus pause all scripts), follow these steps. Page 57 of 228... -
Page 58: Resuming A Glider's Script Queue
Revision 7.10 2/28/2012 1. Activate the appropriate glider tab and click the pause queue button in the scripts control area. The script status field’s outline turns yellow indicating that the script queue is suspended. Suspending a glider's script queue while a glider is communicating with the Dock Server allows a user to enter one time glider commands and then resume the queue. 4.4.4 Resuming a Glider's Script Queue To resume a selected glider's script queue, follow these steps. 1. Activate the appropriate glider tab and click on the resume queue button in the scripts control area. The script status field’s outline changes from yellow to green. 4.5 Receiving Glider Email The Dock Server machine can notify users by email that specific glider events have occurred. These events include establishing communications with the Dock Server machine and aborting a glider mission. Users can subscribe to event notification for a specific glider by activating that glider’s tab (i.e., opening that glider’s tab or clicking on it) and then clicking the email subscriber button. To receive glider event notifications by email, follow these steps. 1. Activate the appropriate glider tab and click the Email subscriber button email subscriber button. Figure 47 shows the email button in the glider perspective. 2. From the subscriber email pull down box in the Figure 47. Email subscriber button Event Notifications Subscriptions dialog, select button. the Subscriber email to receive glider event notifications (Figure 48). If the desired subscriber email address does not appear among the selections, then click the Add Subscriber button, enter the subscriber’s email, and click the OK button. Now select the desired email address from the pull down box. Page 58 of 228... - Page 59 Revision 7.10 2/28/2012 Subscriber email pull down box Click to add subscribers Check notifications to receive by email Figure 48. Event Notification Subscriptions Dialog. 3. Check the notifications to receive by email. The “Glider ABORT” notification is emailed when a glider contacts Dock Server after aborting a mission. The “Glider connects to dock server” notification is emailed each time a glider contacts the Dock Server. This notification can be used to signal when a glider surfaces during a mission. To stop receiving a specific event notification, uncheck it in the Event Notification Subscriptions dialog. To delete a subscriber’s email address, select the subscriber to delete from the Subscriber email pull down box and then click the Delete Subscriber button. The Dock Server machine’s email system is factory configured to allow the Dock Server application to send email notifications. No user configurations are required. If expected Dock Server application emails are not received, follow these steps to verify that email is working independent of the application. 1. Log on to the Dock Server machine as user “localuser”. The factory delivered password for this account is “WideOpen” (see Appendix D). 2. Open a shell window on the Dock Server machine by right clicking on the desktop’s background and selecting “Open Terminal” from the popup menu. Start an email by Page 59 of 228...
-
Page 60: Advanced File Transfer To A Glider - Dockzr Command
Revision 7.10 2/28/2012 entering the following shell command where <to address> is replaced by a user’s email address. mail <to address> 3. At the “Subject:” prompt, enter the email’s subject line followed by a return key. 4. Enter a controlD. 5. At the “Cc:” prompt, enter the return key. The mail application terminates and a shell prompt appears. 6. Log on as user “root” by entering the following shell command. Refer to Appendix D for the factory delivered root password. 7. Examine the “maillog” file by entering the following shell command. less /var/log/maillog 8. Move to the end of the maillog file by entering the “End” key. If a log entry appears showing that the email authored in step 2 was accepted for delivery, then the email system is working. Thus, the Dock Server Application is failing to send the expected glider notification email. Verify that the steps to receive glider email event notifications have been followed (refer to the beginning of this section). After verification, if email problems persist, then report them to glidersupport@webbresearch.com. 9. When finished viewing maillog, enter a “q” to return to a shell prompt. Enter an “exit” to end the session as user root. Finally, enter a second “exit” to close the shell window. 4.6 Advanced File Transfer to a Glider – dockzr Command This section details the dockzr command features. This command transfers files from the Dock Server machine to a glider using the zmodem protocol. The dockzr command syntax follows. Page 60 of 228... - Page 61 Revision 7.10 2/28/2012 dockzr [?][v N][nosmartdir][f rf | irid][cd dir][noremove] [d <path1>] <file11> <file12> ... <file1N> [[d <path2> <file21> <file22> ... <file2N>] ... ] This command is a superset of the gliderDOS "zr" command. However, it is not a gliderDOS or picoDOS command; it can only be used from Glider Terminal’s glider perspective. This command is entered in a glider’s channel tab input console pane. The <fileNN> items represent only the filename with its extension; no path prefix is allowed. The wildcard characters “?” and “*” may appear in filenames. The “?” matches any single character in the filename’s corresponding position. The “*” matches any number of contiguous characters in a filename. By default, a Dock Server looks for the indicated files in the glider's toglider directory. The user may specify other directories using the "d <path>" option. All <fileNN> items appearing after a d option are presumed to be located in the directory specified by the most recently preceding d option. Multiple d options can appear on one command line. By default, files moved to a glider using the dockzr command are deleted from the local file system after transfer. To override this behavior, use the noremove option. Dock Server translates the entered dockzr command into a gliderDOS “zr” command which is sent to the glider. Any zr command options may be specified in the dockzr command. Such options are sent with the zr command to the glider. Examples follow (assume the commands are entered into glider sim012’s channel tab). 1. dockzr ashumet.mi Transfers the file ashumet.mi from Dock Server machine directory /var/opt/gmc/gliders/sim012/toglider to sim012. After transfer, ashumet.mi is deleted from sim012’s toglider directory. 2. dockzr –noremove ashumet.mi Transfers the file ashumet.mi from Dock Server machine directory /var/opt/gmc/gliders/sim012/toglider to sim012. After transfer, ashumet.mi is NOT deleted from sim012’s toglider directory. Page 61 of 228...
-
Page 62: Menu Bar Functions
Revision 7.10 2/28/2012 3. dockzr *.ma Transfers ALL files with the “ma” extension from Dock Server machine directory /var/opt/gmc/gliders/sim012/toglider to sim012. After transfer, ALL files with the “ma” extension are deleted from sim012’s toglider directory. 4. dockzr –d /home/rtrout/myMissions world.mi si_world.mi world_10.ma Transfers the files world.mi, si_world.mi, and world_10.ma from the Dock Server machine directory /home/rtrout/myMissions to sim012. After transfer, these three files are deleted. 5. dockzr –v 35 –f irid –noremove ashumet.mi Sets the zmodem verbosity to 35 on the glider and forces the glider to use the iridium channel for file transfer. Transfers the file ashumet.mi from the Dock Server machine directory /var/opt/gmc/gliders/sim012/toglider to sim012. After transfer, ashument.mi is NOT deleted from sim012’s toglider directory. 4.7 Menu Bar Functions This section describes Glider Terminal’s menu bar functionality. 4.7.1 File Menu This section details the menu items on the File menu. Exit Terminates the Glider Terminal application. 4.7.2 Edit Menu This section details the menu items on the Edit menu. Find Opens the Find dialog (see figure 49). This dialog facilitates searching the glider output in the active channel tab for the desired text. Page 62 of 228... -
Page 63: View Menu
Revision 7.10 2/28/2012 Figure 49. The Find Dialog. Select All Selects all text in the active channel tab. To select specific text in the active channel tab, click and drag the mouse over the desired text. CtrlC copies the selected text to the system clipboard. Preferences Opens glider terminal's Preferences dialog window. This dialog allows users to configure glider terminal's features like default audio alarms. 4.7.3 View Menu This section details the menu items on the View menu. Last Mission Status Open a view that shows the latest glider mission status taken from the glider's dialog (see figure 410). This view shows the last known running mission, its mission number, and reason for surfacing. This information is time stamped with UTC and mission time. Clicking the close button in the view's upper righthand corner, hides the view. Note that this view is only available in glider perspective. Page 63 of 228... -
Page 64: Popup Menu Functions
Revision 7.10 2/28/2012 Select “Last Mission Status” to open the Last Mission Status View. Last Mission Click to close Last Status View Mission Status View Figure 411. The last mission status view in glider perspective. 4.8 Popup Menu Functions This section describes glider perspective’s popup menu functionality. The various glider perspective popup menus are activated by hovering the mouse over a specific portion of the user interface and rightclicking. The displayed menu shows actions that can be performed on the object under the mouse pointer. The following sections detail the items appearing in each glider perspective popup menu. 4.8.1 Dock Server Popup Menu Hovering over a Dock Server node in the glider tree and rightclicking the mouse activates the Dock Server popup menu. Items selected from this menu only apply to the Dock Server under the mouse pointer at the time the menu is activated. Synchronize Forces Glider Terminal to synchronize its displayed gliders with those managed by the Dock Server under the mouse pointer. Thus, gliders no longer managed by this Dock Server are removed from the user interface and newly managed gliders appear in the glider tree. Page 64 of 228... -
Page 65: Glider Popup Menu
Revision 7.10 2/28/2012 Note that Dock Server does notify all Glider Terminal clients when its managed glider list changes. Thus, a Dock Server’s managed gliders and those displayed in Glider Terminal should always be synchronized without using this menu item. Remove Terminates all network connections to the Dock Server under the mouse pointer, closes all glider tabs associated with this Dock Server, and removes the Dock Server’s node from the glider tree. Upon subsequent startups, Glider Terminal will not automatically reconnect to this Dock Server. 4.8.2 Glider Popup Menu Hovering over a glider node in the glider tree and rightclicking the mouse activates the glider popup menu. Items selected from this menu only apply to the glider under the mouse pointer at the time the menu is activated. Open Opens the glider tab associated with the glider under the mouse pointer. This action shows subsequent glider output in a channel tab(s) on this glider tab and allows the user to issue glider commands. Close Closes the glider tab associated with the glider under the mouse pointer. Properties Opens the property dialog window for the glider under the mouse pointer. This dialog allows users to configure glider specific properties like audio alarms. 4.8.3 Channel Tab Popup Menu Hovering over the glider output pane of a channel tab and rightclicking the mouse activates the channel tab popup menu. Items selected from this menu only apply to the active channel tab. Select All Selects all text in the glider console output pane of the active channel tab. Now, using controlC to copy and controlV to paste, a user can copy the glider output to another application. Page 65 of 228... -
Page 66: Audio Alarms
Revision 7.10 2/28/2012 Close Closes the channel tab under the mouse pointer. A user can not explicitly open a channel tab. Glider Terminal automatically opens a channel tab when it receives glider output on a channel. Glider Terminal automatically closes a channel tab when the tab’s corresponding glider is no long managed by its Dock Server. 4.9 Audio Alarms Glider Terminal sounds audio alarms when particular events occur. Currently, these events include when a glider surfaces and when a glider aborts a mission. By default, a ship’s bell is sounded when a glider surfaces and a klaxon is sounded when a glider aborts a mission. For the purpose of audio alarms, Glider Terminal sounds a glider surface event when one of the following situations occurs: A) Dock Server has determined that a glider is at the surface at the time Glider Terminal is launched. Sounding the alarm in this case gives the user immediate audio cues that gliders are currently in communication with the Dock Server. A glider may actually have been at the surface for some time. Note that Dock Server determines a glider is at the surface when it knows the glider’s name or has labeled it as the “unknown” glider (refer to section 11.4 How Does Dock Server Recognize a Glider). B) Dock Server recognizes a glider is at the surface while Glider Terminal is running. Glider Terminal sounds a glider abort event when the following situation occurs: A) Dock Server notifies Glider Terminal that an abort has occurred and that abort’s “last abort time” is later than the launch time of Glider Terminal. That is, Glider Terminal does NOT sound an abort alarm for any abort that occurs before Glider Terminal was last launched. Dock Server detects a glider abort by scanning received glider dialog for an “abort dialog”. An example abort dialog follows: ABORT HISTORY: total since reset: 3 ABORT HISTORY: last abort cause: MS_NOINPUT ABORT HISTORY: last abort time: 20050322T14:27:37 ABORT HISTORY: last abort segment: ann200508032 (0847.0002) ABORT HISTORY: last abort mission: GY10V001.MI Page 66 of 228... -
Page 67: Audio Alarm Configuration
Revision 7.10 2/28/2012 Note that an entire abort dialog must be seen by Dock Server before it will signal an abort. The word “abort” or “ABORT” is NOT enough to cause Dock Server to detect a glider abort. 4.9.1 Audio Alarm Configuration A user can customize Glider Terminal’s audio alarms. There are three types of audio alarms (1) factory audio alarms, (2) default audio alarms, and (3) glider audio alarms. Factory and default audio alarms are glider independent. They are triggered by events, regardless of any glider involved with the event. For example, factory audio alarms are defined for glider surface and abort events. Each time a surface event occurs, the factory surface alarm sounds (in the absence of a well configured default alarm) – regardless of which glider surfaces. Factory alarms provide a failsafe against user configured default or glider audio alarms failing to sound due to misconfiguration. For example, if a default alarm fails to sound because of a missing or corrupt sound file, the factory alarm corresponding to the same event will sound. While factory alarms cannot be changed by the user, they can be overridden by default audio alarms. Default alarms are configured by the user through the Glider Terminal Preferences dialog. Initially, this dialog shows the factory alarm configuration (see figure 411). By changing the displayed configuration, the user creates an overriding default alarm (no change is made to any factory alarm). The user can enable/disable default audio alarms and browse the file system to select a sound file for playback. Disabling a default alarm also disables the factory alarm for the same event. This action has the effect of sounding NO alarm for the selected event. To save alarm configuration changes, the user clicks the OK button. Clicking the Cancel button discards any changes made since opening the preferences dialog. Figure 411. Glider Terminal Preferences Dialog showing the Default Audio Alarms tab. Page 67 of 228... - Page 68 Revision 7.10 2/28/2012 The factory and default audio alarms sound when an event occurs – independent of any glider involved with the event. Glider audio alarms override factory and default alarms for a specific dockserver / glider / event combination. For example, a unique audio alarm could sound for glider zippy on dockserver64 when it surfaces. Figure 412 shows the glider properties dialog. The “Enable” checkbox enables/disables the triggering of a glider audio alarm. If the “Use Default” checkbox is checked, the default alarm corresponding to this glider alarm's event is triggered in place of this glider alarm (even if the glider alarm is enabled). For example, the glider alarm configuration shown in figure 412 will trigger the default audio alarm when zippy on dockserver64 surfaces. Figure 412. Glider Properties Dialog showing Audio Alarms tab for glider zippy on dockserver64. For a glider audio alarm (and not its corresponding default alarm) to trigger, the “Use Default” checkbox must be unchecked and the “Enable” checkbox must be checked. To disable all alarms from triggering for a specific dockserver / glider / event combination, the “Use Default” and “Enable” checkboxes must be unchecked. To save glider alarm configuration changes, the user clicks the OK button. Clicking the Cancel button discards any changes made since opening the glider properties dialog. Page 68 of 228...
-
Page 69: How To Use Glider Terminal's Serial Port Perspective
Revision 7.10 2/28/2012 5. How to Use Glider Terminal’s Serial Port Perspective Glider Terminal’s serial port perspective allows a user to communicate over the Internet with any device connected to a Dock Server serial port. This perspective does not assume the connected device is a Slocum glider. The serial port perspective behaves like a terminal emulator (i.e., a ProComm, a Hyperterminal, or a Minicom). It displays characters received from a serial port as they are received and sends characters to the serial port as they are entered. In addition, this perspective displays the status of each serial port (e.g., CD, RI, DTR, RTS, etc…). If Dock Server knows a Slocum glider is attached to a serial port, the serial port perspective will show the glider’s name with its corresponding port name. However, no glider specific features are available through this perspective. To display Glider Terminal’s serial port perspective, click the button shown in Figure 51. Serial Port Perspective Button Figure 51. Serial Port Perspective Button. 5.1 Interacting with a Serial Port Device To view data from a serial port device, follow these steps. 1. Click the serial port perspective button to show that perspective. If not connected to a Dock Server, follow the steps in section 3.4 Browsing a Dock Server to show serial ports in the serial port tree. Figure 52 shows the serial port perspective with open serial port tabs. 2. Click a Dock Server node’s lollipop icon to open it and show its managed serial ports. Page 69 of 228... - Page 70 Revision 7.10 2/28/2012 3. Pick the desired serial port and click on its serial port tree node. This action opens a serial port tab that displays characters received from this port and allows users to enter characters to send. 4. Click in the serial port tab’s text area and enter characters to send to the serial device. Serial Port Tab for / dev/ttyUSB0 Text area for serial data Serial Port Node output and input. Carrier Detect indicator Serial port status and configuration. Figure 52. Serial Port Perspective showing the tab for /dev/ttyUSB0. A serial port’s status and configuration is shown in the serial port tree and along the bottom of its tab. The icon next to a serial port node represents that port's carrier detect line. Green icons indicate a “line high” or active status; red icons indicate a “line low” or inactive status. If the serial port node's text appears black, it was successfully opened on the Dock Server; red text indicates the serial port failed to open. If Dock Server knows that a specific glider is attached to a serial port, the serial port perspective displays that glider’s name following the port’s name in the serial port tree and in the port’s tab title. Otherwise, “unknown” is displayed. That is, Dock Server Page 70 of 228...
-
Page 71: Menu Bar Functions
Revision 7.10 2/28/2012 doesn’t know if the serial device is a glider, or if it is a glider, Dock Server doesn’t know its name. The following key strokes effect the text shown in serial port tabs. These keys also control scroll lock in the serial port text area. When text other than the latest data pane’s worth is shown, scroll lock is automatically turned on. When the latest pane’s worth is shown, scroll lock is turned off. A red scroll bar indicates that scroll lock is on; a grey scroll bar indicates scroll lock is off. Up Arrow Scrolls the displayed text to show the line of text before the current line. If the previous line is already visible, no scrolling occurs. Down Arrow Scrolls the displayed text to show the line of text after the current line. If the subsequent line is already visible, no scrolling occurs. Page Up Scrolls the displayed text to show a pane’s worth of text before the currently visible text. Page Down Scrolls the displayed text to show a pane’s worth of text after the currently visible text. Altu Clear all text (shown and not shown) from the serial port tab’s test area. Scrolls the serial port tab’s text area to show the latest serial port data. CtrlC If text is selected in the serial port tab, then copy that text to the system clipboard. If no text is selected and the serial port tab has focus, then send a CtrlC to the glider. CtrlV If the serial port tab has focus, then paste the contents of the system clipboard to the serial port tab. 5.2 Menu Bar Functions This section describes Glider Terminal’s menu bar functionality. Page 71 of 228... -
Page 72: File Menu
Revision 7.10 2/28/2012 5.2.1 File Menu This section details the menu items on the File menu. Exit Terminates the Glider Terminal application. 5.2.2 Edit Menu This section details the menu items on the Edit menu. Find Opens the Find dialog (see figure 410). This dialog facilitates searching serial port data displayed in the active serial port tab for the desired text. Figure 410. The Find Dialog. Select All Selects all text in the active serial port tab. To select specific text in the active serial port tab, click and drag the mouse over the desired text. Selecting Copy from the text area’s popup menu, copies the selected text to the system clipboard. Note that CtrlC is sent to the serial port device and not used as a shortcut keystroke for copy. 5.3 Popup Menu Functions This section describes serial port perspective’s popup menu functionality. The various serial port perspective popup menus are activated by hovering the mouse over a specific portion of the user interface and rightclicking. The displayed menu shows actions that can be performed on the object under the mouse pointer. The following sections detail the items appearing in each serial port perspective popup menu. Page 72 of 228... -
Page 73: Dock Server Popup Menu
Revision 7.10 2/28/2012 5.3.1 Dock Server Popup Menu Hovering over a Dock Server node in the serial port tree and rightclicking the mouse activates the Dock Server popup menu. Items selected from this menu only apply to the Dock Server under the mouse pointer at the time the menu is activated. Synchronize Forces Glider Terminal to synchronize its displayed serial ports with those managed by the Dock Server under the mouse pointer. Thus, serial ports no longer managed by this Dock Server are removed from the user interface and newly managed serial ports appear in the serial port tree. Note that Dock Server does notify all Glider Terminal clients when its managed serial port list changes. Thus, a Dock Server’s managed serial ports and those displayed in Glider Terminal should always be synchronized without using this menu item. Remove Terminates all network connections to the Dock Server under the mouse pointer, closes all glider and tags and serial port tabs associated with this Dock Server, and removes the Dock Server’s node from the glider tree and serial port tree. Upon subsequent startups, Glider Terminal will not automatically reconnect to this Dock Server. 5.3.2 Serial Port Popup Menu Hovering over a serial port node in the serial port tree and rightclicking the mouse activates the serial port popup menu. Items selected from this menu only apply to the serial port under the mouse pointer at the time the menu is activated. Open Opens the serial port tab associated with the serial port under the mouse pointer. This action shows subsequent serial port data in a serial port tab and allows the user to view received serial data and to send entered characters to the serial port. Once the tab is open, it corresponding receiving data indicator in the serial port tree (see Figure 52) will turn green when data is actively received from the serial port. Note that this indicator functions only when its corresponding serial port tab is open. Page 73 of 228... -
Page 74: Serial Port Tab Popup Menu
Revision 7.10 2/28/2012 Close Closes the serial port tab associated with the serial port under the mouse pointer. 5.3.3 Serial Port Tab Popup Menu Hovering over the serial port text area of a serial port tab and rightclicking the mouse activates the serial port tab popup menu. Items selected form this menu only apply to the active serial port tab. Select All Selects all text in the text area of the active serial port tab. Now, using controlC to copy and controlV to paste, a user can copy the glider output to another application. Copy Copies selected text in the serial port tab to the system clipboard. Note that CtrlC is sent to the serial port device and not used as a shortcut keystroke for copy. Page 74 of 228... -
Page 75: How To Use The Glmpc Terminal Application
Revision 7.10 2/28/2012 6. How to use the Glmpc Terminal Application The Glider Mission Planning and Control (GLMPC) application provides a graphical interface for a user to interact with gliders that are monitored by the Dock Server. For example, to instruct a glider to follow a sequence of waypoints, the user can apply mouseclicks to a map showing the geographical area occupied by the glider. Also, information such as last known glider positions can be displayed on the map, and updated when the glider hits a waypoint on the surface. Glmpc Terminal can run on any machine that is networked to a Dock Server machine and has Java JRE 1.4.2 or later and Java Web Start (typically part of the JRE) installed. 6.1 Installing Glmpc Terminal For a first time install of Glmpc Terminal, follow the steps in this section. After the initial install, Glmpc Terminal upgrades are automatically distributed after a Dock Server upgrade. 1. Open a web browser and browse to the URL www.webbResearch.com where your Dock Server’s fully qualified domain name would replace www.webbResearch.com. NOTE: It can take from a few minutes to a few days for the Dock Server’s fully qualified domain name to be known across the internet. If the browser cannot find the Dock Server, then use the Dock Server’s IP address in place of its fully qualified domain name. For example, if 192.168.0.100 is Dock Server’s IP address, then enter “192.168.0.100” in the browser. 2. Click on the link labeled “Click here to install and run Glmpc Terminal”. The following dialog should appear with your Dock Server domain name. Page 75 of 228... - Page 76 Revision 7.10 2/28/2012 Figure 61. Java Web Start Glmpc Terminal Install Dialog 3. After a few seconds to a few minutes, the following dialog should appear. Click the “Start” button. Figure 62. Web Start Security Warning Dialog. 4. When the following dialog appears, click the “Yes” button to add a Glmpc Terminal to your desktop or configure as you like. Page 76 of 228...
-
Page 77: Starting Glmpc Terminal
Revision 7.10 2/28/2012 Figure 63. Web Start Desktop Integration Dialog. Once added to your desktop, the Glmpc Terminal application launches and its main window appears (Figure 64). If the world map is not displayed, select initialworldmap from the Map combobox on the lower section of the Glmpc Terminal. 6.2 Starting Glmpc Terminal To launch Glmpc Terminal after an initial install, follow the steps in this section. 1. Double click the desktop icon labeled “Glmpc Terminal” or select the item labeled “Glmpc Terminal” from the “All Programs” menu (Windows XP). The Glmpc Terminal window should appear (Figure 64) with a world map displayed. NOTE: Each time Glmpc Terminal is launched, the Dock Server machine of the initial Glmpc Terminal install is checked for a new version of Glmpc Terminal. If a new version is found, it is installed and launched. During this time you may see the dialog shown in Figure 61. A new version of Glmpc Terminal is placed on the Dock Server machine each time the Dock Server application is upgraded. Page 77 of 228... -
Page 78: Stopping Glmpc Terminal
Revision 7.10 2/28/2012 Figure 64. Glmpc Terminal Main Window. Further Glmpc Terminals can be launched by selecting File/New from the main menu bar. Each Glmpc Terminal can then be used independently of the others, which is useful when simultaneously interacting with several gliders (possibly connected to different Dock Servers). 6.3 Stopping Glmpc Terminal To stop Glmpc Terminal, follow the steps in this section. 1. Either select File/Exit from a Glmpc Terminal’s menu bar (to close that particular terminal), or click the window’s close button in the upper right corner (red with a white X) to close all currently open Glmpc Terminals. Page 78 of 228... -
Page 79: The Glmpc Terminal User Interface
Revision 7.10 2/28/2012 6.4 The Glmpc Terminal User Interface The Glmpc Terminal user interface (shown in Figure 65) relies on the following controls and output: Menu bar items, which are used to close the system, connect to a Dock Server, load maps and define new routes (ii) Combo boxes, which are used to list Dock Servers, loaded maps, available gliders and previously saved routes (iii) Check boxes, which customize the display by showing map gridlines, bathymetry data (if available), selected glider surface positions and alternate formats for the map cursor position indicator (iv) Map cursor position indicator, which displays the latitude / longitude of the map position currently pointed to by the cursor (v) Map scroll bars, which enables map images to be larger than the display area Page 79 of 228... -
Page 80: Loading Maps
Revision 7.10 2/28/2012 Menu bar item Map scroll bar Map cursor position indicator Combo box Check box Figure 65. Glmpc Terminal User Interface controls. The following sections indicate how each of these controls and output are used to interact with gliders. 6.5 Loading Maps Maps must be loaded into the Glmpc Terminal before they can be viewed. Once loaded, a map must be selected from the Map combobox for it to become displayed. Maps can be loaded from the following sources: A central Webb Research Inc. FTP site containing predefined maps (ii) The Dock Server machine from which Glmpc Terminal was installed Page 80 of 228... - Page 81 Revision 7.10 2/28/2012 (iii) Any userspecified FTP site containing maps (iv) The Glmpc Terminal machine's local file system When a map is loaded into the Glmpc Terminal for the first time, it will automatically become selected (and therefore displayed). The newly loaded map will also appear listed in the Map combobox (shown on Figure 65), which can be used to select any previously loaded map for display. If a newly loaded map does not display, explicitly select it from the Map combobox. Note that when Glmpc Terminal is initially installed it already has the map named initialworldmap loaded and selected. However, on subsequent launches, any previously selected map is displayed. On launching, the Glmpc Terminal connects to a central FTP site containing several predefined maps. Maps can then be loaded from this site by selecting Maps/Load map from…/Central FTP Site…/<map name> from the Glmpc Terminal’s menu bar, where any map name can be chosen from the list. Maps can be loaded from the Dock Server machine from which Glmpc Terminal was installed by selecting Maps/Load map from…/GMC FTP Site…/<map name> in the same way. Maps can also be loaded from any userspecified FTP site using the following steps: Select Maps/User Specified FTP Site/User Specified FTP Site Login, from the Glmpc Terminal’s menu bar. A login dialog (similar to that shown in Figure 66) will appear. Enter the name, password, FTP server site and path to a Maps directory on the user specified site and select Login. If login is successful, newly available maps will appear as menu items under Maps/Load map from…/User Specified FTP Site… Select Maps/Load map from…/User Specified FTP Site…/<map name> where any map name can be chosen from the resulting menu list. Page 81 of 228...
- Page 82 Revision 7.10 2/28/2012 Figure 66. FTP Site Login Dialog. Any maps already stored on the local file system can be loaded into Glmpc Terminal, as long as the maps adhere to the format outlined in Appendix G. Local maps are loaded using the following steps: Select Maps/Load map from…/Local file system, from the Glmpc Terminal’s menu bar. A Select map directory dialog (similar to that shown in Figure 67) will appear. Use the dialog to choose a map directory on the local file system. Note that the map directory must contain a coordinates.xml file (and would usually contain an image.JPG file showing the map to be displayed). Select the chosen map directory. A warning dialog will result if the map directory does not contain a coordinates.xml file, otherwise, the map will be loaded and displayed. Page 82 of 228...
- Page 83 Revision 7.10 2/28/2012 Figure 67. Local File System Map Selection dialog. Maps can also be created and loaded into the Glmpc Terminal without having to explicitly store them in the format outlined in Appendix G. The prerequisite for this is that a .JPG file for the map exists (assuming the usual flat platte carree geographic projection, but of arbitrary name), and that the user knows the coordinates of the lower lefthand and upperrighthand points of the map image. The map can then be loaded using the following steps: Select Maps/Create Map from the Glmpc Terminal’s menu bar. A Select image file dialog (similar to that shown in Figure 67) will appear. Use the dialog to choose the map’s .JPG file on the local file system. Once selected, a dialog requesting a unique name for the map will be displayed. Enter a name for the map (e.g. newyorkharborNY) and select ‘OK’. This will result in two further dialogs (similar to that shown in Figure 68) requesting the lowerleft and upperright map coordinates respectively. If all data is entered correctly, the map will then be loaded and displayed. Page 83 of 228...
- Page 84 Revision 7.10 2/28/2012 Note that this approach simplifies the creation of new maps for the user, but does not include the creation of associated bathymetry data. Also, the user must of course ensure that the coordinates of the lowerlefthand and upperrighthand points of the map image are correct. Finally, maps can be created and loaded for use by Glmpc Terminal using only the lowerleft and upperright map coordinates as input (i.e. when no actual .JPG image of the map exists). This is useful when, for example, the user wishes to use Glmpc Terminal on an area of open ocean where an image may not be available, or may be of little use (e.g. with no coastline visible). There are two ways of doing this: either by explicitly entering the map coordinates, or by rubberbanding a region on the currently displayed image. Both approaches result in an imageless map being created and loaded. The first approach (explicitly entering coordinates) requires the following steps: Select Maps/Create Map (no image file) from the Glmpc Terminal’s menu bar. A dialog requesting a unique name for the map will be displayed. Enter a name for the map (e.g. newyorkharborNY) and select ‘OK’. This will result in two further dialogs (similar to that shown in Figure 68) requesting the lowerleft and upperright map coordinates respectively. If all data is entered correctly, the map will then be loaded and displayed as a blank background with gridlines. The second approach (rubberbanding a region) requires the following steps: Select Maps/Create Map (rubberband) from the Glmpc Terminal’s menu bar. A dialog requesting a unique name for the map will be displayed. Enter a name for the map (e.g. newyorkharborNY) and select ‘OK’. Leftmouse clicking will then create a rubberband, which can be used to define a region on the currently displayed image. Once the region is defined, the map will then be loaded and displayed as a blank background with gridlines. Page 84 of 228...
- Page 85 Revision 7.10 2/28/2012 Any map that is not currently being displayed can be unloaded by selecting Maps/Unload map/<map name>. This removes the map from the Glmpc Terminal Map combobox. Once a map has been loaded into the Glmpc Terminal, it can be exported onto the Dock Server to which the terminal is connected (see next section for connecting to a Dock Server). This is particularly useful for sharing locally created maps with other users, since once a map has been exported to a Dock Server it can be loaded from any Glmpc Terminal connected to that Dock Server. A map can be exported using the following steps: Make sure that the map to export is displayed, and that the Glmpc Terminal is connected to the Dock Server to which the map is to be exported. Select Maps/Export Map, from the Glmpc Terminal's menu bar. After a brief delay, a dialog will indicate whether the map has been successfully exported or not. Note that other Glmpc Terminal users will have to connect (or reconnect) to the Dock Server in order to then load the exported map. It is sometimes useful to add visible reference points to the currently displayed map. This can be achieved by selecting Maps/Draw Reference Point, from the Glmpc Terminal’s menu bar. The resulting dialog (shown in Figure 68) appears, requesting the user to enter the reference point latitude and longitude, in the ISO format DDMM.MMM, DDDMM.MMM. Figure 68. Reference Point Dialog. Page 85 of 228...
-
Page 86: Connecting To A Dock Server
Revision 7.10 2/28/2012 On selecting OK, the reference point will be marked with orange colored crosshairlines at the specified latitude and longitude. Note that the reference point is only temporary, and will not be redrawn if the map is redisplayed. Finally, the surface distance between any two points on the currently displayed map can be found by selecting Maps/Measure Distance, from the Glmpc Terminal’s menu bar. The next mouse click on the map then starts a rubberband, which can be extended by mousedragging to any other point on the map. While mousedragging , the surface length of the resulting rubberband is displayed on the Glmpc Terminal just below the map cursor position indicator. The displayed surface distance is removed on releasing the mouse button. 6.6 Connecting to a Dock Server To interact with a glider, the Glmpc Terminal must be connected to a Dock Server by indicating both the server name and port number (the combination of which is referred to as a GMC site). To connect to a Dock Server, follow the steps in this section. Select GMC/Add GMCSite, from the Glmpc Terminal’s menu bar. An ‘Add GMCSite’ dialog (similar to that shown in Figure 69) will appear. Figure 69. GMC Site Dialog. Enter the Dock Server name and port number in the format <server>:<portnumber> as shown, and select OK. Note that the port number will default to 6564 if not specified. Ensure that the newly specified Dock Server name and port number is now showing in the GMC Site combobox. Page 86 of 228... - Page 87 Revision 7.10 2/28/2012 Select GMC/Connect to GMCSite, from the Glmpc Terminal’s menu bar. A dialog (similar to that shown in Figure 610) will appear. Selecting Yes will then attempt to connect the Glmpc Terminal to the specified Dock Server using the port number. Figure 610. Connecting to a GMC Site. Note that the Glmpc Terminal can be connected to any previously added GMCSite appearing in the GMC Site combobox by performing step 3 above (which will result in the dialog shown in Figure 610 appearing). If the connection is successful a confirmation dialog will appear, and the text Connected to <server> using port <port> will appear below the displayed map, indicating the selected server and port number. Also, the Glider combobox will be updated to list all gliders known to the Dock Server. If the connection is not successful, a warning dialog will appear. The dialog in Figure 610 simply warns that connecting to the new GMC site will reset the list of gliders shown in the Glider combobox to those known by the newly connected Dock Server. Also, any monitoring of glider positions will be terminated until a new glider is selected (see section 6.8 on Interacting with a Glider). The Glmpc Terminal can only be connected to one Dock Server at a time, so connecting to Dock Server B while still connected to Dock Server A will simply drop the connection to Dock Server A. Finally, any previously added GMC site can be removed by selecting the site in the GMC Site combobox, and selecting GMC/Delete GMCSite from the Glmpc Terminal’s menu bar. Page 87 of 228...
-
Page 88: Defining A Route
Revision 7.10 2/28/2012 6.7 Defining a Route A route is made up of an ordered sequence of waypoints, and must first be defined if a glider is to be instructed to follow those waypoints. To define a route, follow the steps in this section. Select Routes/New Route, from the Glmpc Terminal’s menu bar. Enter a unique name for the route in the ‘New Route’ dialog and select ‘OK’. Define a sequence of waypoints by placing the cursor on the displayed map, and using a left mouse click to indicate the position of each point. The sequence of defined waypoints will be connected by red lines, with small arrowheads indicating the intended direction of traversal. Select Routes/Save Route. The Routes combobox will then be updated to list the newly defined route, while any previous route can be displayed on the map by selecting that route from the combobox. Note that some menu and combobox options are disabled during route creation to avoid possible confusion. As an example, Figure 611 shows a route named route3, made up of 5 waypoints, displayed on the map named woodsholeMA. Since maps and routes are stored independently, route3 will be displayed on any map that covers the area containing that route (as long as route3 is selected in the Routes combobox). Page 88 of 228... - Page 89 Revision 7.10 2/28/2012 Figure 611. Map Display of Route. Once a route has been defined it can be updated by either mouseclicking on a visible waypoint (which brings up a dialog containing the editable waypoint properties, including the position), or by mousedragging a visible waypoint (to update its position). Other Routes menu options are as follows: Clear Route, which clears (but does not delete) the currently selected route from being displayed (ii) Delete Route, which deletes the currently selected route (iii) Execute Route, described in the next section Page 89 of 228...
-
Page 90: Interacting With A Glider
Revision 7.10 2/28/2012 (iv) Export / Import options, described in a later section 6.8 Interacting with a Glider The Glmpc Terminal can be used to both control and monitor any glider appearing in the Glider combobox. Glmpc Terminal control of a glider currently includes instructing a glider to follow a saved route, while monitoring includes displaying the last known glider positions on a map. To instruct a glider to follow a particular route, use the following steps. Ensure that the glider is running the predefined mission glmpc.mi, and the script glmpc.xml (Note: if the glider is communicating over a direct connection, use script glmpcdirect.xml instead). Ensure that the glider has been selected using the Glider combobox Select a route for the glider to follow using the Routes combobox Select Routes/Execute Route, from the Glmpc Terminal’s menu bar. A ‘Route traversal’ dialog will then appear (shown in Figure 612), requesting the number of waypoints to be traversed. Enter the number of waypoints, and select ‘OK’. If the request for the glider to follow the specified route is accepted, a dialog informing as such will appear. Note that if ‘Traverse list once only’ or ‘Traverse list forever’ is selected, the ‘Specify number of waypoints’ entry field will be disabled. Page 90 of 228... - Page 91 Revision 7.10 2/28/2012 Figure 612. Route Traversal Dialog. To ensure that the glider is running both glmpc.mi and glmpc.xml, it is useful to first start a Glider Terminal application to observe the running glider, and to start the mission and script if necessary. To display the last known glider positions on a map, use the following steps. Ensure that the glider has been selected using the Glider combobox Select the ‘Show Glider Positions’ checkbox Each time the selected glider surfaces the position will be indicated by a small green square on the map. All such surface positions are joined by arrowed lines, with the most recent position showing the date and time at which it occurred. Note that surface positions are only shown for the glider currently selected in the Glider combobox, and will show when the glider transmits output of the following form (which uses glider07 as an example, and only shows the relevant lines): Glider glider07 at surface. … Curr Time: Wed Aug 15 17:59:36 2006 MT: 4276 … GPS Location: 4137.008 N -7032.006 E measured 3.506 secs ago …...
- Page 92 Revision 7.10 2/28/2012 clicking on visible surface positions (which brings up a dialog containing properties such as surface position, date and time, distance to previous surface positions etc.). By default, all glider surface positions since the Dock Server was last started will be shown. This can result in an overcrowded display (due to a possibly large number of surface positions) so the positions actually displayed can be filtered. The simplest way to do this is by selecting Reports/Clear previous positions, which removes all currently displayed surface positions. However, displayed positions can also be filtered by date. To set the earliest recorded day for which positions are displayed, use the following steps. Select Reports/Set reported position start date. A datepicker dialog will then appear (shown in Figure 613), enabling the user to select a date. Either select a date, or simply close the dialog by selecting the topright ‘X’. In both cases the datepicker dialog closes. Selecting a date will ensure that no glider surface positions earlier than that date will be displayed, while selecting ‘X’ results in no such earliest constraint. Figure 613. DatePicker Dialog. Setting the latest recorded day for which positions are displayed uses similar steps, starting with selecting Reports/Set reported position end date. In this case, selecting ‘X’ on the datepicker results in no latest constraint on displayed positions. Note that the result of setting earliest and latest recorded display dates is immediate, often updating the number of displayed surface positions as soon as the datepicker is closed. Page 92 of 228...
-
Page 93: Defining Mission Parameters
Revision 7.10 2/28/2012 6.9 Defining Mission Parameters When using Glmpc Terminal to instruct a glider to follow a particular route, the glider would normally be running the predefined mission glmpc.mi, and the script glmpc.xml. The purpose of script glmpc.xml is twofold: To transfer any newly generated goto_l10.ma file from Dock Server to the glider when the glider surfaces (ii) To transfer .sbd files from the glider to Dock Server when the glider surfaces. Mission glmpc.mi retrieves waypoints from the goto_l10.mi file for the glider to follow. Since Glmpc Terminal actually generates the goto_l10.ma file on Dock Server when executing a route, this enables Glmpc Terminal to instruct a glider to follow a route. Glmpc Terminal does allow some flexibility in the files generated through use of the Missions menu bar item. In particular, the user can choose to define mission parameter values, specify variations on the glmpc.xml script, or change the name of the goto_l10.ma file generated by Glmpc Terminal. 6.9.1 Setting Mission Parameters To change the values of mission parameters included in the Glmpc Terminal generated goto_l10.ma file, use the following steps. Select Missions/Set ‘goto’ parameters. A mission parameters dialog will then appear (similar to that shown in Figure 614), enabling the user to change parameter values. Double click any entry in the ‘Value’ column, and update the parameter value. Select ‘OK’. Page 93 of 228... -
Page 94: Specifying Scripts
Revision 7.10 2/28/2012 Figure 614. Mission Parameters Dialog. All future Glmpc Terminal generated mission parameters will then have the values as set above. 6.9.2 Specifying scripts Several variations on the glmpc.xml script have been created, and may be available depending on the version on Dock Server installed. These include: glmpcmbd.xml, similar to glmpc.xml but used to transfer .mbd files only (ii) glmpcdbd.xml, similar to glmpc.xml, but used to transfer .dbd files only (iii) glmpcall.xml, similar to glmpc.xml, but used to transfer all file types To automatically start the appropriate script when instructing a glider to follow a particular route, use the following steps. Select Missions/Specify script action. A script action dialog will then appear (similar to that shown in Figure 615), with radiobuttons for each of the available scripts, plus a radiobutton option to maintain whatever script is currently running. Select the required script action, where ‘Collect all .sbd files’ corresponds to the glmpc.xml script, ‘Collect all .mbd files’ corresponds to the glmpcmbd.xml script, ‘Collect all .dbd files’ corresponds to the glmpcdbd.xml script etc. Select ‘OK’. Page 94 of 228... -
Page 95: Setting .Ma File Names
Revision 7.10 2/28/2012 Figure 615. Script Action Dialog. The selected script will now automatically start when instructing a glider to follow a route using the Routes/Execute Route menu option. 6.9.3 Setting .ma file names The predefined mission glmpc.mi explicitly looks for a file named goto_l10.ma to retrieve waypoints for the glider to follow. However, any .ma file name could be used to instruct a glider to follow a particular route, as long as the mission being run looked for the correct .ma file, and the .ma file described the desired waypoints. For this reason, Glmpc Terminal allows variations on the .ma file name generated when executing a route, as long as the name takes the form goto_l<N>.ma where N is as integer. To change the .ma file name generated by Glmpc Terminal, use the following steps. Select Missions/Set .ma file name. A dialog will then appear requesting the required .ma file name. Enter a file name of the form goto_l<N>.ma (e.g. goto_l14.ma) and select ‘OK’. Page 95 of 228... -
Page 96: Importing/Exporting Routes And Positions
Revision 7.10 2/28/2012 Note that care must be taken to ensure that the mission being run looks for the newly named .ma file, or Glmpc Terminal instructions to follow a particular route (using the Routes/Execute Route menu option) will be ignored. 6.10 Importing/Exporting Routes and Positions Any saved route can be exported to a file by first selecting the route (using the Routes combobox) and then selecting Routes/Export Route (.ma format). A ‘Save’ dialog (similar to that shown in Figure 67) will then appear, allowing a directory and file name to be chosen for storing the route. As the menu item suggests, the route will be stored in the same format as a standard .ma file. To import a route that has been previously exported, select Routes/Import Route (.ma format). A ‘Select’ dialog (similar to that shown in Figure 67) will appear, allowing selection of a previously saved route file. On selecting the file, a dialog (similar to that shown in Figure 616) will appear, requesting a previously unused route name. If the name is accepted, the newly imported route will then be displayed on the map and selected in the route combobox. Figure 616. New Route Dialog. This import/export feature allows users to share routes, since route files can be easily transferred between clients running Glmpc Terminal. Any route that a glider is currently following can also be imported, even if the route was defined by another user from a separate Glmpc Terminal. To import such a route, first ensure that the glider has been selected using the Glider combobox, and then select Routes/Import Route (from glider). A ‘New route’ dialog (similar to that shown in Figure Page 96 of 228... -
Page 97: Customizing The Display
Revision 7.10 2/28/2012 616) will appear, requesting a previously unused route name. If the name is accepted, the newly imported route will then be displayed on the map and selected in the route combobox. Note that importing a route from a glider may take a few seconds, during which the wait cursor will display. Finally, an important feature of Glmpc Terminal is the ability to display glider surface positions in real time (see section 6.8). However, other tools exist for displaying geographic data, including Google Earth ™ which uses KML files to include user defined data in the displayed image. To enable a snapshot of glider surface positions to be displayed using Google Earth, a glider’s positions can be exported and stored as a KML file using the following steps. Ensure that the glider has been selected using the Glider combobox Select Routes/Export Positions (.kml format). This will display a ‘Save’ dialog (similar to that shown in Figure 67). Choose a directory and file for storing the glider positions, where the file name must end with .kml, and select Save. When Google Earth is opened using the resulting KML file, the glider’s positions will be displayed, and stored as placemarks in a folder (using the chosen file name) under Temporary Places. Selecting a placemark will then show the glider’s surface date and time on the displayed position. 6.11 Customizing the Display The following checkboxes on the lower section of the Glmpc Terminal allow some customization of the display: Show Grid, which superimposes coordinate gridlines on the display. This is useful when the displayed map itself does not include any gridlines, and can extend beyond the displayed map to allow control and monitoring of gliders beyond the area covered by the map. Note that since a map image is not strictly required to run the Glmpc Terminal (only a coordinate file), gridlines are a useful addition when no map is available. Page 97 of 228... -
Page 98: Audio Alarms
Revision 7.10 2/28/2012 (ii) Show Bathymetry, which is used to display depth contours if the data exists. Note that a map’s depth data is stored (in a proprietary format) in the bathymetry.xml file, although it is not required for running the Glmpc terminal. (iii) ISO Format, which enables the cursor position (shown just under the map) to be displayed in an ISO 6709 compliant format. This format shows latitude/longitude as DDMM.MMM, DDDMM.MMM. For example, 4922.13, 12114.84. The alternative format shows latitude/longitude as (direction) degrees, minutes and seconds. For example, N 41° 15’ 39”, W 70° 21’ 29”. 6.12 Audio Alarms Glmpc Terminal provides similar audio alarms to Glider Terminal (see section 4.9), although the events at which alarms are sounded currently only include when a glider surfaces while Glmpc Terminal is running. Default sounds are the same as those used by Glider Terminal, and are configured in the same way using the Terminal Preferences Dialog and Glider Properties Dialog described in section 4.9.1. The Terminal Preferences dialog (shown in Figure 4.12) is opened by selecting GMC/Preferences, while the Glider Properties Dialog (shown in Figure 4.13) is opened by selecting GMC/Properties. Page 98 of 228... -
Page 99: How To Use The Data Server Application
Revision 7.10 2/28/2012 7. How to use the Data Server Application The Data Server application provides an integrated mechanism for both storing glider data, and making the data available to client applications. Like the Dock Server, the Data Server is intended to run continuously without human intervention, and has no graphical interface. During operation the Data Server copies, but does not remove, glider data from the Dock Server. In particular, the Data Server application provides the following services: Stores glider data, recorded by any Dock Server that the Data Server has subscribed to. Stored data is updated in realtime as more glider data becomes available on the Dock Server. (ii) Cleansup stored data by (for example) interpolating missing glider positions based on standard algorithms. (iii) Makes data available for viewing by network connected clients. The Data Server can only subscribe to Dock Servers that are currently running. Consequently, for a Data Server to access a Dock Server's data, the Dock Server must be running when the Data Server is started. By default, the Data Server automatically subscribes to the Dock Server running on the same machine (although this is configurable, as described in Section 7.5). 7.1 Starting Data Server To start the Data Server application, complete the following steps: 1. Log on to the Data Server machine (typically the same as the Dock Server machine) as user “localuser”. The factory delivered password for this account is “WideOpen” (see Appendix D). Desktop icons visible to localuser, to start, stop, see and inspect the Data Server are similar to those used for the Dock Server (see Figure 21), and have a similar function. 2. Double click the desktop icon labeled “startdataserver”. Page 99 of 228... -
Page 100: Checking That Data Server Is Running
Revision 7.10 2/28/2012 A shell window opens that shows the Data Server application’s process information (Figure 71). This information confirms that the application is running. However, for the same reason as Dock Server, do not start more than one instance of the Data Server application at any time. Data Server processing information Figure 71. Shell window confirming that Data Server is running. 3. Type the enter key to close the shell window. To start the Data Server application remotely, complete the following steps: 1. Log on to the Data Server machine as user “localuser”. The factory delivered password for this account is “WideOpen” (see Appendix D). 2. Go to directory /opt/localuser/bin 3. Type ./startdataserver followed by the the enter key. 7.2 Checking that Data Server is Running To check that the Data Server application is running, complete the following steps: 1. Log on to the Data Server machine as user “localuser”. The factory delivered password for this account is “WideOpen” (see Appendix D). 2. Double click the desktop icon labeled “seedataserver”. Page 100 of 228... -
Page 101: Stopping Data Server
Revision 7.10 2/28/2012 A shell window opens that shows the Data Server application’s process information (Figure 71). If the application is not running, no process information appears in the window. Important Note: If more than one line of process information appears, then more than one Data Server is running. Stop both Data Servers and restart just one Data Server instance. 3. Type the enter key to close the shell window. To check that the Data Server application is running remotely, complete the following steps: 1. Log on to the Data Server machine as user “localuser”. The factory delivered password for this account is “WideOpen” (see Appendix D). 2. Go to directory /opt/localuser/bin 3. Type ./seedataserver followed by the the enter key. 7.3 Stopping Data Server To stop the Data Server application while leaving the machine running, complete the following steps: 1. Log on to the Data Server machine as user “localuser”. The factory delivered password for this account is “WideOpen” (see Appendix D). 2. Double click the desktop icon labeled “stopdataserver”. A shell window opens that shows column headings for process information but no process information appears (Figure 72). This function stops all running Data Servers on the Figure 72. Shell window confirming that no Data Server is running. machine. Page 101 of 228... -
Page 102: Monitoring Data Server While It's Running
Revision 7.10 2/28/2012 3. Type the enter key to close the shell window. To stop the Data Server application is running remotely, complete the following steps: 1. Log on to the Data Server machine as user “localuser”. The factory delivered password for this account is “WideOpen” (see Appendix D). 2. Go to directory /opt/localuser/bin 3. Type ./stopdataserver followed by the the enter key. 7.4 Monitoring Data Server while it's Running To view Data Server’s interactions with clients and any subscribed Dock Servers in real time, complete the following steps: 1. Log on to the Data Server machine as user “localuser”. The factory delivered password for this account is “WideOpen” (see Appendix D). 2. Double click the desktop icon labeled “inspectdataserver”. A shell window opens that shows the Data Server application’s “data.log” file and any additions made to it in realtime. This function uses the “less” utility to view the log file. You may use any of its commands to view other parts of the log file. Figure 73 shows the results of using inspectdataserver after starting up the Data Server application. Note that the Data Server has started storing glider data (indicated by the number of data files remaining to process, which involves copying the files from the subscribed Dock Server on localhost and storing the data content). The Data Server has also processed two requests from clients, namely, to access available gliders and to view stored sensor data. Page 102 of 228... -
Page 103: Configuring Glider Data Managed By Data Server
Revision 7.10 2/28/2012 Figure 73. Result of running the inspectdataserver function. The inspectdataserver function is the primary method for monitoring Data Server’s behavior and the place to start when diagnosing Data Server problems. 3. Type controlC followed by the Q key to stop the realtime display of the log contents and close the shell window. 7.5 Configuring glider data Managed by Data Server A user can specify the data to be stored by Data Server using file dataServerState.xml in folder /var/opt/gmc. For example, the dataServerState.xml file in Figure 74 configures a Data Server to store data from two gliders (wt01 & wt02) accessed from two Dock Servers (running on localhost & on machine with IP address 172.16.2.206). If no gliders are specified, then data from all available gliders on the specified Dock Servers is stored. Also, if no Dock Server is specified, then data from any Dock Server running on the same machine as the Data Server is stored. Restarting Data Server with this configuration will ensure that only data from the specified Dock Servers and gliders is stored, which is useful if the total data stored by Data Server needs to be limited. Previously stored data from other gliders remains on the Data Server. The <parser> element defines where dbd2asc, the application used for parsing the content of glider data files, is stored. Typically, this need not be updated since dbd2asc is placed in the specified folder when the Data Server is installed. The <insertPause> element defines a minimum time (in milliseconds) that the Data Server pauses between database record inserts. This can be useful when a high level Page 103 of 228... -
Page 104: Backing Up Glider Data Managed By Data Server
Revision 7.10 2/28/2012 of simultaneous storing & viewing of data is required, but should generally be left at zero. Figure 74. Example contents of the dataServerState.xml file. 7.6 Backing up glider data Managed by Data Server Data Server stores its glider data in a mySQL database installed on the Data Server machine, and never removes the original data files from Dock Server. However, a user may wish to copy or back up the database to another machine. To copy the Data Server database, complete the following steps: Log on to the Data Server machine as user “root”. The factory delivered password for this account is “WideOpen” (see Appendix D). Go to directory /opt/gmcoutofbandtools/bin Type ./gmcdbbackup followed by a number N (e.g. 3) and the enter key Page 104 of 228... - Page 105 Revision 7.10 2/28/2012 This creates a tarball file gmcmysqlbackupN.tgz in directory /var/opt/gmcoutofband tools/backups/mysql, containing the database in a compressed format and identified by the unique number N. Note that copying the database and creating the tarball may take a long time To restore the database identified by N, complete the following steps: Log on to the Data Server machine as user “root”. The factory delivered password for this account is “WideOpen” (see Appendix D). Go to directory /opt/gmcoutofbandtools/bin Type ./gmcdbrestore followed by the number N and the enter key This replaces the database currently being used by Data Server with the database stored in gmcmysqlbackupN.tgz so care should be taken if the current Data Server database has not been backed up. Alternatively, the tarball file could be copied to another machine and unpacked, to become a copy of the original mySQL Data Server database. Page 105 of 228...
-
Page 106: How To Use The Data Visualizer Application
Revision 7.10 2/28/2012 8. How to use the Data Visualizer Application The Data Visualizer application provides a graphical interface for a user to view data stored by the Data Server. For example, sensor data collected by a particular glider, transferred to Dock Server, and stored on a Data Server can be viewed along different axis, superimposed on other data, and zoomedin on, all using a remote Data Visualizer application. Data Visualizer can run on any machine that is networked to a Data Server machine and has Java JRE 1.4.2 or later, and Java Web Start (typically part of the JRE) installed. 8.1 Installing Data Visualizer For a first time install of Data Visualizer, follow steps similar to those for installing Glider Terminal (Section 3.1) and Glmpc Terminal (Section 6.1), the only difference being to click on the link labeled “Click here to install and run Data Visualizer” . 8.2 Starting Data Visualizer To launch Data Visualizer after an initial install, follow the steps in this section. Double click the desktop icon labeled “Data Visualizer” or select the item labeled “Data Visualizer” from the “All Programs” menu (Windows XP). The Data Visualizer window should appear (Figure 81). NOTE: Each time Data Visualizer is launched, the machine of the initial Data Visualizer install is checked for a new version of Data Visualizer. If a new version is found, it is installed and launched. A new version of Data Visualizer is placed on the Dock Server machine each time the Data Server application is upgraded. When launched for the first time, Data Visualizer attempts to connect to the machine from which it was Web Started. For example, Figure 81 shows a Data Visualizer connected to dockserver64.webbresearch.com. When further launched, Data Visualizer attempts to connect to the machine last selected for connection. Page 106 of 228... -
Page 107: Stopping Data Visualizer
Revision 7.10 2/28/2012 Menu bar item Combo box Figure 81. Data Visualizer Main Window. 8.3 Stopping Data Visualizer To stop Data Visualizer, follow the steps in this section. Select File/Exit from Data Visualizer’s menu bar or click the window’s close button in the upper right corner (red with a white X). The Data Visualizer window will close. Page 107 of 228... -
Page 108: The Data Visualizer User Interface
Revision 7.10 2/28/2012 8.4 The Data Visualizer User Interface The Data Visualizer user interface (shown without displayed data in Figure 81) relies on the following controls and output: Menu bar items, which are used to close the system, connect to a Data Server, filter which sensors can be displayed, configure and save plots, and define date boundaries on displayed data. (ii) Combo boxes, which are used to list Data Servers, select gliders and sensors for display, show plots, and define displayed axis. (iii) Mouse rightclicking, which can be used to print, zoomin and out, and save the display. (iv) Mouse leftclicking, which can be used to rubberband regions of data for zoomin. To view stored data, the Data Visualizer must be connected to a Data Server by indicating the server name. If not already connected, this can be achieved using the following steps: Select Server/Add Data Server, from the Data Visualizer’s menu bar. An ‘Add Data Server’ dialog (similar to that shown in Figure 82) will appear. Figure 82. Data Server Dialog. Enter the Data Server name and select OK. Note that port number 6600 will be used to communicate with the Data Server. Page 108 of 228... -
Page 109: Displaying Sensor Data
Revision 7.10 2/28/2012 Ensure that the newly specified Data Server name is now showing in the Data Server combobox. Select Server/Connect to Data Server, from the Data Server’s menu bar. A dialog (similar to that shown in Figure 83) will appear. Selecting Yes will then attempt to connect the Data Visualizer to the specified Data Server. Figure 83. Connecting to a Data Server Note that the Data Visualizer can be connected to any previously added Data Server appearing in the Data Server combobox by following steps 3 & 4 above. If the connection is successful a confirmation dialog will appear, and the text Connected to <server> using port <port> will appear below the display area, indicating the selected server and port number. Also, the Glider combobox will be updated to list all gliders known to the Data Server. If the connection is not successful, a warning dialog will appear. The dialog in Figure 83 simply warns that connecting to the new Data Server will reset the list of gliders shown in the Glider combobox to those known by the newly connected Data Server. The Data Visualizer can only be connected to one Data Server at a time, so connecting to Data Server B while still connected to Data Server A will simply drop the connection to Data Server A. Any previously added Data Server can be removed by selecting the site in the Data Server combobox, and selecting Server/Delete Data Server from the Data Visualizer’s menu bar. 8.5 Displaying Sensor Data Sensor data (such as glider depth, battery voltage etc.) is displayed on the graph yaxis, while the xaxis displays only time, longitude or distance flown by the glider. For Page 109 of 228... -
Page 110: Selecting Data For Display
Revision 7.10 2/28/2012 example, Figure 84 shows sensor data from dockserver64.webbresearch.com, for glider sim041. Data for both depth and m_battpos sensors is displayed against time, between 08:16:40 and 10:13:20 on 18 April, 2008. As more data is superimposed, the Data Visualizer color codes each line & axis label to match them against each other. 8.5.1 Selecting data for Display When a glider is selected, the YSensor combobox displays all sensors for which the glider has data (as stored by the connected Data Server). However, since the number of sensors can be large, the list displayed by the combobox can be filtered using the Sensors menu option. Only those senors prepended with names checked in the Sensors menu list will appear in the YSensor combobox. For example, if the Sensors menu has only m_ checked, then only sensor names such as m_air_fill, or m_battery will appear in the combobox. However, if all is checked, all sensors regardless of name will appear in the YSensor combobox. Sensor names prepended with inter_ refer to interpolated data, and should typically be checked. Page 110 of 228... - Page 111 Revision 7.10 2/28/2012 Figure 84. Data Visualizer data display Once a glider and YSensor has been selected, all data for that sensor will be displayed (see Figure 8.4). This may cover a larger timespan (or other xaxis span) than required, so the user can zoomin by left mouseclicking and rubberbanding across the required xaxis span. Note that each time data is redisplayed, the data is fetched anew from the Data Server, so some delay may result for large data sets. Other zoom features (as well as printing and saving the graph) are available by right mouseclicking on the graph. Finally, any number of sensors can be displayed simultaneously since each YSensor selection simply adds another yaxis as required. Page 111 of 228...
-
Page 112: Using The Plots Menu
Revision 7.10 2/28/2012 The Glider combobox is initialized when the Data Visualizer connects to a Data Server, so the list of gliders may become outofdate if the Data Server stores data for a new glider while the Data Visualizer is connected. In this case, the Glider combobox can be updated by selecting Server/Refresh Gliders from the Data Visualizer's menu bar. 8.5.2 Using the Plots Menu A plot is defined as a combination of: A glider name (ii) An xaxis sensor (such as a time, or distance) (iii) A collection of yaxis sensors (such as m_air_fill, m_battery & inter_depth) Since users may want to display the same combination of the above on a regular basis, they can define and name a plot using the following steps: Select and display the required glider/xaxis/yaxis' combination using the combo boxes. Select Plots/Save Plot, from the Data Visualizer’s menu bar. A New plot dialog (similar to that shown in Figure 85) will appear. Enter a unique name for the plot and select OK. The new plot name will then appear in the Plot combobox. Selecting the plot in the Plot combobox will then redisplay the defined glider/xaxis/yaxis' combination (using the latest available data). Figure 85. Saving a new plot Page 112 of 228... -
Page 113: Constraining Displayed Data
Revision 7.10 2/28/2012 Other Plots menu selections are as follows: Plots/Clear Plot, which clears the currently displayed plot from the display. Plots/Clear Sensor, which clears the currently selected sensor from the display. Plots/Reset Plot, which resets the xaxis to its original span (i.e zooms out). Plots/Delete Plot, which deletes the plot from the Plot combobox. Plots/Lines/Points, which toggles between displaying the selected sensor data using lines or points. Plots/Write to File, which writes the displayed data (in XML format) to a file. 8.5.3 Constraining Displayed Data By default, all data for a selected sensor will be displayed. However, a user may only be interested in data between certain dates (e.g covering a particular mission period) without having to continually zoomin. To help with this, displayed data can be filtered by date, in the same way that Glmpc terminal filters displayed glider surface positions by date. To set the earliest recorded day for which sensor data is displayed, use the following steps. Select Dates/Set plot start date. A datepicker dialog will then appear (shown in Figure 86), enabling the user to select a date. Either select a date, or simply close the dialog by selecting the topright ‘X’. In both cases the datepicker dialog closes. Selecting a date will ensure that no data recorded earlier than that date will be displayed, while selecting ‘X’ results in no such earliest constraint. Page 113 of 228... - Page 114 Revision 7.10 2/28/2012 Figure 86. DatePicker Dialog Setting the latest recorded day for which sensor data is displayed uses similar steps, starting with selecting Dates/Set plot end date. In this case, selecting ‘X’ on the date picker results in no latest constraint on displayed positions. An alternative method for constraining displayed data is to select the original files (.sbd, .dbd etc) from which the currently displayed data was read. To see the original files for any displayed data, use the following steps. Select Dates/Select data files. A scrollable list of files will then appear (similar to that shown in shown in Figure 87). Figure 87. Dialog for viewing files used to provide data Page 114 of 228...
-
Page 115: Manually Transferring Glider Data To Data Server
Revision 7.10 2/28/2012 This will only work for data stored by a Data Server of version 6.34 or later. Displaying the dialog for data stored by an earlier version, or for data from a blank Data Visualizer display, will result in a dialog containing text 'No record available'. The Data Files dialog in Figure 87 can also be used to select which data is to be displayed. For example, highlighting files dgtg200820240.dbd through dgtg200820310.sbd from the multiselection list and selecting 'OK' will update the Data Visualizer display to only show data from those files. This provides an alternative mechanism to drilldown on data obtained from specific files. Finally, the Data Files dialog will remain visible, and instep with any displayed data, until 'Cancel' is selected. 8.6 Manually Transferring glider data to Data Server Glider data is typically transferred (i.e. copied) automatically to Data Server from a connected Dock Server, as specified by the dataServerState.xml configuration file (see Section 7.5). However, the ability to manually transfer glider data from some client to a Data Server, without reference to Dock Server, can be useful. Assuming glider data resides on the same client machine that is running Data Visualizer, transferring the data to a Data Server can be achieved using the following steps: Ensure that Data Visualizer is connected to the required Data Server (see section 8.4) Select Server/Transfer Data to Server, from the Data Visualizer menu bar. A Select files to transfer dialog (similar to that shown in Figure 88) will appear. Figure 88. Select files to transfer Dialog Page 115 of 228... - Page 116 Revision 7.10 2/28/2012 Use the dialog to select a set of glider data files. Note that data files containing header information (e.g. in Figure 7.3 this would include blackjack200818100.sbd) are required to ensure that the dbd2asc application works correctly. Enter the glider name under which Data Server will store the data and select OK. Figure 89. Synchronization Progress Dialog After an initial pause, a progress dialog (similar to that shown in Figure 89) will appear. The dialog reports on the total number of glider data files currently being synchronized (i.e. parsed and stored) by Data Server, including those in the original ‘Select files to transfer’ dialog. Note that glider data files are never removed from Dock Server during synchronization, and closing the progress dialog does not terminate synchronization. To see any new gliders resulting from the transfer, select Server/Refresh Gliders from server. The gliders will then appear in the Glider combobox. Also, at any time during the transfer, new data can be seen by selecting Server/Refresh Data from server or by simply selecting the appropriate sensor. Page 116 of 228...
-
Page 117: How To Use The Gmc Ftp Application
Revision 7.10 2/28/2012 9. How to use the GMC FTP Application The GMC FTP application allows a user to transfer files between the Dock Server machine and any other machine on the network. GMC FTP can run on any machine that is networked to a Dock Server machine and has Java JRE 1.4.2 or later and Java Web Start (typically part of the JRE) installed. GMC FTP is a bare bones FTP client that is preconfigured to connect to your Dock Server machine. However, any network file transfer method or application can be used to move files to and from a Dock Server machine. Most commercial and shareware FTP clients provide more features and better usability. FTP clients should connect to a Dock Server machine as user “dockserveruser”, password “dockserveruser”. This section describes the use of GMC FTP. 9.1 Installing GMC FTP For a first time install of GMC FTP, follow the steps in this section. After the initial install, GMC FTP upgrades are automatically distributed after a Dock Server upgrade. Open a web browser and browse to the URL www.webbResearch.com where your Dock Server’s fully qualified domain name would replace www.webbResearch.com. NOTE: It can take from a few minutes to a few days for the Dock Server’s fully qualified domain name to be known across the internet. If the browser cannot find the Dock Server, then use the Dock Server’s IP address in place of its fully qualified domain name. For example, if 192.168.0.100 is Dock Server’s IP address, then enter “192.168.0.100” in the browser. Click on the link labeled “Click here for GMC FTP utility to access glider data”. The following dialog should appear with your Dock Server domain name. Page 117 of 228... - Page 118 Revision 7.10 2/28/2012 Figure 91. Java Web Start GMC FTP Install Dialog. After a few seconds to a few minutes, the following dialog should appear. Click the “Start” button. Figure 92. Web Start Security Warning Dialog. When the following dialog appears, click the “Yes” button to add GMC FTP to your desktop or configure as you like. Page 118 of 228...
- Page 119 Revision 7.10 2/28/2012 Figure 93. Web Start Desktop Integration Dialog. Once added to your desktop, the GMC FTP application launches and its main window appears (Figure 94). FTP connection tab Local directory browser Figure 94. GMC FTP Main Window. Page 119 of 228...
-
Page 120: Starting Gmc Ftp
Revision 7.10 2/28/2012 9.2 Starting GMC FTP To launch GMC FTP after an initial install, follow the steps in this section. 1. Double click the desktop icon labeled “GMC FTP Utility” or select the item labeled “GMC FTP Utility” from the “All Programs” menu (Windows XP). The GMC FTP window should appear (Figure 94). NOTE: Each time GMC FTP is launched, the Dock Server machine of the initial GMC FTP install is checked for a new version of GMC FTP. If a new version is found, it is installed and launched. During this time you may see the dialog shown in Figure 91. A new version of GMC FTP is placed on the Dock Server machine each time the Dock Server application is upgraded. 9.3 Stopping GMC FTP To stop GMC FTP, follow the steps in this section. 1. Click the GMC FTP window’s close button in the upper right corner (red with a white X). The GMC FTP window will close. 9.4 Transferring Glider Files from the Dock Server Machine To transfer glider files from the Dock Server machine to a local machine, follow the steps in this section. 1. Select the item labeled “GMC” followed by your Dock Server machine name in the pulldown labeled “Look in”. Figure 95 Dock Server item shows the GMC FTP application connecting to the Dock Server named “expose”. Figure 95. Connecting to a Dock Server. Page 120 of 228... - Page 121 Revision 7.10 2/28/2012 2. Double click the “gliders” folder in GMC FTP window’s righthand file browser. Figure 96 shows the “gliders” folder. gliders folder Figure 96. Dock Server file browser in GMC FTP application. 3. Drill down to the glider of interest’s “fromglider” folder on the Dock Server by double clicking the folder labeled with that glider’s name and then double clicking the “from glider” folder. Figure 97 shows the contents of glider sim012’s fromglider folder. NOTE: All files transferred from the sim012’s fromglider glider are stored in that glider’s from folder contents glider folder. These files include SBD, DBD, MBD, and MLG files. Dock Server renames transferred files to their long filename. 4. Drilldown to show the contents of the destination folder in the local file browser (lefthand pane of GMC FTP’s window) by double clicking on the appropriate folder(s). Figure 97. sim012’s fromglider folder contents. 5. Select the glider files to transfer in the Dock Server file browser and click the “Download” button at the bottom of the browser. A transfer dialog appears and the selected files are copied to the local machine. Figure 98 shows the “GliderData” folder on the local machine as the destination folder and a number of selected files on the Dock Server machine to transfer. Page 121 of 228...
- Page 122 Revision 7.10 2/28/2012 Dock Server machine’s source folder Selected files to copy to the destination folder Local machine’s destination folder Download button copies files to local machine Figure 98. Transferring selected sim012 files from the Dock Server machine to the local folder GliderData. Page 122 of 228...
-
Page 123: Transferring Glider Files To The Dock Server Machine
Revision 7.10 2/28/2012 9.5 Transferring Glider Files to the Dock Server Machine To transfer glider files from a local machine to a Dock Server machine, follow the steps in this section. 1. Select the appropriate disk drive from the “look in” pulldown on the left Local source folder hand file browser in GMC FTP’s window and drill down by double Local file system clicking folder icons until the source browser folder appears in the “Look in” pull down. Figure 99 shows the folder “GliderMissions” selected as the source folder. Its contents are displayed in the lefthand file browser. Figure 99. Local file browser with GliderMissions as the source folder. 2. Select the item labeled “GMC” followed by your Dock Server machine name in the “Look in” pulldown on the Dock Server file browser (righthand pane of GMC FTP’s window). Figure 95 shows the GMC FTP application connecting to the Dock Server named “expose”. 3. Drilldown to show the contents of the destination glider’s “toglider” folder in the Dock Server file browser by double clicking on the “gliders” folder followed by the destination glider’s folder and finally the “toglider” folder. Page 123 of 228... -
Page 124: Transferring Glider Files With Other Ftp Clients
Revision 7.10 2/28/2012 NOTE: The dockzr command’s default behavior expects files to sent to the glider to be found in that glider’s toglider folder. 4. Select the glider files to transfer in the local machine file browser and click the “Upload” button at the bottom of the browser. A transfer dialog appears and the selected files are copied to the Dock Server machine. Figure 910 shows sim012’s toglider folder on the Dock Server machine as the destination folder and two selected files on the local machine to transfer. Source folder on Destination folder on Dock local file system Server’s file system Files to transfer are highlighted Upload button Figure 910. Two files selected for upload from the local machine’s GliderMissions folder to sim012’s to glider folder. 9.6 Transferring Glider Files with other FTP Clients Any file transfer method can be used to move files between the Dock Server machine and any other machine. The GMC FTP application is a barebones FTP client provided to allow a user to transfer files out of the box. There are numerous freeware, Page 124 of 228... - Page 125 Revision 7.10 2/28/2012 shareware, and commercial FTP applications that provide a host of features beyond those of GMC FTP. When using another FTP client, login as user “dockserveruser” and password “dockserveruser”. This Dock Server user account has been set up specifically for FTP transfers. Page 125 of 228...
-
Page 126: How To Use Glider Simulators
Revision 7.10 2/28/2012 10. How to use Glider Simulators Glider simulators are very useful for testing glider missions before deployment on an actual glider and for training glider personal without risking an actual glider. Glider simulators can be controlled through Dock Server similar to a real glider. Dock Server makes no distinction between real gliders and glider simulators. Two basic types of glider simulators are available – a pocket simulator and a shoebox simulator. The pocket simulator only contains a flight persistor processor; there is no freewave transceiver, iridium modem, or science persistor processor. The shoebox simulator has a flight persistor with optional freewave transceiver, iridium modem, or science persistor. The following sections describe connecting glider simulators to Dock Server’s hardware and the important behavior differences between simulators and actual gliders from a Dock Server viewpoint. 10.1 Pocket Glider Simulators 10.1.1 Connecting to Dock Server Hardware Pocket glider simulators can be connected to Dock Server hardware by direct serial cable. To connect a pocket simulator to a Dock Server machine, follow these steps. Connect one end of a serial cable to the RS232 port on the simulator and the other end to a Dock Server machine serial port. Figure 101 shows a direct connection between a pocket simulator and a Dock Server machine. NOTE: Pocket simulators must be connected to a serial port configured as a “direct” device. Serial port 4 on the 4port USB serial adaptor is factory configured as a “direct” device. Refer to section 2.6 to change the factorydelivered serial port configuration. Page 126 of 228... -
Page 127: Differences Between A Pocket Simulator And An Actual Glider
Revision 7.10 2/28/2012 Figure 101. Direct pocket simulator to Dock Server machine connection. 10.1.2 Differences between a Pocket Simulator and an actual Glider This section lists the differences between a pocket glider simulator and an actual glider with respect to how Dock Server behaves. A pocket glider simulator does not support the serial port’s carrier detect line (CD). That is, a simulator does not bring the CD high when it’s in communication with Dock Server and low when it’s “under water”. Typically, Dock Server monitors the CD to determine when a glider is connected (CD High) or not (CD low). Since pocket simulators do not support CD, a new device type labeled “direct” was created. Dock Server assumes that any serial port configured as a direct device is always in Page 127 of 228... -
Page 128: Shoebox Glider Simulators
Revision 7.10 2/28/2012 communication with Dock Server (see sections 2.6, 9.3). Thus, the icon in the glider tree corresponding to a pocket simulator (as a direct device) is always green whether or not a simulator is actually connected. 10.2 Shoebox Glider Simulators 10.2.1 Connecting to Dock Server Hardware Shoebox glider simulators can be connected to Dock Server hardware by direct serial cable, freewave wireless data transceiver, or iridium modem. However, to connect using a freewave transceiver or an iridium modem the simulator must have the freewave or modem physical device installed. To connect a shoebox simulator using a direct serial cable to a Dock Server machine, follow these steps. Connect one end of a serial cable to the RS232 port labeled “Glider Comms” on the simulator and the other end to a Dock Server machine serial port. NOTE: For shoebox simulators directly connected by serial cable to the Dock Server machine (i.e., no freewave or Iridium involved), a serial port configured as a “direct” device must be used. Serial port 4 on the 4port USB serial adaptor is factory configured as a “direct” device. Refer to section 2.6 to change the factorydelivered serial port configuration. Position the simulator’s Carrier Detect Source switch to “CD Forced High”. This position forces the simulator to behave as if the CD for the “Glider Comms” port is always high. To connect a shoebox simulator using a freewave transceiver to a Dock Server machine, follow these steps. Connect one end of a serial cable to the RS232 port of the master freewave corresponding to the simulator’s installed slave freewave. Connect the other end to a Dock Server machine serial port. Page 128 of 228... -
Page 129: Differences Between A Shoebox Simulator And An Actual Glider
Revision 7.10 2/28/2012 NOTE: For shoebox simulators connected by freewave transceiver to the Dock Server machine, a serial port configured as a “freewave” device must be used. Serial port 2 on the 4port USB serial adaptor is factory configured as a “freewave” device. Refer to section 2.6 to change the factorydelivered serial port configuration. Position the simulator’s Carrier Detect Source switch to “CD External”. This position forces the simulator to read the CD line of the internal slave freewave transceiver. To connect a shoebox simulator using an iridium modem to a Dock Server machine, follow these steps. Connect a U.S. Robotics model 3453B modem (configured as described in section 1.3) to a Dock Server machine serial port using the 25pin to 9pin cable supplied with the modem. NOTE: For shoebox simulators connected by modem (Iridium) to the Dock Server machine, a serial port configured as a “modem” device must be used. The Dock Server’s internal serial port is factory configured as a “modem” device. If the Dock Server machine has no internal serial port, then serial port 1 on the 4port USB serial adaptor is factory configured as a “modem” device. Refer to section 2.6 to change the factorydelivered serial port configuration. Position the simulator’s Carrier Detect Source switch to “CD External”. This position forces the simulator to read the CD line of its internal iridium modem. 10.2.2 Differences between a Shoebox Simulator and an actual Glider This section lists the differences between a shoebox glider simulator and an actual glider with respect to how Dock Server behaves. When connected as a direct device, a shoebox simulator behaves just like a pocket simulator (see section 10.1.2). When connected as a modem or freewave device, a shoebox simulator behaves like a real glider out of the water whose simul.sim file contains “on_bench”. Page 129 of 228... -
Page 130: Theory Of Operation
Revision 7.10 2/28/2012 11. Theory of Operation This section explains important aspects of Dock Server and Glider Terminals’ operation. 11.1 When Does a Glider Icon turn Red, Green, or Yellow Glider Terminal displays a colored icon to the left of each glider shown in the glider tree. The icon’s color indicates the communication state of its corresponding glider. Table 111 details these states. Icon Color Meaning Glider Terminal is in communication with Dock Server but Dock Server is NOT in communication with the corresponding glider. Red indicates no call is inprogress between Dock Server and the glider. The glider may be turned off, under water, or out of freewave range. The user can NOT send commands to the glider. Green Glider Terminal is in communication with Dock Server and Dock Server is in communication with the corresponding glider. Green indicates the glider is currently connected to Dock Server by iridium or freewave. The user can send commands to the glider and view glider output. Yellow The network connection that transports the corresponding glider’s output to Glider Terminal and glider commands to Dock Server is down, or the glider’s corresponding Dock Server is not running. Or, in very rare cases, this Dock Server has no available network connections to service additional Glider Terminal requests. The connection status between this Dock Server and the glider is unknown. The user can NOT send commands to the glider. Table 111. Glider icon colors in Glider Terminal. Page 130 of 228... - Page 131 Revision 7.10 2/28/2012 Table 112 shows the events that trigger a change the icon’s color. Color Change Triggering Event to Red For devices that support the Carrier Detect line (i.e., modem and freewave), a transition from high to low on this line triggers a change to red. This transition causes Dock Server to send a “glider has disconnected” network packet to all connected Glider Terminals. In response, Glider Terminal turns the glider’s icon red. For devices that do NOT support the Carrier Detect line, a change to red never occurs. Glider simulators that are directly connected to a Dock Server serial port (i.e., no modem or freewave is inline – just a serial cable) do not supply a Carrier Detect signal. For all devices at the time of this event, Glider Terminal must be receiving “keep alive” packets on the network connection that transports a glider’s character output from Dock Server to Glider Terminal. That is, the Glider Terminal to Dock Server network connection is up. to Green For devices that support the Carrier Detect line (i.e., modem and freewave), a transition from low to high on this line triggers a change to green. This transition causes Dock Server to send a “glider has connected” network packet to all connected Glider Terminals. In response, Glider Terminal turns the glider’s icon green. For devices that do NOT support the Carrier Detect line, the icon is green as long as the Glider Terminal to Dock Server network connection is up. Glider simulators that are directly connected to a Dock Server serial port (i.e., no modem or freewave is inline – just a serial cable) do not supply a Carrier Detect signal. Their icon will always be green or yellow. For all devices at the time of this event, Glider Terminal must be receiving “keep alive” packets on the network connection that transports a glider’s character output from Dock Server to Glider Terminal. That is, the Glider Terminal to Dock Server network Page 131 of 228...
-
Page 132: When Does A Dock Server Icon Turn Red Or Green
Revision 7.10 2/28/2012 connection is up. to Yellow Glider Terminal has stopped receiving “keep alive” packets on the network connection that transports a glider’s character output from Dock Server to Glider Terminal. The Glider Terminal to Dock Server network connection is down, or the glider’s Dock Server is not running. Or, in very rare cases, the Dock Server has no available network connections to service additional Glider Terminal requests. Table 112. Events triggering a change in glider icon color. For glider network connections that are down yellow, Glider Terminal automatically attempts to reestablish them. It continues trying to reconnect about once a minute until the connection is opened (icon will turn red or green). 11.2 When Does a Dock Server Icon turn Red or Green Glider Terminal displays a colored icon to the left of each Dock Server shown in the glider tree. The icon’s color indicates the communication state of its corresponding Dock Server. Table 113 details these states. Icon Color Meaning The network connection between Glider Terminal and the corresponding Dock Server is down or the Dock Server is not running. Or, in very rare cases, the Dock Server has no available network connections to service additional Glider Terminal requests. Typically, all glider icons associated with that Dock Server are Yellow. Green The network connection between Glider Terminal and the corresponding Dock Server is up. Typically, all glider icons associated with that Dock Server are Red or Green. Tabel 113. Dock Server icon colors in Glider Terminal. Page 132 of 228... -
Page 133: How Do Iridium, Freewave, And Direct Communications Differ
Revision 7.10 2/28/2012 Table 114 shows the events that trigger a change the icon’s color. Color Change Triggering Event to Red Glider Terminal has stopped receiving “keep alive” network packets from the corresponding Dock Server. The Glider Terminal to Dock Server network connection could be down or the Dock Server is not running. to Green Glider Terminal is receiving “keep alive” packets every few seconds from the corresponding Dock Server. That is, the Glider Terminal to Dock Server network connection is up and the Dock Server is servicing Glider Terminal requests. Table 114. Events triggering a change in Dock Server icon color. For Dock Server network connections that are red, Glider Terminal automatically attempts to reconnect. It continues trying to reconnect about once a minute until the connection is opened (icon will turn green). 11.3 How do Iridium, Freewave, and Direct Communications Differ Gliders and glider simulators communicate with Dock Server by modem (Iridium), freewave, and direct serial cable connection. Since these three methods have different characteristics, Dock Server must treat them differently. Each of these methods is characterized as a “device” – modem (Iridium), freewave, and direct. This section details how Dock Server treats each device. A direct device is simply a serial cable between a Dock Server serial port and a glider simulator (i.e., no modem or freewave is inline). Since Dock Server can not determine what device is attached to each managed serial port, the user must provide this information in the dockServerState.xml file (refer to section 2.6). If this file does not reflect the actual devices connected to Dock Server serial ports, then Dock Server to glider communications can fail. Page 133 of 228... -
Page 134: How Does Dock Server Recognize A Glider
Revision 7.10 2/28/2012 Note that there are also virtual serial ports which service RUDICS Internet Communications. They appear as net/<0>. This section does not apply to the virtual serial ports. See section 12, Internet Communication: Iridium RUDICS. Devices behave differently in the areas of character transmission and Carrier Detect support. Although the glider can transmit characters at 115,200 baud, it suffers from “buffer overrun” when receiving characters at this rate. In the context of servicing all its tasks, the glider’s main persistor simply can not consume the characters in the hardware receive buffer fast enough. Thus, the glider appears to drop received characters at 115,200 baud. For freewave devices, Dock Server solves this overrun issue by verifying that each character sent to the glider is echoed by the glider. Once Dock Server receives a character’s echo, it sends the next character and waits to receive its echo. Simply adding a delay between sending characters does not work since the communicating freewaves have their own character buffers and transmission timing. For direct devices, Dock Server uses the intercharacter delay approach to solve this overrun issue. For modem (Iridium) devices, this issue does not occur due to the inherent low baud rates. Typically, Dock Server monitors the Carrier Detect (CD) line to determine when a glider is initiating and terminating communication. When the CD line transitions low to high, Dock Server assumes a glider is initiating communication and notifies all Glider Terminals accordingly. When the CD line transitions high to low, Dock Server assumes a glider is terminating communication and again notifies all Glider Terminals. This approach to determining glider to Dock Server communication status works for modem and freewave devices since they support CD. However, since direct devices do not support CD, Dock Server treats gliders connected by a direct device as always in communication with the Dock Server. That is, in Glider Terminal, the icon next to such a glider is never red – regardless of whether or not a glider simulator is actually attached. 11.4 How Does Dock Server Recognize a Glider Dock Server performs many functions that depend on knowing a glider’s name. Among these functions are notifying Glider Terminals when a specific glider has connected and disconnected and sending glider status emails to that glider’s subscribers. Page 134 of 228... -
Page 135: Dock Server Machine User Accounts
Revision 7.10 2/28/2012 Each time a glider initiates communication with Dock Server, it treats the glider as if its name is “unknown” until Dock Server determines the glider’s real name. Thus, the unknown glider’s icon in Glider Terminal may momentarily turn green. To determine a glider’s name, Dock Server continually monitors glider output for the string “Vehicle Name:”. A glider’s name always immediately follows this string. The glider outputs this string with its name each time it boots, each time it connects by freewave and iridium, each time it outputs the surface dialog, and in response to the whoRu command (available in picoDOS, gliderDOS, science, and mission surfaces). Upon initially connecting, Dock Server attempts to detect the glider’s name in its output. If not detected after a short period, Dock Server sends a single whoRu command. This causes the glider to respond with its name and Dock Server detects it. Once detected, the “unknown” glider icon turns red and the icon corresponding to the detected glider turns green. Occasionally, a glider can not respond to the whoRu command at the time Dock Server sends it. In this case, Dock Server continues to treat the glider as the glider “unknown” and to monitor its output for its real name. Users may interact with this unknown glider by opening its glider tab and treating it as they would any other glider. It is strongly recommended that the only user interaction with an unknown glider be to identify the glider to Dock Server. That is, when the glider can accept user commands, the user should enter the whoRu command. This will force Dock Server to recognize the glider. Otherwise, all files transferred to and from this glider will be stored in the unknown glider’s toglider and fromglider directories. 11.5 Dock Server Machine User Accounts Table 115 details the four user accounts related to Dock Server’s use as a glider mission control machine. These accounts have different privileges appropriate to their purpose. Refer to Appendix D for the factory delivered passwords to these accounts. User Account Purpose dockserver The Dock Server application runs as this user. No user login allowed. dataserver The Data Server application runs as this user. No user login allowed. dockserveruser Set up for FTP transfer of glider files. The application, gmcFTP, uses this account to FTP files. No user login allowed. Page 135 of 228... - Page 136 Revision 7.10 2/28/2012 localuser Dock Server user account. All Dock Server control scripts are run from this account – i.e., launchdockserver, killdockserver, seedockserver, and inspectdockserver. Glider Terminal can be run locally from this account using the startgliderterminal script. root Dock Server upgrades are run from this account. Table 115. Dock Server machine User Accounts. Page 136 of 228...
-
Page 137: Internet Communication: Iridium Rudics
Revision 7.10 2/28/2012 12. Internet Communication: Iridium RUDICS 12.1 Overview In Version 6.33, the Dock Server was enhanced to support Glider communications using Iridium RUDICS (Router based Unrestricted Digital Interworking Connectivity System) connections. The traditional Iridium connections transfered data between the Iridium Gateway and the Dock Server over the PSTN (Public Switched Telephone Network), i.e. over regular telephone lines. These are the dashed lines shown in Figure 121. This requires a Modem at the Dock Server premises to answer the phone and deliver data to the Dock Server over an RS232 serial connection, represented by the dashdoubledotted line in Figure 121. Figure 121. Glider Iridium Connection Paths Page 137 of 228... -
Page 138: Pros And Cons
Revision 7.10 2/28/2012 An Iridium RUDICS connection transfers data between the Iridium Gateway and the Dock Server over the Internet using TCP/IP. A public IP port must be available to the Internet at large. The communication between the Glider, Satellites, and Iridium Gateway is the same for both PSTN (traditional) and RUDICS connections. The differences are between the Iridium Gateway and the Dock Server. Any Glider currently using traditional Iridium PSTN can be switched to Iridium RUDICS with a simple configuration change. There are NO HARDWARE CHANGES REQUIRED in the Glider to utilize RUDICS. The Glider must be configured to “dial” a different number and the Iridium SIM card might have to be changed. All of the Gliders in the fleet can “dial” the same Iridium RUDICS number and be simultaneously connected to the same Dock Server. All Iridium Gliders (both PSTN and RUDICS) appear the same to the Dock Server users. The Iridium RUDICS gliders appear to be connected on virtual serial port net/<N> and are treated the same as any other Glider in all the GMC applications: Glider Terminal, GLMPC Terminal, Data Visualizer, and any future GMC applications. Gliders using RUDICS may optionally be required to authenticate (login with username/ password) before they are allowed to connect to the Dock Server. 12.2 Pros and Cons The following table compares PSTN versus RUDICS Iridium connections. PSTN RUDICS Comments Reliability Your mileage may vary. Data Rate Probably not a lot different. Ease of Initial Your mileage may vary. Setup Scalability No contest. (many gliders) Mobility No contest. (shore side) Initial Cost Probably not a lot different. Page 138 of 228... -
Page 139: Reliability
Revision 7.10 2/28/2012 Recurring Cost Your mileage may vary depending on your Iridium Provider. Real World No contest. Experience 12.2.1 Reliability RUDICS superior: Your mileage may vary. The data path from the Glider to Iridium Gateway is the same in both cases. There is no expected change in the over the air reliability: Hangups and pauses in data delivery due to the over the air segment should be the same. The reliability of the Internet strongly depends on the method of connection to the Internet and the ISP. The reliability of the PSTN depends on the distance from the Telephone Company's central office and the length of internal phone wiring. In general, with a modern T1 connection to the Internet and a reliable ISP, the Internet should deliver data much more reliably than the PSTN. The modem required for the PSTN is a huge source of errors and disconnects. 12.2.2 Data Rate PSTN/RUDICS equivalent: Probably not a lot different. The data path from the Glider to Iridium Gateway is the same in both cases. There is no expected change in the over the air reliability: Hangups and pauses in data delivery due to the over the air segment should be the same. The RUDICS initial connection should be faster as there is no Modem training time (the screeches you hear from a modem). 12.2.3 Ease of Initial Setup PSTN/RUDICS equivalent: Your mileage may vary. Page 139 of 228... -
Page 140: Scalability (Many Gliders)
Revision 7.10 2/28/2012 Installing the internal analog phone wires required for a PSTN Dock Server is frequently difficult. Many institutions no longer have analog phones and are required to install or reconfigure wires in the walls for PSTN. Most institutions have the Ethernet cables required for a RUDICS Dock Server already installed. Installing and testing the analog modems required for a PSTN Dock Server has sometimes proved troublesome. Diagnosing, reproducing, and repairing faults (e.g. failure to answer, no connects,...) in analog modems is difficult. The proper installation of a RUDICS Dock Server typically requires configuration of Firewalls, NAT routers, DNS servers, and the network settings on the Dock Server itself. In particular, there must be a publicly assessable IP port which is available to any and all on the Internet. Making this IP port available to the Internet while securing the Dock Server and the rest of the internal network can present administrative and/or technical difficulties. The skill, availability, and attention span of the local Internet/TCP/IP Network Administrator/IT Guru will have a large impact on the initial setup experience. The process of establishing an Iridium RUDICS account takes longer and is slightly more complicated than opening a Iridium PSTN account. The selection of an Iridium RUDICS Provider has a large impact on the results. RUDICS is relatively new and the Iridium Providers don't have nearly the experience or customer base that they do with PSTN. 12.2.4 Scalability (many gliders) RUDICS superior: No contest. No additional hardware or data wires are required for a RUDICS Dock Server to scale from 1 to 50 gliders. A PSTN Dock Server might require ten more RS232 Serial Ports, ten more modem channels, and ten more phone lines. 12.2.5 Mobility (shore side) RUDICS superior: No contest. Page 140 of 228... -
Page 141: Initial Cost
Revision 7.10 2/28/2012 With a phone call to Iridium or with a configuration change in the networking Firewall, all Glider data can be diverted to any RUDICS Dock Server in the world with an Internet connection. To move a PSTN Dock Server requires installation of new phone lines and modems. 12.2.6 Initial Cost PSTN/RUDICS equivalent: Probably not a lot different. The initial establishment of an Iridium RUDICS account requires a onetime payment to open the account. A PSTN Dock Server requires the purchase of a modem and the installation of phone lines. 12.2.7 Recurring Cost RUDICS superior: Your mileage may vary depending on your Iridium Provider. The cost for the Iridium air time is the dominant recurring cost factor. In general, RUDICS air time costs less than PSTN air time. PSTN connections sometimes require an additional perminute charge to the PSTN vendor, e.g. Verizon, ATT. The fixed monthly charges to the Iridium Provider probably don't vary much between RUDICS and PSTN. There is a monthly charge to the PSTN vendor for the phone line which is not required for RUDICS. 12.2.8 Real World Experience PSTN superior: No contest. As of this writing, PSTN Iridium Gliders have more than 100,000 Kilometers in the water compared to about 5 Kilometers for RUDICS. Page 141 of 228... -
Page 142: How To Get Started
Revision 7.10 2/28/2012 12.3 How to Get Started 12.3.1 Plan your Network You must decide: Recommendation Public RUDICS IP Number See Section 12.3.1.1 immediately following Public RUDICS IP Port 6565 Are Gliders Required to Authenticate? If Gliders Authenticate... Do all Gliders share a single Username? If Gliders Authenticate... Which PAM Username/Password on the Dock Authentication Method is Used? Server It is HIGHLY RECOMMENDED that you print a copy of Section 12.8.1 More Example Names and IP Numbers and write in the names and numbers of your installation. This piece of paper can be used as the documentation for your network. It can be given to your Network Administrator or sent to glidersupport@WebbResearch.com. When following trouble shooting Procedures, it makes it easy to substitute your information for what is shown in the examples. 12.3.1.1 Public RUDICS IP Number You must determine the Public IP number and (if applicable) the Private IP number of RUDICS Dock Server. Refer to Section 12.5 CONFIGURATION: Network, Firewall, and Operating System and consult with your Network Administrator. If you change the RUDICS Public IP after your account is open, you'll have to give Iridium some more money. For planning purposes, you may inform the Network Administrator that you will be consuming zero bandwidth. The glider connects a few times a day for low minutes with a typical date rate of 120 bits/seconds. If there is confusion or doubt about what the IP numbers will be, it is recommended that you have the Network Administrator reconfigure the network per Section 12.5 CONFIGURATION: Network, Firewall, and Operating System and you test it per Page 142 of 228... - Page 143 Revision 7.10 2/28/2012 Section 12.8 Initial Checkout and Troubleshooting before you open the RUDICS account. The network configuration and administrative policy at your facility may well dictate that you receive administrative approval to make these changes. The actual changes may have to be done by the Network Administrator. Plan accordingly. It is somewhat ironic that many times one can get data from the middle of the ocean to the edge of your building easier than getting that data from the edge of your building to your desk. 12.3.1.2 Public RUDICS IP Port Select the RUDICS TCP/IP port you will be using. Unless you have an unusually compelling reason, it is recommended that you use the default Iridium RUDICS port: 6565. If there is confusion or doubt about what the IP port will be, it is recommended that you have the Network Administrator reconfigure the network per Section 12.5 CONFIGURATION: Network, Firewall, and Operating System and you test it per Section 12.8 Initial Checkout and Troubleshooting before you open the RUDICS account.
-
Page 144: Open Account With Iridium Rudics Service Provider
Revision 7.10 2/28/2012 requires the end user to create the appropriate Glider user account(s) on the Dock Server. Authentication is NOT restricted to local username/password. Any PAM method (Kerberos,OpenPGP, SAMBA, Radius, LDAP, ...) may be employed. The creation of user accounts and PAM configuration issues are outside the scope of this document and support is NOT available from Webb Research Corporation. If you don't know how to create a user account, you should not have gliders authenticate. If you can't reconfigure PAM without help, you shouldn't change it. 12.3.2 Open account with Iridium RUDICS Service Provider You must select an Iridium RUDICS Service Provider. Iridium does not typically deal directly with end users. The capabilities, services offered, and costs can vary greatly between Iridium RUDICS Service Providers. To open an Iridium RUDICS account. You give the selected provider: The Public RUDICS IP Number (ii) The RUDICS IP Port Number (iii) $$$ After some period of time, the Iridium RUDICS Service Provider will give you: A “number to dial”. This will be placed in a Glider configuration file. All Gliders in your fleet can “dial” the same number. (ii) SIM card(s) that will be installed in the Glider. This process may take 24 weeks depending on the provider. Plan Accordingly. If the SIM card(s) and “number to dial” are provided to Webb Research prior to Glider shipment, the glider will arrive preconfigured and tested for Iridium RUDICS communication. 12.3.3 Configure your Network, Firewalls, and Operating System Follow the procedures outlined in Section 12.5 CONFIGURATION: Network, Firewall, and Operating System using the Public IP number and port that was supplied to the Iridium RUDICS Service Provider in Section 12.3.2. The network configuration and administrative policy at your facility may well dictate that you receive administrative approval to make these changes. The actual changes may have to be done by the Network Administrator. Page 144 of 228... -
Page 145: Configure The Dock Server Application
Revision 7.10 2/28/2012 Test the configuration as described in Section 12.8 Initial Checkout and Troubleshooting. Almost ALL of these test can be performed before the actual RUDICS account is open. Almost ALL of these tests can be performed without a Glider. 12.3.4 Configure the Dock Server Application Follow the procedures outlined in Section 12.6 CONFIGURATION: Dock Server Application using the Public IP number and port that was supplied to the Iridium RUDICS Service Provider in Section 12.3.2. Test the configuration as described in Section 12.8 Initial Checkout and Troubleshooting. Almost ALL of these test can be performed before the actual RUDICS account is open. Almost ALL of these tests can be performed without a Glider. 12.3.5 Configure the Gliders Follow the procedures outlined in Section 12.7 CONFIGURATION: Glider using the Iridium “number to dial” and SIM card that was supplied by the Iridium RUDICS Service Provider in Section 12.3.2 Test the configuration as described in Section 12.8 Initial Checkout and Troubleshooting. 12.4 Glider/GLMPC Terminal Usage Gliders connecting to the Dock Server via Iridium RUDICS appear the same as a Glider connecting via Freewave or the “traditional” Iridium PSTN. There is full functionality in all GMC applications: Glider Terminal : Glider Perspective (ii) Glider Terminal : Serial Port Perspective (iii) GLMPC Terminal (iv) Data Visualizer The Iridium RUDICS Gliders appear to be connected on a virtual serial port: net/<N>... - Page 146 Revision 7.10 2/28/2012 CONFIGURATION: Dock Server Application for changing the number of virtual serial ports allocated. The only minor difference between a virtual serial port and a real one is the appearance of the lights and baud rate in Glider Terminal : Serial Port Perspective. NOT connected As a virtual serial port doesn't have a baud rate, data bits, or stop bits; they are always listed as 0. The output bit indicators from the Dock Server (DTR/RTS) should always be green. The input bit indicators to the Dock Server (CD/CTS/DSR/RI) will always be the same color and collectively indicate when a Glider is connected via Iridium RUDICS: GREEN A Glider is connected on this virtual serial port (ii) RED A Glider is NOT connected on this virtual serial port The indicator next to the net/<N> name in the left pane retains it's normal meaning. Page 146 of 228...
-
Page 147: Configuration: Network, Firewall, And Operating System
Revision 7.10 2/28/2012 CONNECTED 12.5 CONFIGURATION: Network, Firewall, and Operating System This section gives guidance on network configuration. There are many different network topologies and network security policies. Many of the configuration changes will be made in proprietary routers or Firewalls, each with their own custom user interface. It would be impossible to describe the detailed configuration changes for these diverse environments. This section will describe at a high conceptual level the requirements for supporting Iridium RUDICS connections and provide detailed network diagrams for a select few topologies. While this section is focused on Iridium RUDICS connections, it should be noted that these techniques may also be utilized in securely allowing external Glider Terminal users access to a Dock Server on a private network. Three topologies will be described: The Dock Server on a NATed private network behind a Firewall. This is probably the most typical topology. (ii) The Dock Server directly connected to the Internet with no intervening Firewall. Page 147 of 228... -
Page 148: Example Names And Ip Numbers
Revision 7.10 2/28/2012 (iii) An advanced topology with a public relay host which securely forwards (via ssh) the Iridium RUDICS traffic to a Dock Server behind a Firewall over an encrypted channel The Operating System of the Dock Server computer has it's own internal Firewall. This Firewall is disabled by default under the presumption that the Dock Server is on a trusted network and security is provided by an upstream Firewall. There is a section giving guidance on enabling and configuring the Operating System Firewall for interested users. There is a final brief section which is only applicable if the Gliders are required to authenticate which outlines how to add Glider user accounts to the Dock Server. 12.5.1 Example Names and IP Numbers The table below documents the fictitious network used in this section. What's used in examples comments Domain name yourdomain.com Dock Server hostname dockserver dockserver.yourdomain.com Public Dock Server (RUDICS) 140.186.63.239 dockserver.yourdomain.com IP Number resolves in DNS to this from the Internet. See Section 12.3.1.1 Public RUDICS IP Number. Private Dock Server IP 10.20.30.40 dockserver.yourdomain.com Number resolves in DNS to this from your internal private network. This is the actual IP of the ethernet interface on the Dock Server computer. Private Default Gateway IP ... -
Page 149: Typical Topology: Nated Behind A Firewall
Revision 7.10 2/28/2012 RUDICS IP Port (both Public 6565 The default. See Section and Private) 12.3.1.1 Public RUDICS IP Port. It is assumed the both the Public and Private IP Port Numbers are the same. That doesn't have to be the case, but there is usually no reason why they shouldn't be. Iridium's computer's hostname iridium.com The name of the computer that will be connecting to the Dock Server via: telnet dockserver.yourdomain.com 6565 Iridium's computer's IP 68.178.254.188 This is accurate as of this Number writing. It's believed that all the Iridium RUDICS connections are NATed to/from this address, but that could change in the future. 12.5.2 Typical Topology: NATed behind a Firewall The figure below shows the data flow in a typical topology fictitious network: Figure 1251. Typical Topology: NATed behind a Firewall Page 149 of 228... - Page 150 Revision 7.10 2/28/2012 Computers at the Iridium ground station initiate the RUDICS connection as if a human typed: telnet 140.186.63.239 6565 The Dock Server is listening for a connection at: 10.20.30.40 port 6565 The Network Administrator has to accomplish four tasks (two required, two optional) for a RUDICS connection to succeed: Configure NAT (Network Address Translation) to ROUTE packets to and from 140.186.63.239 and 10.20.30.40. This is required. Configure the Firewall at the NAT router to PERMIT packets to and from iridium.com and 10.20.30.40. This is required. Configure DNS (Domain Name Service) so that you can type dockserver.yourdomain.com instead of 140.186.63.239 or 10.20.30.40. Which you have to type depends on where your computer is connected. This is optional. You can always type the dottedquad IP address. Configure the firewall built into the Dock Server operating system to PERMIT access to port 6565. This firewall is disabled by default, making the task optional. See Section 12.5.6 Configuring the Operating System Firewall. 12.5.2.1 Configuring NAT The recommended approach is to : Translate ALL incoming packets from the Internet bound for 140.186.63.239 to 10.20.30.40 regardless of where the packets are coming from or what port they are on. (ii) Translate ALL outgoing packets from 10.20.30.40 to 140.186.63.239 regardless of where the packets are going to or what port they are on. The philosophy is to route everything and depend on the Firewall for security. The following two NAT rules accomplish this: Page 150 of 228...
- Page 151 Revision 7.10 2/28/2012 Source IP Destination IP PORT Original Translated Original Translated Original Translated Incoming NOT translated 140.186.63.239 10.20.30.40 NOT translated Packets Outgoing 10.20.30.40 140.186.63.239 NOT translated NOT translated Packets There are many, many variations. One could additional restrict the NAT rules by many combinations of source IP, destination IP, and port number. 12.5.2.2 Configuring NAT Router Firewall This section assumes that all traffic originating from inside the network is allowed to pass to the Internet. This is probably true in most networks. Some networks may restrict outgoing traffic to approved ports or from approved IP addresses. The Firewall must be configured to allow inbound packets to dockserver.yourdomain.com on port 6565 to pass through the Firewall. The exact nature of the Firewall rules will vary depending on the relative order of the Firewall and NAT. The following two rules will cover both cases. Source IP Destination IP PORT ACTION 140.186.63.239 6565 ALLOW 10.20.30.40 6565 ALLOW...
-
Page 152: Simple Topology: Directly Connected To The Internet
Revision 7.10 2/28/2012 and to 10.20.30.40 from computer's inside the Firewall. This is NOT required. Iridium only knows the IP (140.186.63.239) and not the hostname (dockserver.yourdomain.com). One can always type the dottedquad IP address directly ( 10.20.30.40 or 140.186.63.239) instead of dockserver.yourdomain.com, but most people find it easier to remember the hostname instead of the IP address. 12.5.3 Simple Topology: Directly connected to the Internet The figure below shows data flow in a fictitious network: Figure 1253. Simple Topology: Directly connected to the Internet This topology requires: The network interface of the Dock Server be configured for 140.186.63.239 with appropriate network mask, default gateway, and nameserver IP numbers. A dynamic DHCP setting is NOT acceptable. See Section 1.2 Configuring the Dock Server for the Network. (ii) The Firewall must be either be disabled or configured to accept traffic on port 6565. See Section 12.5.6 Configuring the Operating System Firewall. Page 152 of 228... -
Page 153: Advanced Topology: Relay Host With Ssh Forwarding
Revision 7.10 2/28/2012 12.5.4 Advanced Topology: Relay Host with SSH Forwarding The figure below shows data flow in a fictitious network: Figure 1254. Advanced Topology: Relay Hosts with SSH Forwarding This topology is ONLY for advanced network users with stringent security requirements. This section exists to alert the potential user of the possibility of this topology. It describes the topology in general and makes no attempt to document the stepbystep procedure for implementation. The general approach: There is a proxy computer on the Internet (140.186.63.239) whose IP address was given to Iridium. The Glider makes connection via telnet to this computer. There should be minimal services running on this computer. (ii) The proxy computer forwards the port 6565 traffic over ssh (port 22) through the Firewall(s) to the actual Dock Server at 10.20.30.40 Page 153 of 228... -
Page 154: Configuring The Operating System Firewall
Revision 7.10 2/28/2012 This allows only encrypted traffic on the private network. There are multiple approaches to authentication. The Glider could authenticate via telnet to the proxy computer. The Glider's user account could (e.g. via .bash_login) initiate a ssh connection to the actual Dock Server. Alternatively, all the port 6565 traffic on the proxy computer could be forwarded to the Dock Server (at the system level) and the glider could authenticate at the actual Dock Server. All of the intervening Firewalls and NAT routers must be configured to route and pass ssh traffic from the proxy computer. 12.5.5 Configuring the Operating System Firewall The software Firewall in Dock Server is disabled by default under the presumption that the Dock Server is deployed on a secure network. If enabled, it must be configured to accept packets on the following ports: Port Number Service Name Why? Transfer data from Glider Data to/from Dock Server and Users Remote management via gmc outofbandtools Web Launch Glider/GLMPC Terminal. Observe Dock Server status from a web browser. 6564 Glider/GLMPC Terminal Allow remote usage 6565 RUDICS Allow Glider to connect to Dock Server. NOTE: as of this writing, PASSIVE FTP CONNECTIONS will not work through the Dock Server Operating System Firewall! Configure your FTP Client for Active Connections only if you enable the Firewall. The Firewall can be configured from a GUI launched from the Menu: Applications / System Settings / Security Level The appropriate settings are shown in the following screen shot: Page 154 of 228... -
Page 155: Adding Glider User Accounts To The Operating System
Revision 7.10 2/28/2012 Figure 1255. Firewall configuration settings 12.5.6 Adding Glider User Accounts to the Operating System The Glider only requires an account (with a Username and Password) on the Dock Server if the Glider is required to authenticate. See Section 12.3.1.3 Glider Authentication and Section 12.7.3 Tell the Glider the authentication sequence. To create a Glider account with Username:slocum and Password:WideOpen on dockserver.yourdomain.com via the command line from a remote client: [you@client ~]$ ssh root@dockserver.yourdomain.com useradd -c '"A Glider"' slocum root@dockserver.yourdomain.com's password: [you@client ~]$ ssh root@dockserver.yourdomain.com passwd slocum root@dockserver.yourdomain.com's password: New UNIX password: WideOpen Retype new UNIX password: WideOpen Changing password for user slocum. passwd: all authentication tokens updated successfully. -
Page 156: Configuration: Dock Server Application
Revision 7.10 2/28/2012 Connection to dockserver.yourdomain.com closed. [you@client ~]$ To delete the Glider account and confirm it: [you@client ~]$ ssh root@dockserver.yourdomain.com userdel -r slocum root@dockserver.yourdomain.com's password: [you@client ~]$ ssh slocum@dockserver.yourdomain.com slocum@dockserver.yourdomain.com's password: Permission denied, please try again. The Glider user accounts may also be created and deleted from a GUI via the Menu: Applications / System Settings / Users and Groups 12.6 Configuration: Dock Server Application All CONFIGURATION: Dock Server Application information for Iridium RUDICS is contained in a single file on the Dock Server: /etc/opt/gmc/dockserver.conf This is a pure ASCII text file with the configuration information expressed in XML. The configuration file is only read by the Dock Server Application when it initially starts. You must restart the Dock Server for any changes dockserver.conf to take effect. This configuration only applies to glider authentication when connecting by RUDICS. Refer to section X.XX, for glider authentication over serial ports (iridium and freewave connections). - Page 157 Revision 7.10 2/28/2012 max_num One more than the This sets the maximum number of Gliders that will number of Gliders that be connecting via Iridium can be connected via RUDICS Iridium RUDICS at the same time. It sets the number of virtual serial ports (dev/ <N>) that are allocated.
-
Page 158: Configuration: Glider
Revision 7.10 2/28/2012 [you@client ~]$ ssh root@dockserver.yourdomain.com \ /opt/gmc-out-of-band-tools/bin/gmc-services dockserver restart Any parsing errors of dockserver.conf are reported in: /var/log/gmc/console.log Examine that file and confirm normal operation after any Dock Server restarts. Any of the following command lines will accomplish that: [you@client ~]$ ssh localuser@dockserver.YourDomain.com cat /var/log/gmc/console.log [you@client ~]$ ssh localuser@dockserver.YourDomain.com tail /var/log/gmc/console.log [you@client ~]$ ssh localuser@dockserver.YourDomain.com tail -f /var/log/gmc/console.log The last command, , continuously monitors the log file. It is frequently useful tail -f ... to keep this window open all the time. Type ControlC to interrupt it or just kill it's ... -
Page 159: Tell The Glider The Authentication Sequence
Revision 7.10 2/28/2012 sensor: c_iridium_phone_num(digits) A typical “number to call” looks like: 88160000555 You may receive a “number to dial” with an additional two leading zeros. Those are NOT entered into c_iridium_phone_num. The Glider determines the final “number to dial” by combining c_iridium_lead_zeros and c_iridium_phone_num: c_iridium_lead_zeros(nodim) 2 # number of leading zeros in phone number # typically 2 for both commercial or military The usual methods of permanently setting a Glider sensor value may be employed: GliderDos>put c_iridium_phone_num 88160000555 GliderDos>longterm + c_iridium_phone_num (ii) Edit the Glider file: \config\autoexec.mi THIS METHOD IS BEST. It leaves an obvious trail for the configuration change. - Page 160 Revision 7.10 2/28/2012 When the Glider initially makes an Iridium connection via the “traditional” PSTN or RUDICS, it examines the contents of the Glider file: \config\loginexp.0 This file contains an list of expected lines of text from the Dock Server and what text the Glider should emit when it sees the expected text. This file must be altered to comply with the selected authentication method. IF THE GLIDER DOESN'T HEAR WHAT IT EXPECTS..IT DISCONNECTS. Consider well the ramifications of that fact. If the Glider is in the middle of the ocean and there is a bug in the script, or the loginexp.0 file gets corrupted, or the Dock Server login sequence changes, or .. you'll never hear from that Glider again over Iridium. The default loginexp.0 that is shipped with the Glider has a commented out script designed to handle local username/password PAM authentication with: Glider Username: slocum Password: WideOpen The latest shipping version of loginexp.0 is available at: ftp://ftp.glider.webbresearch.com/glider/windoze/production/targetglider/electric200/config/loginexp.0 The relevant snippet of loginexp.0 is shown below. The comment characters ( ) in BOLD must be removed to activate the script, as the Glider silently ignores any loginexp.0 that only contains comment lines. ### 2008.07.10 changed example for RUDICS network connection with default username/password # send the required first line to start authentication dialog send 60 "\rAuth\r"...
-
Page 161: Initial Checkout And Troubleshooting
Revision 7.10 2/28/2012 Note, authentication is initiated by the glider sending a line of text containing only “Auth” (a carriagereturn, “\r” is required before and after “Auth”). If a different username and/or password is selected, loginexp.0 will require additional changes that are NOT described here. If the PAM authentication method is altered, loginexp.0 will require significant additional modifications. The user is referred to Appendix I: Glider login_script_syntax.txt or http://www.gliderdoco.webbresearch.com/howtooperate/login_script_syntax.txt . 12.8 Initial Checkout and Troubleshooting 12.8.1 More Example Names and IP Numbers The table below documents the fictitious network used in this section. IT IS STRONGLY RECOMMEDED THAT YOU PRINT THIS PAGE AND WRITE IN THE NAMES AND NUMBERS FOR YOUR INSTALLATION! This piece of paper can be used as the documentation for your network. It can be given to your network administrator or sent to glidersupport@WebbResearch.com. When following trouble shooting Procedures, it makes it easy to substitute your information for what is shown in the examples. What's used in examples comments Domain name yourdomain.com Dock Server hostname dockserver dockserver.yourdomain.com Public Dock Server (RUDICS) 140.186.63.239 dockserver.yourdomain.com IP Number resolves in DNS to this from the Internet. See Section 12.3.1.1 Public RUDICS IP Number. Private Dock Server IP 10.20.30.40 dockserver.yourdomain.com Number resolves in DNS to this from your internal private network. ... -
Page 162: Configuration/Testing Tools
Revision 7.10 2/28/2012 that AREN'T physically on the same Ethernet. Private Name Server IP 10.20.31.2 The computer used for DNS, Number i.e. translating hostnames to IP numbers. RUDICS IP Port (both Public 6565 The default. See Section and Private) 12.3.1.1 Public RUDICS IP Port. It is assumed the both the Public and Private IP Port Numbers are the same. That doesn't have to be the case, but there is usually no reason why they shouldn't be. Your computer's hostname client client.yourdomain.com Your Username on Your The name you use to login computer with to your computer. The Glider's name slocum Joshua circumnavigated the world..but he also died at sea. The Iridium RUDICS 88160000555 See Section 12.3.2 Open “number to dial” account with Iridium RUDICS ... -
Page 163: Checkout/Troubleshooting Sequence
Revision 7.10 2/28/2012 Replace dockserver.yourdomain.com with localhost –or (ii) From a root account, omit ssh root@dockserver.yourdomain.com and simply type the remainder of the line directly to the shell. All the examples assume the the remote computer is on a linux platform. Everything described here can be accomplished on a remote computer with a Microsoft Windows Operating System, it's just harder. Many Microsoft Operating Systems don't ship with the required TCP/IP command line tools. There are many third party toolsets, both open source and proprietary, that the end user can obtain and install to accomplish the required tasks (e.g. putty). It is beyond the scope of this document and Webb Research Customer Support in providing assistance in these selections and installations. 12.8.3 Checkout/Troubleshooting Sequence Most of the problems that you encounter will involve misconfigured networking components: name servers, NAT routing issues, and particularly Firewall issues. It's important that one proceeds stepbystep and confirm the proper operation of each component before proceeding to next component. The Iridium RUDICS system simply delivers characters to and from the Glider to a TCP/ IP socket on the Dock Server. You strongest debugging technique is pretending to be a Glider by executing: telnet dockserver.yourdomain.com 6565 Any characters you type are sent to the the Dock Server in exactly the same manner that Glider sends characters. Any characters sent by the Dock Server to the Glider show up on your console. The proper checkout sequence is: Follow the techniques in Section 12.8.4 Checkout/Troubleshooting Procedures in the following environments: 1. Verify the proper operation of the Dock Server as a self contained computer, i.e. make NO USE of any network connections. You will pretend to be a Glider. Substitute localhost for dockserver.yourdomain.com. Page 163 of 228... -
Page 164: Checkout/Troubleshooting Procedures
Revision 7.10 2/28/2012 2. Verify proper operation from a computer on your private network. You will pretend to be a Glider. 3. Verify proper operation from the Internet at large. It is sometimes difficult to find a computer in your building that is NOT on the private network. One suggestion is to try it from home. You will pretend to be a Glider. [OPTIONAL] Verify proper operation from a Glider crudely simulated on any computer with a Python interpreter. This requires gmcoutofbandtools which was initially published in Version 6.33. See Section 12.8.5 Testing with Simulated Glider. Verify proper operation with a real Glider. See Section 12.8.6 Testing with a Glider. 12.8.4 Checkout/Troubleshooting Procedures These examples are written as if they are executed on a computer on your private network which is configured as described in Section 12.5.2 Typical Topology: NATed behind a Firewall. 12.8.4.1 Confirm your network connectivity Who is my default gateway? [you@client ~]$ /sbin/route -n Kernel IP routing table Destination Gateway Genmask Flags Metric Ref Use Iface 192.168.122.0 0.0.0.0 255.255.255.0 0 virbr0 10.20.30.0 0.0.0.0 255.255.255.0 0 eth0... - Page 165 Revision 7.10 2/28/2012 Cable plugged in? (ii) You have right IP number? (iii) Is the network configuration on your computer correct? (iv) Consult your Network Administrator or Network Guru 12.8.4.2 Confirm DNS Configuration Determine your NameServer: [you@client ~]$ cat /etc/resolv.conf ; generated by /sbin/dhclient-script search yourdomain.com nameserver 10.20.31.2 Network Connectivity to NameServer? [you@client ~]$ ping -c 3 10.20.31.2 PING 10.20.31.2 (10.20.31.2) 56(84) bytes of data. 64 bytes from 10.20.31.2: icmp_seq=1 ttl=64 time=0.949 ms 64 bytes from 10.20.31.2: icmp_seq=2 ttl=64 time=0.600 ms 64 bytes from 10.20.31.2: icmp_seq=3 ttl=64 time=1.00 ms --- 10.20.31.2 ping statistics ---...
- Page 166 Revision 7.10 2/28/2012 IF DNS IS MISCONFIGURED... You may still proceed testing while your Network Administrator is repairing DNS by substituting IP Numbers for Hostnames. 12.8.4.3 Confirm network connectivity of dockserver.yourdomain.com Can you ping it by name? [you@client ~]$ ping -c 3 dockserver.yourdomain.com PING dockserver.yourdomain.com (10.20.30.40) 56(84) bytes of data. 64 bytes from dockserver.yourdomain.com (10.20.30.40): icmp_seq=1 ttl=64 time=1.27 ms 64 bytes from dockserver.yourdomain.com (10.20.30.40): icmp_seq=2 ttl=64 time=0.345 ms 64 bytes from dockserver.yourdomain.com (10.20.30.40): icmp_seq=3 ttl=64 time=0.400 ms --- dockserver.yourdomain.com ping statistics --- 3 packets transmitted, 3 received, 0% packet loss, time 2001ms rtt min/avg/max/mdev = 0.345/0.672/1.271/0.424 ms...
- Page 167 Revision 7.10 2/28/2012 3 packets transmitted, 3 received, 0% packet loss, time 1999ms rtt min/avg/max/mdev = 0.491/0.513/0.542/0.021 ms, pipe 2 See Section 1.2 Configuring Dock Server for the Network (ii) Consult the Network Administrator What is NameServer for Dock Server? (It should probably be the same as yours) [you@client ~]$ ssh localuser@dockserver.yourdomain.com cat /etc/resolv.conf localuser@dockserver.yourdomain.com's password: ; generated by /sbin/dhclient-script search yourdomain.com nameserver 10.20.31.2 Can Dock Server talk it it's NameServer? [you@client ~]$ ssh localuser@dockserver.yourdomain.com ping -c 3 10.20.31.2 localuser@dockserver.yourdomain.com's password: PING 10.20.31.2 (10.20.31.2) 56(84) bytes of data.
- Page 168 Revision 7.10 2/28/2012 12.8.4.4 Confirm GliderTerminal operation on dockserver.yourdomain.com Launch a web browser and open URL: dockserver.yourdomain.com Page 168 of 228...
- Page 169 Revision 7.10 2/28/2012 Unable to connect: Web Server running on dockserver.yourdomain.com? (ii) Some firewall block http service on port 80? (iii) Dock Server web content properly installed? (iv) Web Server properly configured? Launch GliderTerminal and switch to Serial Port Perspective GliderTerminal won't launch: Java Web Start Properly configured on your computer? (ii) Firewall blocking port 6564? No net/0 tabs show: See Section 12.6 CONFIGURATION: Dock Server Application Monitor the Dock Server log file. In a separate command line window (or see Section 2.4 Monitoring Dock Server while it's Running): [you@client ~]$ ssh localuser@dockserver.yourdomain.com tail-f /var/log/gmc/console.log localuser@dockserver.yourdomain.com's password: 20080817T184440 - you@client.yourdomain.com-Glider Terminal-1218998760450 - request for dock configuration. 20080817T184442 - you@client.yourdomain.com-Glider Terminal-1218998760450 - Request to start sending all events from serial port: net/0 Page 169 of 228...
- Page 170 Revision 7.10 2/28/2012 12.8.4.5 Confirm RUDICS operation by pretending to be a Glider In a command line window: [you@client ~]$ telnet dockserver.yourdomain.com 6565 Trying 10.20.30.40... Connected to dockserver.yourdomain.com. Escape character is '^]'. telnet: connect to address 10.20.30.40: No route to host Firewall blocking port 6565? (ii) No software is listening on port 6565? (iii) Dock Server running? (iv) RUDICS enabled? A RUDICS connection to the Dock Server has been established. You should see evidence of this in both the log window and in Glider Terminal: 20080818T122209 - DockServer received DETECTION event for glider: unknown on channel net/0- network-multiple 20080818T122209 - Glider link unknown-network-net/0 initialized.
- Page 171 Revision 7.10 2/28/2012 will NOT be locally echoed in GliderTerminal window (ii) will appear in telnet window [you@client ~]$ telnet dockserver.yourdomain.com 6565 Trying 10.20.30.40... Connected to dockserver.yourdomain.com. Escape character is '^]'. I typed this in telnet window I typed this in GliderTerminal Window Data is now flowing in both directions between the Dock Server and what the the Dock Server thinks is a glider. At this point, the Dock Server doesn't know which glider is connected. If one switched to Glider Perspective, all the previously typed characters should show up under the Unknown Glider tab. If you type the magic string used to identify a glider in the telnet window: Vehicle Name: slocum The Dock Server now thinks you are the Glider named slocum. There should be evidence in the log window: 20080818T124739 - Glider link slocum-network-net/0 initialized.
-
Page 172: Testing With Simulated Glider
Revision 7.10 2/28/2012 12.8.5 Testing with Simulated Glider This section is OPTIONAL. You will crudely simulate a Glider with a RUDICS connection to dockserver.yourdomain.com using the program: /opt/gmcoutofbandtools/bin/glidersimulatedonnetwork It requires: a computer with Python 2.5 (or greater) installed (ii) gmcoutofbandtools installed. See Appendix I: glideroutofbandtools NOTE: Unfortunately, at the time of this writing, the Python interpreter on the shipped Dock Server is too old to run the required glidersimulatedonnetwork [you@client ~]$ ssh localuser@dockserver.yourdomain.com python -V localuser@dockserver.yourdomain.com's password: Python 2.3.4 This may have changed since this manual was written. Until it does, glidersimulated onnetwork can't be executed on the Dock Server itself. If you execute glider simulatedonnetwork without any command line arguments, it will print it's usage: [you@client ~]$ /opt/gmc-out-of-band-tools/bin/glider-simulated-on-network USAGE: glider-simulated-on-network ds-ip ds-port [con't] glider-name ini-lat ini-lon [con't] Page 172 of 228... - Page 173 Revision 7.10 2/28/2012 heading speed-knots surf-interval-minutes where: ini-lat decimal degrees -90 to 90, +North, -South ini-lon decimal degrees -180 to 180 +East -West heading degrees tr 0 to 360 Simulates a glider starting at "ini-lat,ini-lon" gliding at "speed-knots" in direction "heading". It connects to dockserver at "ds-ip,ds-port"...
- Page 174 Revision 7.10 2/28/2012 Glider:slocum: Connecting [attempt # 1 ] to ( dockserver.yourdomain.com , 6565 ) Glider:slocum: Connected Glider:slocum: Staying connected for 5 seconds Glider:slocum: End of connection time: Disconnecting ..Launch a GLMPC Terminal. Connect to dockserver.yourdomain.com. Load the ashumetMA map. Select the glider slocum. You should see something similar to: Figure 1285. Testing with Simulated Glider You can also monitor the Glider using Glider Terminal or by monitoring the Dock Server log files as usual. Page 174 of 228...
-
Page 175: Testing With A Glider
Revision 7.10 2/28/2012 12.8.6 Testing with a Glider It's recommended to follow this procedure with the Glider in the parking lot before putting it in the ocean. The best arrangement is to position the Glider with a clear view of the sky for the Iridium connection and within Freewave range of the Dock Server. This should produce two “tabs” in GliderTerminal that shows all communication on the “Freewave” tab and Iridium RUDICS communication on the “networknet/<n>” tab. Note: It is sometimes difficult to have a single physical Dock Server within Freewave range of the glider while connected to the private ethernet. If one has access to two Dock Servers, it is straightforward (but somewhat confusing) to have GliderTerminal connect to different Dock Servers simultaneously. One can watch the Freewave communications via one Dock Server and the Iridium RUDICS communications via the other Dock Server from the same GliderTerminal. Establish Communication over Freewave. Put the Glider in lab_mode: GliderDos I -3>lab_mode on GliderLAB I -3 > In Freewave tab, you should see the Glider “dialing”: 476.09 12 Iridium has been powered on for 4.2 secs 476.12 Waking up Iridium... sending:ATE1 480.29 13 Iridium driver received:[ATE1[0D][0D]] 480.33 Iridium modem matched: OK 480.35... - Page 176 Revision 7.10 2/28/2012 GPS TooFar: 69697000.000 N 69697000.000 E measured 1e+308 secs ago GPS Invalid : 3830.596 N -6925.796 E measured 210.809 secs ago GPS Location: 3830.578 N -6925.800 E measured 49.944 secs ago sensor:m_battery(volts)=13.123 4.652 secs ago sensor:m_vacuum(inHg)=6.49999999999999 4.741 secs ago sensor:m_leakdetect_voltage(volts)=2.5 4.711 secs ago 519.32...
-
Page 177: How It All Works - The Bits And Bytes
Revision 7.10 2/28/2012 12.9 How it all Works – the bits and bytes This section is primarily intended for software developers. It documents the software stack , networks, and hardware components that processes the data to/from the Dock Server program and the Gliders. DockServer Application CLASS: com.WebbResearch.gmc.dockserver.* JAR: /opt/gmc/jars/dockServer.jar RPM: gmcdockserver6.331jpp CLASS: com.webbResearch.gmc.dockServer.SerialConnection CLASS: com.webbResearch.gmc.dockServer.SerialConnection CLASS: com.webbResearch.gmc.dockServer.NetworkSerial Connection EXTENDS: SerialConnection CLASS: javax.comm.SerialPort EXTENDS: javax.comm.CommPort JAR: /usr/share/java/javacomm.jar RPM:javacomm2.0.01jpp CLASS:gnu.io.RXTXCommDriver CLASS:com.webbResearch.gmc.dockServer.NetworkSerialPort IMPLEMENTS:javax.comm.CommDriver EXTENDS:SerialPort JAR:/usr/lib/java/RXTXcomm.jar RPM:RXTXcomm2.0.7pre11jpp CLASS:com.webbResearch.gmc.DynamicallySwitchedOutputStream IMPLEMENTS:java.io.OutputStream CLASS:com.webbResearch.gmc.DynamicallySwitchedInputStream IMPLEMENTS:java.io.InputStream /dev/ttyS0 CLASS:java.net.Socket Kernel Serial Port (RS232) Driver Kernel Networking /dev/eth0 Kernel Ethernet Driver HARDWARE: RJ45 Ethernet Connector HARDWARE: DB9 RS232 Connector NETWORK: Local Area Network (Routers/Firewalls) HARDWARE: Modem NETWORK: Internet NETWORK: PSTN Iridium Ground Station Iridium Satellites... -
Page 178: Appendix A. Anatomy Of Dock Server Log Files
Revision 7.10 2/28/2012 Appendix A. Anatomy of Dock Server Log Files The Dock Server application records its interaction with Glider Terminals, gliders, and serial ports in three log file classes. First, communication between Dock Server and all Glider Terminal clients and between Dock Server and all gliders is recorded in a master log file and in daily log files. Second, Dock Server records all received glider console output in glider surface log files. Third, Dock Server records all data received over each managed serial port in serial port log files. When examining Dock Server historical behavior or diagnosing Dock Server problems, these log file classes should be consulted first. Since the Dock Server application depends on system services such as FTP and email, system logs also provide a perspective on Dock Server behavior. Subsequent sections detail the location and content of these log files and how to view them. A.1 Master Log File console.log This section explains the contents of the master Dock Server log file, console.log, stored in /var/log/gmc. The script inspectdockserver displays this file’s contents (see section 2.4). When checking the status of Dock Server or diagnosing Dock Server issues, this file is the primary source of information. Each log entry begins with the UTC date and time the entry was made in the format YYYYMMDD “T” HHMMSS followed by the event that occurred at that time. Example events recorded in console.log are: 1. The initiation and termination of all glider communications with Dock Server. 2. Initial status of all managed serial ports. 3. All commands sent to gliders and the client that sent them. 4. All file transfers to and from all gliders. 5. The status of Dock Server scripts. Page 178 of 228... -
Page 179: A.1.1 Dock Server Startups
Revision 7.10 2/28/2012 When contacting glider support concerning possible erroneous Dock Server behavior, always include the portion of console.log that covers the questionable behavior. The following sections detail portions of the console.log file. A.1.1 Dock Server Startups This section describes the master log entries made during Dock Server startup. The initial entries detail the Dock Server application’s version running on your server machine. Please, always include the version information that begins with “glider” when contacting Webb Glider Support concerning Dock Server issues. For example, this log portion came from Dock Server version “glider 6.24 ALPHA_20060901_191924 20060901 19:19:24”. The entry following the version describes the last major bug fix or enhancement made to this Dock Server version. 20060901T194640 ======================== 20060901T194640 ++++++++++++++++++++++++ DOCK SERVER VERSION 4.7 RELEASE 4.7 IS STARTING UP... 20060901T194640 ++++++++++++++++++++++++ glider 6.24 ALPHA_20060901_191924 20060901 19:19:24 20060901T194640 ++++++++++++++++++++++++ 20060901T194640 ++++++++++++++++++++++++ Last Fix/Enhancement: New glider detection method glider name no longer in persistent store. 20060901T194640 ======================== When Dock Server starts up, it restores the state of all Dock Server scripts associated with managed gliders. Each time a script’s status changes, Dock Server saves the change in a file, gliderState.xml, associated with the script’s glider. During a restart, this file allows Dock Server to resume each script at the point left off due to the last Dock Server shutdown. For example upon start up, the following log entries show the scripts on gliders ru12 and sim015 now UNLOADED – i.e., no script is currently associated with these gliders. And, the script, /opt/gmc/factoryscripts/glmpc.xml, is RUNNING on glider sim012 and has resumed at the state, “waitForDisconnect” (refer to Appendix C for a description of scripts and their states). Note that the glider, “unknown”, has no script associated with it (i.e., UNLOADED). Since upon initial contact, Dock Server treats all gliders as the glider “unknown” until Page 179 of 228... - Page 180 Revision 7.10 2/28/2012 identified, it is prudent to never run a script on the glider “unknown”; one can never tell what specific glider may be the “unknown” glider or when Dock Server will identify it causing the “unknown” glider to disconnect and the correct glider to connect (possibly switching scripts). 20060901T194640 Script on glider ru12 is UNLOADED 20060901T194640 Script on glider unknown is UNLOADED 20060901T194640 Script on glider sim015 is UNLOADED 20060901T194640 Script /opt/gmc/factoryscripts/glmpc.xml on glider sim012 is RUNNING. 20060901T194640 Script on glider ann is UNLOADED 20060901T194640 Script on glider ru11 is UNLOADED 20060901T194640 Script on glider sim05 is UNLOADED 20060901T194640 Started script /opt/gmc/factoryscripts/glmpc.xml at state waitForDisconnect on glider sim012 The following log entries detail the expected device connected to each serial port. The file dockServerState.xml specifies these connections (refer to section 2.6). After editing the managed serial ports or their devices in this file, it is recommended that the changes are verified by examining this portion of the log. For example, this Dock Server is managing three serial ports: /dev/ttyG0_13, /dev/ttyG0_14, and /dev/ttyG0_15. In addition, Dock Server will treat port 14 as if it is directly connected to a glider or glider simulator and ports 13 and 15 as if freewaves are connected. Refer to section 11.3 for how Dock Server treats these devices differently. 20060901T194640 Dockserver listening to glider detector on channel: /dev/ttyG0_14 direct 20060901T194640 Dockserver listening to glider detector on channel: /dev/ttyG0_13 freewave 20060901T194640 Dockserver listening to glider detector on channel: /dev/ttyG0_15 freewave The next log entries show Dock Server successfully opening three serial ports. The lines with no date / time stamp are output directly from the serial port driver. If Dock Server appears unable to communicate with gliders, this portion of the log and the previous portion detailing portdevice associations should be checked first. The more common reason for no Dock Server to glider communications is that the serial ports did not open successfully (usually caused by not connecting the 4port USB serial adapter). The next most common reason is that the configured portdevice associations do not match the real portdevice connections (usually a configured modem or direct association actually has a freewave connected). Page 180 of 228...
-
Page 181: A.1.2 Glider Connects, Disconnects, And Redirects
Revision 7.10 2/28/2012 Devel Library ========================================= Native lib Version = RXTX2.07pre1 Java lib Version = RXTX2.07pre1 RXTX Warning: Removing stale lock file. /var/lock/LCK..ttyG0_13 RXTX Warning: Removing stale lock file. /var/lock/LCK..ttyG0_14 RXTX Warning: Removing stale lock file. /var/lock/LCK..ttyG0_15 20060901T194641 Serial port /dev/ttyG0_14 opened successfully! 20060901T194641 Serial port /dev/ttyG0_13 opened successfully! 20060901T194641 Serial port /dev/ttyG0_15 opened successfully! The following log portion indicates that Dock Server is done with all startup and initialization tasks and ready to service client requests (i.e., Glider Terminal requests). 20060901T194641 Listening for client requests on /0:0:0:0:0:0:0:0:6564 20060901T194641 Dock Server listening for client connections... A.1.2 Glider Connects, Disconnects, and Redirects This section details the master log entries made when a glider initiates contact with Dock Server and disconnects from Dock Server. Respectively, these two events cause the glider icon in Glider Terminal to turn green and red (provided network connectivity is good). In addition, this section shows the log entries for a glider redirect event. This event occurs when Dock Server detects that a communicating glider is not the glider Dock Server assumed. The following log portion illustrates two gliders initiating communication with Dock Server. The first three entries indicate that a glider named “unknown” has connected to Dock Server on serial port ttyG0_14 over a direct connection. Until Dock Server identifies a glider by its name (in autoexec.mi), it treats the glider as if its name is “unknown” (Refer to section 9.4). The last three log entries show the glider sim012 has connected to Dock Server on serial port G0_15 over a freewave device. 20060901T194641 DockServer received DETECTION event for glider: unknown on channel /dev/ttyG0_14direct 20060901T194641 Glider link unknowndirect/dev/ttyG0_14 initialized. 20060901T194641 Glider unknown: Connection Event on channel /dev/ttyG0_14direct Page 181 of 228... -
Page 182: A.1.3 Glider Commands
Revision 7.10 2/28/2012 20060901T194715 DockServer received DETECTION event for glider: sim012 on channel /dev/ttyG0_15freewave 20060901T194715 Glider link sim012freewave/dev/ttyG0_15 initialized. 20060901T194715 Glider sim012: Connection Event on channel /dev/ttyG0_15freewave The next log entries record the glider sim012 disconnecting from Dock Server. Dock Server resumes listening on the open port G0_15 for subsequent glider connections. 20060901T152842 Glider sim012: Disconnect Event on channel /dev/ttyG0_15freewave 20060901T152842 DockServer resumes glider DETECTION on channel /dev/ttyG0_15freewave As discussed in section 11.4, until Dock Server can identify a glider, it is treated as the glider “unknown”. Once identified, Dock Server redirects communications from the glider “unknown” to the identified glider. The following log entries illustrate Dock Server redirecting an initially unidentified glider to the identified glider sim012. The first three entries show an unidentified glider has initiated communication with Dock Server on serial port G0_15 over a freewave device. The log entry beginning with “Glider mismatch Event…” represents Dock Server identifying the unknown glider as glider sim012. The last three entries show Dock Server disconnecting the glider unknown on port G0_15 and connecting the glider sim012 on that same port. In Glider Terminal this redirect causes the “unknown” glider’s icon to turn red and sim012’s icon to turn green. 20060831T182450 DockServer received DETECTION event for glider: unknown on channel /dev/ttyG0_15freewave 20060831T182450 Glider link unknownfreewave/dev/ttyG0_15 initialized. 20060831T182450 Glider unknown: Connection Event on channel /dev/ttyG0_15freewave 20060831T182505 Glider mismatch Event: Glider sim012 output received on channel unknown freewave/dev/ttyG0_15. Channel's output redirected to glider sim012 20060831T182505 Glider unknown: Disconnect Event on channel /dev/ttyG0_15freewave 20060831T182505 Glider link sim012freewave/dev/ttyG0_15 initialized. 20060831T182505 Glider sim012: Connection Event on channel /dev/ttyG0_15freewave A.1.3 Glider Commands Glider Terminal sends user entered glider commands to the Dock Server application which relays them to the appropriate glider. Dock Server logs every command sent to a glider and the user that sent it. The following log entries show user ziggy logged in to machine with IP address 172.16.3.29 running Glider Terminal instance 1157048855343 Page 182 of 228... -
Page 183: A.1.4 File Transfers To / From Gliders
Revision 7.10 2/28/2012 sending sim012 a series of glider commands – i.e., CtrlC, lab_mode on, use – iridium, loadmission si_ashum.mi and run glmpc.mi. 20060831T182924 ziggy@172.16.3.29Glider Terminal1157048855343 sends CtrlC to sim012 20060831T183142 ziggy@172.16.3.29Glider Terminal1157048855343 sends lab_mode on to sim012 20060831T183206 ziggy@172.16.3.29Glider Terminal1157048855343 sends use iridium to sim012 20060831T183249 ziggy@172.16.3.29Glider Terminal1157048855343 sends loadmission si_ashum.mi to sim012 20060831T184205 ziggy@172.16.3.29Glider Terminal1157048855343 sends run glmpc.mi to sim012 A.1.4 File Transfers to / from Gliders Dock Server transfers files to and from gliders using the zmodem protocol. This section details log entries that record file transfers between Dock Server and gliders. The following log entry shows Dock Server initiating the transfer of files from glider sim012 to the Dock Server on serial port ttyG0_15 over a freewave device. The undated lines are output from the commercial zmodem package used by Dock Server and detail the zmodem settings in effect for the upcoming file transfer. 20060831T185112 Initiating zModem transfer from link sim012freewave/dev/ttyG0_15 to Dock Server. Solutions Consulting ZModemPort Version 1.6 Copyright (C) Solutions Consulting 19982002. All rights reserved. RcvTask is running c in receiveFiles is 4 m_zconv = 3 m_lzConv = 3 m_lzManag = 6 m_zmanag = 6 The subsequent log entries show the two files transferred. For each file, Dock Server logs the start of the transfer, the receipt of each zmodem data subpacket, and the completion of the transfer. 20060831T185121 Starting zModem transfer of 02290010.sbd to/from sim012 size is 1138 dir is /var/opt/gmc/gliders/sim012/fromglider file pointer is 0 c in rzFile is 0 c in rzFile is 10 20060831T185121 Total Bytes sent/received: 1024 20060831T185121 Total Bytes sent/received: 1138 Page 183 of 228... - Page 184 Revision 7.10 2/28/2012 c in rzFile is 11 Exec'ing command 'touch m d '20060831 18:30:28 +0000' /var/opt/gmc/gliders/sim012/from glider/02290010.sbd' to set mtime of file received from glider stdout = '' stderr = '' c in rzFiles is 11 20060831T185121 zModem transfer DONE for file 02290010.sbd m_zconv = 3 m_lzConv = 3 m_lzManag = 6 m_zmanag = 6 append mode istrue 20060831T185122 Starting zModem transfer of 02290009.sbd to/from sim012 size is 6257 dir is /var/opt/gmc/gliders/sim012/fromglider file pointer is 0 c in rzFile is 0 c in rzFile is 10 20060831T185122 Total Bytes sent/received: 1024 20060831T185122 Total Bytes sent/received: 2048 20060831T185122 Total Bytes sent/received: 3072 20060831T185122 Total Bytes sent/received: 4096 20060831T185123 Total Bytes sent/received: 5120 20060831T185123 Total Bytes sent/received: 6144 20060831T185123 Total Bytes sent/received: 6257 c in rzFile is 11 Exec'ing command 'touch m d '20060831 18:26:08 +0000' /var/opt/gmc/gliders/sim012/from glider/02290009.sbd' to set mtime of file received from glider stdout = '' stderr = '' c in rzFiles is 11 20060831T185123 zModem transfer DONE for file 02290009.sbd RcvTask returns Once all files have been transferred, Dock Server logs the termination of the zmodem process on glider sim012. It then renames the transferred files by starting an OS shell process to run the rename_dbd_files utility. Dock Server logs the standard output and error streams from this utility. The following log entries are made for the zmodem termination and the renaming processes. 20060831T185210 Glider sim012 Surrogate thread done with zmodem download (thread terminating). 20060831T185210 Renaming data files transfered from link sim012freewave/dev/ttyG0_15 20060831T185210 '/bin/sh c rename_dbd_files 02290010.sbd 02290009.sbd ' Output Stream Page 184 of 228...
-
Page 185: A.1.5 Dock Server Scripts
Revision 7.10 2/28/2012 sim0122006242110.sbd sim012200624219.sbd 20060831T185210 '/bin/sh c rename_dbd_files 02290010.sbd 02290009.sbd ' Error Stream Dock Server makes a set of log entries similar to those in this section for transferring files from Dock Server to a glider. A.1.5 Dock Server Scripts This section describes the log entries made for Dock Server scripts. Each time a Glider Terminal user opens, runs, pauses, and resumes a script, Dock Server logs the event. In addition, Dock Server logs all script state transitions as they occur in a running script (refer to Appendix C for an explanation of scripts and state transitions). The following log entries show user ziggy logged in to machine with IP address 172.16.3.29 running Glider Terminal instance 1157048855343 starting the Dock Server script called glmpc.xml. The first entry identifies the user sending the script command. The second entry details the command sent. That is, run the factory script glmpc.xml on the glider sim012. The third entry specifies that execution of glmpc.xml started with the state labeled “sendzModem”. 20060831T184725 ziggy@172.16.3.29Glider Terminal1157048855343 sends script command to glider sim012 20060831T184725 Script /opt/gmc/factoryscripts/glmpc.xml on glider sim012 is RUNNING. 20060831T184725 Started script /opt/gmc/factoryscripts/glmpc.xml at state sendzModem on glider sim012 Once a script has started, Dock Server logs every state transition a script makes. These log entries are very useful for debugging scripts as they represent an execution trace of a running script. If you expect a script to make a certain transition in response to specific glider activity but don’t see that transition in the log, then you know where things went wrong. The following log entry specifies that the script glmpc.xml sent the glider command, s *.sbd, to glider sim012 while moving from state “sendzModem” to state “sendzrma”. 20060831T185059 s *.sbd to sim012 in transition from sendzModem to verifyzModem in /opt/gmc/factoryscripts/glmpc.xml Page 185 of 228... -
Page 186: A.2 Daily Event Log Files
Revision 7.10 2/28/2012 Similarly, the next log entry shows that the script glmpc.xml sent the command “!dockzr goto_l10.ma” to glider sim012 while moving from state “sendzrma” to “verifyzrma”. 20060831T185716 !dockzr goto_l10.ma to sim012 in transition from sendzrma to verifyzrma in /opt/gmc/ factoryscripts/glmpc.xml As a last example, the following log entry shows that the script glmpc.xml sent a control R to glider sim012 while moving from state “sendResume” to “waitForResume”. 20060831T185758 CtrlR to sim012 in transition from sendResume to waitForResume in /opt/gmc/factoryscripts/glmpc.xml A.2 Daily Event Log Files To facilitate examining Dock Server behavior on a given day, Dock Server creates a new log file each day. These files are located in the directory /var/log/gmc and are named according to the day they cover. For example, the log file, WebbDock_20060817.log covers the activity of Dock Server, WebbDock, on August 17, 2006 UTC. These log files can be viewed by making /var/log/gmc the current directory (cd shell command) and then entering “less” or “gedit” followed by the filename in a shell window. These daily log files are basically the master log file’s content (refer to section A.1) divided by days. The one important content difference between the master log and the daily log files concerns Dock Server debug / status information that Webb Research uses to monitor Dock Server behavior. This information is only recorded in the master log file, console.log. When contacting glider support concerning possible erroneous Dock Server behavior, always include the portion of console.log that covers the questionable behavior. A.3 Glider Surface Log Files Each time a glider connects to Dock Server a new surface log file is created and named by appending the communication device and the UTC time of the connection to the glider’s name. The surface log files for a particular glider are located in the logs subdirectory of that glider’s home directory. All output received from the glider is stored in the file; this output is also displayed by Glider Terminal. Thus, the surface log files’ content is similar to the MLG files created on a glider. Page 186 of 228... - Page 187 Revision 7.10 2/28/2012 Surface log files can be viewed by making the appropriate glider’s logs directory the current directory (cd shell command) and then entering “less” or “gedit” followed by the filename in the shell window. For example, the file ann_freewave_20060519T121530.log in the folder /var/opt/gmc/gliders/ann/logs contains the glider ann’s surface dialog over a freewave connection on May 19, 2006 at 12:15:30 UTC. A sample of this log file’s content follows. Glider ann at surface. Because:Hit a waypoint [behavior surface_2 start_when = 8.0] MissionName:INITIAL.MI MissionNum:ann207009203 (0009.0003) Vehicle Name: ann Curr Time: Thu Apr 3 16:08:30 2070 MT: 594 DR Location: 4136.767 N 7028.962 E measured 1.812 secs ago GPS TooFar: 69697000.000 N 69697000.000 E measured 1e+308 secs ago GPS Invalid : 4136.773 N 7028.961 E measured 40.942 secs ago GPS Location: 4136.767 N 7028.962 E measured 3.244 secs ago sensor:m_battery(volts)=13.123 61.754 secs ago sensor:m_vacuum(inHg)=6.49999999999999 61.789 secs ago sensor:m_leakdetect_voltage(volts)=2.5 61.759 secs ago devices:(t/m/s) errs: 0/ 0/ 0 warn: 0/ 0/ 0 odd: 0/ 0/ 0 ABORT HISTORY: total since reset: 0 Hit ControlR to RESUME the mission, i.e. dive! Hit ControlC to END the mission, i.e. GliderDos Hit ControlE to extend surface time by 5 minutes. Hit ControlW to get device warning reports. Hit ControlF to reread MAFILES. Hit S [f={rf}|{irid] [num=<n>] [t=<s>] [filespec ...] to send log files Hit ! <GliderDos cmd> to execute <GliderDos cmd> Hit C to consci to science computer Water Velocity Calculations waiting for final gps fix(ideally 36 secs) Waypoint: (4136.7696,7028.9610) Range: 4m, Bearing: 18deg, Age: 1:1h:m Drifting toward outer watch circle, centered on waypoint Now 4.4 meters from middle, will dive at 100.0 meters Time until diving is: 2983 secs(estimated) 598.41 4 behavior goto_wpt_5: SUBSTATE 2 >3 : Waiting until we get to waypoint s *.sbd Page 187 of 228...
- Page 188 Revision 7.10 2/28/2012 599.09 00090003.mlg LOG FILE CLOSED Enumerating and selecting files About to send 3 files Prechecking is not necessary for this invocation 599.31 save_and_change_sensors().. Changed c_science_on from 1 to 0 599.34 save_and_change_sensors().. Changed c_iridium_on from 0 to 0 Changed c_profile_on from 1 to 1 Changed c_gps_on from 1 to 1 Changed c_argos_on from 1 to 1 Changed c_att_time from 1 to 1 Changed c_pressure_time from 0 to 1 Changed c_iridium_time_til_callback from 0 to 0 Changed u_pinger_rep_rate from 8 to 0 Waiting for glider attached ctd to idle Waiting for motors idle Enabling hardware handshake on output START **B00000000000000 Š607.61 restore_sensors().. Restored c_science_on from 0 to 1 607.63 restore_sensors().. Restored c_iridium_on from 0 to 0 Restored c_profile_on from 1 to 1 Restored c_gps_on from 1 to 1 Restored c_argos_on from 1 to 1 Restored c_att_time from 1 to 1 Restored c_pressure_time from 1 to 0 Restored c_iridium_time_til_callback from 0 to 0 Restored u_pinger_rep_rate from 0 to 8 607.71 restore_sensors()..SHUFFLING FILES... Sent 3 file(s): c:\logs\00090003.SBD c:\logs\00090002.SBD c:\logs\00090001.SBD SUCCESS 630.30 00090004.mlg LOG FILE OPENED ...
- Page 189 Revision 7.10 2/28/2012 Glider ann at surface. Because:Hit a waypoint [behavior surface_2 start_when = 8.0] MissionName:INITIAL.MI MissionNum:ann207009204 (0009.0004) Vehicle Name: ann Curr Time: Thu Apr 3 16:09:07 2070 MT: 631 DR Location: 4136.767 N 7028.962 E measured 39.149 secs ago GPS TooFar: 69697000.000 N 69697000.000 E measured 1e+308 secs ago GPS Invalid : 4136.773 N 7028.961 E measured 78.275 secs ago GPS Location: 4136.767 N 7028.962 E measured 40.578 secs ago sensor:m_battery(volts)=13.123 36.792 secs ago sensor:m_vacuum(inHg)=6.49999999999999 99.128 secs ago sensor:m_leakdetect_voltage(volts)=2.5 36.797 secs ago devices:(t/m/s) errs: 0/ 0/ 0 warn: 0/ 0/ 0 odd: 0/ 0/ 0 ABORT HISTORY: total since reset: 0 Hit ControlR to RESUME the mission, i.e. dive! Hit ControlC to END the mission, i.e. GliderDos Hit ControlE to extend surface time by 5 minutes. Hit ControlW to get device warning reports. Hit ControlF to reread MAFILES. Hit S [f={rf}|{irid] [num=<n>] [t=<s>] [filespec ...] to send log files Hit ! <GliderDos cmd> to execute <GliderDos cmd> Hit C to consci to science computer Water Velocity Calculations waiting for final gps fix(ideally 2 secs) Waypoint: (4136.7696,7028.9610) Range: 4m, Bearing: 18deg, Age: 1:1h:m Drifting toward outer watch circle, centered on waypoint Now 4.4 meters from middle, will dive at 100.0 meters Time until diving is: 3788 secs(estimated) Glider ann at surface. Because:Hit a waypoint [behavior surface_2 start_when = 8.0] MissionName:INITIAL.MI MissionNum:ann207009204 (0009.0004) Vehicle Name: ann Curr Time: Thu Apr 3 16:09:28 2070 MT: 652 DR Location: 4136.767 N 7028.962 E measured 59.293 secs ago Page 189 of 228...
- Page 190 Revision 7.10 2/28/2012 GPS TooFar: 69697000.000 N 69697000.000 E measured 1e+308 secs ago GPS Invalid : 4136.760 N 7028.964 E measured 7.831 secs ago GPS Location: 4136.767 N 7028.962 E measured 60.722 secs ago sensor:m_battery(volts)=13.123 56.935 secs ago sensor:m_vacuum(inHg)=6.49999999999999 119.271 secs ago sensor:m_leakdetect_voltage(volts)=2.5 56.94 secs ago devices:(t/m/s) errs: 0/ 0/ 0 warn: 0/ 0/ 0 odd: 0/ 0/ 0 ABORT HISTORY: total since reset: 0 Hit ControlR to RESUME the mission, i.e. dive! Hit ControlC to END the mission, i.e. GliderDos Hit ControlE to extend surface time by 5 minutes. Hit ControlW to get device warning reports. Hit ControlF to reread MAFILES. Hit S [f={rf}|{irid] [num=<n>] [t=<s>] [filespec ...] to send log files Hit ! <GliderDos cmd> to execute <GliderDos cmd> Hit C to consci to science computer Water Velocity Calculations waiting for final gps fix(ideally 22 secs) Waypoint: (4136.7696,7028.9610) Range: 4m, Bearing: 18deg, Age: 1:1h:m Drifting toward outer watch circle, centered on waypoint Now 4.4 meters from middle, will dive at 100.0 meters Time until diving is: 4222 secs(estimated) ^R656.33 11 behavior surface_2: User typed ControlR, resuming I heard a ControlR RESUMING MISSION Megabytes used on CF file system = 7.685547 Megabytes available on CF file system = 116.162109 660.05 00090004.mlg LOG FILE CLOSED Doing system wide housekeeping..report_heap_size(): M_FREE_HEAP=141.0K, M_SPARE_HEAP=124.2K Running algorithm to free disk space if required Not necessary to delete any files at this time Writing longterm state disk file: c:/state/longterm.sta m_tot_num_inflections(nodim) 55.000000 m_tot_horz_dist(km) 5.965029 m_avg_speed(m/s) 0.371378 m_lat(lat) 4136.767300 m_lon(lon) 7028.961900 x_last_wpt_lat(lat) 4136.769600 Page 190 of 228...
-
Page 191: A.4 Serial Port Log Files
Revision 7.10 2/28/2012 x_last_wpt_lon(lon) 7028.961000 m_tot_ballast_pumped_energy(kjoules) 8.176993 f_ocean_pressure_min(volts) 0.250000 m_battery(volts) 13.123000 m_iridium_dialed_num(nodim) 0.000000 m_iridium_call_num(nodim) 0.000000 s_water_depth_avg(m) 220.000000 s_water_depth_delta(m) 0.000000 s_water_depth_wavelength(m) 100.000000 The instantaneous lag time between the system and gps clock is 1.0 seconds. The average lag time between the system and gps clock is 1.8 seconds. Housekeeping is done A.4 Serial Port Log Files For each managed serial port, Dock Server creates a serial port log file. A serial port’s log file contains all data received over that serial port across all Dock Server runs. Every time Dock Server is started, it appends new serial port data to the end of that port’s log file. All serial port log files reside in /var/opt/gmc/serialPorts. A port’s log filename is the port’s device name followed by the extension “.log”. For example, serial port device /dev/ttyUSB0’s log filename is “ttyUSB0.log”. Serial port logging is turned on for all serial ports by default. To turn logging off for a specific port, edit that port’s XML <port> element in the file dockServerState.xml located in /var/opt/gmc. For example, to turn off logging on port /dev/ttyUSB0, add the logging=”off” attribute to /dev/ttyUSB0’s <port> XML element. <port port=”/dev/ttyUSB0” baud=”115200” flowControlIn=”RTSCTS” flowControlOut=”RTSCTS” dataBits=”8” stopBits=”1” parity=”none” logging=”off”> </port> Page 191 of 228... -
Page 192: A.5 Email System Log File
Revision 7.10 2/28/2012 To turn logging on, change the logging attribute’s value to “on” (logging=”on”) or remove the logging attribute entirely from the <port> element. Note that the doublequotes (“) around the attribute’s value are required. Once the file dockServerState.xml has been appropriately changed, Dock Server must be stopped and restarted for the changes to take effect. Serial port log files can be viewed by making /var/opt/gmc/serialPorts the current directory (cd shell command) and then entering “less” or “gedit” followed by the filename in the shell window. A.5 Email System Log File Dock Server uses an email client provided with the OS to send glider event notifications. This email service logs its status in the file maillog located in /var/log. This status includes all emails accepted for delivery from the Dock Server application. To view this log, refer to section 4.5. Page 192 of 228... - Page 193 Revision 7.10 2/28/2012 Appendix B. Dock Server Factory Scripts This appendix describes the Dock Server factory scripts delivered with a Dock Server machine. These scripts reside in the directory /opt/gmc/factoryscripts. As mentioned in section 4.4.1, the contents of this script directory may be changed by subsequent Dock Server upgrades. All scripts a user wishes to preserve should be stored in the directory /var/opt/gmc/scripts. Appendix C presents a short guide to authoring custom Dock Server scripts. sdbDockzr.xml Each time a glider comes to the surface during a mission, this script transfers up to 30 SBD files to the Dock Server, transfers a specified MA file to the glider, directs the glider to reread the MA, and finally directs the glider to resume its mission. To change the .ma file sent to the glider, search for two occurrences of 'gotoTest.ma' and replace with desired filename. Note this script expects this MA file to be in the glider's 'toglider' folder on the Dock Server machine. Note: This script only works with device types that support Carrier Detect – i.e., freewave wireless data transceivers and iridium modems. This script is a good place to start when authoring a custom script that transfers files between a glider in the water and the Dock Server. sbdToDock.xml Each time a glider comes to the surface during a mission, this script transfers up to the latest 30 SBD files to the Dock Server. Once the files are transferred the script directs the glider to resume its mission. This script is a good place to start when authoring a custom script that transfers files between a glider in the water and the Dock Server. allfilesToDock.xml Each time a glider comes to the surface during a mission, this script transfers up to the latest 30 files of type DBD, MBD, SBD, MLG, and sys.log to the Dock Server. Once the files are transferred the script directs the glider to resume its mission. Page 193 of 228...
- Page 194 Revision 7.10 2/28/2012 burnGlider.xml Burns a glider app into Persistor flash memory. Preferably the Glider would be in GliderDos or PicoDos before running this script. However, it should be able to deal with being in a mission; the mission and sequence will be aborted. The glider.app file must be in the glider’s “toglider” directory before starting this script. This script leaves the Glider in GliderDos in lab mode. If an error occurs, it leaves the Glider in PicoDos with a warning string. When this script stops, verify that the app version you expect was installed by examining the output of the last "ver" command issued by the script. burnScience.xml For burning a science app into Persistor flash memory. Preferably the Glider would be in GliderDos or PicoDos beforerunning this script. However, it should be able to deal with being in a mission; the mission and sequence will be aborted. The supersci.app file must be in the glider’s “toglider” directory before starting this script. IMPORTANT NOTE: Once consci is run from PicoDos, the only exit is via dropping the CD signal on the console serial port. This cannot be accomplished (yet) by Dock Server. Therefore, this script leaves the Glider stuck in consci. The operator will need to drop CD to exit. After that, he will be in PicoDos, but the Persistor boot switch remains set the same as on entry (presumably boot app). So just typing "app" will be sufficient to complete the process and return the glider to operation. After this script finishes running, issue a "ver" command and from the version of the science app you can judge whether it succeeded. dbdmlgToDock.xml Each time a glider comes to the surface during a mission, this script transfers up to the latest 30 files of type DBD and MLG to the Dock Server. Once the files are transferred the script directs the glider to resume its mission. Page 194 of 228...
- Page 195 Revision 7.10 2/28/2012 glmpc.xml glmpcdirect.xml glmpcdbd.xml glmpcdirectall.xml glmpcmbd.xml glmpcall.xml These scripts are used in conjunction with GLMPC Terminal for viewing glider positions and specifying glider waypoints on a displayed map. Each time a glider comes to the surface during a mission, these scripts transfer up to the latest 30 SBD files to the Dock Server. Once transferred, they transfer the GLMPC created waypoint file (which defaults to goto_l10.ma, but which can be renamed) to the glider and direct it to reread this MA file and resume its mission. NOTE: The nondirect scripts (eg. glmpc.xml) expect the device type to support Carrier Detect – i.e., the glider is connected by a freewave transceiver or an iridium modem. The direct scripts (ie. glmpcdirect.xml or glmpcdirectall.xml) should be used when the device type is direct. NOTE: Since the GLMPC created waypoint file can be renamed, glmpc scripts transfer all files in the 'toglider' directory to the glider (when it surfaces) to ensure that any new waypoint files are transferred. Consequently, the user should be aware that any other files placed in the 'toglider' directory on the Dock Server machine will also be transferred. NOTE: These scripts assume that the mission glmpc.mi is running on the glider. However, all files in the 'toglider' directory are also transferred when the script is first started, independent of whether a mission is being run (as long as the glider is connected). This ensures that the glider does not have to be running a mission to receive the first waypoint file. IridCallback.xml This script minimizes iridium phone connect time when a glider is just drifting on the water surface and in GliderDOS. It repeatedly directs the glider to callback in 30 minutes. Page 195 of 228...
-
Page 196: Appendix C. Quick Guide To Authoring Dock Server Scripts
Revision 7.10 2/28/2012 Appendix C. Quick Guide to Authoring Dock Server Scripts This appendix presents a short primer on authoring Dock Server Scripts. These scripts run within the Dock Server application. A Dock Server script operates similar to Expect on Unix or Linux. A script monitors the character input stream on a serial port for specific patterns of characters. When one of these patterns is detected, the script writes a preprogrammed character sequence to the serial port. In this fashion, glider output read on a serial port triggers a script to write glider commands to the glider. In turn, the glider responds with more output which triggers the writing of additional commands. This cycle repeats until the script terminates. To be a little more formal, a Dock Server script represents a finite state machine. A script is composed of states. Each state is composed of transitions. Each transition specifies a condition, an action, and a state. A condition is a regular expression (see Appendix H. Java 1.4.2 Regular Expression Syntax). This expression is continuously matched against glider output. If a match is found, the condition becomes true. As long as no match is found, the condition is false. When a transition’s condition becomes true, its action is performed. For Dock Server scripts, a transition’s action is to send a given command to a glider. Thus, when a transition’s condition is true, its action (i.e., glider command) is sent to the glider. In addition, this transition’s state becomes the “active” state of the script. That is, the conditions of this new state’s transitions are now matched against glider output. This matching glider output against the conditions of a state’s transitions continues until a special state called the final state is reached. The script terminates when the final state is reached. While many glider associated tasks can be automated using scripts, they have limitations. The following list identifies the most prominent Dock Server script limitations. 1. No arithmetic. Quantities can not be manipulated mathematically – no addition, subtraction, etc… Thus, no loop counters. 2. No variables. Quantities can not be saved and then referred to later. Page 196 of 228... - Page 197 Revision 7.10 2/28/2012 3. No procedures or methods. Portions of a script can not be parameterized for reuse. 4. No ability to “exec” OS shell commands or “call out” to other applications. Modifying a script from the factoryscripts directory that is close to your desired task is a good method for learning how to develop your own Dock Server scripts. The remainder of this section explains script features and draws on the complete script that follows for examples. Dock Server scripts are written as XML documents; thus, they must begin with the XML header element whose tag is “?xml”. Embedded XML comments begin with “<!“ and end with “>”. These embedded comments explain the purpose of the script and of each state and transition. Please read them for a detailed explanation of this script’s behavior. The following list enumerates general points that apply to all scripts and refers to the shown script to exemplify these points. 1. All of a script’s states are nested within the <gliderScript> element. 2. All scripts must have an initial state and a final state. These states are coded using the <initialState> and <finalState> elements. When a script is run, it begins with the initial state. When the final state is reached, the script stops. 3. All states must have a name attribute that uniquely identifies the state. For example the <initialState>’s name is “sendzModem”. These names are used in transitions to specify the transition’s destination state. 4. Each state but the <finalState> has a <transitions> element that encapsulates one or more <transition> elements. 5. Every transition has a single condition. There are two types of conditions. The first type specifies a regular expression that is matched against glider output. This type has a “matchExpression” attribute set to the regular expression. For Example, the only <transition> in the <initialState> state has a matchExpression equal to “Hit ControlR to RESUME”. When “Hit ControlR to RESUME” appears in the glider output, this condition becomes true. Java’s regular expression Page 197 of 228...
- Page 198 Revision 7.10 2/28/2012 syntax can be found at the following URL or in Appendix H: Java 1.4.2 Regular Expression Syntax. http://java.sun.com/j2se/1.4.2/docs/api/java/util/regex/Pattern.html The second condition type acts as a timer. This type has a “timeout” attribute that specifies a time in whole minutes. When a state with this type of condition is entered, a countdown from the given number of minutes begins. Each state can have only one timer condition at most. For example, the last transition of the state <sendResume> has a “timeout” attribute set to 10 minutes. This condition becomes true if the script waits in this state for 10 minutes or more. 6. Every transition has a single destination state. When a transition’s condition becomes true, the script moves to the destination state. That is, the conditions of the current state’s transitions are abandoned and the conditions of the destination state’s transitions are tested. The destination state is coded as the value of the “toState” attribute. For example, assume the current state is the <initialState> state and that the glider just output the characters “Hit ControlR to RESUME”. These characters cause the condition of <initialState>’s only transition to become true. The script stops testing <initialState>’s conditions and starts testing the conditions of the state named “verifyzModem”. As another example, assume the current state is the state named “sendResume”. If the script has been in this state for 10 minutes without any other conditions of this state’s transitions becoming true, then the script stops testing the conditions of the state named “sendResume” and starts testing the conditions of the state named “sendzModem”. 7. Every transition can have zero or more actions. These actions represent what task the script should perform when the actions’ corresponding condition is true. Dock Server scripts have two types of actions: (1) send a specified command to the glider, and (2) send a command to the Dock Server application itself. Page 198 of 228...
- Page 199 Revision 7.10 2/28/2012 Each action is coded as an <action> element nested within the <transition> element. The <action> element has two attributes labelled “type” and “command”. For glider actions, the type is “glider”. For Dock Server actions, the type is “dockserver”. For glider type actions, the command attribute must be a GliderDOS or PicoDOS command, or the “dockzr” command (refer to section 4.2). For example, the action associated with <initialState>’s only transition sends the glider command “s *.sbd” to the glider when the character sequence “Hit Control R to RESUME” is detected in the glider’s output. Command line parameters can appear in the command attribute of the <action> element. The user enters command line arguments via Glider Terminal's Add Script Dialog. Dock Server substitutes these arguments for parameters found in the script at the time the script is added to the glider's script queue. Parameters are specified using the $n or ${n} syntax where n is the position of the corresponding argument on the command line. For example, suppose the user adds a script, filesToDock.xml, to the queue and enters the following command line arguments. *.sbd *.tbd Suppose filesToDock.xml contains the following <action> element. <action type=”glider” command=”s $0 ${1}” /> When Dock Server adds this script to the queue, it replaces $0 with *.sbd and ${1} with *.tbd to produce the following <action> element. <action type=”glider” command=”s *.sbd *.tbd” /> For Dock Server type actions, the only implemented command attribute is “gliderConsoleOutInsert”. This command inserts the text located in the body of the <action> element into the glider console output stream. Thus, the inserted Page 199 of 228...
- Page 200 Revision 7.10 2/28/2012 text appears on Glider Terminal in that glider’s console output pane. This command is used to display messages while a script is running. Its intended use is analogous to the debug print statements of programming languages. The following action element exemplifies the gliderConsoleOutInsert command. <action type=”dockserver” command=”gliderConsoleOutInsert”> Text appearing here shows up in the Glider Terminal output pane. Same for text here. And the same for text here. </action> The previous <action> element produces the following text in the Glider Terminal output pane. <dockserver> <scriptInsert> Text appearing here shows up in the Glider Terminal output pane. Same for text here. And the same for text here. </scriptInsert> </dockserver> 8. The Dock Server application executes a script in the following manner. 1. When run, a script’s <initialState> is made the current state and any available glider output is placed in a match buffer. 2. If the current state is the <finalState>, the script terminates. 3. If the current state has a timeout condition, a countdown timer starts counting from the “timeout” attribute value. 4. All match expression conditions of the current state’s transitions are matched in the order written. If any match condition successfully matches against the buffer contents, then the countdown timer is stopped, the matching process is stopped, and Page 200 of 228...
- Page 201 Revision 7.10 2/28/2012 the successful match condition becomes true. If the countdown timer expires during matching, then the match process is stopped and the timeout condition becomes true. 5. If any condition is true, then the state given in that condition’s corresponding “toState” attribute becomes the current state, the match buffer is cleared up to and including the matched glider output (if a timeout condition is true, the entire buffer is cleared), and script interpretation continues with step 2. If no condition is true, then glider output received during matching (step 4) is appended to the match buffer and script interpretation continues with step 4. The previous examples are taken from the following complete script. <?xml version="1.0" encoding="UTF8"?> <! Date Author Comments Nov 30, 2004 trout.r@comcast.net Created. Dec 18, 2004 trout.r@comcast.net Add responding to commands that do not verify. Dec 21, 2004 trout.r@comcast.net Fixed Iridium "double" surface dialog burst where two s *.sbd are sent in response to two "...RESUME" triggers. > <! Used during a mission to transfer sbd files to the dockserver and then resume the mission. For use with dockserver version 1.2 and up. > <gliderScript> <! Start state. When a glider surface dialog is seen, send the "s" command and transition to verify that the command was received. > <initialState name="sendzModem"> <transitions>...
- Page 202 Revision 7.10 2/28/2012 </action> </transition> </transitions> </initialState> <! This state verifies that the "s" command was received. Once verified, it transitions to wait for the file transfer to complete. > <state name="verifyzModem"> <transitions> <! If a surface dialog is seen, continue to watch for echo of command in order to verify it was received. > <transition matchExpression="Hit ControlR to RESUME" toState="verifyzModem"> </transition> <! If the "s" command verify timer on the dock server times out, then transition to resend the command. > <transition matchExpression="xxx command verify fail xxx" toState="sendzModem"> </transition> <! If the "s" command's echo is seen from the glider, then the command is verified. Transition to wait for the zmodem file transfer to complete. > <transition matchExpression="s \*.sbd" toState="waitForTransfer"> </transition> </transitions> </state> <! Wait for the file transfer to complete either successfully or not. > <state name="waitForTransfer"> <transitions> <! If a surface dialog is seen, then the glider has not started a file transfer even though it echoed the "s" command. Resend the "s" command and transition to verify it.
- Page 203 Revision 7.10 2/28/2012 > <transition matchExpression="NO TRANSMISSION" toState="sendResume"> </transition> <! If an error occured while transfering the files, give up and resume the mission > <transition matchExpression="Error sending files" toState="sendResume"> </transition> </transitions> </state> <! Wait for a surface dialog to appear, then resume the glider mission. > <state name="sendResume"> <transitions> <! If a surface dialog is seen, send a ^R to resume the mission and transition to verify it was received. > <transition matchExpression="Hit ControlR to RESUME" toState="waitForResume"> <action type="glider" command="CtrlR"> </action> </transition> <! If no surface dialog is seen for 10 minutes, then assume the glider has dove. Transition to send the "s" command upon the next surface event. > <transition timeout="10" toState="sendzModem"> </transition> </transitions> </state> <! This state verifies that the mission has resumed. This verification keeps the script from prematurely sending an "s" command before the glider actually dives (sometimes a surface dialog is seen after the ^R is sent. Ideally this script should be changed to watch for the glider disconnect message. This approach is more robust. > <state name="waitForResume">...
- Page 204 Revision 7.10 2/28/2012 <transition matchExpression="RESUMING MISSION" toState="sendzModem"> </transition> <! If the command cannot be verified one way or the other within 10 minutes, then assume the glider has dove and transition to send the "s" command upon the next surfacing. > <transition timeout="10" toState="sendzModem"> </transition> </transitions> </state> <finalState name="final" completionCode="0" completionMessage="All OK"> </finalState> </gliderScript> Page 204 of 228...
-
Page 205: Appendix D. Shipped Dock Server Configuration File
Revision 7.10 2/28/2012 Appendix D. Shipped Dock Server Configuration File Each Dock Server machine is delivered with a sheet containing information specific to that Dock Server and its purchasing customer. This sheet details important information such as account passwords for root and dock server, and the Dock Server application version installed. This appendix shows an example sheet without actual customer information. *************** DOCKSERVER N ************************************************ Contact Information name: < ? ? > Technical contact: < ? ? > mailing/shipping address: < ? ? > voice number: < ? ? > fax: < ? ? > email address: < ? ? > Installed OS / Hardware Information computer model: HP Laptop NC6120 WRC PO# for computer: 06450 Part Number: PZ718UA#ABA Serial Number: CNU5520Q21 Installation kickstart: 20060314 moose@DinkumSoftware.com laptopHPnc6120sxgaplusks.cfg postinstall: 20060314 moose@DinkumSoftware.com dockserverfc3pi.sh dockserver: 20060314 moose@DinkumSoftware.com ftp://ftp.glider.dinkumsoftware.com/dockserverfinishinstall/RELEASE_3_6/dockserverinstallstuff.tar.gz serial adapter(s): Keyspan USA49WLC 4 port USB or Edgeport/4 4 RS232 Serial DB9 mn# 301100004 modem(s): USR Courier mn# 3453B, sn# < ? ? > Network Information WRC Private: hostname: dockserverN.DinkumSoftware.com Page 205 of 228... - Page 206 Revision 7.10 2/28/2012 IP: 172. 16. 60. 30 netmask: 255.255. 0. 0 default gateway: 172. 16. 63.225 DNS: 172. 16. 63.233 172. 16. 63.251 Customer: hostname: < ? ? > IP: < ? ? > netmask: < ? ? > default gateway: < ? ? > DNS: < ? ? > < ? ? > Page 206 of 228...
-
Page 207: Appendix E. Dock Server Install From Scratch
Revision 7.10 2/28/2012 Appendix E. Dock Server Install from Scratch Each Dock Server machine is delivered with the CentOS and the Dock Server application installed. This appendix details what Webb Research does to install the CentOS and the Dock Server application on a laptop computer. << TO BE DONE >> Page 207 of 228... -
Page 208: Appendix F. Dock Server Rpm Upgrade Output
Revision 7.10 2/28/2012 Appendix F. Dock Server RPM Upgrade Output This appendix shows the Dock Server RPM upgrade output for a successful upgrade on a laptop machine. << TO BE DONE >> Page 208 of 228... -
Page 209: Appendix G. Glmpc File Formats
Revision 7.10 2/28/2012 Appendix G. GLMPC File formats Each GLMPC map is stored in a directory with a name identifying the particular map. For example, newyorkharborNY contains a map of New York harbor. Each map directory must contain a file named coordinates.xml which defines two coordinates (in ISO 6709 format): one identifying the lowerlefthand point of the map image (first point XML element) in the directory, and one identifying the upperrighthand point of the map image (second point XML element). The following shows example contents of a coordinates.xml file (note the ?xml element is required): <?xml version=” 1 .0” encoding=” U TF-8” ? > <coordinates> <point><lat>+4137.616</lat><lon>-07032.550</lon></point> <point><lat>+4138.367</lat><lon>-07031.500</lon></point> </coordinates> Each map directory usually contains an image of the map to be displayed (which must be stored in a file named image.JPG), although this is not a requirement. Images can be obtained from any number of sources, although they must present a flat (platte carree) geographic projection. If no such image exists, the coordinates.xml file simply includes two points defining the geographical area of interest. Finally, each map directory may contain a file named bathymetry.xml describing depth contours, in a proprietary format. The following shows (artificially simplified) example contents of a bathymetry.xml file: <?xml version=” 1 .0” encoding=” U TF-8” ? > <contours>... - Page 210 Revision 7.10 2/28/2012 <point><lat>4138.043</lat><lon> -7032.233</lon></point> <point><lat>4137.909</lat><lon> -7032.180</lon></point> </contour> </contours> Each <point> element defines a point on the contour, at a depth indicated by its parent <contour> depth attribute. Also, points must be sequenced to ‘trace out’ the contour, as opposed to being randomly scattered across the contour. Finally, contours with identical depth attributes can be used as many times as necessary within <contours>. Page 210 of 228...
-
Page 211: Appendix H. Java 1.4.2 Regular Expression Syntax
Revision 7.10 2/28/2012 Appendix H. Java 1.4.2 Regular Expression Syntax This section reproduces the Java 1.4.2 API documentation on regular expressions. Dock Server scripts use regular expressions to trigger the sending of glider commands (refer to Appendix C: Quick Guide to Authoring Dock Server Scripts). This documentation can be found at: http://java.sun.com/j2se/1.4.2/docs/api/java/util/regex/Pattern.html Summary of regularexpression constructs Construct Matches Characters The character x The backslash character n (0 The character with octal value n 7) <= <= The character with octal value nn (0 n 7) <= <= mnn (0 The character with octal value m 3, <= <= 0 n 7) <= <= The character with hexadecimal value hhhh hhhh The character with hexadecimal value ... - Page 212 Revision 7.10 2/28/2012 [a-z&&[^bc]] through , except for and : (subtraction) [ad-z] [a-z&&[^m-p]] through , and not through : (subtraction) [a-lq-z] Predefined character classes Any character (may or may not match line terminators) A digit: [0-9] A nondigit: [^0-9] A whitespace character: [ \t\n\x0B\f\r] A nonwhitespace character: [^\s] A word character: [a-zA-Z_0-9] A nonword character: [^\w] POSIX character classes (USASCII only) \p{Lower} A lowercase alphabetic character: [a-z] \p{Upper} An uppercase alphabetic character: [A-Z] \p{ASCII} All ASCII: [\x00-\x7F]...
- Page 213 Revision 7.10 2/28/2012 The beginning of a line The end of a line A word boundary A nonword boundary The beginning of the input The end of the previous match The end of the input but for the final terminator, if any The end of the input Greedy quantifiers X, once or not at all X, zero or more times X, one or more times X, exactly n times X, at least n times X, at least n but not more than m times Reluctant quantifiers X, once or not at all X, zero or more times X, one or more times X, exactly n times X, at least n times X, at least n but not more than m times Possessive quantifiers X, once or not at all X, zero or more times X, one or more times X, exactly n times X, at least n times X, at least n but not more than m times Logical operators Page 213 of 228...
- Page 214 Revision 7.10 2/28/2012 X followed by Y Either X or Y X, as a capturing group Back references Whatever the n capturing group matched Quotation Nothing, but quotes the following character Nothing, but quotes all characters until Nothing, but ends quoting started by Special constructs (noncapturing) X, as a noncapturing group (?idmsux-idmsux) Nothing, but turns match flags on off X, as a noncapturing group with the given flags on off (?idmsux-idmsux: X, via zerowidth positive lookahead X, via zerowidth negative lookahead X, via zerowidth positive lookbehind (?<= X, via zerowidth negative lookbehind (?<! X, as an independent, noncapturing group (?> Backslashes, escapes, and quoting The backslash character ( ) serves to introduce escaped constructs, as defined in the table above, as well as to quote characters that otherwise would be interpreted as unescaped constructs. Thus the expression matches a single backslash and matches a left brace. It is an error to use a backslash prior to any alphabetic character that does not denote an escaped construct; these are reserved for future extensions to the regularexpression language. A backslash may be used prior to a nonalphabetic character regardless of whether that character is part of an unescaped construct. ...
- Page 215 Revision 7.10 2/28/2012 them from interpretation by the Java bytecode compiler. The string literal , for example, "\b" matches a single backspace character when interpreted as a regular expression, while "\\b" matches a word boundary. The string literal is illegal and leads to a compiletime "\(hello\)" error; in order to match the string the string literal must be used. (hello) "\\(hello\\)" Character Classes Character classes may appear within other character classes, and may be composed by the union operator (implicit) and the intersection operator ( ). The union operator denotes a class that && contains every character that is in at least one of its operand classes. The intersection operator denotes a class that contains every character that is in both of its operand classes. The precedence of characterclass operators is as follows, from highest to lowest: Literal 1 escape 2 Grouping [...] 3 Range 4 Union [a-e][i-u] 5 Intersection [a-z&&[aeiou]] Note that a different set of metacharacters are in effect inside a character class than outside a character class. For instance, the regular expression loses its special meaning inside a character class, while the expression ...
- Page 216 Revision 7.10 2/28/2012 The regular expression matches any character except a line terminator unless the flag DOTALL is specified. By default, the regular expressions and ignore line terminators and only match at the beginning and the end, respectively, of the entire input sequence. If mode is activated MULTILINE then matches at the beginning of input and after any line terminator except at the end of input. When in mode matches just before a line terminator or the end of the input MULTILINE sequence. Groups and capturing Capturing groups are numbered by counting their opening parentheses from left to right. In the expression , for example, there are four such groups: ((A)(B(C))) 1 ((A)(B(C))) 2 3 (B(C)) 4 Group zero always stands for the entire expression. Capturing groups are so named because, during a match, each subsequence of the input sequence that matches such a group is saved. The captured subsequence may be used later in the expression, via a back reference, and may also be retrieved from the matcher once the match operation is complete. The captured input associated with a group is always the subsequence that the group most recently matched. If a group is evaluated a second time because of quantification then its previouslycaptured value, if any, will be retained if the second evaluation fails. Matching the string against the expression ...
- Page 217 Revision 7.10 2/28/2012 Unicode escape sequences such as in Java source code are processed as described in ?3.3 \u2014 of the Java Language Specification. Such escape sequences are also implemented directly by the regularexpression parser so that Unicode escapes can be used in expressions that are read from files or from the keyboard. Thus the strings and , while not equal, compile "\u2014" "\\u2014" into the same pattern, which matches the character with hexadecimal value . 0x2014 prop Unicode blocks and categories are written with the and constructs as in Perl. matches if the input has the property prop, while \P{prop does not match if the input has that property. Blocks are specified with the prefix , as in . Categories may be InMongolian specified with the optional prefix : Both and denote the category of Unicode \p{L} \p{IsL} letters. Blocks and categories can be used both inside and outside of a character class. 3.0 . The block The supported blocks and categories are those of The Unicode Standard, Version names are those defined in Chapter 14 and in the file Blocks3.txt of the Unicode Character ...
- Page 218 Revision 7.10 2/28/2012 subexpressions exist at that point in the regular expression, otherwise the parser will drop digits until the number is smaller or equal to the existing number of groups or it is one digit. Perl uses the flag to request a match that resumes where the last match left off. This functionality is provided implicitly by the class: Repeated invocations of the Matcher method will resume where the last match left off, unless the matcher is reset. find In Perl, embedded flags at the top level of an expression affect the whole expression. In this class, embedded flags always take effect at the point at which they appear, whether they are at the top level or within a group; in the latter case, flags are restored at the end of the group just as in Perl. Perl is forgiving about malformed matching constructs, as in the expression , as well as dangling brackets, as in the expression , and treats them as literals. This class also abc] accepts dangling brackets but is strict about dangling metacharacters like +, ? and *, and will throw a if it encounters them. PatternSyntaxException For a more precise description of the behavior of regular expression constructs, please see Mastering Regular Expressions, 2nd Edition , Jeffrey E. F. Friedl, O'Reilly and Associates, 2002. Page 218 of 228...
-
Page 219: Appendix I: Glider Login_Script_Syntax.txt
Revision 7.10 2/28/2012 Appendix I: Glider login_script_syntax.txt This content is also available at: http://www.gliderdoco.webbresearch.com/howtooperate/login_script_syntax.txt login_script_syntax.txt =================================================== This file discusses how to control the Iridium login process. Table of Contents ========================================================= - Overview - Example - Error handling details - How to change a script - Revision history = Overview ================================================================ The Iridium modem can automatically dial, connect, and log into a host system. - Page 220 Revision 7.10 2/28/2012 # have the glider wake the remote system send 60 "\r" expect 60 "login:" # send the user_id send 60 "zippy_the_glider\r" expect 60 "password:" # send the password send 60 "zippys_password\r" # wait for any signon message and prompt to clear before making the Iridium port serve as an active glider console.
-
Page 221: Appendix J: Calibrating The Glider Revolution(Tm) Compass
Revision 7.10 2/28/2012 Appendix J: Calibrating the glider Revolution (TM) compass Gliders using the True North Revolution (TM) compass require that the compass be calibrated to ensure accurate compass readings. Calibration compensates for any permanent or induced magnetic fields from the glider, and must be performed after the compass is installed on the glider. For this reason, Dock Server machines are delivered with a compass calibrator application that can be run as localuser. The software uses a Freewave transceiver to communicate with the compass installed on the glider, requiring no physical connection between the Dock Server machine and the glider. This also enables the compass to be calibrated without opening the glider on which it is installed. The compass calibrator application is configured in Linux using file: /etc/opt/compass/compassCalibrator.conf which is initially installed with the following XML as content: <?xml version="1.0" encoding="UTF-8"?> <compassCalibratorConfiguration> <port port="/dev/ttyUSB1" baud="115200" dataBits="8" stopBits="1" parity="none"></port> <numberOfReadings>3000</numberOfReadings> <characterDelay>100</characterDelay> </compassCalibratorConfiguration> The port element attributes are similar to those found in the dockServerState.xml file. For example, the file above configures the compass calibrator application to communicate using serial port /dev/ttyS0. To use a different serial port (eg. /dev/ttyUSB0) simply update the XML port attribute in compassCalibrator.conf. The numberOfReadings element defines how many data points are collected from the compass during calibration. This is initially set to 3000, which is usually adequate. Finally, the characterDelay element defines the delay (in milliseconds) between each character communicated to the glider from the compass calibrator application. A delay is required to limit the risk of characters being dropped during communication, with 100 milliseconds usually being adequate. Typically, the port element ... - Page 222 Revision 7.10 2/28/2012 1. Ensure that the Dock Server application is not running. 2. Connect the Dock Server machine to a Freewave transceiver, using the port specified in compassCalibrator.conf and communicating with the glider containing the compass to be calibrated 3. Log on to the Dock Server machine as user localuser and open a terminal window. 4. Go to directory /opt/locauser/bin and enter command ./calibratecompass If no communication can be established with the compass, the application displays the following: Compass calibration aborted: cannot communicate with compass. In this case, as well as doublechecking the compassCalibrator.conf settings, check that the glider is powered up and communicating over Freewave. Also, try power cycling the glider to put the compass in run mode. If there is still no communication, make sure the glider is running the talk utility by using the following steps: 1. Open a terminal window and start the minicom application on the specified port, for example by entering: minicom u1 (where u1 refers to a minicom configuration file, on the Dock Server machine, for port ttyUSB1) 2. Power the glider on. If in “boot app” then exit to PicoDos. If in “boot pico” then leave in this state. 3. From the (GPICO)C:\> prompt, type ver (to display version information) and then type talk att. This starts the talk utility and opens a serial port to the attitude sensor. You should now see data being read from the compass. 4. Close the minicom application This frees up the serial port for use by the compass calibrator. 5. Try starting the compass calibrator application again by going to directory /opt/locauser/bin and entering command ./calibratecompass Starting the compass calibrator in Windows The compass calibrator application also runs in Windows using the following steps: 1.
- Page 223 Revision 7.10 2/28/2012 2. Download the file compasscalibrator.zip onto a Windows machine from the URL ftp://ftp.glider.webbresearch.com/clients/compasscalibrator/filesfor windows 3. Unzip the contents of compasscalibrator.zip into the compasscalibrator directory 4. Go to the compasscalibrator directory and execute runcompasscalibrator.bat If no communication can be established with the compass, the application displays the following: Compass calibration aborted: cannot communicate with compass. In this case, first check the compassCalibrator.conf file in directory 'Documents and Settings\<username>\.compass', where <username> is the user currently logged on. By default, the file configures the compass calibrator application to communicate using serial port COM1, although the port configured may have to be updated. Also, try power cycling the glider to put the compass in run mode. If compassCalibrator.conf is correct and there is still no communication, make sure the glider is running the talk utility by using the following steps: 1. Open a Windows terminal emulator such as HyperTerminal or ProComm 2. Inside the terminal emulator connect to the required serial port using the following settings: Bits per second (baud) = 115200, Data bits = 8, Parity = none, Stop bits = 1, Flow control = Hardware 3. Power the glider on. If in “boot app” then exit to PicoDos. If in “boot pico” then leave in this state. 4. From the (GPICO)C:\> prompt, type ver (to display version information) and then type talk att. This starts the talk utility and opens a serial port to the attitude sensor. You should now see data being read from the compass. 5. Close the terminal emulator. This frees up the serial port for use by the compass calibrator. 6.
- Page 224 Revision 7.10 2/28/2012 ++++++++++++++++++++++++ Last Fix/Enhancement: ======================== The application then proceeds to collect initial data from the compass, indicated by the following (time delayed) output: Calibration = 0% complete ... similar output up to ... Calibration = 10% complete Once all initial data has been collected, the application displays the following output: ***** Start reorienting the glider ***** indicating that the user should now begin reorienting the glider (and consequently the contained compass). This provides further data for the application, specifically for calibration, and results in the following (time delayed) output: Calibration = 20% complete ... similar output up to ... Calibration = 80% complete This stage may take several minutes, during which time the glider should be reoriented through ...
- Page 225 Revision 7.10 2/28/2012 Calibration = 100% complete (succeeded). If the output ends with 100% complete (succeeded), as shown above, the compass calibration procedure has been successful. An output that jumps straight from 92% to 100% without intermediate values indicates that the previous compass calibration could not be improved upon using the current data, so the calibration procedure is still considered to have completed successfully. In this case, select Quit to exit the compass calibrator. If the output does not end with 100% complete (succeeded) then the procedure will have to be repeated. For example, an output ending with: Calibration failed - inadequate data set captured indicates that data gathered while reorienting the glider was not good enough for the calibrator algorithm – probably because the glider was not rotated enough. It is also possible for the compass calibrator application to abort at any stage during the calibration procedure. Abort messages associated with this are shown in the table below, together with possible solutions. Once the abort reason is fixed, the calibration procedure would have to be repeated until the 100% complete (succeeded) is achieved. Abort message Possible solution Cannot communicate with compass. Check compassCalibrator.conf settings and Freewave connection. Glider may be in wrong state for Place glider in PicoDOS.
- Page 226 Revision 7.10 2/28/2012 12-Aug-02 Initial Page 226 of 228...
-
Page 227: Appendix K: How To Use Glider Terminal's Dock Server Perspective
Revision 7.10 2/28/2012 Appendix K: How to Use Glider Terminal's Dock Server Perspective Starting with Dock Server release 6.37, the Dock Server application can send notifications to Glider Terminals. These notifications describe the health and status of the Dock Server machine. For example, when disk utilization exceeds its threshold (initially 70%), Dock Server will send a notification to all connected Glider terminals specifying current disk utilization. Another example, when a Glider Terminal user requests a backup of glider files or removal of a glider, Dock Server responds with a notification indicating the request's outcome. To view a Dock Server notifications within Glider Terminal, switch to Dock Server Perspective by clicking the button show in figure K1. Each time the Dock Server application sends a notification, the Dock Server Perspective button is outlined in red. Viewing the notification by clicking this button removes the red outline. Dock Server Perspective Figure K1. Dock Server Perspective button. To view a specific Dock Server's notifications, open its tree view node and click on 'Notifications'. Figure K2 shows the notifications view for the 'localhost' Dock Server in the Dock Server Perspective. Figure K2. Notifications view in Dock Server Perspective. Starting with Dock Server release 7.6, Glider Terminal users can direct a Dock Server to backup a specific glider's files or to remove that glider from the Dock Server machine. To backup or remove a glider's files, click on 'Gliders' node under the desired Dock Server node. Firgure K3 shows the gliders view for 'localhost'. Page 227 of 228... - Page 228 Revision 7.10 2/28/2012 Figure K3. Gliders view in Dock Server Perspective. To backup or remove glider files, select the gliders from the displayed list, check the appropriate boxes, and click 'Apply'. Dock Server will report the outcome in its notifications view. For backup, all of each glider's files are placed in a .tar.gz file located in /var/opt/gmc/backups on the Dock Server machine. This file's name contains the backup date/time and glider name. For remove, all of each glider's files are deleted from the Dock Server machine. If backup and remove are simultaneously checked, the files are backed up first, then removed. Clicking the 'Clear' button, will clear all selected gliders and uncheck the backup and remove checkboxes. Note that only Dock Server releases 7.6 and later support this 'Glider' view. Page 228 of 228...
Need help?
Do you have a question about the Dock Server and is the answer not in the manual?
Questions and answers