Table of Contents
Advertisement
Quick Links
ASSEMBLY INSTRUCTIONS
INSTRUCCIONES DE ENSAMBLE
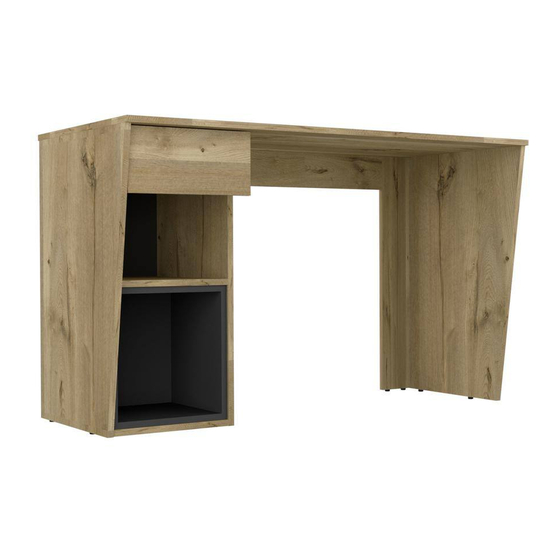
Height: 28,62 in
Alto: 72,7 cm
Width: 47,24 in
Ancho: 120 cm
Depth: 20,67 in
Fondo: 52,5 cm
REF./SKU.
SL-OFFCE-8
LOT N°
ASTER CONSOLE LAPTOP DESK
Escritorio Consola Aster
For assistance with assembly or customer service, call 1-877-924-2090 (English) Monday-Friday, 8 a.m. to 5 p.m.
Mountain Time, North America. Email: customerservice@rstbrands.com or visit our website at www.rstbrands.com /
Para recibir ayuda con el ensamblaje o para comunicarse con servicio al cliente llame al 1-877-924-2090 (inglés) de lunes a
viernes de 8:00 a.m. a 5:00 p.m. (hora de la montaña de Norte América), envíe un correo electrónico a
customerservice@www.rstbrands.com o visite nuestro sitio web en www.rstbrands.com
Advertisement
Table of Contents

Related Manuals for rst brands ASTER SL-OFFCE-8


Summary of Contents for rst brands ASTER SL-OFFCE-8
- Page 1 ASSEMBLY INSTRUCTIONS INSTRUCCIONES DE ENSAMBLE Height: 28,62 in Alto: 72,7 cm Width: 47,24 in Ancho: 120 cm Depth: 20,67 in Fondo: 52,5 cm REF./SKU. SL-OFFCE-8 LOT N° ASTER CONSOLE LAPTOP DESK Escritorio Consola Aster For assistance with assembly or customer service, call 1-877-924-2090 (English) Monday-Friday, 8 a.m. to 5 p.m. Mountain Time, North America.
- Page 2 IMPORTANT RECOMMENDATIONS / RECOMENDACIONES IMPORTANTES -The cabinet MUST be used exclusively indoors, do not expose to direct sun. / El mueble debe ser usado únicamente en interiores, no exponer al sol directo. -Do NOT overload the cabinet (see suggested loads), Do not hit or hammer the cabinet (just when indicated) sobrecargar el mueble (ver las cargas sugeridas).
-
Page 3: Required Tools
INDEX ÍNDICE Assembly Hardware Herrajes para Armado Assembly Parts Piezas de Armado Suggested Loads Cargas Sugeridas Assembly Recommendations Recomendaciones de Ensamble Assembly Steps 7-24 Pasos de Armado 7-24 Warranty Garantía REQUIRED TOOLS* HERRAMIENTAS NECESARIAS* *No incluidas y no se muestran en tamaño real. *Not included, and not shown actual size. -
Page 4: Assembly Hardware
ASSEMBLY HARDWARE HERRAJES PARA ARMADO Please check that the hardware content is correct. Compruebe que el contenido de los herrajes sea If any item is missing, please call to our customer el correcto. En caso de que falte alguna pieza, por service line. -
Page 5: Assembly Parts
ASSEMBLY PARTS PIEZAS DE ARMADO A - x1 E - x1 I - x1 M - x1 Q - x2 B - x1 F - x1 J - x2 N - x1 R - x2 C - x1 G - x1 K - x1 O - x1 S - x1... -
Page 6: Assembly Recommendations
MAX SUGGESTED LOADS CARGAS MÁXIMAS SUGERIDAS 22 lb 10kg 17.64 lb 17.64 lb 17.64 lb 10kg ASSEMBLY RECOMENDACIONES RECOMMENDATIONS DE ENSAMBLE Two people are recommended to assemble Ensamble el mueble entre dos personas. the product. Assemble the cabinet on a flat, smooth Ensamble el mueble sobre una superficie surface, preferably on a carpeted floor plana y lisa, preferiblemente sobre un... - Page 7 The plastic stop should be placed on the rear Revisar que el tope plástico del riel quede en la parte trasera Rotate Voltear Gently hit to adjust. Golpee suavemente para ajustar. Page 7...
- Page 8 Rotate Voltear Page 8...
- Page 9 Gently hit the pieces with a rubber hammer Rotate 180° to adjust the joint. Golpee suavemente la pieza con un martillo de goma para ajustar el ensamble. Turn minifix cams to the right to tighten. Gire las cajas minifix hacia la derecha para apretar las piezas.
- Page 10 Rotate Voltear Page 10...
- Page 11 J X2 Rotate to tighten. Gire para apretar. Page 11...
- Page 12 Rotate to tighten. Gire para apretar. Rotate to tighten. Gire para apretar. Page 12...
- Page 13 Page 13...
- Page 14 Rotate to tighten. Gire para apretar. Page 14...
- Page 15 Rotate to tighten. Gently hit to adjust. Gire para apretar. Golpee suavemente para ajustar. Page 15...
- Page 16 Slide the back panel inside the cabinet Deslice el fondo dentro del mueble Page 16...
- Page 17 Rotate to tighten. Gire para apretar. Page 17...
- Page 18 Rotate to tighten. Gire para apretar. Page 18...
- Page 19 Rotate to tighten. Gire para apretar. Page 19...
- Page 20 Rotate to tighten. Gire para apretar. Page 20...
- Page 21 Rotate Voltear When placing the slide on the side of the drawer, the metallic stop should be placed on the FRONT. Para poner el riel en el lateral del cajón, revisar que el tope metálico del riel quede en la PARTE DELANTERA Rotate Voltear...
- Page 22 2" Rotate to tighten. Gire para apretar. Page 22...
- Page 23 Rotate to tighten. Gire para apretar. Slide the drawer inside the cabinet Deslice el cajón dentro del mueble After you finish the adjustment After you finish assembling the of the cams, cover them with cabinet, take off the adhesive the cover caps. letters.
- Page 24 For the user safety, it is recommended Por la seguridad del usuario se recomienda to anchor the cabinet to the wall. anclar el mueble a la pared. -WARNING! TIPPING HAZARD – Unanchored furniture can tip over -WARNING: CHECK FOR HIDDEN PIPES AND CABLES BEFORE DRILLING.
-
Page 25: Warranty Policy
PÓLIZA DE GARANTÍA Welcome to the RST Family Here at RST Brands™ we are committed to your satisfaction by offering you a competitive warranty to ensure all our products are free from defects, in material and workmanship, to the original purchaser for a period of one year from the date of your purchase.
Need help?
Do you have a question about the ASTER SL-OFFCE-8 and is the answer not in the manual?
Questions and answers