Advertisement
Available languages
Available languages
Quick Links
Flooring Cutters - Instructions
WARNING: Read and understand all instructions.
SAVE THESE INSTRUCTIONS FOR FUTURE REFERENCE.
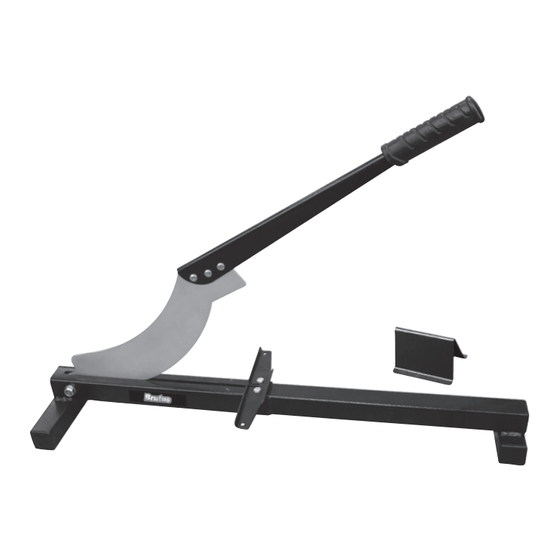
PARTS LIST:
1 Cutter Base
1 Handle
1 Cutting Blade
3 Screws
SAFETY WARNINGS
WARNING
• Always wear safety glasses when operating this tool
• Keep cutting blade in the fully closed position when not in
use
• Keep fingers and hands away from blade cutting area
• Periodically check that all hardware remains tight
WARNING: Drilling, sawing, sanding or machining
wood products can expose you to wood dust, a
substance known to the State of California to cause
cancer. Avoid inhaling wood dust or use a dust mask
or other safeguards for personal protection. For more
information go to
www.P65Warnings.ca.gov/wood-dust.
MAINTENANCE
• Keep cutter clean and store in a dry place when
not in use
• This cutter does not use a sharp blade. It is a blunt blade
meant to rip through flooring planks and will not splinter
flooring. If necessary, square off the edges of blade by using
a sharpening stone.
• Periodically check all assembly to ensure that hardware
remains tight.
CUSTOMER SERVICE: 1-866-435-8665
6 Washers
3 Nuts
4 Felt Pads
1 V-Support
ASSEMBLY INSTRUCTIONS:
Tools needed for assembly (not included): 11/16" and 3/8"
wrench
Step 1: Attach handle to the cutting blade with the supplied
screws, washers, and nuts.
Step 2: Attach the blade to the cutter base
• Remove the locknut from the base and slide the bolt out
just enough to release one of the plastic spacers from
the underside of the base.
• Align the blade hole with the bolt and hole in the base.
• Replace the spacer and bolt, tighten locknut.
Step 3: Place the 4 round self-stick felt pads on the bottom
of the base.
OPERATING INSTRUCTIONS
1.
Place cutter on the floor making
sure it is on a level surface
2.
Mark the plank to be cut and
place it finished side up against
the backstop. Note: Place the
grooved or indented side of the
laminate against the backstop.
The "tongue" side should be
closest to the blade.
3.
The V-Support should be used to support the plank
while cutting
4.
Begin the cut by holding the flooring firmly with
one hand and cutting approximately ½" into the
flooring material.
5.
Proceed using both hands with a smooth powerful
downward motion to complete your cut.
6.
Your cut plank will be slight rough. Remember the cut
side will always be placed along the wall to be covered
up by baseboard or finish molding.
10-38 / 10-48
T0919-11399
Advertisement

Related Manuals for Brutus 10-38


Summary of Contents for Brutus 10-38
- Page 1 10-38 / 10-48 Flooring Cutters - Instructions WARNING: Read and understand all instructions. SAVE THESE INSTRUCTIONS FOR FUTURE REFERENCE. PARTS LIST: ASSEMBLY INSTRUCTIONS: 1 Cutter Base 6 Washers Tools needed for assembly (not included): 11/16” and 3/8” 1 Handle 3 Nuts...
- Page 2 10-38 / 10-48 Cortadores de piso - Instrucciones ADVERTENCIA: Lea y comprenda todas las instrucciones. GUARDE ESTAS INSTRUCCIONES PARA USAR COMO REFERENCIA EN EL FUTURO. LISTA DE PARTES: INSTRUCCIONES DE MONTAJE: 1 Base del cortador 6 Arandelas Herramientas necesarias para el montaje (no están...
Need help?
Do you have a question about the 10-38 and is the answer not in the manual?
Questions and answers