COOLWHIP T4 Installation Instructions Manual
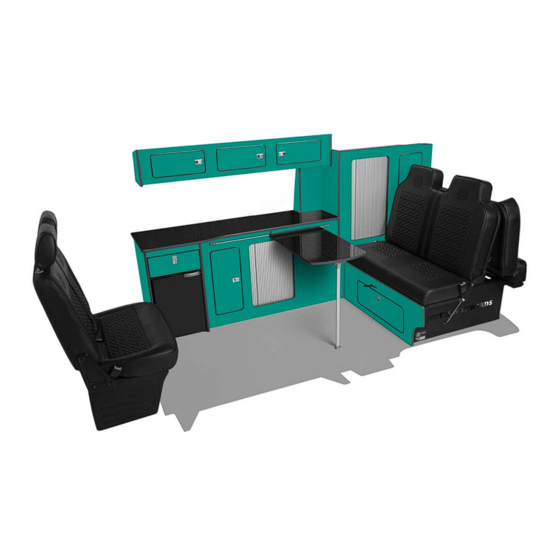
Flat pack furniture
Hide thumbs
Also See for T4:
- Installation instructions manual (39 pages) ,
- Installation instructions manual (111 pages)
Advertisement
Quick Links
Advertisement

Related Manuals for COOLWHIP T4

Summary of Contents for COOLWHIP T4
- Page 1 YOUR INSTALLATION INSTRUCTIONS...
- Page 2 T4/T5/T6 FLAT PACK FURNITURE INSTALLATION INSTRUCTIONS...
- Page 3 STOP & READ Please ensure you briefly read over this instruction manual before attempting to assemble and fit your units. Once you have an understanding of the process, please then read and follow each page step by step, failure to do this can result in mistakes and the process taking much longer.
-
Page 4: Table Of Contents
CONTENTS Overview 8-17 T Trimming 18-30 Pre assembly 31-45 Wardrobe assembly 46-48 Soft close drawer assembly 49-53 Fridge pod assembly 54-56 Fitting the table leg and rail 57-59 Above unit shelf/ locker assembly 60-62 Fitting guide... - Page 5 THE PROCESS Read instructions and Upgraded Tambour doors Assemble prepare work space and tools T Trimming Hang all doors and fit catches Fitting...
-
Page 6: T Trimming
T TRIMMING TOOLS • Mallet • Stanley knife • Curved Stanley knife • Mitre shears... - Page 7 QUICK OVERVIEW Staring the Trim Trimming corners Ending the join Removing Trim from hinge holes Tips and hints Do not t trim cupboard parts...
- Page 8 STARTING THE TRIM Cut the trim square before Ensure the lip is on the surface Start and finish on the starting every piece denoted by the piece sticker black line...
- Page 9 CORNERS Keep the Trim tight Use the inside of the mallet to avoid gaps to trim door apertures* *ensure you use masking tape...
- Page 10 CORNERS Remove the inner trim to avoid bobbled corners...
- Page 11 ENDING THE TRIM Mark and cut the Trim a few Mallet the join flush. Butt the two Trims together (mm) past the start point...
- Page 12 ENDING THE TRIM Where there is no join simply cut the edge straight with a Stanley...
- Page 13 REMOVE THE HINGE Remove the inner Trim from the hinge hole to allow the hinge to sit flush. Failure to do this will result in bulging...
- Page 14 TIPS AND HINTS Always keep the trim taught Always hit down onto a surface, use Heat the trim to stretch to avoid gaps and bobbles the edge of a bench if necessary and manipulate...
- Page 15 HANGING DOORS TOOLS • Drill Driver • Stanley knife • Cross head Screw driver...
- Page 16 HANDLES Place the correct door into the Using 16mm screws, fix the Place the handle catch correct aperture ensuring the back of the catch into place into the hole door is orientated correctly ensuring the catch is straight...
- Page 17 HINGES Turn the adjustment all the Fix the hinges to the door only Clip on the cover plates way to the rear before fixing using 16mm screws and the to the aperture pilot holes provided...
- Page 18 (CONT.) HINGES HORIZONTAL ADJUSTMENT OVERLAY ADJUSTMENT CLIP-ON MOUNT Once both hinges are fitted, Remove wide screws and adjust the door to fit flush with replace with 16mm screws to fit equal spacing the plate to the aperture...
- Page 19 STRIKE PLATE Remove the trim lip from the door and the Mark out the width of the strike plate aperture allowing the strike plate to sit flush onto on the door and the aperture parallel the wood, then fit using 2 x 16mm screws* to the catch using a Stanley knife *adjust before tightening...
- Page 20 HANGING DOORS CHECK & MAKE SURE… The doors sit flush and open and shut correctly Now follow the same process of hanging all the doors before continuing to page 23...
- Page 21 UPGRADED TAMBOUR DOORS TOOLS • Drill Driver • Mallet • Stanley knife • Sand paper • Cross head Screw driver • Tape Measure • Set Square...
- Page 22 WARDROBE REAR BOTTOM TAMBOUR Screw the wheel to the support Sand the internal Orientate the correct ensuring it sits flush all round wheel to allow the wheel/ support using 25mm screws tambour to glide...
- Page 23 (CONT.) WARDROBE REAR BOTTOM TAMBOUR Fit the support into the Ensure the wheel and support are Fit using chock blocks and rebate, butt the bottoms square, failure to do this will 16mm screw flush for the correct location result in a poor running tambour...
- Page 24 KITCHEN UNIT TAMBOUR Sand the internal wheel to Orientate the correct Screw the wheel to the support allow the tambour to glide wheel/ support ensuring it sits flush all round using 25mm screws...
- Page 25 (CONT.) KITCHEN UNIT TAMBOUR From the rear, fit the supports Ensure the wheel and support are Ensure the supports are an equal into the rebates with the wheels square, failure to do this will distance from the edge before closest to the left result in a poor running tambour screwing into place with 16mm screws...
- Page 26 (CONT.) KITCHEN UNIT TAMBOUR Super glue the track Slide the tambour door into the When fitting the track ensure wheels, make sure you have the it butts into and up to the tambour handle the correct way wheel...
- Page 27 (CONT.) KITCHEN UNIT TAMBOUR Butt the tracks up into the wheel and press firmly, then screw the door stop chock using the pilot holes and 16mm screws...
-
Page 28: Wardrobe Assembly
WARDROBE ASSEMBLY TOOLS • Drill Driver • Mallet • Stanley knife • Sand paper • Cross head Screw driver • Tape Measure • Set Square... - Page 29 (CONT.) WARDROBE ASSEMBLY OVERVIEW The wardrobe is the most time consuming part of assembly Its important you follow each step in order of instruction Use 16mm screws unless directed otherwise This is a two person job You will need a large clean flat surface Do not counter sink 25mm screws...
- Page 30 (CONT.) WARDROBE ASSEMBLY Remove the T Trim lip Remove the T Trim lip from the Fix the wardrobe bottom shelf from the underside of the underside of the bottom shelf inner blocks to the underside of bottom shelf inner the shelf with a 10mm overhang to support the shelf inner using 25mm screws...
- Page 31 (CONT.) WARDROBE ASSEMBLY Place the wardrobe face down Slot the bottom shelf, divider Fit the wardrobe upright (L) and lid shelf into the rebates first, align all rebates and start DO NOT SCREW from the base working up to the top using chock blocks using 16mm screws...
- Page 32 (CONT.) WARDROBE ASSEMBLY Fit the wardrobe upright (R) Ensure all rebates are flush Ensure the bottom shelf is align all rebates and start from and fit together nicely seated correctly before fixing the base working up to the top using chock blocks and 16mm screws and pilot holes...
- Page 33 (CONT.) WARDROBE ASSEMBLY Screw the bottom shelf together using the chock blocks and pilot holes provided, ensure the joins are tight and flush...
- Page 34 (CONT.) WARDROBE ASSEMBLY If you have a rear bottom tambour Slide the Tambour door into the Super glue the track door fit the opposite wheel using wheels ensuring the tambour 25mm screws, make sure to butt the handle is the correct way wheel up to the shelf and upright...
- Page 35 (CONT.) WARDROBE ASSEMBLY When fitting the track ensure it Stick the tambour track making butts into and up to the wheel sure to butt into the tambour wheel...
- Page 36 (CONT.) WARDROBE ASSEMBLY FLUSH Screw through the bottom Fit the lid shelf to the upright (R) using the shelf into the divider using a chock blocks and pilot holes provided, 25mm screw* ensure the joins are tight and flush *You may countersink...
- Page 37 (CONT.) WARDROBE ASSEMBLY Repeat the process with Stand the wardrobe up and fit the top Using a 25mm screw drive through the left upright chock blocks, pulling the lid shelf into the lid shelf into the divider the face tight and flush ( see picture)
- Page 38 (CONT.) WARDROBE ASSEMBLY Screw the large tambour door Repeat the process with the Insert the tambour door into the wheel (R) to the bottom shelf opposite wheel on the lid shelf wheel runners from the rear using 25mm screws...
- Page 39 (CONT.) WARDROBE ASSEMBLY Glue the bottom track 14b onto the bottom Close tambour door, Slide the Wardrobe tambour shelf butt up to the tambour wheel. door upper shelf into rebates, then fit using chock Repeat the process for the top track blocks underneath with the pilot holes provided...
- Page 40 (CONT.) WARDROBE ASSEMBLY Repeat the process for the Fit the blocks for the Fit the Wardrobe rear shelf Wardrobe tambour door lower shelf Wardrobe rear shelf flush with the rear...
- Page 41 (CONT.) WARDROBE ASSEMBLY T Trim the Wardrobe T Trim the Wardrobe T Trim the Wardrobe upright (L) starting on the face starting on the upright (R) starting on the arrow. Trim lip outside arrow. Trim lip outside arrow. Trim lip outside...
-
Page 42: Soft Close Drawer Assembly
SOFT CLOSE DRAWER ASSEMBLY... - Page 43 (CONT.) SOFT CLOSE DRAWER ASSEMBLY Attach the mounting clips Fit the drawer rear using Fit the drawer base using 16mm screws 16mm screws, ensure the base is flush to avoid gaps...
- Page 44 (CONT.) SOFT CLOSE DRAWER ASSEMBLY Fit the drawer face catch Screw the drawer face mounts Clip the face into the into the pilot holes with the 4 x side runners large head screws provided with the drawer box...
-
Page 45: Fridge Pod Assembly
FRIDGE POD ASSEMBLY... - Page 46 FRIDGE POD ASSEMBLY 4 x screws in each plate (provided with drawer box) Ensure the block sits flush Align the Drawer fixing blocks and Fit the runners to the blocks using before screwing, some fit using 5 x 25mm screws into the the pilot holes provided, ensure you sanding may be required same pilot holes as the picture...
- Page 47 FRIDGE POD ASSEMBLY Mark and cut away the Screw the strike plate with Fit the two chock blocks to overhanging Trim on the inside 16mm screws the drawer upper support of the drawer upper support...
- Page 48 FRIDGE POD ASSEMBLY Fit the drawer upper support Fit the drawer upper Fit the unit rear support over the to the fridge pod (L) support and fridge pod (L) finger joint of the fridge pod (R) and to the fridge pod (R) chock block to fridge pod upright (L)
- Page 49 FRIDGE POD ASSEMBLY Pull out the drawer runners Fit the drawer sides to the Remove the inner lip trim parallel with drawer runners with an the above drawer support to allow audible click flush closure of the drawer catch Please see drawer box manual for more information on how to align the drawer, remove from runners and any other information you may require.
- Page 50 ABOVE UNITE SHELF/ LOCKER ASSEMBLY...
- Page 51 ABOVE UNITE SHELF/ LOCKER ASSEMBLY Fit above unit shelf/ locker Screw into the end panel then Fit the fixing blocks to the end panel (L) using 16mm the shelf base, repeat the Above unit shelf/ locker face screw and chock blocks, process on the end panel (R) rear flush...
- Page 52 ABOVE UNITE SHELF/ LOCKER ASSEMBLY Fix the face to the base using Now finish the T Trim on the Fit the unit shelf/ locker rear 16mm screws Above unit shelf/ locker face to the top side of the base...
-
Page 53: Fitting The Table Leg And Rail
FITTING THE TABLE LEG AND RAIL... - Page 54 FITTING THE TABLE LEG AND RAIL Screw the table leg into Fit the rail brackets 40mm Align the rail central and the underside of the table from the table edge with 4 x 30mm from the unit top with 4 x 20mm screws 16mm screws in each bracket provided, ensure central...
- Page 55 FITTING THE TABLE LEG AND RAIL 30mm 25mm 30mm 30mm Rail 30mm from top of Fit the rail using a 30mm screw Fit the centre support using a unit face on the outer hole and a 25mm 30mm screw screw on the inner hole...
- Page 56 FITTING Here at Coolwhip Campers we have perfected our pre scribed T5/6 kits to fit as flawlessly as possible to the contours of your van. The kit has been designed to fit with a 12mm ply floor, including 3mm altro, and 6mm ply lined and carpeted walls, with no rear quarter window.
- Page 57 FITTING 1. Fit the Wardrobe first 2. Butt the unit face up to the wardrobe T Trim and fix using chock blocks 3. Fit the fridge pod and unit rear support 4. Fit the unit shelf 5. Fit the work top 6.
- Page 58 FIND US CONTACT INFO Unit 10 Mon - Sat 07399 637 083 8am - 6pm Gallows Park info@coolwhipcampers.co.uk Sunday closed Millbrook PL11 3AX coolwhipcampers.co.uk...
Need help?
Do you have a question about the T4 and is the answer not in the manual?
Questions and answers