
Related Manuals for DeZurik APCO CVS-250


Summary of Contents for DeZurik APCO CVS-250
-
Page 1: Safety Messages
APCO CVS-250/250A SWING CHECK VALVES D12003 Instruction October 2018 DeZURIK, Inc. Sartell, Minnesota USA | Phone: 320-259-2000 | www.dezurik.com | info@dezurik.com... -
Page 2: Instructions
Safety label(s) on the product indicate hazards that can cause injury or death. If a safety label becomes difficult to see or read, or if a label has been removed, please contact DeZURIK for replacement label(s). Personnel involved in the installation or maintenance of valves should be constantly alert to potential emission of pipeline material and take appropriate safety precautions. -
Page 3: Table Of Contents
DeZURIK APCO CVS-250/250A Swing Check Valves Table of Contents Instructions ..........................1 Safety Messages ........................1 Inspection ........................... 1 Parts ............................1 DeZURIK Service ........................1 Table of Contents ........................3 Description ..........................4 Handling and Storage ......................... 4 Installation ..........................4 Fusion/Powder Coated Valves .................... -
Page 4: Description
DeZURIK APCO CVS-250/250A Swing Check Valves Description A swing check valve consists of a valve body, a cover, and a disc that is connected to a hinge. The disc swings away from the valve-seat to allow flow in the forward direction, and returns to valve-seat when upstream flow is stopped, to prevent backflow. -
Page 5: Fusion/Powder Coated Valves
DeZURIK APCO CVS-250/250A Swing Check Valves Installation (Continued) • Before installation, remove foreign material such as weld spatter, oil, grease, and dirt from the pipeline. • Prepare pipe ends and install valves in accordance with the pipe manufacture’s instructions for the joint used. -
Page 6: Shaft Packing Replacement
DeZURIK APCO CVS-250/250A Swing Check Valves Maintenance (Continued) Shaft Packing Replacement Removal of the valve from the line for shaft packing replacement is not required as long as the shaft is accessible. These valves may open or close, swinging the counterweight/spring loaded arm without warning due to flow changes from pumps starting and stopping. -
Page 7: Changing Counterweight Or Spring Assembly To Opposite Side Of Valve
DeZURIK APCO CVS-250/250A Swing Check Valves Maintenance (Continued) Changing Counterweight or Spring Assembly to Opposite Side of Valve These valves may open or close, swinging the counterweight/spring loaded arm without warning due to flow changes from pumps starting and stopping. Servicing or working around these valves while the pipeline is under pressure can cause personal injury or equipment damage. -
Page 8: Adding Air Cushion Assembly To Valve
DeZURIK APCO CVS-250/250A Swing Check Valves Maintenance (Continued) 15. Slide the Flanged Bushing (A12), on 4” and larger valves over the Pivot Shaft (A13) and into the Body (A01). 16. Install one Packing Ring (A17) at a time. Make sure it is clean and has not picked up any dirt in handling before installing it. -
Page 9: Operation
DeZURIK APCO CVS-250/250A Swing Check Valves Maintenance (Continued) 6. Install the Retaining Rings (B60) and Clevis Pin (B59) to secure the Cushion Arm to the cylinder rod eye. 7. Install Counter Weight Arm (B19) and Weight (B29) or Spring (B59) to the Pivot Shaft (A13). If equipped with lever &... -
Page 10: Start-Up Procedure
1. Testing must conducted carefully and adjustments made in small increments to arrive at the optimum where the swing check valve shuts off just prior to or at zero reverse flow. 2. The APCO CVS-250/250A Swing Check Valve is not a silent closing check valve. D12003... -
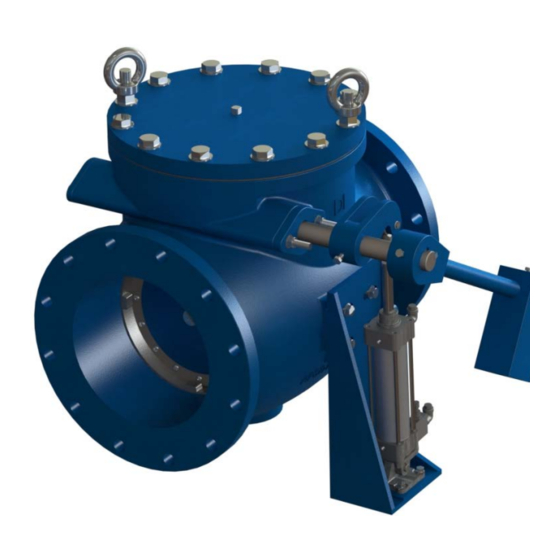
Page 11: Drawings
DeZURIK APCO CVS-250/250A Swing Check Valves Drawings Figure 2 – APCO CVS-250/250A Swing Check Valve (with Air Cushion) October 2018 Page 11 D12003... - Page 12 DeZURIK APCO CVS-250/250A Swing Check Valves Drawings (Continued) Figure 3 - CVS-250/250A Swing Check Valve (Lever & Weight) D12003 Page 12 October 2018...
- Page 13 DeZURIK APCO CVS-250/250A Swing Check Valves Drawings (Continued) Table 1 - CVS-250/250A Swing Check Valve Parts Lever & Weight and Cylinder Parts Item Item Number Description Description Number Body Counter Weight Arm Assembly Cover Cylinder Assembly (Air Cushion only) Cover Gasket...
- Page 14 DeZURIK APCO CVS-250/250A Swing Check Valves Drawings (Continued) Figure 4 - CVS-250/250A Swing Check Valve (Lever & Spring) Lever Table 2 – & Spring Parts Item Description Number Lever Arm (Spring Only) Spring Lever Arm Key (Spring Only) Spring Lever Arm Retainer Screw (Spring...
-
Page 15: Troubleshooting
DeZURIK APCO CVS-250/250A Swing Check Valves Troubleshooting Condition Possible Cause Corrective Action Packing is worn. Packing is not Replace Packing. Adjust Shaft seal leaks. tight. packing. Foreign matter caught between Fully open valve to remove disc and seat. object. Valve leaks excessively from one side of the disc to the other. - Page 16 If you use metric fasteners with ASME Class 150/300 bolt holes and flange bolt patterns, you do so at your sole risk and any liability associated with such use shall not be the responsibility of DeZURIK, Inc. In addition to the foregoing, DeZURIK’s Manufacturer’s Conditions apply.
Need help?
Do you have a question about the APCO CVS-250 and is the answer not in the manual?
Questions and answers