
Related Manuals for Mediso Nucline SPIRIT DH-V

Summary of Contents for Mediso Nucline SPIRIT DH-V
- Page 1 SPIRIT DH-V Nucline DUAL - HEAD SPECT AND WHOLE BODY DIGITAL GAMMA CAMERA Operator's Manual Revision 3.04...
- Page 2 Part number: DV-93-10-03 The information and drawings set forth in this manual are the property of Mediso Ltd. No part of this document may be copied without the prior consent of Mediso Ltd. Manufacturer reserves the right to revise or update the contents of this manual due to modifications or improvements in the design of the equipment without obligation to notify any person or organization of such changes.
-
Page 3: Disclaimer
Disclaimer Mediso Ltd. and its official representatives may not be held responsible for personal injury or damage of any kind, expressed or implied, caused by, or emerging out of the use of this equipment, if equipment is not operated in adherence to operating and maintenance procedures set forth in this manual. - Page 4 ™ SPIRIT DH-V Operator’s Manual Nucline Rev. Date Description Pages Approved 0000307 3.01 24.01.2006. upgrade Warning label on the 0000869 3.02 26.07.2007. Daniel Cser collimator cart. 0000970 3.03 13.11.2007. Collimator exchange 65-75 0000972 3.04 14.11.2007. ECG connections 4/195 26/07/2007...
-
Page 5: Table Of Contents
Table of contents Disclaimer ..........................3 Warning ............................3 Electrical ..........................3 Mechanical..........................3 Radiation..........................3 TABLE OF CONTENTS................... 5 INTRODUCTION .................... 10 SCOPE OF MANUAL ..................11 Text Conventions Used in this Manual ................. 12 CHAPTER 1. SAFETY AND REGULATORY INFORMATION....13 General Safety ...................... - Page 6 ™ SPIRIT DH-V Operator’s Manual Nucline Safe Operation Guidelines ..................28 Safety Labels ........................ 29 Regulatory Information ....................30 1.8.1 Standard Compliance....................30 1.8.2 USA Regulations ..................... 31 CHAPTER 2. SYSTEM OVERVIEW............32 ™ SPIRIT DH-V System................33 Nucline Operating Conditions....................33 2.2.1 Installation Site Requirements ................
- Page 7 3.4.3.1 Preventing collisions ..................60 3.4.3.2 Clearing collisions .................... 61 3.4.4 Power failure procedure ..................63 3.4.4.1 When electrical power is restored..............64 Preprogrammed motions..................... 64 3.5.1 HOME........................65 3.5.2 COLLIMATOR EXCHANGE..................65 3.5.2.1 Collimator exchange ..................65 CHAPTER 4. ACQUISITION IMAGE ............76 Using the acquisition monitor..................
- Page 8 ™ SPIRIT DH-V Operator’s Manual Nucline 7.3.1 Generally occurring fields..................125 7.3.2 Static Setup Form....................128 7.3.3 Dynamic Setup Form..................... 129 7.3.4 SPECT Setup Form....................130 7.3.5 Gated Setup Form....................132 7.3.6 Total Body Setup Form ..................135 7.3.7 Gated SPECT Setup Form..................136 CHAPTER 8.
- Page 9 APPENDIX B - ROOM LAYOUT..............180 APPENDIX C - REAR PANEL CONNECTORS........... 182 APPENDIX D - DIMENSIONS AND WEIGHT..........183 APPENDIX E - SERVICE MODES............... 185 MANUAL OVERRIDE ....................186 HOMING ALL....................... 187 CALIBRATION......................188 SET EXCHANGE POSITION..................193 APPENDIX F - TECHNICAL SPECIFICATIONS ......... 194 APPENDIX G - SIMPLIFIED SYSTEM BLOCK DIAGRAM......
-
Page 10: Introduction
Nucline optional ECG gated acquisition capability which allows performing gated cardiac planar and gated cardiac SPECT studies. To enhance system features toward higher resolution imaging, Mediso presents the HR detectors option utilizing thinner NaI(Tl) detector crystal, most ™ SPIRIT DH- suitable under gamma photon energies of 200 keV. -
Page 11: Scope Of Manual
Preface Scope of manual ™ SPIRIT DH-V Acquisition Operator's Manual contains the Nucline following chapters: • Chapter 1 SAFETY AND REGULATORY INFORMATION Describes safety precautions and safety features. • Chapter 2 SYSTEM OVERVIEW Contains environmental requirements, provides system overview, system power-up, rebooting, shut-down and other priority procedures. -
Page 12: Text Conventions Used In This Manual
™ SPIRIT DH-V Operator’s Manual Nucline This manual does not include information on clinical image processing procedures. Topics related to image manipulation and clinical evaluation are NOTE covered in your image processing workstation's manuals Text Conventions Used in this Manual The following conventions are used throughout the manual: •... -
Page 13: Chapter 1. Safety And Regulatory Information
Safety and Regulatory Information Chapter 1. Safety and Regulatory Information The safety precautions and regulatory information included in this chapter are provided in the following sub-sections: • General Safety • IEC Symbols Used • Safety Devices • Patient Safety and Emergency •... -
Page 14: General Safety
The system in whole or in part should not be modified in any way without prior written approval by Mediso Medical Imaging Systems. Do not defeat any safety feature of the system. - Page 15 Safety and Regulatory Information It is important that this manual should be kept at hand, studied carefully and reviewed periodically by the authorized operators. Ensure a qualified operator is present all through acquisitions. Do not place patients weighing in excess of 200 kg (440 lbs) on the imaging table.
-
Page 16: Electrical Safety
For external connections, in order to maintain electrical safety, only the peripherals listed below, or others subsequently approved by Mediso Medical Imaging Systems, may be powered directly from the two output AC sockets (marked by the "TO ACCESSORIES" label) ™ SPIRIT DH-V Electronics Rack. -
Page 17: Prevention Of Electrical Hazards
Safety and Regulatory Information Rating USA Wall Plug European Wall Plug Current 12 A Voltage 115 VAC 230 VAC Cable diameter 0.5 inch (12 mm) 12 mm UL: “Hospital Grade” Meets local current and Approvals voltage ratings UL: “Hospital Only” The total current from the two output AC sockets should be less than Other peripherals connected to the system shall be independently powered and grounded. -
Page 18: Handling Danger Situations
Gantry, or remove the power plug of the Electronics Rack from the wall outlet or uninterruptible power supply (UPS). Notify your service representative or the Mediso Medical Imaging Systems office of the accident. 1.1.2 Mechanical Safety All moveable assemblies and supporting structures should be operated with care and routinely inspected. -
Page 19: Iec Symbols Used
Safety and Regulatory Information 1.2 IEC Symbols Used The system may have labels with one or more of the following symbols. These symbols indicate the IEC standards to which the system conforms. Symbol IEC Standard Alternating Current Protective Earthing Point ON / Power ON OFF / Power OFF Input Power... -
Page 20: Safety Devices
™ SPIRIT DH-V Operator’s Manual Nucline 1.3 Safety Devices The imaging system has 3 types of safety devices: • Emergency Stop Button - used by the operator to halt the motorized system motions in cases where there is any possibility of danger to the patient. •... -
Page 21: Emergency Stop Button
Safety and Regulatory Information 1.3.1 Emergency Stop Button 1.3.1.1 Using the Emergency Stop • Use the emergency stop switches to stop all gantry, detector and imaging table motions in case of emergency. • The Emergency Stop button disconnects power to the motors controlling movement, and all motions stop quickly. -
Page 22: Preventing Collisions
™ SPIRIT DH-V Operator’s Manual Nucline CAUTION Do not reset the button until the problem that necessitated its use is resolved. 1.3.2 Preventing Collisions ™ SPIRIT DH-V systems are equipped with collision detect sensors, Nucline which are located on the front plane of the collimator. If collision is detected by the sensor plate, all gantry motions stop to prevent the hazards of personal injury or equipment damage. -
Page 23: Uninterruptible Power Supply (Ups)
Safety and Regulatory Information Automatic (computer controlled, preprogrammed) motions can be halted immediately by pressing any button on the handcontroller. Press any button on the handcontroller to stop an automatic motion, if collision danger is impending due to the patient's accidental movement or an incorrect gantry position. Make sure the obstruction is cleared before restarting an acquisition. -
Page 24: Shift To Booster Or Fader Mode
™ SPIRIT DH-V Operator’s Manual Nucline - AC power is absent: Button <15>and LED <16>are ON. The protected equipment is supplied by the UPS, operating on battery power. All the connected equipment is supplied with power. 1.3.3.2 Shift to booster or fader mode During voltage variations in the AC-input power. -
Page 25: Operation On Battery Power
Safety and Regulatory Information 1.3.3.3 Operation on battery power The AC-input power is out of tolerances, LED <16> goes ON. During operation on battery power, the buzzer beeps every ten seconds. The equipment connected to the UPS is supplied by the battery. If the batteries are full charged, the UPS can provide the power-supply for NOTE about 15-20 minutes. -
Page 26: Patient Positioning
™ SPIRIT DH-V Operator’s Manual Nucline Never exceed the rated load of patient handling devices. The user should be aware of system limitations regarding particularly large or overweight patients. Please be aware of any particular system limits or safety precautions and labels regarding large or overweight patients. -
Page 27: Power Failure Procedure
Safety and Regulatory Information In any case, the operator must first ensure that the patient is safely removed using the appropriate removal procedure. 1.4.4 Power Failure Procedure If you have installed uninterruptible power supply (UPS) in the camera system, you have about 15-20 minutes before the UPS’s battery run down. Unless an uninterruptible power supply (UPS) is installed in the camera system, hospital power failures cause detector and table motions to stop. -
Page 28: Data Safety
™ SPIRIT DH-V Operator’s Manual Nucline 1.5 Data Safety 1.5.1 General Verify and record the patient’s identification before starting a scan. CAUTION It is highly recommended to always make a backup of image data in case of possible medium breakdown. 1.5.2 Connectivity Always verify that the data transferred to another system has been correctly... -
Page 29: Safety Labels
Safety and Regulatory Information 1.7 Safety Labels ® Type: Nucline Spirit(DHV) S/N.: DH-000000-V0 Unit: Collimator cart 2/1 0197 Manufactured: 2006 Made in Hungary Medical Diagnostics ® Type: Nucline Spirit(DHV) S/N.: DH-000000-V0 Unit: Collimator cart 2/2 0197 Manufactured: 2006 Made in Hungary Medical Diagnostics ®... -
Page 30: Regulatory Information
™ SPIRIT DH-V Operator’s Manual Nucline LEADS ™ Type: Nucline RG TRIGGER S/N.: ECG-000000 Unit: Patient Part Type BF Manufactured: 2006 Manufacturer: Mediso Ltd. Made in Hungary 1022 Budapest Alsótörökvész út 14. Phone: +36-1-399-3030 Medical Diagnostics ® Type: Nucline Spirit(DHV) S/N.: DH-000000-V0... -
Page 31: Usa Regulations
The camera has parts (WEEE), which must not get into the waste. Therefore at final removal the camera must be disassembled, and its parts must handle accurately. The Mediso takes over this disposal process free of charge, if you carry back the camera into its depot. -
Page 32: Chapter 2. System Overview
™ SPIRIT DH-V Operator’s Manual Nucline Chapter 2. System Overview ™ SPIRIT DH-V system. This chapter gives an overview of the Nucline • SPIRIT DH-V System Nucline™ • Operating Conditions • System Overview Gantry Image Acquisition Workstation Electronics Rack Imaging Table Collimators and collimator carts •... -
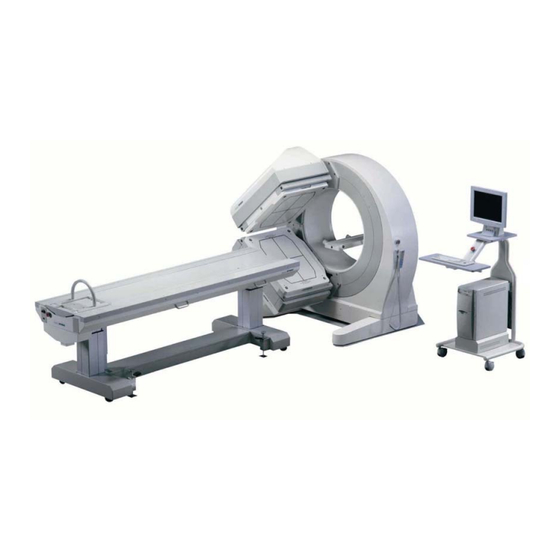
Page 33: The Nucline ™ Spirit Dh-V System
System Overview ™ SPIRIT DH-V System 2.1 The Nucline ™ SPIRIT DH-V System Nucline Figure 1. 2.2 Operating Conditions CAUTION The extremely fragile detector crystal is located right behind a thin aluminum film on the face of the detector. Do not expose this surface to effects of heat, mechanical force, or abrupt temperature change. -
Page 34: Installation Site Requirements
™ SPIRIT DH-V Operator’s Manual Nucline 2.2.1 Installation Site Requirements ™ SPIRIT DH-V Pre-Installation Survey for gantry floor Refer to the Nucline loading, room layout and electrical power requirements. The customer is responsible to ensure the power distribution system of the installation site meets the specifications issued in local requirement codes. -
Page 35: System Overview
System Overview 2.3 System Overview E-STOP switch Gantry with 2 detectors Imaging table Acquisition workstation ™ SPIRIT DH-V acquisition system Nucline Figure 2. Revision 3.04 35/195... -
Page 36: Gantry
™ SPIRIT DH-V Operator’s Manual Nucline 2.3.1 Gantry The gantry provides the supporting structure and the means to move and position the detectors. The main gantry parts are shown in the next figure. Detector bonnet Detector 1 E-STOP switch Collimator 1 Collimator 2 Detector 2 Handcontroller... -
Page 37: Handcontroller
System Overview 2.3.1.2 Handcontroller You use the handcontroller to position the gantry and detector and initiate preprogrammed motions. The handcontroller includes a red E-STOP button which can be used to stop all gantry motions in case of emergency. SPIRIT DH-V Handcontroller ™... -
Page 38: Emergency Stop Knob
™ SPIRIT DH-V Operator’s Manual Nucline Main functions of the image acquisition workstation are listed below: • Display the spectrum and control the spectrum settings by specifying peak (keV) and width (%) values. • Display accumulating images (for monitoring patient position during study setup and acquisition), and control the image display functions. -
Page 39: Electronics Rack
System Overview 2.3.3 Electronics Rack ™ Electronics Rack contains the acquisition computer and Nucline associated electronics that provide the interface between the gamma camera and the acquisition computer. In addition to controlling the acquisition keyboard and acquisition monitor, the acquisition computer has multiple other automatic functions related to normal system operation, such as: •... - Page 40 ™ SPIRIT DH-V Operator’s Manual Nucline ™ Electronics Rack Nucline Figure 6. After an acquisition is finished the acquisition computer automatically transfers acquired image(s) to the data host. The data host can be either an image ™ SPIRIT DH- processing workstation or any networked computer if the Nucline V system was connected and configured during installation so it can reach an existing hospital network.
-
Page 41: Front Panel Buttons And Indicators
System Overview 2.3.3.1 Front Panel Buttons and Indicators The imaging system can be turned on by depressing and releasing the Front Power Button. system turned shutting down Windows (Start>Shutdown) or by depressing and releasing the Front Power Button. When it is off, the system enters stand-by state and maintains only primary power supply to the connected detector and the control circuits. -
Page 42: Locating The Table
™ SPIRIT DH-V Operator’s Manual Nucline 2.3.4.1 Locating the table The proper table position relative to the gantry is achieved by mating the locating bolts with the two sockets installed on the floor. To lock the table in imaging position: Hold the table handles and position the table so that one of the locating bolts is directly above its floor socket. -
Page 43: Head Holder And Strap
3.4.2 EMERGENCY mode on usage. 2.3.4.4 Head holder and Strap For brain studies, Mediso supplies a head holder accessory. It contains two pins at the bottom that fit into the holes on the front-end of the imaging pallet. Figure 9. - Page 44 3.9 / 4.8 / 7.4* 1080 / 290 (1) Low Energy General Purpose collimator Mediso 09/2005. Specifications are subject to change. (2) Low Energy High Resolution collimator (3) Low Energy Ultra High Resolution collimator (4) Medium Energy General Purpose collimator...
-
Page 45: Collimator Carts
System Overview 2.3.5.2 Collimator carts Collimator cart Figure 10. Collimators are heavy in addition to being fragile. Collimator exchange is aided by a mobile storage rack (collimator cart). Each collimator cart allows the storage of two collimators. Collimators are suspended on the four support studs of the cart. -
Page 46: Refillable Flood Source And Mixing Cart
™ SPIRIT DH-V Operator’s Manual Nucline Collimator safety locks warning Figure 11. WARNING Do not release the safety collimator locks, because the collimator could fall down. Collimator exchange is detailed in 3.5.2 COLLIMATOR EXCHANGE. 2.3.5.3 Refillable flood source and mixing cart To lock / unlock the plexiglas container on the mixing cart, pull on the retaining pin, turn it by 90 degrees then release. -
Page 47: Inserting Media Into The Acquisition System
System Overview filler/ airing holes retaining pin handle rotatable plexiglass container screwdriver Refillable flood source on the mixing cart Figure 12. 2.4 Inserting media into the acquisition system ™ Electronics Rack contains a floppy disk The acquisition computer in the Nucline drive and a CD ROM reader. -
Page 48: Inserting A Cd Rom
The booting process continues, and a window appears on your display. Enter the following information to log on: Username: console1* Password: mediso* * default values – user can change them after installation The imaging system is ready for operation when the main menu screen appears on the image acquisition monitor. -
Page 49: Restarting The System
System Overview 2.5.2 Restarting the System Restarting is the initialization of one or more of the system computers. Restarting may be necessary in case of certain software, hardware or unidentified operational errors. To restart the system: Select “Shutdown Windows” from the Main Menu. A window appears on your display. -
Page 50: Chapter 3. Nucline ™ Spirit Dh-V Control
™ SPIRIT DH-V Operator’s Manual Nucline ™ SPIRIT DH-V Control Chapter 3. Nucline This chapter contains the following sections: • Using the handcontroller • System Operations • Normal modes • In case of problem • Preprogrammed motions 50/195 26/07/2007... -
Page 51: Using The Handcontroller
™ SPIRIT DH-V Control Nucline 3.1 Using the handcontroller You use the handcontroller to manually position the gantry and detector and initiate preprogrammed motions. Refer to Figure 14 Detector motions convention and range SPIRIT DH-V motions Table 1 for motion convention. Nucline™... - Page 52 ™ SPIRIT DH-V Operator’s Manual Nucline TABLE buttons move the patient table down or up. MODE button increments actual selection available modes preprogrammed motions. Selected item is shown in the MODE: field on gantry display. <START> button initiates a preprogrammed motion that was previously selected using the <MODE>...
-
Page 53: System Operations
™ SPIRIT DH-V Control Nucline Gantry and detector motion definitions Motion Zero position Min. Max. Resolution SLOW FAST speed speed Rotate detector 1 is at 100- 230- -10° +365° 0.1° bottom of °/min °/min gantry Radius* gantry axis of +14,5cm +32cm 0.1cm cm/min cm/min rotation (AOR) - Page 54 ™ SPIRIT DH-V Operator’s Manual Nucline LEVEL 1 LEVEL 2 HOME COLLIMATOR EXCHANGE SET 102 SET 180 HEART 102 MANUAL WHOLE BODY TABLE UP OPEN HEADS NORMAL MODES HAND EXAM QUALITY CONTROL I. QUALITY CONTROL II. HOME COLLIMATOR EXCHANGE SET 102 COLLISION OVERRIDE SET 180 QUALITY CONTROL I.
- Page 55 ™ SPIRIT DH-V Control Nucline <START> button and you can use the <MODE> button again to browse the menu tree placed on LEVEL 2. Finding the satisfactory mode push the <START> button on the handcontroller and the preprogrammed motion will start. LEVEL 2 contains preprogrammed motions.
-
Page 56: Normal Modes
™ SPIRIT DH-V Operator’s Manual Nucline CAUTION It is not advisable starting SERVICE mode procedures without knowing the system, so do not start any procedures in SERVICE mode if a skilled person is not available. 3.3 Normal modes 3.3.1 MANUAL mode MANUAL mode display Figure 15. -
Page 57: Collision Override Mode
™ SPIRIT DH-V Control Nucline 3.3.2 COLLISION OVERRIDE mode COLLISION OVERRIDE mode display Figure 16. Without collimators you can start only the COLLISION OVERRIDE mode. In this case only 6 of 11 preprogrammed motions are available named HOME, COLLIMATOR EXCHANGE, SET 102, SET 180, QUALITY CONTROL I. -
Page 58: In Case Of Problem
™ SPIRIT DH-V Operator’s Manual Nucline 3.4 In case of problem 3.4.1 ERROR mode Figure 17. ERROR mode display During the operations errors can occur. The ERROR mode is displayed on Figure 17. In this case the motions will be stopped, and a WARNING appears on your display which shows you the kind of the error. -
Page 59: Emergency Mode
™ SPIRIT DH-V Control Nucline 3.4.2 EMERGENCY mode Figure 18. EMERGENCY mode display Use the emergency stop switches to stop all gantry, detector and imaging table motions in case of emergency. Emergency stop switches disconnect power to the motors controlling movement, and all motions stop quickly. The gantry display will indicate the EMERGENCY status in the MODE: field. -
Page 60: Collision
™ SPIRIT DH-V Operator’s Manual Nucline 3.4.3 COLLISION Figure 19. COLLISION mode display 3.4.3.1 Preventing collisions ™ SPIRIT DH-V was designed with respect to patient comfort and Nucline ™ SPIRIT DH-V collimators are equipped with a sensor safety. All Nucline plate, however, the existence of this safety feature will not subdue the responsibility of the operator. -
Page 61: Clearing Collisions
™ SPIRIT DH-V Control Nucline preprogrammed motion. Do not initiate a preprogrammed motion when the patient is on the imaging table if the patient presence is not required. During SPECT acquisitions, the detector automatically moves along the defined circular motion path (orbit). During whole body acquisitions, the patient pallet automatically moves along the defined horizontal motion path. - Page 62 ™ SPIRIT DH-V Operator’s Manual Nucline A) Removing the obstruction • Remove the obstruction. • Press the <MODE> button on the handcontroller. If the obstruction is cleared, the COLLISION message disappears from the gantry display and the MANUAL mode appears in the MODE: field, otherwise you get to the COLLISION mode again.
-
Page 63: Power Failure Procedure
™ SPIRIT DH-V Control Nucline Collision occurs (warning beep) ("COLLISION" appears on gantry display) Options ⇓ ⎯⎯⎯⎯⎯⎯⎯⎯⎯⎯⎯⎯⎯⎯⎯⎯⎯ ⇓ ⇓ Removing the obstruction Repositioning the system Remove obstruction. Press <MODE> on handcontroller. (COLLISION OVERRIDE in the MODE: field; beeping sounds during motions) Press <MODE>... -
Page 64: When Electrical Power Is Restored
™ SPIRIT DH-V Operator’s Manual Nucline imaging table from the floor sockets, and hold on to the table handles. Slide the table itself with increased care to avoid patient injury. Remove the patient. 3.4.4.1 When electrical power is restored The gamma camera detector contains components that are designed to operate on continuous power supply. -
Page 65: Home
™ SPIRIT DH-V Control Nucline • Press any button on the handcontroller. • Push an emergency stop switch. • Push the collision detect plate on an installed collimator. To suffice patient and equipment safety in respect to preprogrammed motions, preprogrammed motions cannot be started if: •... - Page 66 ™ SPIRIT DH-V Operator’s Manual Nucline WARNING NEVER attempt to open the safety lock on a stored collimator. Collimator detachment from the cart may cause personal injury or equipment damage. CAUTION With the collimator removed, the extremely fragile detector crystal is located right behind a thin aluminum film on the face of the detector.
- Page 67 ™ SPIRIT DH-V Control Nucline floor guide. By keeping the rear bolt locked, you will be able to easily reposition the table at the end of collimator exchange. locks on detector 2 locks on detector 1 release pedal floor guide Collimator exchange position Figure 21.
- Page 68 ™ SPIRIT DH-V Operator’s Manual Nucline Figure 22. Milled line points to collimator in OPEN position Put the Allen-wrench back to its place. Press <START> on the handcontroller. The gantry automatically moves the detectors out to allow rolling the collimator cart away. There are two phases of this movement.
- Page 69 ™ SPIRIT DH-V Control Nucline If you do not install collimators, only the COLLIMATOR EXCHANGE, SET NOTE 102 and SET 180 preprogrammed motions will be available in COLLISION OVERRIDE mode. B) Collimators installation IMPORTANT Do not attempt to install a single collimator using this procedure. CAUTION With the collimators removed, double caution is necessary to protect the delicate detector crystal against collision damage.
- Page 70 ™ SPIRIT DH-V Operator’s Manual Nucline way you will start the slower phase of the movement when the detectors will be positioned to the collimators on the collimator cart. WARNING Never put your hand between the detector and the collimator cart during the motion.
- Page 71 ™ SPIRIT DH-V Control Nucline The following message will appear: "Check the cart separation and Press <START>!” Press the <START> button on the handcontroller. The gantry moves out the detectors to allow rolling the cart away. There are two phases of this movement.
- Page 72 ™ SPIRIT DH-V Operator’s Manual Nucline Reset the front locating bolt of the imaging table by stepping on its release tongue, and pivot the table about the rear bolt. Pivoting the table will allow for the collimator cart to be rolled onto the floor guide. By keeping the rear bolt locked, you will be able to easily reposition the table at the end of collimator exchange (Figure 20 Table...
- Page 73 ™ SPIRIT DH-V Control Nucline After this operation you have to press the <START> button on the handcontroller again. In this way you will start the faster phase of the movement when the detectors move to their outermost positions. The following message will appear: "Remove the cart and press <START>!”...
- Page 74 ™ SPIRIT DH-V Operator’s Manual Nucline collimators on the support studs of the cart. There are two phases of this movement. The first one is a faster movement while the detectors approach the collimator cart. A message appears: "Check the cart pins position and press <START>!” After this operation you have to press the <START>...
- Page 75 ™ SPIRIT DH-V Control Nucline After these movements stop you have to take the bed in its right position and fix it. CAUTION Before you start an acquisition you have to perform a collision test to check the right operation of collision-sensors. When you finished the collimator exchange and done all steps from 1 to 22, you have to push the collision detect plate on one of the installed collimators.
-
Page 76: Chapter 4. Acquisition Image
™ SPIRIT DH-V Operator’s Manual Nucline Chapter 4. Acquisition Image This chapter contains the following sections: • Using the acquisition monitor • Using the image acquisition keyboard • Patient orientation • Using the detector masks • Setting up acquisitions Setting up SPECT acquisitions Setting up total body acquisitions •... -
Page 77: Using The Acquisition Monitor
Acquisition Image 4.1 Using the acquisition monitor The image viewport aids patient positioning and monitoring by displaying the activity seen by the camera. The viewport is displayed when you enter the study setup form. When it is active, you can use the following keys on the acquisition keyboard to manipulate the display: <F2>... -
Page 78: Using The Image Acquisition Keyboard
™ SPIRIT DH-V Operator’s Manual Nucline The spectrum display. Figure 25. 4.2 Using the image acquisition keyboard The keyboard contains alphanumeric keys as well as special keys for system and program control. Unless otherwise noted, always press the <Enter> key after typing a response. Use the <Backspace>... - Page 79 Acquisition Image The active function keys are listed below: Function List options – Controls the list feature of various fields in <F1> the data entry forms. Lists predefined options for the active field. <F2> Display mode – Controls which detector is displayed by incrementing the following options: Single 1, Single 2, Dual.
-
Page 80: Patient Orientation
™ SPIRIT DH-V Operator’s Manual Nucline Window – You can change the centerline and window width values either by entering numbers directly into the fields or by using the +(plus) or -(minus) keys to increase or decrease the current values by one (Simultaneously pressing <Shift>... -
Page 81: Using The Detector Masks
Acquisition Image • To set the orientation for planar acquisitions, rotate the image on the acquisition monitor by pressing the <F5> key several times if necessary until the image is displayed in the correct direction. • To set the orientation for total body and SPECT acquisitions, select 0° or 180° in the Orientation Field of the Study Setup Form, where 0°... -
Page 82: Setting Up Acquisitions
™ SPIRIT DH-V Operator’s Manual Nucline ™ SPIRIT DH-V Center detector masks (15.1 – 60.6 cm) Figure 28. Nucline ™ SPIRIT DH-V High detector mask (34.1 cm) Figure 29. Nucline 4.5 Setting up acquisitions The following section provides only initial information and suggestions on setting up image acquisitions. -
Page 83: Setting Up Spect Acquisitions
Acquisition Image the selected procedure manually, if needed. To speed up and facilitate acquisition setup, it is recommended to determine predefined parameters for frequent clinical procedures. Detailed information on customizing clinical procedures is given in Chapter 8 Customizing Acquisitions. • Use the image acquisition workstation's monitor to verify the patient's position prior to starting acquisitions and to monitor the acquisition process. -
Page 84: Setting Up Total Body Acquisitions
™ SPIRIT DH-V Operator’s Manual Nucline For single detector studies, the amount of rotation that the gantry moves equals the Total Rotation. For dual detector studies with Total Rotation: 360, each detector acquires data for 180º, but the images are combined into a single 360º... -
Page 85: Marking Anatomical Features
Acquisition Image Setting the total body acquisition parameters During total body acquisitions, the gantry scans the patient's body by slowly moving the pallet from the defined start scan position to the stop scan position. The acquisition starts with an automatic mask insertion and ends with mask removal which is integral part of the acquisition. -
Page 86: Creating A Protocol For Automatic Hot Spot Localizing
™ SPIRIT DH-V Operator’s Manual Nucline The image in the viewport will freeze. The information line at the bottom of the screen displays “Marker positioning”, and a flashing crosshair appears in the image viewport. Move the crosshair to the center of the hot spot just acquired, by using the ←, →, ↑... -
Page 87: Inserting Crosshair Marks Automatically
Acquisition Image To learn how to create clinical procedures in general, refer to section 8.2.1 Creating clinical procedures. Define your clinical procedure, and insert the hot spot localizing segment where you want it to appear during the procedure. The segment must use the above described parameters for View ID and Matrix Size. -
Page 88: Chapter 5. The Menu System
™ SPIRIT DH-V Operator’s Manual Nucline Chapter 5. The Menu System 5.1 Main menu The Main Menu - shown in Figure 30- appears on the screen of the image acquisition workstation when one of the following cases occurs: • The acquisition system is powered up from the Front Power Switch on the ™... -
Page 89: Main Menu Options
The Menu System 5.2 Main menu options The main menu contains five options: ACQUIRE Patient Study initiates image data acquisition. It steps you through three consecutive data entry screens where you can select the type of the clinical procedure you want to perform, input patient information and specify acquisition parameters. -
Page 90: Menu Tree
™ SPIRIT DH-V Operator’s Manual Nucline 5.3 Menu Tree The next list shows the entire menu system of the image acquisition workstation. • ACQUIRE Patient Study Patient Acquisition User Tests User Calibrations Service Cal. & Tests Daily QC • SPECTRUM Setup Select And Acquire Create Settings Delete Settings... - Page 91 The Menu System • Flood field uniformity • Flood field uniformity [Multi frame] • Center of Rotation • Spatial Registration • System resolution • Pixel statistic • Energy resolution • Max. count rate performance I. • Max. count rate performance II. •...
-
Page 92: Chapter 6. Learning Image Acquisition
™ SPIRIT DH-V Operator’s Manual Nucline Chapter 6. Learning Image Acquisition This chapter contains exercises that help you familiarize yourself with the basic issues of image data acquisition. In this chapter you will find examples of the various acquisition types supported by the camera that will lead you through the image acquisition procedures in a step by step fashion. -
Page 93: Image Acquisition Exercises
Learning Image Acquisition 6.1 Image acquisition exercises For a short review of the general data entry process, one may note: • The cursor (triangle) on the screen indicates the current field to which you can enter data. • After entering the appropriate information into a field, then press the <Enter> key to advance to the next field within a form. - Page 94 ™ SPIRIT DH-V Operator’s Manual Nucline The Procedure Setup Form appears: Procedure Setup Form Figure 32. At the Procedure Type field press <F1> to display the procedure list. Procedure Type list Figure 33. Choose a procedure of study type STA. Move the highlighted line using the ↑...
- Page 95 Learning Image Acquisition Begin data entry by specifying the Procedure Type, since changing the NOTE Procedure Type automatically deletes the contents of the Procedure ID, Patient ID and Patient Name fields. Enter the Procedure ID up to 6 characters. After typing in the Procedure ID, press the <Enter> key. The cursor moves to the Patient Name field.
- Page 96 ™ SPIRIT DH-V Operator’s Manual Nucline List of data entry fields in the Static (STA) Setup Form Figure 35. Enter the appropriate values for each field and press <Enter> to move to the next field. To leave a field unchanged press <Enter> to accept its default value. To choose values from a list you have to press <F1>...
-
Page 97: Dynamic Study Acquisition
Learning Image Acquisition Press the <F3> key to begin the acquisition. The system automatically begins acquiring the image, and the "Acquisition in progress" message appears. The acquisition stops, and the acquired image is saved to the hard disk of the acquisition computer when one of the following occurs: The stop parameters such as total time, total counts, or saturation are met. - Page 98 ™ SPIRIT DH-V Operator’s Manual Nucline Enter the patient's name up to 20 characters. After typing in the name, press the <Enter> key. The cursor moves to the Patient ID field. Enter the Patient ID up to 11 characters. After filling in all fields in the Procedure Setup Form (Figure 32 Procedure Setup Form), press <F3>.
- Page 99 Learning Image Acquisition After all fields contain the desired values, press <F3> to proceed. At this point the program verifies the parameters entered. If any parameter falls outside the allowed range, or parameters conflict with each other, then an indicative message appears on the screen and at the same time the incorrect or conflicting entries are highlighted.
-
Page 100: Spect Acquisition
™ SPIRIT DH-V Operator’s Manual Nucline 6.1.3 SPECT acquisition WARNING Watch the patient closely during camera movements to ensure that the detector will not touch the patient, imaging table or other equipment. To acquire a SPECT study, begin on the image acquisition workstation: Choose ACQUIRE Patient Study >... - Page 101 Learning Image Acquisition Figure 37. List of data entry fields in the SPECT (ECT) Setup Form Enter the appropriate values for each field and press <Enter> to move to the next field. To leave a field unchanged press <Enter> to accept its default value. After all fields contain the desired values, press <F3>...
-
Page 102: Gated Study Acquisition
Gated study acquisition The following procedure describes the gated study acquisition when using the qualified ECG triggering device. Mediso may have delivered to you a customized acquisition hardware that allows connecting an external ECG monitoring system. In this case read out the average RR interval length from your external ECG monitor and enter this value in milliseconds into the RR interval field at step 8, and skip steps 9 through 12 in the following procedure. - Page 103 Learning Image Acquisition You may also enter 0 (zero) into the RR interval field to force the system to automatically determine the RR interval from the first 5 heartbeats. To acquire a gated study, first prepare the patient and the qualified ECG triggering device for the patient's R-wave detection: to acq.
- Page 104 ™ SPIRIT DH-V Operator’s Manual Nucline The potential of any unattached line is undefined and may interfere with the measurement, therefore ensure that none of the 5 banana pins is left IMPORTANT "floating" in air. If you wish to put on less than 5 electrodes, connect all remaining banana pins together and into a banana pin that will be connected to the patient.
- Page 105 Learning Image Acquisition Figure 38. List of data entry fields in the Gated (GAT) Setup Form Enter the appropriate values for each field and press <Enter> to move to the next field. To leave a field unchanged press <Enter> to accept its default value. Initiate the detection of the patient's R-waves by pressing <Shift>+<F12>.
- Page 106 ™ SPIRIT DH-V Operator’s Manual Nucline The ECG screen with the following menu appears: To move between lines use the ↑ and ↓ keys. To increment options in the highlighted menu line, press <Space>. A short description of menu options follows: Calibrate: If you want to measure the integrity and triggering capability of the ECG card, set Calibrate to ON.
- Page 107 Learning Image Acquisition Filter controls the cutoff frequency of the preamplifier's low-pass filter. The lower the value, the smoother the R-wave will be. Recommended setting is 32 Hz, since this will effectively dampen 50 Hz (60 Hz) noises. Speed controls the curve drawing speed (horizontal stretch) on the screen.
-
Page 108: Total Body Acquisition
™ SPIRIT DH-V Operator’s Manual Nucline Press the <F3> key to begin the acquisition. The system automatically begins acquiring the image, and the "Acquisition in progress" message appears. The acquisition stops, and the acquired image is saved to the hard disk of the acquisition computer when one of the following occurs: The stop parameters, such as total time, total beats or saturation, are met. - Page 109 Learning Image Acquisition Enter the Procedure ID up to 6 characters. After typing in the Procedure ID, press the <Enter> key. The cursor moves to the Patient Name field. Enter the patient's name up to 20 characters. After typing in the name, press the <Enter> key. The cursor moves to the Patient ID field.
- Page 110 ™ SPIRIT DH-V Operator’s Manual Nucline WARNING Do not use preprogrammed motions if the patient is on the imaging table. Place the source (patient) onto the imaging table, then adjust the table height by pressing the TABLE ↓ and TABLE ↑ buttons. Use the RADIUS 1 and RADIUS 2 buttons on the handcontroller to adjust the detector-to- patient distance.
- Page 111 Learning Image Acquisition The acquisition stops, and the acquired images are saved to the hard disk of the acquisition computer when one of the following occurs: The pallet position reaches the value of the Stop Scan Limit field. You press <Shift>+<F4> on the image acquisition keyboard. To terminate and save the study press <Shift>+<F4>.
-
Page 112: Gated Spect Acquisition
The following procedure describes the gated study acquisition when using the qualified ECG triggering device. Mediso may have delivered to you a customized acquisition hardware that allows connecting an external ECG monitoring system. - Page 113 Learning Image Acquisition The potential of any unattached line is undefined and may interfere with the measurement, therefore ensure that none of the 5 banana pins is left IMPORTANT "floating" in air. If you wish to put on less than 5 electrodes, connect all remaining banana pins together and into a banana pin that will be connected to the patient.
- Page 114 ™ SPIRIT DH-V Operator’s Manual Nucline Enter the patient's name up to 20 characters. After typing in the name, press the <Enter> key. The cursor moves to the Patient ID field. Enter the Patient ID up to 11 characters. After filling in all fields in the Procedure Setup Form, press <F3>. The Patient Information Form appears.
- Page 115 Learning Image Acquisition Initiate the detection of the patient's R-waves by pressing <Shift>+<F12>. The acquisition monitor displays the patient's ECG diagrams. You can observe the pulse frequency (HR - heart rate in pulses per minute) and pulse length (RR interval in milliseconds). To return to the previous display mode press <F3>.
- Page 116 ™ SPIRIT DH-V Operator’s Manual Nucline Sound: Set Sound to ON, if you want to hear a beep at triggering instants. Gain controls the preamplification gain of the device. You can select 5, 10, or 20 mm/mV. 20 mm/mV is the recommended setting for maximum sensitivity.
-
Page 117: Protocol String Acquisition
Learning Image Acquisition Set the camera positions using the following instructions. Use the handcontroller to set Gantry Rotate=90° position on the gantry display (detectors stand vertically at the sides of the table). Move the imaging table up or down, and roll it toward or backward the gantry to center the source (organ) in the field-of-view. - Page 118 ™ SPIRIT DH-V Operator’s Manual Nucline To acquire a protocol string study, begin on the acquisition workstation: Choose ACQUIRE Patient Study > Patient Acquisition, and press <Enter>. The Procedure Setup Form appears. (Figure 32 Procedure Setup Form) At the Procedure Type field press <F1> to display the procedure list. Choose a procedure of study type PRT.
- Page 119 Learning Image Acquisition Position the source (patient) and the gantry. Use the handcontroller to move the gantry and detector. Use the active keys between <F5> and <F12> on the acquisition keyboard to control the display. If you wish, you can localize anatomical features on the patient by using a penpoint marker.
- Page 120 ™ SPIRIT DH-V Operator’s Manual Nucline Press <F3> to begin the acquisition. The system automatically begins acquiring the static (post-injection) image, when the "Acquisition in progress" message appears. The acquisition stops, and the acquired image is saved to the hard disk of the acquisition computer when one of the following occurs: The acquisition time reaches the value specified in the Total Time field (60 s).
-
Page 121: Chapter 7. Acquire Menu Options
ACQUIRE Menu Options Chapter 7. ACQUIRE Menu Options This chapter provides you with the detailed description of each data entry field within the ACQUIRE Patient Study > Patient Acquisition menu. It contains the following sections: • Procedure Setup Form • Patient Information Form •... -
Page 122: Procedure Setup Form
™ SPIRIT DH-V Operator’s Manual Nucline 7.1 Procedure Setup Form The Procedure Setup Form appears when you choose the ACQUIRE Patient Study > Patient Acquisition (Figure 32 Procedure Setup Form) menu from the Main Menu. The Procedure Setup Form allows you to select the clinical procedure such as STA, DYN, ECT, GAT, TB, GSP and PRT. - Page 123 ACQUIRE Menu Options abbreviation study type static dynamic SPECT gated total body gated SPECT protocol string Column 4 is the radionuclide used in the procedure. Column 5 is the date the protocol was created. Procedure ID field The Procedure ID field starts with the two-letter abbreviation of the Procedure Type, after which you can add any combination of letters, numbers and some special characters up to a maximum of 6 characters.
-
Page 124: Patient Information Form
™ SPIRIT DH-V Operator’s Manual Nucline 7.2 Patient Information Form Inserting patient information is optional. If you wish to skip this form, press <F3>. After completing the Patient Information Form (Figure 34 Patient Information Form), press <F3> to proceed to the Study Setup Form. Information inserted in this form can be redisplayed on the image processing workstation. -
Page 125: Study Setup Forms
ACQUIRE Menu Options 7.3 Study Setup Forms Each study type requires a unique parameter set, and consequently each acquisition setup form is different. However, there are several fields that appear in all setup forms equally. Let us start with the discussion of these generally displayed fields. 7.3.1 Generally occurring fields Proc. - Page 126 ™ SPIRIT DH-V Operator’s Manual Nucline The available collimators Figure 42. Flood Corr. field To change the flood correction, press <F1> to display a pop-up menu of available flood corrections. Use the ↑ and ↓ keys to highlight the desired flood correction, then press <Enter>.
- Page 127 ACQUIRE Menu Options WINDOWS + SUM Use to create separate images from each energy window plus an additional image which combines all events from the specified energy windows. During multiple energy acquisitions the display changes to the following four-quadrant format: Window A Window B Window A...
-
Page 128: Static Setup Form
™ SPIRIT DH-V Operator’s Manual Nucline 7.3.2 Static Setup Form The Static Setup Form appears before an acquisition of the Static acquisition type (STA) is started (Figure 35 List of data entry fields in the Static (STA) Setup Form). When the Static Setup Form comes up, default values appear in each field. To accept the preset value in a field, no action is required. -
Page 129: Dynamic Setup Form
ACQUIRE Menu Options Saturate & field This field determines the system response when a pixel reaches its maximum value (saturates) during the course of the acquisition. (The maximum pixel value is 255 for 8-bit acquisitions and 65.535 for 16-bit acquisitions.) If the field is set to CONT (continue), the system continues to acquire counts into any pixels that have not saturated until the acquisition is terminated. -
Page 130: Spect Setup Form
™ SPIRIT DH-V Operator’s Manual Nucline Orientation field Patient orientation is determined as the locations of the patient’s head in relation to the detector zero direction. Options for patient orientation are 0°, 90°, 180°, and 270° (Figure 26 Orientation convention of the SPIRIT detectors). - Page 131 ACQUIRE Menu Options No. of frames field The No. of frames field specifies the number of angles moved by the gantry during a SPECT study. Press <F1> to display the pop-up list with the 4, 8, 16, 32, 64, 96, 128, 160 or 192 values to choose from. Typical value is 64 for 360°...
-
Page 132: Gated Setup Form
™ SPIRIT DH-V Operator’s Manual Nucline Body Contour field ™ SPIRIT DH-V system. If the This is an optionally part of the Nucline Body Contour is On, the detectors follow the contour of the patient’s body. Orientation field Patient Orientation is 0°, if the patient is positioned head-in to the gantry (conventional setup), and is 180°... - Page 133 Pressing <Shift>+<F12> takes you to the display of the patient's heart rate diagrams, where you can check beat frequency (HR) and beat length (RR), NOTE and adjust the parameters of your Mediso ECG triggering device. Pressing <Shift>+<F12> again returns you to the previous display mode. WARNING The display of the patient's heart rate diagram should only be used for synchronizing image acquisitions.
- Page 134 ™ SPIRIT DH-V Operator’s Manual Nucline Images/Cycle field Images/Cycle refers to the number of images (segments) acquired per heartbeat. This parameter, combined with the % of RR interval selected, determines the temporal resolution of the cardiac cycle. Values between 2 and 64 can be selected; typical value is 16. Increasing the number of images per cycle allows a fine temporal resolution by dividing the cardiac cycle into shorter periods of time.
-
Page 135: Total Body Setup Form
ACQUIRE Menu Options If the field is set to CONT (continue), the system continues to acquire counts into any pixels that have not saturated until the acquisition is terminated. If the field is set to STOP, then the system stops acquiring data into the current image, when any pixel saturates. -
Page 136: Gated Spect Setup Form
™ SPIRIT DH-V Operator’s Manual Nucline Rotate field Not adjustable at this camera type. Display Mode Not adjustable at this camera type. Orientation field Patient Orientation is 0°, if the patient is positioned head-in to the gantry (conventional setup), and is 180° for feet-in position. ACQ. - Page 137 ACQUIRE Menu Options Special fields of the Gated SPECT Setup Form In addition to the generally occurring fields described in section 7.3.1 Generally occurring fields, the Gated SPECT Setup Form contains the following special fields: No. of frames field The No. of frames field specifies the number of angles moved by the gantry during a SPECT study.
- Page 138 ™ SPIRIT DH-V Operator’s Manual Nucline Body Contour field ™ SPIRIT DH-V system. If the This is an optionally part of the Nucline Body Contour is On, the detectors follow the contour of the patient’s body. Time/Proj. field Time per Proj. (angle) is the time that the detector spends at each frame stop.
- Page 139 Pressing <Shift>+<F12> takes you to the display of the patient's heart rate diagrams, where you can check beat frequency (HR) and beat length (RR), NOTE and adjust the parameters of your Mediso ECG triggering device. Pressing <Shift>+<F12> again returns you to the previous display mode. WARNING The display of the patient's heart rate diagram should only be used for synchronizing image acquisitions.
-
Page 140: Chapter 8. Customizing Acquisitions
™ SPIRIT DH-V Operator’s Manual Nucline Chapter 8. Customizing Acquisitions This chapter describes how to customize your acquisition system by creating, modifying or deleting isotope settings and clinical procedure definitions. This chapter contains the following sections: • Creating isotope settings •... -
Page 141: Customizing Isotope Settings
Customizing Acquisitions 8.1 Customizing isotope settings There are a number of isotope settings, mostly the standard isotopes used in clinical studies that are included within the distribution software. However, you can create other arbitrary isotopes you may encounter in your practice. You can also delete existing isotope settings. - Page 142 ™ SPIRIT DH-V Operator’s Manual Nucline Pressing C returns you to the Create Settings menu without saving the new radionuclide setting. Exit by pressing the <Esc> key. In this way you will return to the SPECTRUM Setup menu. Refer to section 9.4.3.1 Energy &...
-
Page 143: Deleting Isotope Settings
Customizing Acquisitions 8.1.2 Deleting isotope settings At the main menu choose SPECTRUM Setup, then select Delete Settings from the options displayed. A pop-up list of available radionuclides appears. Highlight the selection you want to delete using the ↑ and ↓ keys, then press <Enter>. - Page 144 ™ SPIRIT DH-V Operator’s Manual Nucline Entering a unique procedure type creates a new procedure, but entering an existing type modifies that procedure. If you want to modify an existing procedure, you can choose it from a list by pressing <F1> on Procedure Type field.
-
Page 145: Modifying Clinical Procedures
Customizing Acquisitions After all segments of the procedure have been defined, press <F3> to terminate the procedure definition. The pop-up list of existing clinical procedures appears. Move the highlighted area in the list using the ↑ and ↓ keys to select where to insert the new procedure, then press <Enter>... -
Page 146: Deleting Parameter Sets Or Entire Procedures
™ SPIRIT DH-V Operator’s Manual Nucline Modify any fields in the setup form, and press <F3> when done. If you are adding a new parameter set to a protocol, a message appears prompting you to select (A)ppend, (I)nsert or (C)ancel. Pressing the A key adds the new parameter set to the bottom of the pop-up list of existing parameter sets. -
Page 147: Copy A Protocol
Customizing Acquisitions Respond by typing Y or N. Entering Y deletes the selected parameter set from the list. Entering N does not delete the selection. If an isotope is used as part of a procedure default, deletion of that isotope is not permitted. -
Page 149: Chapter 9. Operator Maintenance
Troubleshooting Chapter 9. Operator Maintenance The following chapter discusses system care and maintenance procedures including tests for quality assurance. These procedures must be carried out on a regular basis to keep the system operation precise and reliable at all times. The following sections are included in this chapter: •... -
Page 150: Maintenance Schedule
™ SPIRIT DH-V Operator’s Manual Nucline 9.1 Maintenance schedule The next table contains maintenance procedures listed by frequency. Item Frequency Action by Refer to Visual check daily Operator Daily visual check Peaking daily* Operator Peaking and window verification Uniformity test daily** Operator Uniformity test... -
Page 151: Preparing A Uniform Flood Source
Troubleshooting 9.2 Preparing a uniform flood source You use the refillable flood source for several routine procedures, such as the uniformity test, uniformity & energy calibration, and image resolution test. The following instructions tell you how to prepare a uniform source. For the uniformity test and uniformity &... -
Page 152: Peaking And Window Verification
™ SPIRIT DH-V Operator’s Manual Nucline 9.3 Peaking and window verification You use peaking to set acceptance windows on the useful portion of the energy spectrum, allowing photopeak areas of the spectrum to contribute in imaging, but excluding most of the scatter and background from the image. Peaking is to be performed: •... - Page 153 Troubleshooting Select the appropriate radionuclide and press <Enter>. The radiation spectrum incident on Detector 1 will be displayed. You can set up to three windows on the spectrum. The windows appear as color-coded lines in the spectrum and are named A, B and C. The peak refers to the location of the middle of the window in the keV scale.
-
Page 154: Procedure 2: Peaking From Within An Acquisition Setup
™ SPIRIT DH-V Operator’s Manual Nucline Repeat steps 4 through 6 to set the spectrum for Detector 2. To return to the main menu, press the <Esc> key. If needed, repeat the entire procedure for other radionuclides you plan to use. -
Page 155: Preventive Maintenance And Quality Assurance
Troubleshooting If you use dual acquisition (DUAL is set in the Acq. mode field), press <F2> to toggle the display from Detector 1 to Detector 2, then repeat step 8 to set the spectrum for Detector 2. Press <F3> to proceed when no more spectrum settings need to be changed. -
Page 156: Users Test
™ SPIRIT DH-V Operator’s Manual Nucline Decontamination If radioactive contamination occurs, use the decontamination agent and method as described in your site protocol to clean the outside of the equipment. 9.4.2 Users test Choose ACQUIRE Patient Study > User Tests from main menu. The user tests submenu appears. - Page 157 Troubleshooting However, you may also wish to acquire system flood images to test the collimator quality. Uniformity test is to be performed: • Daily, when SPECT studies are acquired. If only planar mode is used and recommended operating conditions as well as stable electrical power are maintained, test frequency can be extended to once per week.
- Page 158 ™ SPIRIT DH-V Operator’s Manual Nucline At the Procedure Type field press <F1> to display the Procedure list (Figure 43 User test submenu). Choose “XM FLOOD_TEST_INTR”, “XN_FLOOD_TEST_EXTR” or “XO_FLOOD_TEST_EXTR_CO” study type STA. Enter references in the Procedure ID, Patient ID and Patient Name fields, and then press <F3>.
- Page 159 Troubleshooting Static Setup Form for Uniformity test Figure 44. Press <F3> to proceed. When the "Ready for Acquisition. Press F3" message appears, press <F3> again. The acquisition stops when the total count equals 16,000 kcnts. To terminate the study with save press <Shift>+<F4>. Uniformity evaluation After the acquisition finished the program asks "Calculate NEMA flood field uniformity? (Y/N)”.
-
Page 160: Center Of Rotation (Cor) Test
™ SPIRIT DH-V Operator’s Manual Nucline 3.5% integral uniformity for UFOV is the upper limit acceptable for SPECT acquisitions. If the value exceeds 3.5%, SPECT acquisitions must be suspended until the problem is resolved. The application limit for planar acquisitions is around 6%. Specification is given for Tc, which is not intercomparable with results NOTE... - Page 161 Troubleshooting COR Test procedure Install a low energy collimator to the detector (LEHR preferred). Position the source and the detector: Set Prepare or obtain a compact point source, such as 50-100 MBq of Tc or a sealed Co source. Use the smallest possible volume of Tc.
- Page 162 ™ SPIRIT DH-V Operator’s Manual Nucline Ensure that the SPECT Setup Form contains the following values: Number of frames: Counterclockwise Direction of rotation: Scan area: Starting position: 10 sec Time/Projection: Max value: Supine Supine or prone: ECT mode: Step 64 x 64 x 16 Matrix Size: Body contour: Full field...
-
Page 163: Image Resolution Test
(spatial resolution) of a gamma camera by observing the visibility of the test patterns in an image acquired by using a bar phantom. The resolution bar phantom supplied by Mediso is a high resolution (HR) bar phantom with bar sizes at: 2.0/2.5/3.0/3.5 mm. - Page 164 ™ SPIRIT DH-V Operator’s Manual Nucline Procedure 2 Position the source and the detector as follows: Attach the LEHR (or LEGP) collimator to the detector. Rotate the camera to point the detector upward, and carefully place the quadrant bar phantom onto the detector. Prepare an approximately 100 MBq Tc flood source or use the Co-57 flat source.
-
Page 165: User Calibrations
Evaluation Compare the images with the images obtained after the camera was tuned during the most recent Mediso maintenance visit. To print the image, refer to the image processing workstation's manual for details on printing images from the image processing application. -
Page 166: Energy & Uniformity Calibration
™ SPIRIT DH-V Operator’s Manual Nucline Figure 45. Users Calibrations submenu • You perform the energy & uniformity calibration when the uniformity test results are not within the specification. This procedure takes about 50 minutes. Its expected frequency is once a month, if stable environmental conditions are maintained. - Page 167 Troubleshooting The room temperature may rise during power failures in hot weather, when the air condition system is off for a prolonged time period. In this case wait until the temperature stabilizes below 25 C before performing the calibration. The energy & uniformity calibration is to be performed •...
-
Page 168: Center Of Rotation Calibration
™ SPIRIT DH-V Operator’s Manual Nucline A calibration menu will be displayed. Ensure the fields are filled in as follows: Collimator ID: INTR or EXTR respectively Isotope ID: Tc-99m / If you use a different radionuclide, you can display a pop-up list of the available isotopes by pressing <F1>. - Page 169 Troubleshooting Procedure Install low energy collimators to the detectors (LEHR preferred). Position the source and the detector: Prepare or obtain a compact point source, such as 50-100 MBq of Tc or a sealed Co source. Use the smallest possible volume of Tc.
-
Page 170: Service Functions
™ SPIRIT DH-V Operator’s Manual Nucline 9.5 Service functions 9.5.1 Checking the status of distortion corrections Choose Status of Distortion Corrections from the SYSTEM Maintenance > Service menu to display the Status of Distortion Corrections information panel. For normal system operation, the status of the system corrections should be set for the detectors as follows: Status of Distortion Corrections Figure 46. -
Page 171: Database Maintenance
Troubleshooting To change the values, you have to step on the required field using ↑ and ↓ arrows, and enter the required values. Press <F3> to proceed. A system information message will appear: Setting Date and Time… After you set the right Date and Time, the system adjustments (in the operating system) will be changed according to your settings. - Page 172 ™ SPIRIT DH-V Operator’s Manual Nucline Delete Patient scans Select SYSTEM Maintenance > Database Maintenance > Delete Patient scans. Use the ↑ and ↓ keys to move the cursor to the desired field, then press <Enter> to toggle the selection. This function deletes a patient’s scan from database.
- Page 173 Troubleshooting Delete Patient(s) in selected date range Figure 50. Erase database index files Select SYSTEM Maintenance > Database Maintenance > Erase database index files. Use the ↑ and ↓ keys to move the cursor to the desired field, then press <Enter> to toggle the selection. This function deletes the database index files.
- Page 174 ™ SPIRIT DH-V Operator’s Manual Nucline Figure 51. Archive patient images To change the values, you have to step on the required field using ↑ and ↓ arrows, and enter the required values. After you set the right data, press <F3> to proceed.
-
Page 175: File Sending
<Enter>. If there are more than one views, you can also use the cine function to play the series. 9.9 About NEMA performance tests Mediso applies the measurement methods described in the NEMA Standards Publication for Performance Measurements of Scintillation Cameras. The full set of ™ SPIRIT DH-V... -
Page 176: Chapter 10. Troubleshooting
™ SPIRIT DH-V Operator’s Manual Nucline Chapter 10. Troubleshooting Any repair work or modification beyond those explicitly described in this manual is prohibited for unauthorized personnel and nullifies warranty. Error Description Possible Cause Action Required After turning on the Front Check the system's power Power Switch, the green plug is connected to the AC... - Page 177 Troubleshooting The acquisition computer A virus attempts to overwrite Press N, and call a computer beeps and the warning the boot sector of the hard expert to clean your hard disk disk using an appropriate "Disk boot sector anti-virus software. will changed.
- Page 178 ™ SPIRIT DH-V Operator’s Manual Nucline Hexagonally arranged Verify window centering on spots appear in images the photopeak. Check both Energy Correction Flood Correction are turned ON at the SYSTEM Maintenance > Status Distortion Corrections menu. problem persists, call service. Curved or distorted bars Check that...
-
Page 179: Appendix A - Accessories
Appendices Appendix A - Accessories ™ SPIRIT DH-V Major units of Nucline • ™ SPIRIT DH-V Gantry with 2 Rectangular Detectors Nucline • ™ PAC Image Acquisition Workstation (PA-00-00-00/2) Nucline mounted on Mobile Cart (KK-10-00-00) • Imaging Table Standard accessories •... -
Page 180: Appendix B - Room Layout
™ SPIRIT DH-V Operator’s Manual Nucline Appendix B - Room layout Figure 53. Typical layout for a 4764 x 3300 mm room Environmental conditions Recommended +21 ± 3 ºC / 69.8 ± 1.7 ºF Temperature range: Max. temperature variation rate: 3 ºC/hour / 1.7 ºF/hour Relative humidity: 40...80% non-condensing... - Page 181 Appendices Electrical data 115 / 230 V AC ± 10%, 45-63 Hz, Mains voltage: single phase Power consumption: max. 2400VA Required fuse: 35A contact breaker Heat dissipation: max. 5000 BTU/h Electrical Safety Classification ™ SPIRIT DH-V is a continuously operating Class I Type B Nucline equipment in accordance with IEC 60601-1 (EN 60601-1) electrical safety regulations.
-
Page 182: Appendix C - Rear Panel Connectors
™ SPIRIT DH-V Operator’s Manual Nucline Appendix C - Rear panel connectors PRINTER POWER MONITOR POWER MOUSE KEYBOARD COM1 COM2 PRINTER Network Audio EMERGENCY MONITOR ETHERNET to camera Rear panel connections Figure 54. 182/195 26/07/2007... -
Page 183: Appendix D - Dimensions And Weight
Appendices Appendix D - Dimensions and weight Overall dimensions (length x width x height) and weight Gantry (without collimators): 1170 x 1520 x 1500 mm approx. 2200 kg 46 x 60 x 59” approx. 4850 lb Imaging table: 2400 x 800 x 650...950 mm approx. - Page 184 ™ SPIRIT DH-V Operator’s Manual Nucline Gantry floor loading Figure 56. 184/195 26/07/2007...
-
Page 185: Appendix E - Service Modes
Appendices Appendix E - SERVICE modes MANUAL OVERRIDE mode display Figure 57. This mode contains a multi level menu you can use for service functions. The main menu consists of the following four items: MANUAL OVERRIDE HOMING ALL CALIBRATION SET EXCHANGE POSITION Revision 3.04 185/195... -
Page 186: Manual Override
™ SPIRIT DH-V Operator’s Manual Nucline MANUAL OVERRIDE SYNCRONYZE LIFTS Lifting up and letting down of the bed is ensured by two telescopes. There is a third telescope, which lifts up and lets down the pallet if it is pushed out through the gantry. -
Page 187: Homing All
Appendices MOVE LIFT 2 and MOVE LIFT 3 MOVE LIFT 2 and MOVE LIFT 3 predefined motions are similar to MOVE LIFT 1. Everything is the same what you have to do using these procedures. LIFT 2 moves the bed-telescope which is nearer the gantry and LIFT 3 the telescope which is on the other side of the gantry. -
Page 188: Calibration
™ SPIRIT DH-V Operator’s Manual Nucline CALIBRATION GR CALIBRATION This function is used to calibrate of gantry-rotation. The process consists of the following steps: Press <ERASE>, <RESUME> and <ENABLE> buttons on the handcontroller simultaneously to enter SERVICE mode. Select CALIBRATION from the menu and press the <START> button on your handcontroller. - Page 189 Appendices If you want to save the current settings of GR CALIBRATION press the <START> button on your handcontroller, otherwise press any other key. If you press the <START> button, the system saves the current settings, if you press the <ERASE> button, the settings will not be saved. DR1 CALIBRATION This function is used to calibrate the radius of detector1 (DR1).
- Page 190 ™ SPIRIT DH-V Operator’s Manual Nucline “Check moving area. Press <START> when ready!” This function was created to avoid unwanted starting of preprogrammed motions. So before starting of motions you have to remove all undesirable objects from moving area. When you are ready with that, you have to push the <START>...
- Page 191 Appendices TR CALIBRATION This function is used to calibrate of pallet translate. The process consists of the following steps: Press <ERASE>, <RESUME> and <ENABLE> simultaneously to enter SERVICE mode. Select CALIBRATION from the menu and press <START>. Select TR CALIBRATION and press <START>. An automatic homing starts to get to a known position.
- Page 192 ™ SPIRIT DH-V Operator’s Manual Nucline LIFT CALIBRATION This function is used to calibrate of telescopes. The process consists of the following steps: Press <ERASE>, <RESUME> and <ENABLE> simultaneously to enter SERVICE mode. Select CALIBRATION from the menu and press <START>. Select LIFT CALIBRATION and press <START>.
-
Page 193: Set Exchange Position
Appendices 13. Press the <START> button if you want to save the current settings of LIFT CALIBRATION, otherwise – if you do not want to do so – press the <ERASE> button. 14. If you agree on current lift calibration and pressed the <MARK> button you can notice the following message on your display for a short time: ”Lift settings saved.”... -
Page 194: Appendix F - Technical Specifications
4096x4096 pixel Collimator changing time < 1.5 Camera weight with table 2500 / 5512 kg / lb Minimal room size 4764 x 3300 / 15.63 x 10.83 / ft Uptime warranty Mediso 11/2003. Specifications are subject to change. 194/195 26/07/2007... -
Page 195: Appendix G - Simplified System Block Diagram
Appendices Appendix G - Simplified system block diagram SPIRIT DH-V dual-head gamma camera - simplified system block diagram Nucline Performs motions Controls gantry hardware Network Reports position info Allows gantry calibration Color DISPLAY Hand- GANTRY monitor color monitor controller ECG module INPUT DEVICES Keyboard GANTRY...
Need help?
Do you have a question about the Nucline SPIRIT DH-V and is the answer not in the manual?
Questions and answers