
Related Manuals for LIFEBOX blue dot B-PO091

Summary of Contents for LIFEBOX blue dot B-PO091
- Page 1 คู ่ ม ื อ การใช้ ง าน เครื ่ อ งวั ด ออกซิ เ จนในเลื อ ดที ่ ป ลายนิ ้ ว รุ ่ น B-PO091...
- Page 2 คำแนะนำสำหรั บ ผู ใ ช เรี ย นลู ก ค า ขอบคุ ณ สำหรั บ การซื ้ อ ผลิ ต ภั ณ ฑ ข องเรา คู ม ื อ นี ้ เ ขี ย นขึ ้ น สำหรั บ Pulse Oximeter ป จ จุ บ ั น ในกรณี ข องการปรั บ เปลี ่ ย นและการ อั...
- Page 3 1. ข อ มู ล ความปลอดภั ย 1.1 คำเตื อ น (1) เฉพาะบุ ค ลากรที ่ ผ า นการรั บ รองที ่ ก ำหนดโดยผู ผ ลิ ต เท า นั ้ น ที ่ ไ ด ร ั บ อนุ ญ าตให ด ู แ ล รั...
- Page 4 ที ่ ม าของคลื ่ น แม เ หล็ ก ไฟฟ า ที ่ ร ุ น แรงเช น เครื ่ อ งส ง วิ ท ยุ โ ทรศั พ ท ม ื อ ถื อ ฯลฯ ให อ ยู ห า ง ไกลจากระดั...
- Page 5 แสดงสถานะแบตเตอรี ่ ต ่ ำ ปรากฏขึ ้ น (25) ไม อ นุ ญ าตให ม ี ก ารฆ า เชื ้ อ ด ว ยไอน้ ำ ที ่ อ ุ ณ หภู ม ิ ส ู ง หรื อ แรงดั น สู ง ของ Pulse Oximeter (26) ห...
- Page 6 2. ภาพรวม ความอิ ่ ม ตั ว ของออกซิ เ จนในชี พ จรคื อ เปอร เ ซ็ น ต ข อง Hb02 ใน Hb ทั ้ ง หมด ในเลื อ ดเรี ย กว า ความเข ม ข น ของ O2 ในเลื อ ด เป น พารามิ เ ตอร ท างชี ว ภาพที ่ สำคั...
- Page 7 b) ความชื ้ น สั ม พั ท ธ : <95% c) ความดั น บรรยากาศ: 500 hPa~1060 hPa สภาพแวดล อ มการทำงาน a) อุ ณ หภู ม ิ : 10 ํ C ~ 40 ํ C b) ความชื ้ น สั ม พั ท ธ : 75% c) ความดั...
- Page 8 3.2 ข อ ควรระวั ง ในการวั ด (1) โปรดตรวจสอบอุ ป กรณ ก อ นใช ง านและยื น ยั น ว า สามารถทํ า งานได ต ามปกติ (2) เซ็ น เซอร SpO2 และหลอดรั บ ตาแมวควรจั ด เรี ย งในลั ก ษณะที ่ ม ี sarteriole ของวั ต ถุ ในตํ...
- Page 9 (13) ค า ที ่ ว ั ด ได ข องความอิ ่ ม ตั ว ของออกซิ เ จนในเลื อ ดใช ส ำหรั บ อ า งอิ ง เฉพาะภาวะขาด ออกซิ เ จนในเลื อ ดและภาวะขาดออกซิ เ จนที ่ เ ป น พิ ษ ผู ป ว ยบางรายที ่ ม ี ภ าวะโลหิ ต จาง รุ...
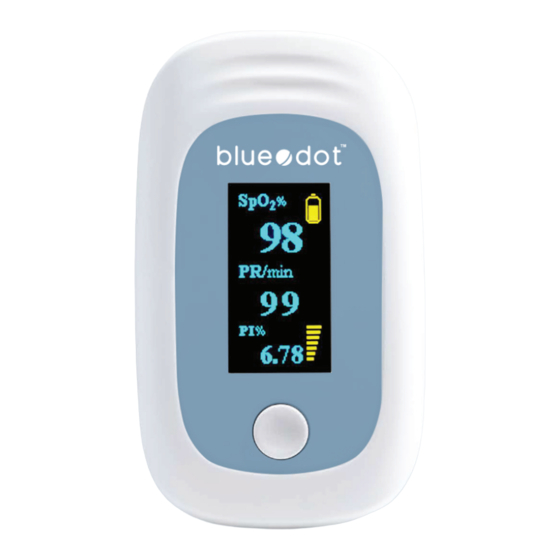
- Page 10 1. หน ว ยความอิ ่ ม ตั ว ของออกซิ เ จนในเลื อ ด: SpO2% 2. ค า ที ่ ว ั ด ได ข องความอิ ่ ม ตั ว ของออกซิ เ จนในเลื อ ด: ช ว งการแสดงผลคื อ (1 ~ 100] และเครื ่ อ งหมาย * - - * หมายถึ ง ค า ที ่ ไ ม ถ ู ก ต อ ง 3.
- Page 11 1. การตั ้ ง ค า ประเภทผู ใ ช ง าน: เด็ ก , ผู ใ หญ 2. การตั ้ ง ค า ความเร็ ว ในการตอบสนอง: เร็ ว / ปกติ / ช า 3. การตั ้ ง ค า ความไว ได แ ก : ต่ ำ / กลาง / สู ง 4.
- Page 12 เป ด รู ป ที ่ 4 เป ด ฝาครอบ ป ด รู ป ที ่ 5 การใส แ บตเตอรี ่ รู ป ที ่ 6 ป ด ฝาครอบ รู ป ที ่ 7 การใส ส ายคล อ งข อ มื อ 6.2 แบตเตอรี...
- Page 13 โปรดใช ค วามระมั ด ระวั ง เมื ่ อ คุ ณ ใส แ บตเตอรี ่ เนื ่ อ งจากการใส ท ี ่ ไ ม เ หมาะ สมอาจทำให อ ุ ป กรณ เ สี ย หายได 6.3 การใส ส ายคล อ งข อ มื อ ขั...
- Page 14 สามารถออกจากอุ ป กรณ ไ ด เมื ่ อ อุ ป กรณ อ ยู ใ นสถานะการทำงาน การกดปุ ม นาน ๆ สามารถเปลี ่ ย นความสว า งของหน า จอได 8. อุ ป กรณ ส ามารถเปลี ่ ย นทิ ศ ทางการแสดงผลตามทิ ศ ทางตามต อ งการ 8.
- Page 15 10. การแก ป ญ หา ป ญ หา สาเหตุ วิ ธ ี แ ก ไ ข SpO2 และ Pulse 1. วางนิ ้ ว ไม ถ ู ก ต อ ง วางนิ ้ ว ให ถ ู ก ต อ ง Rate ไม...
- Page 16 11. ความหมายของสั ญ ลั ก ษณ สั ญ ลั ก ษณ รายละเอี ย ด Type BF คู ม ื อ การใช ง าน ความอิ ่ ม ตั ว ของออกซิ เ จน (%) อั ต ราชี พ จร (bpm) ตั...
- Page 17 12. ข อ มู ล จำเพาะทางเทคนิ ค 1. ประเภท: เครื ่ อ งวั ด ออกซิ เ จนที ่ ป ลายนิ ้ ว 2. เวลาตอบสนอง: <5s 3. แบตเตอรี ่ : 2x AAA 4. อุ ณ หภู ม ิ ใ นการทำงาน: 5 ํ C ~ 40 ํ C 5.
- Page 18 ข อ มู ล จํ า เพาะของ SpO2 ช ว งการวั ด 35% - 100%, (ความละเอี ย ด 1%) ความแม น ยำ 70% - 100%: ±2%, ต่ ำ กว า 70% ไม ร ะบุ แสงสี แ ดง (ความยาวคลื ่ น 660 นาโนเมตร) เซ็...
- Page 19 14. การกำจั ด ㆍห า มทิ ้ ง อุ ป กรณ ร วมกั บ ขยะในครั ว เรื อ น เมื ่ อ หมดอายุ ก ารใช งาน ทิ ้ ง เครื ่ อ งที ่ จ ุ ด รวบรวมหรื อ รี ไ ซเคิ ล ในพื ้ น ที ่ ท ี ่ เ หมาะสม ทิ...
- Page 20 เจ า ของผลิ ต ภั ณ ฑ : บริ ษ ั ท ไลฟ บ อ กซ เอเชี ย จำกั ด Tel: 065-507-8989 08.2021_REV.0001 26 ซ.สุ ข ุ ม วิ ท 62 แ ขวงพระโขนงใต้ เขตพระโขนง กรุ ง เทพฯ 10260...
- Page 21 Instruction manual Pulse oximeter Model. B-PO091...
- Page 22 INSTRUCTION USER Dear Users, thank you very much for purchasing our product. The Manual is written for the current Pulse Oximeter in case of modifications and software upgrades, the information contained in this document is subject to change without notice. The Manual describes.
-
Page 23: Safety Infomation
1. SAFETY INFOMATION 1.1 Warning (1) Only qualified personnel designated by the manufacturer is allowed to maintain the equipment. Users themselves are not allowed to repair the equipment. (2) Explosion hazard: not use the equipment in environment with inflammable substances such as anesthetics. (3) Not use the equipment in MRI and CT examination. - Page 24 eyes, so theuser and the maintenance man should not stare at the light. (12) Testee cannot use enamel or other makeup. (13) Testee's fingernail cannot be too long. (14) Ensure that the environment in which the device is operated is not subject to any sources of strong electromagnetic interference, such as radio transmitters, mobile telephones, etc.
- Page 25 combustible substances, and avoid temperature and humidity too high or too low. (22) Turn off the equipment immediately if water splash the equipment or there is condensate in the equipment. (23) Do not use the equipment immediately when it is transferred from cold environment to warm and humid place.
- Page 26 beyond thehighest or lowest limit, the device would start alarming automatically the premise of the alarming function is on. (34) The device may not work for all patients. If you are unable to achieve stable readings,discontinue use. (35) A flexible circuit connects the two parts of the device. Do not twist or pull on the connection.
- Page 27 Power consumption of the product is low and the two originally equipped AAA batteries can be operated continuously for 20 hours. The product will enter standby mode when no signal is in the product within 5 seconds. Display direction can be changed, easy to view. 2.2 Major Applications and Scope of Application The Pulse Oximeter can be used to measure human Hemoglobin Saturation and pulse rate through finger, and indicate the pulse intensity by the bar-display.
-
Page 28: Principle And Caution
3.PRINCIPLE AND CAUTION 3.1 Principle of Measurement Principle of the Oximeter is as follows: An experience formula of data process is established taking use of Lambert Beer Law according to Spectrum Absorption Characteristics of Reductive Hemoglobin (Hb) and Oxyhemoglobin (Hb02) in glow &... - Page 29 (2) The SpO2 sensor and photoelectric receiving tube should be arranged in a way with the subject' sarteriole in a position there between. (3) The SpO: sensor should not be used at a location or limb tied with arterial canal or blood pressurecuff or receiving intravenous injection.
- Page 30 (13) The measured value of blood oxygen saturation is for reference only to anaemic hypoxia and toxic hypoxia. Some patients with severe anemia may still have higher measured value of blood oxygen saturation due to physiological reasons. (14) As the measure is taken on the basis of arteriole pulse,substantial pulsating blood flow of subject is required.
- Page 31 1. Unit of blood oxygen saturation: Sp02%. 2. Measured value of blood oxygen, saturation: the display range is [1~100] and the sign "--" means invalid value 3. Unit of pulse rate: PR/min. 4. When the unit of pulse rate (3) lights up, display the measured value of pulse rate.
-
Page 32: Installation
3. The parameters of the oximeter can be set through the following menu. 1. Patient type setting including: adult, children 2. Response speed settings including: Rapid, Normal, slow 3. Sensitivity settings include: low, Medium, high. 4. Delete all Historical Data. 5. - Page 33 Open Figure 4 Open the cover Close Figure 5 Batteries installation Figure 6 Close the cover Figure 7 Mounting the Hanging Rope 6.2 Battery Step 1. Open the cover by bringing your finger to pry the groove. (Figure 4) Step 2. Insert the two AAA size batteries properly in the right direction. (Figure 5) Step 3.
- Page 34 Please take care when you insert the batteries for the improper insertion may damage the device. 6.3 Mounting the Hanging Rope Step 1. Put the end of the rope through the hole. (Figure 6) Step 2. Put another end of the rope through the first one and then tighten it. 7.
-
Page 35: Evaluating Measurement Results
8. The device can change the display direction according to the desired direction. 8. EVALUATING MEASUREMENT RESULTS SpO2 measurement Classification/measures to be taken (oxygen saturation) in % 100% - 94% Normal 93% - 90% Decreased range: visit to the doctor recommended <... -
Page 36: Troubleshooting
10. TROUBLESHOOTING Trouble Possible Reason Solution The SpO2 and Pulse 1.The finger is not properly 1.Place the finger properly Rate can’t be positioned. and try again. displayed normally. 2.The testee SpO2 is too low to be detected. The SpO2 and 1. -
Page 37: Key Of Symbols
11. KEY OF SYMBOLS Symbol Description Type BF Refer to instruction manual/booklet The pulse oxygen saturation(%) Pulse rate(bpm) The battery voltage indication is deficient (change the battery in time avoiding the inexact measure) 1. No finger inserted 2. An indicator of signal inadequacy Battery positive electrode Battery cathode 1. -
Page 38: Technical Specifications
12. TECHNICAL SPECIFICATIONS 1. Type: finger clip 2. Response time: <5s 3. Battery: 2x AAA 4. Operating temperature: 5 ํ C -40 ํ C 5. Storage temperature: -10 ํ C ~ 50 ํ C 6. Hemoglobin saturation: Upper limit: 100/ Bottom limit: 94 7. -
Page 39: Pulse Intensity
Sp02 Parameter Specification Measuring range 35%-100%, (the resolution is 1%) Accuracy 70%0-100%0: ±2%, Below 70% unspecified Optical Sensor Red light(wavelength is 660 nm) Infrared ( wavelength is 880 nm) Pulse Parameter Specification Measuring range 30 - 250 bpm, (the resolution is 1 bpm) Accuracy ±2 bpm or ±2%, select larger Pulse Intensity... - Page 40 The codes below are printed on batteries containing harmful substances: Pb = Battery contains lead, Cd = Battery contains cadmium, Hg = Battery contains mercury. Product owner: Lifebox Asia Co., Ltd. Tel: 065-507-8989 08.2021_REV.0001 26 Soi Sukhumvit 62, Phra Khanong Tai, Phra Khanong, Bangkok Thailand 10260...
Need help?
Do you have a question about the blue dot B-PO091 and is the answer not in the manual?
Questions and answers