Table of Contents

Related Manuals for Renova Turborex TX 180

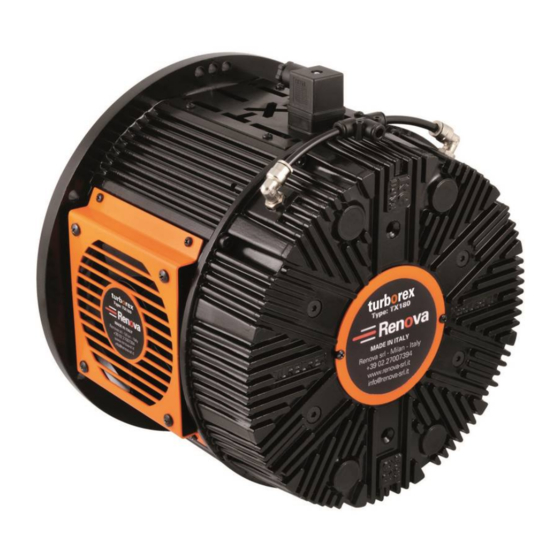
Summary of Contents for Renova Turborex TX 180
- Page 1 180 | 180 HD 180 | 180 HD operating instructions Renova srl – viale Rimembranze 93 – 20099 Sesto San Giovanni - Italy – tel: +39.02.2700.7394 – fax: +39.02.2570.8635 www.renova-srl.com – email: support@renova-srl.com...
- Page 2 This product complies with the Directive 2006/42/CE © Copyright Renova Srl, 2013. All rights reserved. MANTX180ENA4V0421...
-
Page 3: Table Of Contents
index introduction …………………………………………………………….…….………………… page 4 warnings ….….…………………………………………………….…….…….………………… page 4 assistance ………………………………….……………..………..…………………………… page 4 description ……………………………….…………………..…………………………………… page 5 functioning………………………………………………………………………………………… page 5 High dissipation series version ..….……………………………………………………… page 6 brake parts designations ………..……………………..……………………………………. page 6 disassembly, control and storage .……………………………………………….…….. page 7 package contents ………………………………………………………………………………. -
Page 4: Introduction
Dimensions and technical data of our brakes Since the product and Renova itself are constantly changing in order to improve the quality and performance of our products, Renova reserves the right to update the manuals without obligation to update products already marketed and/or any previous manuals. -
Page 5: Description
The Turborex TX - TX/HD - TS - TS/HD brakes, made entirely by Renova in its factory, are mainly designed for use in the field of tension control of unwinding materials, an application that requires excellent heat dissipation and great sensitivity. -
Page 6: High Dissipation Series Version
High Dissipation series version The High Dissipation series version (abbreviated to HD) has now become the Renova standard. The operation of these brakes is identical to its standard version, but they differ, as indicated by the name of the brake itself, as they possess a high working heat dissipation thanks to the innovative design of our self-ventilating central discs. -
Page 7: Disassembly, Control And Storage
Renova guarantees a detailed dimensional and quality control on all the parts that make up our TX-TX / HD brake. We also guarantee total control over any electrical part present in the chosen brake configuration, 100% tested by our operators during the brake assembly phase. -
Page 8: Package Contents
package contents Turborex TX HD version (no optional) Cover with Housing with 4 assembled and guides and two wired pistons carters with fans assembled and connected to the connector Central discs design Pressure disc Double plate holder 2 Single plate holder Allen screw M6 If purchased by the customer... - Page 9 Turborex TX version Cover with Housing with 4 assembled and guides and two wired pistons carters with fans assembled and connected to the connector Central discs design Pressure disc Double plate holder 3 Single plate holder Allen screw M6 If purchased by the customer Springs Soft wire Ø...
-
Page 10: Assembly Procedures
assembly procedures Hub mounting on the machine shoulder Check that the mounting dimensions on the frame and on the shaft correspond to those of the brake. Check that there is no grease or oil from faulty shaft bearing seals. Fit the hub up to the support surface of the brake body. -
Page 11: Pneumatic Connection Procedures
• Fit the pressure disc. • Press the disc pack to check that it moves freely and with a springy motion. • Fit the cover by aligning the holes with the guides and close it with a slight pressure. Then tighten the 8 screws that connect it to the brake body with a tightening torque suitable for the aluminum alloy (~6Nm). -
Page 12: Electrical Connection Procedures
Possible configurations of the pistons present in the cover: electrical connection procedures • Connect the power supply wires of the fans and the rev counter (if present) to the connector in the side brake casing, taking care of the polarity. The electronic card that controls the fans requires this prescription. - Page 13 BOX/MAMMUT CODE CNTH100F0 Multipole connector Cable diameter 2,5 mm Max rated voltage 380 V AC Maximum range 2 A Screw connection Degree of protection IP 54 Used to connect fans, tachometer sensor (in some applications even double) and other sensors such as the temperature sensor. Diagram 1 shows the inlet connections from the fans and the rev counter;...
-
Page 14: Fans
It is preferable to use a transformer that we can supply as an option. The fans normally used are divided into standard and hp (high power) with enhanced cooling characteristics. Type Voltage Power Sound level Renova code Standard 24 V CC 11 W 57 dB(A) VT12038024 High performance HP4... -
Page 15: Maintenance Instructions
maintenance instructions Our TX / TX HD brakes require periodic maintenance as they have parts subject to wear. In order to avoid problems on the brake and to corrupt its operation, below you will find the checks to be carried out on our brakes and the replacement procedures if something should be changed. -
Page 16: Spare Kit (Replacement)
spare kit (replacements) REPLACEMENT OF THE FERRODIC PLATE • Remove the power supply to the fans because the moving blades can be dangerous for the operator’s fingers. • Remove the pneumatic power supply. • Open the brake and remove the old brake pads. •... - Page 17 REPLACEMENT OF THE PISTONS Piston lip seal replacement. • Remove the piston from the cylinder, if it is stuck, feed the brake at very low pressure until the piston comes out of its seat • Remove the damaged gasket and replace it carefully so as not to cut it on the edge of the groove.
-
Page 18: Accessories
• Then power up the sensor and check by turning the shaped central disc that the warning light on its upper end flashes Below is the list of our available tachometers. By default, Renova supplies on its brakes a tachometer with PNP connection normally open (NO), but on request the PNP versions normally closed (NC) and the NPN versions both normally closed and normally open are also available. - Page 19 KIT TEMPERATURE SENSOR - LAMP (KT000000000) Another optional that Renova provides concerns the kit including the temperature sensor and signaling lamp. Thanks to these options it is possible to monitor that the brake temperature does not rise above the threshold and if this happens it will be signaled by a light signal emitted by the lamp.
- Page 20 KIT FOR 4 FANS BRAKE For those applications where more heat dissipation is required, you can switch from 2 fans to 4 fans thanks to the use of a special casing that allows the assembly of 2 fans one above the other. INSTALLATION OF FAN KIT •...
- Page 21 KIT UPGRADE FROM TX TO TX/HD For customers who already have one of our standard versions, Renova also provides upgrade kits on request to change the brake by switching to the High Dissipation version without having to buy a new brake. The upgrade kit consists of the following parts in the version without options.
- Page 22 ASSEMBLY OF THE KIT Before proceeding, make sure the fans are not powered electrically. 1. Remove the brake cover by unscrewing the 8 screws. 2. Remove the brake pad and disc layer in order. For brakes without RPM skip to step 4 3.
- Page 23 7. Reassemble in sequence the remaining discs, springs, 8. Last, insert the pressure disc with the brake wear plate holders as in image below. Please note, in the indicator upgrade from TX180 to TXHD180 you will have the remainder of a double plate holder 9.
-
Page 24: Dimensions
dimensions • C Flange (Ø296mm) drawings with maximum overall dimensions, the same also for HD version K flange (Ø266mm) drawings with maximum overall dimensions, the same also for HD version • Z flange (Ø350mm) drawings with maximum overall dimensions, the same also for HD version •... -
Page 25: Technical Data
technical data performance torque Dependent on cover configuration. For more technical information, consult the brake drawing which presents more detailed and specific data of the brake selected speed max 2500 rpm dissipable heat 4,5 kW – 7 kW max pressure 6 bar materials Housing and brake cover... - Page 26 EXPLODED VIEW OF THE HOUSING POSITION CODE DESCRIPTION CPTX180C00 Housing TX180 flange C, mounting CX250 (Ext. flange diameter 296mm) CPTX180K00 Housing TX180 flange K (External flange diameter 266mm) CPTX180Z00 Housing TX180 flange Z, mounting CX300 (Ext. diameter flange 350mm) GUTX180000 Rods TX180 CATX1804D3P Lateral carter for 3 pin connector...
- Page 27 DISCS Central discs design Central discs standard version Code: Code: TXP0018 DCTX180000 RPM DISCS FOR HIGH DISSPATION SERIES DCTXHD1800FS Disc with cam design TXP001801 Disc TX180HD RPM – 1 notch TXP001802 Disc TX180HD RPM – 2 notches TXP001804 Disc TX180HD RPM – 3 notches TXP001824 Disc TX180HD RPM –...
- Page 28 EXPLODED VIEW OF THE COVER POSITION CODE DESCRIPTION COTX180000 Cover TPTX180000 cup TX180 SFTX180018 Photocell support VITSM60200 Countersunk head screw M6 – cylinder RAM505AR00 Elbow fitting - pipe 6 mm RAM505ARM5 Pipe fitting 5mm – M5 I40-0046 Fitting T form - pipe 6mm TU108G06AR Fitting T form 1/8’’...
- Page 29 ASSEMBLED COVER (KIT FOR REPLACEMENT) TXA0001 Assembled Turborex cover - 2 ps 50 TXA0002 Assembled Turborex cover - 2 ps 40 TXA0003 Assembled Turborex cover - 2 ps 30 TXA0004 Assembled Turborex cover - 3 ps 50 TXA0005 Assembled Turborex cover - 3 ps 40 TXA0006 Assembled Turborex cover - 3 ps 30 TXA0007...
- Page 30 REPLACEMENT KIT FOR TX Illustration Code Description Kit pads KPTX180000 including: - 3 double plate holder - 2 single plate holder Kit discs KDTX180000 including: 4 central discs KDTX180001 Including: 3 central discs and 1 disc with 1 notch for RPM KDTX180FS Including: 3 central discs and 1 disc cam design Kit springs...
- Page 31 REPLACEMENT KIT FOR TX HD Illustration Code Description Springs kit KMTX180HDF18 Kit TX180HD springs Ø1.8mm – Orange KMTX180HDF22 Kit TX180HD springs Ø2.2mm – White STANDARD KMTX180HDF25 Kit TX180HD springs Ø2.5mm – Black KMTX180HDF28 Kit TX180HD springs Ø2.8mm – Black KMTX180HDF30 Kit TX180HD springs Ø3.0mm –...
-
Page 32: Warrantee
12 months from the date of delivery of the brake itself. In the event that, during the period covered by the guarantee, the device exhibits malfunctions, please contact the representative of the Company in the country of origin, or, in the absence of these, Renova srl directly. - Page 34 NOTES...
- Page 35 Manual revision index Rev. n. Revision date Changes description...
- Page 36 Renova srl – viale Rimembranze 93 – 20099 Sesto San Giovanni - Italy – tel: +39.02.2700.7394 – fax: +39.02.2570.8635 www.renova-srl.com – email: support@renova-srl.com...
Need help?
Do you have a question about the Turborex TX 180 and is the answer not in the manual?
Questions and answers