
Related Manuals for Ropox 25-20035-8

Summary of Contents for Ropox 25-20035-8
- Page 1 All-in-one walking trainer User manual This manual should always be in close proximity of the product. TF 200.01.0016 / Date 20-04-2022...
-
Page 2: Table Of Contents
TF 200.01.0016_ENG Table of content Symbols used in this manual ........................4 General safety ............................4 Product Unit label ........................6 2.2 Sales and transport packaging...................... 7 General requirements ..........................7 3.1 Product information ........................7 3.2 Product description ........................8 3.3 Intended purpose .......................... - Page 3 TF 200.01.0016_ENG Maintenance report actuator/lifting motor ................25 Lifetime of actuator/liftingmotor....................26 Components part list..........................27 8.1 Spare parts ..........................27 Environmental protection ........................28 10. Electro magnetic compability ....................... 28 10.1 Suitable Environments ......................28 10.2 Cables ..........................28 10.3 RF portable equipment ......................
-
Page 4: Symbols Used In This Manual
TF 200.01.0016_ENG 1. Symbols used in this manual Warning Symbol Indication of potentially hazardous situation. If not avoided it can result in serious injury or death. Caution Symbol Indication of potentially hazardous situation which may result in minor or moderate injury. It may also be used to alert against unsafe practices. - Page 5 The information in this manual is based on correct installation in accordance with installation instructions for this product. Ropox cannot be held liable if the product is used in any way that differs from stated in this manual and/or installation instruction.
-
Page 6: Product Unit Label
TF 200.01.0016_ENG 2.1 Product Unit label This product is CE-marked in accordance with: European Medical Device Directive 93/42/EEC, including amendments incorporated in Directive 2007/47/EEC. European Medical Device Regulation (EU)2017/745 Council Directive 2006/42/EC on machinery Council Directive 2011/65/EU, RoHS Manufacturer name and address Date of production Stock number Serial number... -
Page 7: Sales And Transport Packaging
TF 200.01.0016_ENG 2.2 Sales and transport packaging Transport packaging label Sales packaging label 3. General requirements 3.1 Product information Manufacturer: Ropox A/S Ringstedgade 221, DK-4700 Naestved +45 55 75 05 00 Email: Info@ropox.com Product models Part number Model Configuration 25-20035-8... -
Page 8: Product Description
The product is used in situations where a patient must be lifted from a sitting position and up to a standing position. The product must not be used for patient transport. The product must always be used with Ropox suitable lifting slings. -
Page 9: Product Dimensions
TF 200.01.0016_ENG 3.9 Product dimensions 25-20035 25-20526 150kg 200kg Lifting capacity 150 kg 200 kg Min. lifting height, lifting hook 150 cm 150 cm Max. lifting height, lifting hook 190 cm 190 cm Lifting travel 40 cm 40 cm Min. height of handle 75 cm 75 cm Max. -
Page 10: Complaints And Adverse Events
TF 200.01.0016_ENG 3.12 Complaints and adverse events Any serious incident that has occurred in relation to the device should be reported to the manufacturer and the competent authority of the Member State in which the user and/or patient is located. -
Page 11: Instructions For Use
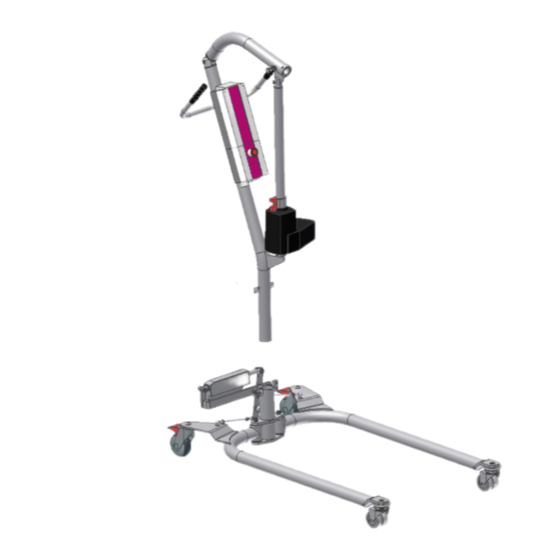
TF 200.01.0016_ENG 4. Instructions for use Installation of product Note! Assembly of 150kg and 200kg Walking Trainers is identical. The only difference is the undercarriage. • Place the lifting mast in the mast holder of the frame. Tighten the two screws with the 5mm Insex wrench provided, and use locking nut on opposite site. -
Page 12: Installation Of Liftig Unit And Hand Support
TF 200.01.0016_ENG 4.2 Installation of liftig unit and hand support • Brake the rear wheels. • Hold the lifting unit (turn it through 90°) so that the locking pin may be pushed into the corresponding slide rail of the lifting mast. •... - Page 13 TF 200.01.0016_ENG Dismounting • Brake the rear wheels. • Loosen the tightening handle. • Note! Do not unscrew it completely. • Lift the hand support off the mast holder. • Note! It may be stuck owing to the clamping plates. •...
-
Page 14: Operating The Product
So for the best possible safety, all users of the hoist must read this user manual before using the hoist. For the All-in-One you can use any of Ropox Domino slings. 4.3.1 Operating instructions - Check that the emergency stop has been released. If not, turn the button clockwise until release. -
Page 15: Safety Function, Liftingmotor
TF 200.01.0016_ENG NOTE! Make sure that the plug from the battery is correctly inserted in the control box, if the plug have been pulled out, before using the lift again. 4.5 Safety function, liftingmotor The lifting motor is provided with a safety function, splejn, against jamming. If the lifting arm meets with resistance during lowering, the movement of the arm will stop automatically. -
Page 16: Brakes
TF 200.01.0016_ENG The lifting motor has a mechanical emergency lowering facility. To release it, pull the red handle. Brakes Brake The hoist may be braked on the two large rear wheels. Press down the rear part of the brake with the foot to brake the hoist. -
Page 17: Transfer - Walking Trainer
TF 200.01.0016_ENG 4.9 Transfer – walking trainer • Before lifting a person it is important to be familiar with the walking trainer and that it works satisfactorily. • Also, it is important to choose the right size of sling for the lifting operation to be performed. Further information about the use of slings will be found in the ”Walking Trainer Manual for Slings”. -
Page 18: Using The Walking Trainer
TF 200.01.0016_ENG 4.9.2 Using the walking trainer • The carer may walk in front of or beside the walking trainer, instructing or supporting the client. • Raising or lowering the sling frame will relieve the client depending on the phase of walking training. -
Page 19: Height Adjustment Of Hand Support
TF 200.01.0016_ENG 4.10 Height adjustment of hand support Press red button, afterwards pull locking tap. Hand support can now be pulled upwards or pushed downwards for adjustment of correct height for user. -
Page 20: Electrical Component Diagram
TF 200.01.0016_ENG 4.11 Electrical component diagram Plug for charging, mains cable Emergency lowering Emergency Charging indicator stop Lifting motor Leg spreading motor Hand control unit Connected to mains voltage... -
Page 21: Trouble Shooting
TF 200.01.0016_ENG 5. Trouble shooting If the walking trainer does not work, check and test the following procedures before contacting an authorised distributor. Has the battery been charged? Has the emergency stop been released? Have all plugs been inserted correctly? Does the hand control unit work properly and has it been mounted correctly? Try with another hand control unit or charger. -
Page 22: Maintenance
TF 200.01.0016_ENG 7. Maintenance Notification! Failing to comply with periodic maintenance may result of degrading of product function and safety. 7.1 Periodic maintenance Always make sure that the mechanical and electrical systems of the hoist operate satisfactorily. In case of malfunction stop the hoist and check or repair it, as required. -
Page 23: Yearly Inspection
TF 200.01.0016_ENG 7.4 Yearly inspection Preventive service must be made once a year. Follow the procedures below must be followed. - Forms to service report Take a copy off the forms on page 4 and 5 and use them when filling out the service report. We recommend to scale them up in A4 size - Visual inspection Inspect hoist frame and weldings for wear, skews or any other damage... -
Page 24: Maintenance Report Mechanical Parts
TF 200.01.0016_ENG 7.5 Maintenance report mechanical parts Invoice address: Delivery address: Repair Mounting Service Warranty Lift type: Serial No. Inspection carried out defective repaired replaced Lubrication of wheels Lubrication of load bearing shafts and hooks Welds Bolts / bushings Mast and arm connection Arm and lifting ascessories Test of the leg-spreading function Switches and safety functions... -
Page 25: Maintenance Report Actuator/Lifting Motor
TF 200.01.0016_ENG 7.6 Maintenance report actuator/lifting motor Invoice address: Delivery address: Repair Mounting Service Warranty Lift type: Serial No. Inspection carried out Not OK Remarks Powercomsumption without load Powercomsumption with max. load Noise Plastic Wires and cords Straightness and outbending when the actuator is completly out Looseness Fixing points... -
Page 26: Lifetime Of Actuator/Liftingmotor
TF 200.01.0016_ENG 7.7 Lifetime of actuator/liftingmotor A service technician fill out the below points from the user information How often is the lift used pr. day : Actuators production date : Expected changing of actuator : Table to determine an actuators lifetime The lifting actuator should be changed when it is max. -
Page 27: Components Part List
8. Components part list Notefication! Ropox will make parts list and circuit diagrams available for extraordinary maintenance and repair beyond what is described in this manual. Repair beyond what is described in this manual may only be done by Ropox designated service personnel. -
Page 28: Environmental Protection
TF 200.01.0016_ENG 9. Environmental protection The product is not intended to be disposed as municipal waste. Proper disassembly, sorting and disposal of components must be done by waste disposal professionals. Part Disposal recommendation Control box Electronics Motors Electronics Handcontrol unit Electronics Battery Electronics...
Need help?
Do you have a question about the 25-20035-8 and is the answer not in the manual?
Questions and answers