
Related Manuals for Vitrolife CulturePro


Summary of Contents for Vitrolife CulturePro
- Page 1 CulturePro™ incubator User manual CulturePro incubator, software version 7.8 User manual, first issue 2021.08.02, revised 2022.06.01/230 V/English...
-
Page 2: Table Of Contents
2.2.1 Transportation and relocation of the CulturePro incubator ......... 16 Starting up the CulturePro incubator ................16 Shutting down the CulturePro incubator and removing all culture dishes ...... 17 Restarting the integrated PC ..................18 Connections to supporting systems .................. 19 Gas .......................... - Page 3 4.2.1.6 Resuming culture in a culture dish (standard configuration only) ..51 4.2.2 Settings screen ....................52 4.2.2.1 Enabling and disabling the screen saver ..........53 Cleaning and disinfecting the CulturePro incubator ............54 Periodic cleaning of the CulturePro incubator..............54 Disinfection of the CulturePro incubator ................ 57 Changing the VOC HEPA filter ....................
- Page 4 15 Disposal of waste ....................... 107 16 Contact information ......................108 CohortView, CulturePro, EmbryoScope, EmbryoSlide, EmbryoViewer, Guided Annotation, iDAScore and KIDScore are trademarks or registered trademarks belonging to the Vitrolife Group. ©2022 Vitrolife A/S. All rights reserved. - 4 -...
-
Page 5: Introduction
Planned service and maintenance to ensure error-free operation of the incubator. The CulturePro incubator is a medical device that must be operated by trained personnel according to the instructions contained in this user manual. Users must be qualified to operate the device and qualified to perform procedures associated with device use in accordance with local qualification standards. -
Page 6: Warnings, Restrictions And Limited Warranty
RESTRICTIONS ON USE • The CulturePro incubator may only be used by persons who have been trained in its use by a person certified by Vitrolife. • The CulturePro incubator may only be used with sterile disposable culture dishes produced and sold by Vitrolife. - Page 7 INSTALLATION AND SERVICE • Installation and service of the CulturePro incubator may only be carried out by a person certified by Vitrolife. The CulturePro incubator must remain at the location where it was installed. If the CulturePro incubator is disconnected and/or moved without supervision by a person certified by Vitrolife, the incubator is no longer approved for clinical use and the warranty may be voided.
- Page 8 TRANSPORTATION AND RELOCATION OF THE CULTUREPRO INCUBATOR • While the CulturePro incubator is still in the shipping boxes, it must only be moved by using a lift truck or a pallet lifter. Do NOT open the shipping boxes without the presence of a person certified by Vitrolife.
- Page 9 ELECTROMAGNETIC COMPATIBILITY • The CulturePro incubator has been tested and found to comply with the limits for medical devices set out in the IEC 60601-1-2 Edition 4.0 for electromagnetic compatibility. These limits are designed to provide reasonable protection against harmful interference in a typical medical installation.
-
Page 10: Intended Use
Ensure that personnel are properly trained in cyber security awareness o Prevent physical access to the equipment by unauthorised users. • Users must inform Vitrolife A/S without any undue delay upon becoming aware of a cyber security vulnerability incident or any suspected security events. 1.2 Intended use... -
Page 11: Proposed Workarounds
Vitrolife. 2 Overview of the CulturePro incubator The CulturePro incubator is a tri-gas incubator that logs the incubation conditions during operation. The incubator is available in two different configurations: •... -
Page 12: Overview Of Features In The Culturepro Incubator
CulturePro incubator 2.1 Overview of features in the CulturePro incubator The CulturePro incubator incorporates a gas and temperature system that controls the incubation conditions. VOC HEPA filter Gas flow components Incubation chamber Load door The blue components in the above illustration represent the gas and temperature system of the incubator. -
Page 13: Barcode Labelling System
CulturePro incubator The culture dishes are placed on the culture dish holder in the CulturePro incubator. The culture dish holder is a sandwich construction controlled by a thermostat. The holder provides direct heat transfer to the culture dishes and automatically moves the culture dishes to load position during door openings. - Page 14 CulturePro incubator In the standard configuration of the incubator, the barcodes can be printed from the EmbryoViewer software. In the stand-alone configuration, the barcodes can be printed from the Create Patient and Print Barcode screen. Go to this screen by pressing in the bottom left corner of the screen.
-
Page 15: Installation And Required Conditions
2.2 Installation and required conditions The incubator must be set up in accordance with the installation checklist. It should not be moved or disconnected by persons who are not certified by Vitrolife (see section 2.2.1 for information on how to move the incubator). -
Page 16: Transportation And Relocation Of The Culturepro Incubator
Vitrolife. 2.3 Starting up the CulturePro incubator In order to start up the CulturePro incubator (e.g. after service or cleaning), turn on the incubator by pressing the green main power switch on the back of the incubator. The incubator and integrated PC will then automatically start. -
Page 17: Shutting Down The Culturepro Incubator And Removing All Culture Dishes
• In case of an emergency, follow the procedure described in section 9. In order to shut down the CulturePro incubator and remove all culture dishes (e.g. for service or cleaning), follow the procedure described below. 1. On the PC home screen, press the settings icon and select Shutdown. -
Page 18: Restarting The Integrated Pc
CulturePro incubator 2.5 Restarting the integrated PC In case an irrecoverable error occurs, an error message is displayed on the screen and the integrated PC will automatically restart when you press OK. To manually restart the PC: Open the lid at the top of the incubator. -
Page 19: Connections To Supporting Systems
CulturePro incubator 3 Connections to supporting systems A number of connectors and sockets are found at the back of the CulturePro incubator. They should only be used by persons certified by Vitrolife for establishing the relevant connections during installation. Operators should never use or attach any tubing/wiring to the incubator without supervision. - Page 20 CulturePro incubator In addition, a USB port that can be used by the clinic to extract monthly incubation reports (see section 13.2.2) is available under the service lid at the top of the incubator: USB port - 20 -...
-
Page 21: Gas
N inlet and vice versa. The couplings are equipped with an automatic shut-off valve that is activated when the couplings are removed from the inlet on the back of the CulturePro incubator. NOTE •... -
Page 22: Server (Standard Configuration Only)
CulturePro incubator 3.2 ES server (standard configuration only) If you are using the standard configuration of the CulturePro incubator, it must be connected to an ES server. The connection is established by Ethernet cable and requires a special set-up, which must be performed by a person certified by Vitrolife. -
Page 23: External Alarm Output
Vitrolife. The connection must be thoroughly tested in collaboration with personnel qualified to operate the internal alarm system to ensure that all alarm signals from the CulturePro incubator are registered properly by the clinic’s alarm system. -
Page 24: Operating The Culturepro Incubator
Validating the individual incubation conditions and calibrating the CulturePro incubator (see sections 4.1.4.2 and 4.1.5.3) • Turning on or off O regulation (see section 4.1.6.1) • Pausing auditory warning alarms issued by the CulturePro incubator (see section 8). - 24 -... -
Page 25: Navigating On The Incubator Screen
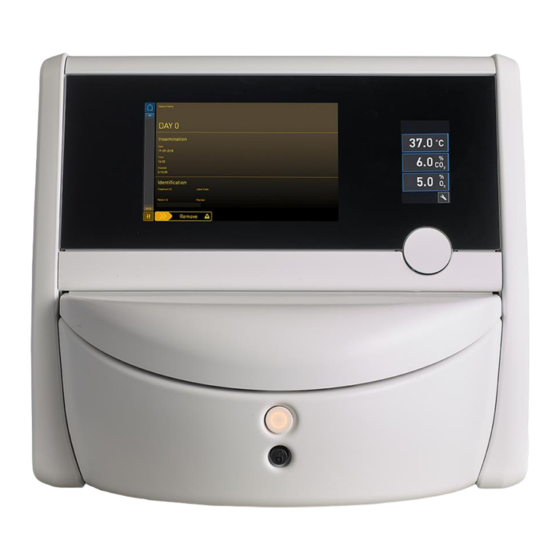
CulturePro incubator 4.1.1 Navigating on the incubator screen When the incubator is in normal operation, the home screen is open. This screen displays the current incubation conditions, i.e. embryo temperature, CO concentration and O concentration: Home screen NOTE • Always leave the incubator with the home screen open. - Page 26 CulturePro incubator You can increase and decrease the set point in steps of 0.1 by using the + and - buttons: Home screen Set point details Change set point mode Press the current set Press the + and - buttons...
-
Page 27: Change Set Point Mode
CulturePro incubator In validation mode, you can display the details of each incubation condition. To display the details, press the CO and O , Temp. Sensor A or Temp. Sensor B buttons. From the validation details display, you can open the calibration mode:... - Page 28 CulturePro incubator This opens the set point details display: details When you open the details display, the large PC screen displays a graph of how the selected parameter has developed over a specific time period. The following example displays a graph of...
-
Page 29: Validation And Calibration Mode
CulturePro incubator When you have pressed the blue-framed Set Point button on the details display, the change set point mode is opened and you can modify the set point: Change set point mode See sections 4.1.4.1 and 4.1.5.1 for further information on how to change set points. - Page 30 CulturePro incubator You can start your validation by pressing either CO and O , Temp. Sensor A or Temp. Sensor In the following example, temperature sensor B is validated. Validation mode. Press to go to calibration mode When the validation mode is opened, the large PC screen displays a graph of the selected parameter in Live mode.
- Page 31 CulturePro incubator The dotted green line displays the expected dish holder temperature, which should be the target if you need to calibrate the internal sensors. In the above example, the target temperature is 37.3°C. The set point is 37.0°C. Since there is a difference of 0.3°C between the temperature of the dish holder (where the current temperature is measured) and the embryo temperature, the target temperature of your calibration is 37.3°C.
-
Page 32: Controlling The Incubator Temperature
CulturePro incubator NOTE • After you have inserted the temperature probe, hold the probe to the right when closing the load door to avoid closing the load door lock directly on the probe. • Carefully remove the temperature probe after calibration/validation. -
Page 33: Calibrating The Temperature
5. Press the close button to return to the incubator home screen: 4.1.4.2 Calibrating the temperature The CulturePro incubator must have been turned on for at least three hours to achieve full equilibrium before the temperature is calibrated. The room temperature must be equivalent to normal laboratory temperature. - Page 34 CulturePro incubator The calibration mode now opens: The PC screen displays a graph of the temperature at the current point in time. The graph is displayed in Live mode. In this mode, the temperature graph is continually updated: 2. Press + on the small incubator screen to increase the temperature for sensor B in steps of 0.1°C, or press - to decrease the temperature in steps of 0.1°C until the displayed value...
- Page 35 CulturePro incubator NOTE • To discard your changes and return to the incubator home screen without applying any changes, press without first pressing the confirmation button. Then select No in the displayed message. • A message will be displayed on the incubator screen in case you have calibrated the temperature in excess of the expected calibration range (i.e.
-
Page 36: Controlling The Co Concentration
CulturePro incubator 4.1.5 Controlling the CO concentration 4.1.5.1 Changing the CO set point 1. Press the current CO concentration to open the set point details: 2. Press the blue-framed Set Point button. 3. Press + to increase the gas concentration in steps of 0.1%, or press - to decrease the gas concentration in steps of 0.1%:... -
Page 37: Validating The Co Concentration
Before the CO concentration is validated, the CulturePro incubator must have been turned on for at least three hours with the appropriate gasses connected to ensure that full equilibrium is attained. The room temperature must be equivalent to normal laboratory temperature. - Page 38 CulturePro incubator 4. Remove the cover from the gas sample port: Cover to gas sample port. Access to gas sample outlet 5. Attach the tube from the gas analyser to the gas sample outlet. The valve symbols differ between incubator models:...
- Page 39 CulturePro incubator 6. Open the valve to withdraw a sample. The valve is open when the switch is turned to the left: Closed valve Open valve The screen displays the current CO reading: 7. Compare the reading made by the external gas analyser with the current reading displayed on the incubator screen.
-
Page 40: Calibrating The Co Concentration
4.1.5.3 Calibrating the CO concentration The CulturePro incubator must have been turned on for at least three hours to achieve full equilibrium before the gas concentration is calibrated. If the reading made by the external gas analyser deviates from the current internal reading displayed on the screen, it is necessary to calibrate the internal gas sensors. - Page 41 CulturePro incubator The PC screen displays a graph of the CO concentration at the current point in time. The graph is displayed in Live mode. In this mode, the graph is continually updated: 3. Press + on the small incubator screen to increase the gas concentration in steps of 0.1%, or press - to decrease the gas concentration in steps of 0.1% to match the values on the...
- Page 42 CulturePro incubator NOTE • To discard your changes and return to the incubator home screen without applying any changes, press without first pressing the confirmation button. Then select No in the displayed message. • A message will be displayed on the incubator screen in case you have calibrated the gas concentration in excess of the expected calibration range (i.e.
-
Page 43: Incubator O Regulation
4.2 The PC screen 4.2.1 PC home screen The PC home screen of the CulturePro incubator provides an overview of all culture dishes that have been placed inside the incubator (see the following screen shot). Each patient may have more than one culture dish and thus be represented more than once in the overview. From all... -
Page 44: Colours On The Home Screen
Green: The equilibration dish is completed and ready for use OR the culture dish contains one or more embryos selected for transfer. Red: The equilibration dish or culture dish is overdue and should be removed from the CulturePro incubator. Home... -
Page 45: Starting A Culture Dish
• Prepare the culture dish as specified in the user manual for the culture dishes. The culture dish is now ready to be inserted in the CulturePro incubator. If there is a problem reading the barcode, see section 4.2.1.3. - 45 -... - Page 46 2. Open the load door and place the culture dish in the accessible position of the holder. The CulturePro incubator keeps track of unoccupied positions and will automatically move the culture dish holder to the next free position. The culture dish should be inserted with the handles and barcode label towards the operator: 3.
- Page 47 CulturePro incubator 4. Enter the date and time of insemination and press Done. NOTE • If you have placed the culture dish in the dish holder and do NOT want to insert the dish after all, press the home icon: .
-
Page 48: Barcode Errors
CulturePro incubator 4.2.1.3 Barcode errors When you insert a culture dish, the barcode reader will automatically attempt to detect a barcode on the culture dish. If the barcode reader is not functioning properly, or if the barcode is damaged or missing, a message will be displayed on the screen. - Page 49 CulturePro incubator Message Cause Solution • Not possible to use the The barcode reader is Continue without barcode reader. currently not functional. barcodes. The system will continue • Restart the PC by without barcodes. pressing the reset button under the service...
-
Page 50: Removing A Single Culture Dish
CulturePro incubator 4.2.1.4 Removing a single culture dish Follow this procedure to remove a culture dish either permanently or e.g. to change medium: 1. From the PC home screen, press the culture dish you want to remove. 2. Move the slider to the right to place the culture dish holder in load position. -
Page 51: Resuming Culture In A Culture Dish (Standard Configuration Only)
CulturePro incubator 4.2.1.6 Resuming culture in a culture dish (standard configuration only) You can resume culture in a culture dish if the incubator is connected to an ES server. Culture can be resumed in the same incubator or in another compatible incubator. -
Page 52: Settings Screen
CulturePro incubator 4.2.2 Settings screen On the Settings screen, you can choose between available display languages and see the instrument number and software version of the incubator. You can also enable or disable the screen saver and set the idle time period after which the screen saver will be activated. -
Page 53: Enabling And Disabling The Screen Saver
CulturePro incubator 4.2.2.1 Enabling and disabling the screen saver On the Settings screen, you can enable or disable the screen saver. If the screen saver is disabled, the text OFF is displayed under Screen Saver. Press the arrow up to enable the screen saver: Use the arrows to set the idle time period after which the screen saver will be activated, e.g. -
Page 54: Cleaning And Disinfecting The Culturepro Incubator
It is strongly recommended to clean and disinfect the CulturePro incubator immediately after any media or oil spills. 5.1 Periodic cleaning of the CulturePro incubator WARNING •... - Page 55 CulturePro incubator 4. Unlock the load door by pressing the emergency unlock button. 5. Open the load door to the incubation chamber by pressing the white load door open button. 6. Check whether any more culture dishes remain inside the incubator. If one or more dishes remain, remove them as explained in the emergency procedure in section 9.
- Page 56 14. Apply clean, distilled water to lint-free tissue wipes and wipe the surfaces of the CulturePro incubator. 15. Inspect the CulturePro incubator. If the incubator is visually clean, it is ready for use. If it is not visually clean, go to step 7 and repeat the periodic cleaning procedure.
-
Page 57: Disinfection Of The Culturepro Incubator
Use a disinfectant that is in accordance with laboratory policy. Wearing gloves and using good handling techniques are important to successful cleaning. Follow the below procedure to disinfect the CulturePro incubator in case of contamination and/or spillage. 1. On the PC screen, press the settings icon. Then press Shutdown and remove all running culture dishes individually. - Page 58 CulturePro incubator 4. Unlock the load door by pressing the emergency unlock button. 5. Open the load door to the incubation chamber by pressing the white load door open button. 6. Remove the load area frame. 7. Clean all internal surfaces: Apply clean, distilled water to lint-free tissue wipes and wipe all internal surfaces.
- Page 59 Then reinsert the load area frame. 14. Inspect the CulturePro incubator. If the incubator is visually clean, it is ready for use. If it is not visually clean, go to steps 8 to 13 and repeat the procedure.
-
Page 60: Changing The Voc Hepa Filter
CulturePro incubator 16. Turn on the CulturePro incubator by pressing the main power switch found at the back. Allow the incubator three hours to equilibrate gas and temperature levels and for the VOC filter to remove any traces of volatile organic compounds. - Page 61 CulturePro incubator 4. Open the service lid at the top of the incubator to access the VOC HEPA filter. White quick connector Grey quick connector 5. To remove the VOC HEPA filter, follow the instructions on the following pages. - 61 -...
- Page 62 CulturePro incubator a) Press the grey quick connector (mounted in the filter tray), and pull the filter to the left: - 62 -...
- Page 63 CulturePro incubator b) Hold the VOC HEPA filter in upright position, and press the white quick connector while pulling the filter upwards to release it: - 63 -...
- Page 64 CulturePro incubator 6. Insert a new VOC HEPA filter by reversing the removal procedure: a) Insert the end of the VOC HEPA filter that has a red O-ring into the white quick connector: - 64 -...
- Page 65 CulturePro incubator b) Insert the end of the VOC HEPA filter that has a grey O-ring into the grey quick connector. Always observe the flow direction indicated on the filter: 7. Turn on the incubator by pressing the main power switch on the back.
-
Page 66: Replacing The Main Fuses
CulturePro incubator 7 Replacing the main fuses WARNING • Before attempting any of the following, ensure that the main power supply cord is completely detached from the incubator and that all culture dishes have been removed from the incubator. CAUTION •... - Page 67 7. Attach the main power supply cord to the power inlet and switch on the incubator. 8. Re-insert the removed culture dishes after following the start-up procedure described in section 2.3. NOTE • If the main fuses become repeatedly defective, contact Vitrolife support for help. - 67 -...
-
Page 68: Alarms, Warnings And Notifications
All alarm conditions are indicated by red visual and/or auditory signals on the incubator. They will also activate an external alarm if the CulturePro incubator is connected to an external alarm system (see section 8.10). There may be a delay before the external alarm is activated, depending on the type and severity of the alarm (see section 8.10.2). -
Page 69: Warnings
This notification indicates that the connection to the ES server has been temporarily lost. Until the connection is re-established, the incubation data will be stored on the hard disk of the CulturePro incubator. The stored data will automatically be transferred to the ES server when the connection is re-established. -
Page 70: Temporarily Pausing Alarms
CulturePro incubator 8.2 Temporarily pausing alarms Alarms activate an auditory signal that prompts you to take corrective action. To pause the auditory signal for three minutes, press the pause audio button: When one of the incubation conditions is not as expected (e.g. deviates from the set point), the button related to that specific condition will be coloured red on the incubator home screen. -
Page 71: Overview Of The Display Colours Of Alarms, Warnings And Notifications
CulturePro incubator 8.3 Overview of the display colours of alarms, warnings and notifications Alarms, warnings and notifications are displayed with the colour scheme specified below. 8.3.1 Alarms Active alarms appear in red colour on the incubator home screen. Once the condition that caused the alarm is back within its normal range (i.e. -
Page 72: Notifications (Standard Configuration Only)
CulturePro incubator 8.3.3 Notifications (standard configuration only) Notifications always indicate that the connection to the server has been lost. Such notifications are shown in red colour in the lower left corner of the PC home screen: . Once the problem has been resolved, the notification is no longer active and the screen returns to normal view: 8.4 Multiple simultaneous alarms... -
Page 73: Resetting Alarms
CulturePro incubator 8.5 Resetting alarms Only resolved alarms related to temperature, CO concentration and O concentration can be reset. Resolved alarms related to temperature, CO or O must be evaluated and reset in order to return to the default incubator home screen and enable operations such as changing set points or calibrating the sensors. -
Page 74: Graphical Overview Of Alarms And Operator Response
Temperature is too high: Temperature is too low: If the error condition cannot be immediately resolved, turn off the CulturePro incubator from the main power switch located on the back of the incubator. Then remove all culture dishes by following the emergency procedure described in section 9. - Page 75 If the error condition cannot be immediately resolved, shut down the CulturePro incubator from the PC home screen -> Settings screen -> Shutdown button. Then remove all culture dishes by following the instructions on the screen.
- Page 76 CulturePro incubator SENSOR ERROR Error condition 1 Error condition 2 Operator response If the CO sensor cannot Remove all culture dishes by adequately measure the CO following the procedure concentration inside the described in section 2.4. incubator because the signal...
- Page 77 If the error condition cannot be accidentally connected to the immediately resolved, turn off nitrogen inlet, an O high the CulturePro incubator from alarm will be activated when the main power switch located the O concentration reaches on the back of the incubator.
-
Page 78: Graphical Overview Of Warnings And Operator Response
Operator response The power to the incubator If there is a complete power has been cut off. failure, turn off the CulturePro incubator from the main switch It is not possible to display a located at the back of the visible alarm signal. - Page 79 CulturePro incubator INLET PRESSURE Error condition 1 Error condition 2 Operator response inlet pressure is too low: inlet pressure is too low: Check gas cylinders and supply lines to ensure adequate supply of gas at the required pressure (see specifications).
-
Page 80: Graphical Overview Of Notifications And Operator Response (Standard Configuration Only)
LOST CONNECTION TO ES SERVER Error condition 1 Error condition 2 Operator response The connection to the ES Re-establish the connection to server has been lost: the ES server. If this is not possible, call Vitrolife support. - 80 -... -
Page 81: Overview Of Error Conditions And Control Unit Responses
CulturePro incubator 8.9 Overview of error conditions and control unit responses Delay ”Resolved” indication Visual warning External alarm Auditory signal (visual and auditory) Error condition Alarm: Temperature Details Alarm: CO concentration Details 0 or 5 Alarm: O concentration Details 0 or 5... -
Page 82: External Alarm System
CulturePro incubator 8.10 External alarm system The integrated alarm system in the CulturePro incubator can be connected to an external alarm system through a plug that is located on the back of the incubator. The alarm signal of the CulturePro incubator can be detected by most commercial external alarm systems that can notify users by phone, pager, SMS or e-mail. -
Page 83: Delay Of External Alarms And Warnings
The information contained in this section is primarily intended for technical staff members who are tasked with setting up the CulturePro incubator with an external alarm. The four-pin alarm plug is labelled Alarm and placed on the back of the CulturePro incubator (see section 3):... -
Page 84: Emergency Procedure
• The emergency procedure may only be used when all other options to safeguard the running culture dishes have failed. 1. Turn off the CulturePro incubator on the main power switch. The main power switch is the illuminated green switch on the back, upper left corner. - Page 85 6. Double-check that ALL culture dishes have been removed by repeating step 5. 7. Call Vitrolife support: US: 781-681-9306 Rest of the world: +45 7023 0500 - 85 -...
-
Page 86: Technical Specifications
CulturePro incubator 10 Technical specifications Additional information on the specifications is found under the respective sections in this manual. Incubator: • Capacity: 15 culture dishes containing 16 embryos each, i.e. 240 embryos in total. • Temperature range: 36°C – 39°C. The temperature set point can be adjusted in steps of 0.1°C. - Page 87 Displayed on the incubator screen when the sensor does not receive a signal strong enough to adequately measure the O concentration inside the incubator. o Malfunction of the unit that controls the running conditions of the CulturePro incubator o Power failure of the entire incubator •...
- Page 88 Isolation of poles: • Isolation on all poles simultaneously is achieved by either turning off the CulturePro incubator by using the main power switch at the back of the incubator or by unplugging the power supply cord from the power supply socket.
- Page 89 In case the boxes are damaged, contact Vitrolife immediately for further instructions. Do NOT open the boxes. Leave the CulturePro incubator in the shipping boxes in a dry and safe place until it can be handled by a person certified by Vitrolife.
-
Page 90: Emc And Hf Technical Review
Guidance and manufacturer’s declaration – electromagnetic emissions The CulturePro incubator is intended for use in the home healthcare environment specified below. The customer or the user of the CulturePro incubator should assure that it is used in such an environment. -
Page 91: Electromagnetic Immunity
Guidance and manufacturer’s declaration – electromagnetic immunity The CulturePro incubator is intended for use in the home healthcare environment specified below. The customer or the user of the CulturePro incubator should assure that it is used in such an environment. - Page 92 Guidance and manufacturer’s declaration – electromagnetic immunity The CulturePro incubator is intended for use in the home healthcare environment specified below. The customer or the user of the CulturePro incubator should assure that it is used in such an environment.
- Page 93 To assess the electromagnetic environment due to fixed transmitters, an electromagnetic site survey should be considered. If the measured field strength in the location in which the CulturePro incubator is used exceeds the applicable RF compliance level above, the CulturePro incubator should be observed to verify normal operation.
- Page 94 Recommended separation distances between portable and mobile RF communications equipment and the CulturePro incubator The CulturePro incubator is intended for use in a home healthcare environment in which radiated RF disturbances are controlled. The customer or the user of the CulturePro incubator can help prevent...
-
Page 95: Accessories And Materials
The CulturePro incubator system’s compliance with the electrical safety standards listed in section 1 has been verified with direct connection to the peripheral devices listed in the table below. Only the devices listed in this table may be connected directly to the CulturePro incubator system: Manufacturer Product Ref./part no. -
Page 96: Planned Service And Maintenance
13 Planned service and maintenance 13.1 Planned service A person certified by Vitrolife will inspect and replace all of the following items in accordance with the intervals specified in the below table, except for the VOC HEPA filter, which may also be... -
Page 97: Regular Service Visits
(see section 13.2). 13.2 Planned maintenance In addition to the service tasks carried out by personnel certified by Vitrolife, it is the responsibility of the clinic to carry out the following maintenance tasks at regular intervals or as required: •... -
Page 98: Maintenance Screen
The pin code on the right side of the screen provides access to advanced maintenance functions to be carried out in collaboration with Vitrolife personnel. Vitrolife will issue a pin code if this is relevant. Press the Exit button to exit maintenance mode and return to the Settings screen. -
Page 99: Generating A Monthly Incubation Report
CulturePro incubator 13.2.2 Generating a monthly incubation report To generate a monthly incubation report, insert a clean USB stick into the USB port under the service lid at the top of the incubator, and press the Incubation Report button. The following... -
Page 100: Voc Hepa Filter And Sensor Maintenance
CulturePro incubator 13.2.3 VOC HEPA filter and sensor maintenance On the VOC Filter and Sensor Maintenance screen, the clinic can set reminders to change the VOC HEPA filter or to validate the internal sensors (temperature sensors A and B, the CO... - Page 101 CulturePro incubator A warning will be shown on the PC home screen when it is time to change the VOC HEPA filter: If you press OK, the warning will disappear and remain hidden for three days. If you do not change the VOC HEPA filter within this period, the warning will reappear.
- Page 102 CulturePro incubator The default interval for validating the internal sensors is 14 days. This period can be changed by the clinic if required. Enter the new interval, and press the Interval Changed button. A warning will be shown on the PC home screen when it is time to validate the internal sensors: If you press OK, the warning will disappear and remain hidden for three days.
-
Page 103: Symbols And Labels
CulturePro incubator 14 Symbols and labels 14.1 Product information labels Label Description Note Reference number Type of power supply See section 10. Declaration by the manufacturer that the device meets all of the applicable requirements in the Medical Device Regulation (EU) -
Page 104: Warning Labels
CulturePro incubator Label Description Note Serial number Caution when See section 15. discarded Refer to the user manual 14.2 Warning labels Label Description Note Warns that the product Placed in the gas is equipped with a UV system inside the light (not connected in incubator. -
Page 105: Connection Labels
Label Description Note Gas sample pipe closed Found under the gas sample cover at the front of the CulturePro incubator. The valve symbols differ between incubator models. Gas sample pipe open Found under the gas sample cover at the front of the CulturePro incubator. -
Page 106: Labels On The Shipping Crate
CulturePro incubator 14.4 Labels on the shipping crate Label Description Note Fragile This side up Keep dry Storage temperature: °C Minimum: -10°C Maximum: 50°C Humidity limitation: Minimum: 30% Maximum: 80% Atmospheric pressure limitation - 106 -... -
Page 107: Disposal Of Waste
CulturePro incubator 15 Disposal of waste In order to minimise the waste of electrical and electronic equipment, waste must be disposed in accordance with the Directive 2012/19/EU on waste electrical and electronic equipment (WEEE) as amended by Directive (EU) 2018/849. This includes: PCBs (lead-free HASL), switches, PC batteries, printed circuit boards and external electrical cables. -
Page 108: Contact Information
CulturePro incubator 16 Contact information Urgently need help? Call our service hotline for support: +45 7023 0500 (available 24 hours a day, 7 days a week) E-mail support: support.embryoscope@vitrolife.com (response within two working days) Vitrolife A/S Jens Juuls Vej 20...
Need help?
Do you have a question about the CulturePro and is the answer not in the manual?
Questions and answers