
Related Manuals for OxyNov FreeO2

Summary of Contents for OxyNov FreeO2
- Page 1 FreeO Automated Oxygen Therapy Device User Manual Models: FO2-110-00, adult and pediatric - STD...
- Page 2 Copyright © 2021 OxyNov User Manual, FO2-OMP-02 (English) Version 3.4, 2021-05...
-
Page 3: Table Of Contents
Table of Contents Table of Contents 1 Typographic Conventions, Alerts, and Symbols ..............1 1.1 Typographic Conventions ..........................1 1.2 Alerts ...................................1 1.3 Symbols ................................2 2 Indications for Use ........................3 2.1 Indications ................................3 2.2 Contraindications ............................3 3 Description ............................5 4 Installation ............................9 4.1 Installing the FreeO ............................9 4.2 Startup ................................12 4.3 Shutdown ...............................14... - Page 4 Table of Contents 9.3 Training ................................46 Appendix A Specifications ......................47 Appendix A.1 FreeO ............................47 Appendix A.2 FreeO Response Time ......................49 Appendix A.3 Example of the SpO Exponential Averaging..............49 Appendix A.4 Default Values and Limits....................50 Appendix A.5 SpO Sensors..........................53 Appendix A.6 Power Supply..........................53 Appendix B Testing Summary ....................
-
Page 5: Typographic Conventions, Alerts, And Symbols
Typographic Conventions, Alerts, and Symbols 1 Typographic Conventions, Alerts, and Symbols This chapter presents the conventions used to present information as well as the warning symbols. 1.1 Typographic Conventions In a procedure, the steps that the user must follow are numbered 1, 2, 3 ... Lower case letters (a, b, c ...) are used to indicate substeps for a complex procedure. -
Page 6: Symbols
Typographic Conventions, Alerts, and Symbols 1.3 Symbols This section presents the symbols used with regard to this medical device. Symbol Label Symbol Label Manufacturer Oxygen Manufacturing date Authorized representative in CE mark (made in compliance with the European Community 93/42EEC Directive on class IIA or IIB medical devices) Serial number Refer to the instruction manual or... -
Page 7: Indications For Use
Indications for Use 2 Indications for Use The FreeO Automated Oxygen Therapy Device provides oxygen therapy on demand, based on continuous, non-invasive monitoring of oxygen saturation. The FreeO Automated Oxygen Therapy Device is intended to deliver a titrated (self-adjusting) flow of oxygen to maintain the patients within predetermined oxygen saturation levels, as set by the user and monitored by the system via an oximeter. - Page 8 Indications for Use Page...
-
Page 9: Description
OxyNov activation Figure 3-1 Front panel (left) and back panel (right) Bolus mode (see Figure 3-1 left) The bolus mode administers a fixed oxygen flow rate for 2 minutes then returns to the mode previously selected either: FreeO , CONSTANT FLOW, or ACQUISITION. - Page 10 5 hours, this indicates that the batteries might need to be changed and the FreeO2 device should be sent to an authorized service center for evaluation. Snooze button (see Figure 3-1 left) During an alarm, tapping this button stops the alarm for a period of 2 minutes after which the alarm restarts.
- Page 11 Description Figure 3-3 Battery operated indication Page...
- Page 12 Description Page...
-
Page 13: Installation
NOTE: In order to adapt to different wall outlets, your distributor will provide you with the appropriate power cable, please connect it to the power adapter. Warning Only use the AC power adapter provided by OxyNov. Any other cord may interfere with the proper operation of the unit. Caution Inspect the power cord regularly and make sure it is free of cuts, tears, damage, etc. - Page 14 Installation Figure 4-1 Electric power connector 2 Connect the oxygen tube to the oxygen input of the FreeO then connect it to the medical grade oxygen source. The FreeO supports all types of oxygen sources, high or low pressure, using the adapted connector of the oxygen input.
- Page 15 Installation 3 Start the FreeO by pressing the start/stop button. The startup takes a certain time, refer to section 4.2. Figure 4-3 Start/stop button Make sure that the oxygen is properly connected: listen for leaks, if there are none, set the unit to the fixed flow rate of 2 L/min.
-
Page 16: Startup
Installation Warning Never use petroleum-based products on the patient during the administration of oxygen. This can cause severe burns. In case of nasal dryness, use a lubricant recommended by the health care personnel. It is also possible to use a humidification system (refer to section 4.1.1). Warning It is strictly forbidden to smoke during treatment. - Page 17 Installation Figure 4-6 Startup screen The sleep mode allows the device to be placed in standby so that a new patient can start their treatment more quickly. In this mode, the screen is turned off and electricity consumption is reduced. To deactivate sleep mode, just touch the screen, or press the snooze or bolus buttons.
-
Page 18: Shutdown
CONSTANT FLOW mode, (section 6.5) (Table 1) the blue circle with a dot as shown in Figure 4-7 corresponds to FreeO2 mode while an eye icon corresponds to the ACQUISITION mode). Figure 4-8 Description of icons Page... - Page 19 Installation Table 1 Description of battery icons Icon Description The batteries are fully charged and the device is plugged into a wall outlet. The batteries are being recharged. The batteries are fully charged and the device is currently in battery- operated mode.
- Page 20 Installation Page...
-
Page 21: Oximeter Warnings And Cautions
Oximeter Warnings and Cautions 5 Oximeter Warnings and Cautions This chapter presents the precaution to take before using the FreeO . The FreeO is equipped with the OEM III module from Nonin®. Nonin® recommends that these instructions are understood and followed. 5.1 Oximeter Warnings • Use only with Nonin® PureLight® pulse oximeter sensors. These sensors are manufactured to meet the accuracy specifications for Nonin®... - Page 22 Oximeter Warnings and Cautions Page...
-
Page 23: Operation
Operation 6 Operation This chapter presents the operation of the FreeO 6.1 Selecting a Patient The screen to select the patient, after selecting NEW PATIENT (see Figure 4-6), allows you to select the patient type: Pediatric, Adult. Figure 6-1 Patient selection NOTE: For Adult patient type, the maximum oxygen flow rate that can be delivered is 20L / min. For Pediatric patient type, the maximum oxygen flow that can be delivered is 10L / min. -
Page 24: Continuing The Treatment
Operation Figure 6-2 Treatment selection 6.2 Continuing the Treatment When selecting CONTINUE (see Figure 4-6), the monitoring screen opens. Figure 6-3 Monitoring screen NOTE: When installing or readjusting the pulse oximeter on the patient, a few seconds are necessary before the oximeter signal appears on the FreeO monitoring screen. -
Page 25: Monitoring
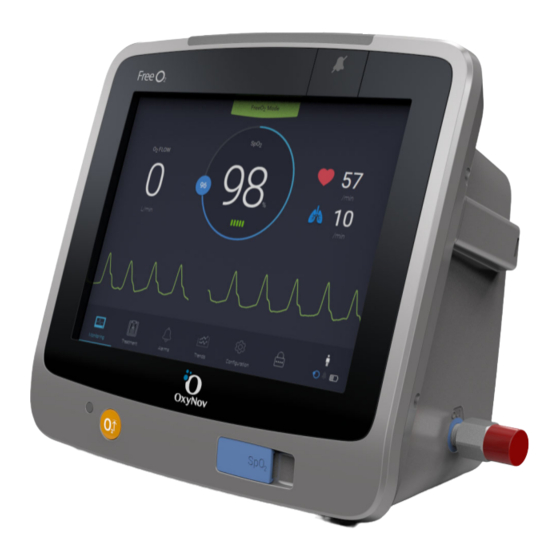
Operation 6.3 Monitoring The Monitoring screen is the default screen which FreeO returns to automatically when no user activity has been detected after a certain amount of time. In this mode, the screen shows: • The usage mode. • Alarms (physiological alarms at top left and technical alarms at top right). •... -
Page 26: Treatment
Operation 6.4 Treatment The treatment screen allows you to select the operation mode: FreeO , CONSTANT FLOW, and ACQUISITION as well as proceeding with the patient identification if it is not already done. Figure 6-5 Screen of the treatment selection To access the treatment screen: 1 At the bottom of the screen tap the Treatment button. - Page 27 Operation 6.4.1 FreeO Mode FreeO mode is the automated oxygen therapy mode in which FreeO automatically adjusts the oxygen flow administered to the patient in order to maintain the defined target SpO . Press the SpO TARGET button and then adjust the target oxygen saturation using the - and + buttons according to clinical recommendations In addition to being able to limit the administered flow rate according to the type of patient (10 L/min for children and 20 L/min for adults), you can also limit the flow rate that FreeO can deliver to any value...
- Page 28 Operation To identify the patient: 1 At the top left of the screen, tap the PATIENT icon. Opening the keyboard Figure 6-7 PATIENT icon 2 In the center of the screen, tap Patient. The keyboard opens. 3 Tap the keyboard keys, then tap the confirmation button. The patient identifier is limited to 12 alphanumeric characters.
-
Page 29: Alarms
Operation 6.5 Alarms The alarm screen allows you to determine at what levels (maximum and minimum) the unit will indicate a problem for the functions detected by the oximeter. These functions are: SpO Flow, HR (Heart rate per minute) and RR (Respiratory Rate per minute). Tap one of these buttons then, using the - and + buttons, adjust the level. - Page 30 Operation Many events can trigger an alarm. When an alarm is triggered, the alarm indicator light turns on. There are three alarm levels: • Yellow = Low • Blinking yellow = Medium • Blinking red = Critical Figure 6-10 Alarm indicator light The following table presents the events that can trigger an alarm.
- Page 31 Operation Table 1 Alarm description (continued) Event Indicator Description Solution FreeO Blinking red Charging error, maintenance required. The FreeO must be sent for repairs. System error #10006 Blinking red The available space of the internal memory The FreeO must be sent for is critical.
- Page 32 Operation Table 1 Alarm description (continued) Event Indicator Description Solution Blinking red Oxygen flow rate high. Verify nasal cannula or face mask. Reset alarm limits if indicated. Blinking red Delivered oxygen flow rate is incorrect. Verify the O connection at the input and output or the nasal cannula or face mask.
-
Page 33: Trend Measurement
Operation 6.6 Trend Measurement The trend screen provides a record of data collected for the last hours. You have a choice of hour range from 1 to 72. The hour range is divided in segments. You can display 2 trends at a time. You have 4 choices of trend display for each of the 2 trends: SpO including the SpO target data, O... -
Page 34: Configuration
Operation 6.7 Configuration The configuration screen gives you access to many configuration parameters. 6.7.1 General This page allows you to select the language, the alarm sound level, the screen brightness as well as determine how long to press on the padlock icon to lock and unlock the screen. Figure 6-12 Configuration screen, GENERAL page 6.7.2 Night Mode This page allows you to lower the sound and brightness levels of the unit in order not to inconvenience the... - Page 35 Operation Tap the Start time and End time buttons and use the - and + buttons to set the time. Figure 6-13 Configuration screen, NIGHT MODE page 6.7.3 SpO Sensor This page allows you to select a wired or Bluetooth oximeter sensor. When selecting a sensor, if no patient is linked to an oximeter, an alarm goes off.
- Page 36 Operation 6.7.4 Export Data This page allows you to export data of the last three patients to a USB key which you connect to the USB port of the unit (see Figure 3-1 on page 5). The USB key must previously be formatted to FAT32. Figure 6-15 Configuration screen, EXPORT page The FreeO always stores the data of the last three patients even after you have transferred them to a USB...
- Page 37 This page gives an access to the maintenance functions of the FreeO (refer to the maintenance manual). Make sure to periodically verify that the firmware/software version is up to date; go to the Support section of our Web site at www.oxynov.com. Page...
-
Page 38: Screen Locking
Operation 6.8 Screen Locking Locking the screen prevents any unwanted setting changes; for example, when cleaning the unit. To lock the screen: 1 At the bottom of the screen, press the padlock icon for the number of seconds defined in the general parameters (see section 6.7 "Configuration"... -
Page 39: Electromagnetic Emissions And Immunity
Electromagnetic Emissions and Immunity 7 Electromagnetic Emissions and Immunity This chapter presents the emission and immunity tests, and compliance of the FreeO 7.1 Electromagnetic Emissions The FreeO oxygen therapy optimization device is intended to be used in an electromagnetic environment as specified in Table 1. Users must make sure that the unit is used in such an environment. Table 1 Emission tests and guidance Test Compliance... - Page 40 Reorient or relocate the FreeO Increase the distance between the FreeO and the other equipment. Contact OxyNov for help. Page...
-
Page 41: Electromagnetic Immunity
Electromagnetic Emissions and Immunity 7.2 Electromagnetic Immunity The FreeO oxygen therapy optimization device is intended to be used in an electromagnetic environment as specified in Table 2. Users must make sure that the unit is used in such an environment. Table 2 Immunity tests and guidance IEC60601-1-2 Test Compliance... - Page 42 Electromagnetic Emissions and Immunity Table 2 Immunity tests and guidance (continued) IEC60601-1-2 Test Compliance Guidance Test Level Conducted RF 3 Vrms 3 Vrms Portable and mobile RF communication equipment should not IEC 61000-4-6 150 kHz to 80 MHz be used closer to any part of the FreeO oxygen therapy optimization device, (including cables), than the...
-
Page 43: Distances Between Rf Communication Equipment And The Freeo
Electromagnetic Emissions and Immunity Table 3 Transmitter Bluetooth compliance Version 4.0 Operating frequency 2.402 to 2.480 GHz Output power 2 dBm Operating range Indoor radius of 5 meters (16 feet) Network topology Point-to-Point Operation Master Antenna type Internal Modulation type Frequency-shift keying Frequency-hopping spread spectrum Bandwidth... - Page 44 Electromagnetic Emissions and Immunity Page...
-
Page 45: Maintenance
Maintenance 8 Maintenance This chapter presents the instructions for cleaning and calibrating the FreeO 8.1 Cleaning This section explains how to clean the FreeO and the precautions to be taken. Warning Do not perform any cleaning operation while a patient is connected to the FreeO Always disconnect the equipment from the AC power before performing any cleaning, disinfection, or maintenance. -
Page 46: Spo Testing
Maintenance 8.3 SpO Testing OxyNov recommends testing the oximeter with a pulse oximetry simulator once a year. There are many commercially available simulators manufactured by third parties. OxyNov recommends the models presented in Table 1. Table 1 Pulse oximetry simulators Simulator... - Page 47 Replacement by an unqualified person could result in excessive temperature, fire, or explosion. Use only OxyNov-approved batteries. Caution The batteries should be adequately charged to ensure the backup power in case of an interruption.
- Page 48 Maintenance Page...
-
Page 49: Warranty And Contact
9.1.2 Exclusions OxyNov reserves the right to bring changes to the design or the construction to one of its products at any time without incurring the obligation of making these modifications on products previously sold. Accessories, including but not limited to, batteries, power cord, and oxygen supply tube. -
Page 50: Contact
135, rue Claude Chappe, Technopôle Brest Iroise, 29280, Plouzane, France Telephone: +33 (0)2 29 00 15 87 | Fax: +33 (0)2 57 40 02 17 service.techniques@oxynov.com Visit the Contact us section under Contact us of our Web site www.oxynov.com. 9.2.1 Manufacturer OxyNov 725, boulevard Lebourgneuf, suite 109/111 Québec, Qc Canada G2J 0C4... -
Page 51: Appendix A Specifications
Specifications Appendix A Specifications This chapter presents the specifications for the FreeO , the SpO sensors, and the power supply. Appendix A.1 FreeO The following tables present the FreeO specifications. Table 1 Performances reading 70% to 100% ±2 digits Heart rate 40 to 190 BPM ±5 digits Respiratory rate 4 to 70 RR/min... - Page 52 8 in. (20.32 cm) diagonal Touchscreen Type Resistive Table 7 Connectivity Connector USB 2.0 Table 8 Applied part sensor Not supplied by OxyNov Refer to appendix A.5 "SpO Sensors" Nasal cannula, face mask Not supplied by OxyNov Follow the clinician instructions Page...
-
Page 53: Appendix A.2 Freeo Response Time
Specifications Appendix A.2 FreeO Response Time The following presents the FreeO response to the patient.s data. If the signal from the sensor is inadequate, the measure shows dashes instead of numbers. Table 9 Response SpO2 Response Latency Fast average SpO 1.5 s 2 beats Pulse Rate Value... -
Page 54: Appendix A.4 Default Values And Limits
Specifications Appendix A.4 Default Values and Limits This section presents a list of default values and limits to be validated for the configuration. A.4.1 Configuration/Treatment Table 11 General Language English Sound level 100% Brightness level 100% Screen lock Enabled, 3 seconds Night mode Disabled, level at 50%, 22H00 to 6H00 Factory default patient type... - Page 55 Specifications A.4.2 Alarm Panel Table 15 Absolute limits (all patient types) Type Minimum Limit Maximum Limit 100% Flow rate 0 L/min 20 L/min Table 16 Pediatric range Low Default High Default Type Configuration Configuration Defined according to the SpO target, refer to Table 18. Flow rate According to the following...
- Page 56 Specifications Table 18 Low Default SpO Alarm Targetted Low SpO alarm - Low SpO alarm - Adult Pediatric 88 % S.O. 88 % S.O. 88 % 89 % 88 % 89 % 88 % 89 % 86 % 88 % 86 % 88 % 86 %...
-
Page 57: Appendix A.5 Spo Sensors
Specifications Appendix A.5 Sensors This section presents the list of SpO sensors compatible with the FreeO Warning Using any other sensor may result in false readings, patients’ injury, and FreeO malfunction. 6000CA - Cloth adult box of 24; 3 feet (1 meter) 6000CI - Cloth infant box of 24;... - Page 58 Specifications Page...
-
Page 59: Appendix B Testing Summary
Testing Summary Appendix B Testing Summary The SpO accuracy, motion, and low perfusion testing were conducted by Nonin® Medical Incorporated. Appendix B.1 Accuracy Testing The SpO accuracy testing was conducted during induced hypoxia studies on healthy, non-smoking, light-to- dark- skinned subjects during motion and no-motion conditions in an independent research laboratory. The measured arterial hemoglobin saturation value (SpO ) of the sensors is compared to arterial hemoglobin oxygen (SaO... - Page 60 Testing Summary Table 1 SpO2 accuracy (A Adult/Pediatric (70 to 100%) No motion Finger clip ±2 digits Flex ±3 digits Reusable Soft sensor ±2 digits 8000Q ±4 digits 6000 series ±2 digits Disposable 7000 series ±3 digits Motion Finger clip ±2 digits Reusable Flex...
Need help?
Do you have a question about the FreeO2 and is the answer not in the manual?
Questions and answers