Advertisement
ASU/ASB
Quick Start Guide
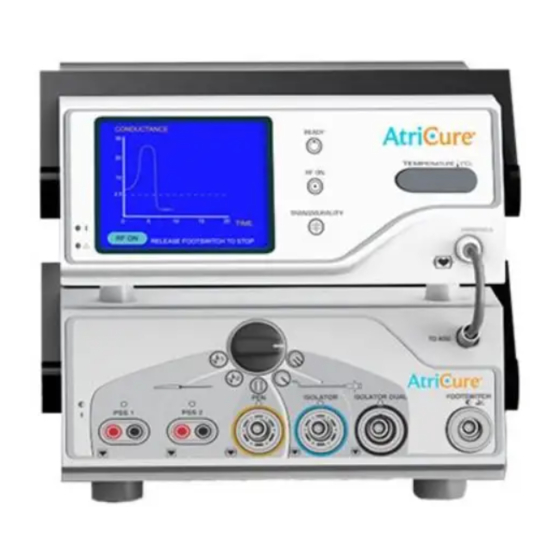
ASU FRONT PANEL
1
8
9
7
6
1 / Tissue Conductance/
Power Graph Display
2 / Ready Indicator
3 / RF ON Indicator
4 / ASB Interface
ASU REAR PANEL
7
1 / Data Port
2 / Speaker Volume Control
3 / Power Entry Module
4 / Fuse Box
1
2
3
5
4
9
5 / Transmurality Indicator
6 / Fault Indicator
7 / Power Indicator
8 / Handle
9/ Handle Adjustment
Knobs
1
6
5
4
3
2
5 / Equipotential Ground
Stud
6 / Input Voltage Selector
Switch
7 / Footswitch Interface
Cable Receptacle
ASB FRONT PANEL
1
2
3
1 / PSS 1 Interface
2 / PSS 2 Interface
3 / Pen Interface
4 / Isolator Clamp
Interface (not used)
ASB REAR PANEL
1
1 / Footswitch Interface Cable Receptacle
2 / Equipotential Ground Stud
3 / Power Entry Module
8
4
5
6
7
5 / Isolator Synergy
Clamp Interface
6 / Footswitch Receptacle
7 / ASU Interface
8 / ASB Selector Switch
2
3
Advertisement
Table of Contents

Related Manuals for ArtiCure ASU


Summary of Contents for ArtiCure ASU
- Page 1 6 / Fault Indicator 6 / Footswitch Receptacle 2 / Ready Indicator 3 / Pen Interface 7 / Power Indicator 7 / ASU Interface 3 / RF ON Indicator 4 / Isolator Clamp 8 / Handle 4 / ASB Interface...
- Page 2 ASU/ASB CONNECTIONS Note: 1 / Use hospital grade ground receptacle. 2 / Do not use extension cord. 3 / May be connected to AtriCure system cart power strip. Note: PSS 1 and PSS 2 may be used for pacing and...
- Page 3 2. the ASU screen will read “READY” and “Depress footswitch to begin.” 2 / Power on the ASU and ASB by activating switches on the back of each machine. • If there is no power after this step, check...
- Page 4 Measurement) • If won’t correct, contact customer service Information relative to other less common error codes can be found in the troubleshooting section in the P000463 ASU IFU. For other concerns, contact your AtriCure representative or contact the AtriCure Customer Service.
Need help?
Do you have a question about the ASU and is the answer not in the manual?
Questions and answers