
Subscribe to Our Youtube Channel
Related Manuals for Vital Systems Smart3G-pn5732P

Summary of Contents for Vital Systems Smart3G-pn5732P
- Page 1 Smart3G – pn5732P Ethernet PLC User Guide (Document Revision 1.5) (Updated: June 20, 2022) © 2022 Vital Systems Inc Buford, GA USA For more information please visit the product web page: www.vitalsystem.com/smart3g...
-
Page 2: Table Of Contents
5. Programming and Configuring Smart-3G Devices ....................18 Deploy/Superlogic Required Setup Steps ......................19 6. Control Word File ..............................23 7. Control Bit File ..............................24 8. Smart-3G Network Topology Examples ....................... 25 Ver. 5732-1.4 © Copyright 2016, Vital Systems Inc 1 | P a g e... -
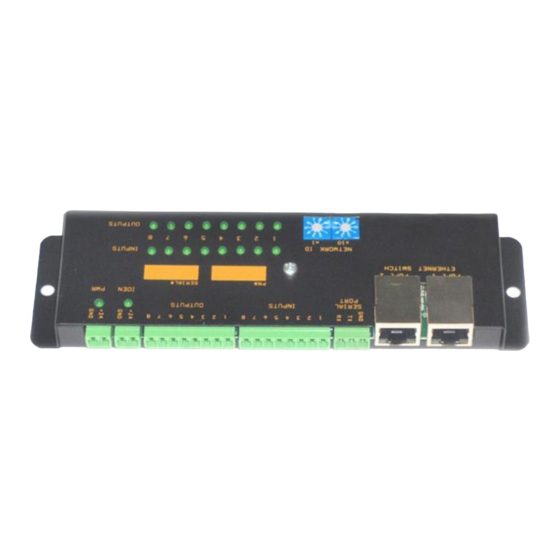
Page 3: Smart-3G - Ethernet Programmable Controller
Input Threshold Voltage 4 Volts. (Logic Low: 0...4v, Logic High: 4.1v...30v) Network Ethernet 100MB/S Ethernet Switch 2 Ports. (Always use Port 1 when single port is required) Ver. 5732-1.4 © Copyright 2016, Vital Systems Inc 2 | P a g e... -
Page 4: Operating Modes
I/O. You can control up to eight remote Smart-3G devices from a single master Smart-3G device, providing a total of 72 inputs and 72 outputs. Ver. 5732-1.4 © Copyright 2016, Vital Systems Inc 3 | P a g e... -
Page 5: Network Configuration And Protocols
Byte 10, 11 = Contents of Control Word 2 (CW:2) Data to Ethernet/IP Master is read from Smart-3G Internal control words file CW:1 and CW:2, 16bit integers. Ver. 5732-1.4 © Copyright 2016, Vital Systems Inc 4 | P a g e... -
Page 6: Output/Consume Message Format
If Remote I/O check-box is checked in SuperLogic configuration window, Byte 4 is mapped to outputs for direct PC software control: Byte 4 Outputs 1…8 (bits 0...7 are mapped to Outputs 1…8). Ver. 5732-1.4 © Copyright 2016, Vital Systems Inc 5 | P a g e... -
Page 7: Ethernet/Ip Configuration Example
Smart-3G User’s Guide www.VitalSystem.com Ethernet/IP Configuration Example Below is an example of a typical Ethernet/IP Master configuration using a 10ms polling interval and a 5 second connection timeout. Ver. 5732-1.4 © Copyright 2016, Vital Systems Inc 6 | P a g e... -
Page 8: Modbus / Tcp Protocol
IP address) in Control Words 41 thru 48 inside the ladder logic program. The default value is 0, which disables the particular slot of the slave scanner. Ver. 5732-1.4 © Copyright 2016, Vital Systems Inc 7 | P a g e... -
Page 9: Profinet
XML device profile from Vital System Inc. After successfully importing the Smart3G device profile, it should then be available in the project’s Hardware Catalog. Ver. 5732-1.4 © Copyright 2016, Vital Systems Inc 8 | P a g e... -
Page 10: Ethernet Configuration For Profinet
The Profinet device name must be set to the text “smart3g-xxx”, where “xxx” is the last octet of the IP Address written in a 3-digit notation. This is also specified by the rotary switch selection. Ver. 5732-1.4 © Copyright 2016, Vital Systems Inc 9 | P a g e... -
Page 11: Real Time Settings
Writable Control Word (2-bytes or 16-bits) 1003 CW:28 Writable Control Word (2-bytes or 16-bits) 1004 CW:29 Writable Control Word (2-bytes or 16-bits) 1005 CW:30 Writable Control Word (2-bytes or 16-bits) Ver. 5732-1.4 © Copyright 2016, Vital Systems Inc 10 | P a g e... -
Page 12: Sycon Setup For Hilscher Profinet I/O Controller
2. Add the Hilscher Profinet I/O Controller on the main bus line. This can be found in the Device Catalog under the “Master” section of “Profinet I/O”. Ver. 5732-1.4 © Copyright 2016, Vital Systems Inc 11 | P a g e... - Page 13 3. Add the Smart3G as a Profinet I/O Device on the Hilscher Controller’s bus line. This can be found under the “Slave” section of “Profinet I/O”. The Smart3G device can then be configured. Ver. 5732-1.4 © Copyright 2016, Vital Systems Inc 12 | P a g e...
- Page 14 5. In the Hilscher Device Configuration, the firmware for “Profinet I/O Controller” will need to be downloaded to the device. Click on “Download” to set the active firmware. Ver. 5732-1.4 © Copyright 2016, Vital Systems Inc 13 | P a g e...
- Page 15 8. Set Process image storage format to Little Endian for compatibility with other applications. Also Watchdog time can be set to a high value (~2000 millisec) to avoid false disconnects when scanning very high number of devices. Ver. 5732-1.4 © Copyright 2016, Vital Systems Inc 14 | P a g e...
- Page 16 10. Set the IP Address for each Smart3G device to its set IP Address. Uncheck the “Inherit” setting to prevent the Hilscher device from setting the Smart3G IP Address. Ver. 5732-1.4 © Copyright 2016, Vital Systems Inc 15 | P a g e...
- Page 17 12. After hitting “OK”, the configuration can then be downloaded to the Hilscher Device in order to initiate the Profinet Network operation. Ver. 5732-1.4 © Copyright 2016, Vital Systems Inc 16 | P a g e...
- Page 18 Smart-3G User’s Guide www.VitalSystem.com Ver. 5732-1.4 © Copyright 2016, Vital Systems Inc 17 | P a g e...
-
Page 19: Programming And Configuring Smart-3G Devices
Deploy3G PC software is used to program and configure systems with multiple Smart3G cards. It maintains a database of ladder programs and device configurations for the entire project. Ver. 5732-1.4 © Copyright 2016, Vital Systems Inc 18 | P a g e... -
Page 20: Deploy/Superlogic Required Setup Steps
Ethernet Adapter to match the target network for the 3G cards. Here are step-by-step instructions on how to do this: Click the Start menu. Next, click on the Control Panel option. Click on the Network and Sharing Center option. Ver. 5732-1.4 © Copyright 2016, Vital Systems Inc 19 | P a g e... - Page 21 Click on Change adapter settings from the left side menu. Right-click on the Local Area Connection icon, then select Properties (there may be multiple. Select the one that corresponds to your Smart3G device). Ver. 5732-1.4 © Copyright 2016, Vital Systems Inc 20 | P a g e...
- Page 22 In the window that opens, click on Internet Protocol Version 4 (TCP/IPv4) (you may need to scroll down to find it). Next, click on the Properties button. Ver. 5732-1.4 © Copyright 2016, Vital Systems Inc 21 | P a g e...
- Page 23 3. In Deploy3G, right click the white area of the Network Devices box, and select Auto-Configure. 4. The Smart3G device should now be on the correct network, and should appear when you click scan. Ver. 5732-1.4 © Copyright 2016, Vital Systems Inc 22 | P a g e...
-
Page 24: Control Word File
Input / Output data for slave devices for S3G protocol. Bit 0…7 are inputs and bits 8…15 are CW:49..56 outputs. This data is also accessible using the IN/OUT file, eg IN:55, OUT:71 etc. Ver. 5732-1.4 © Copyright 2016, Vital Systems Inc 23 | P a g e... -
Page 25: Control Bit File
Downstream main line is ready to take packages. (Input, Read Only) ProfiNET Active. This control bit is activated when a ProfiNET connection is currently online CB:20 and actively transmitting I/O data. Ver. 5732-1.4 © Copyright 2016, Vital Systems Inc 24 | P a g e... -
Page 26: Smart-3G Network Topology Examples
Smart-3G User’s Guide www.VitalSystem.com 8. Smart-3G Network Topology Examples Ver. 5732-1.4 © Copyright 2016, Vital Systems Inc 25 | P a g e...
Need help?
Do you have a question about the Smart3G-pn5732P and is the answer not in the manual?
Questions and answers
3g card testing. is there a way to test the card without supplying power to it?
The Vital Systems Smart3G-pn5732P 3G card cannot be tested without supplying power to it. Power is required for the card to operate, run ladder logic, or communicate over the network.
This answer is automatically generated