Advertisement
Quick Links
Advertisement

Related Manuals for Soyo Computer SY-7IWM

Summary of Contents for Soyo Computer SY-7IWM
- Page 1 SY-7IWM SY-7IWM/M Motherboard Quick Start Guide...
- Page 2 It is the policy of Soyo Computer Inc. to respect the valid patent rights of third parties and not to infringe upon or to cause others to infringe upon such rights.
- Page 3 SY-7IWM & SY-7IWM/M Quick Start Guide Introduction Congratulations on your purchase of the SY-7IWM or SY-7IWM/M Motherboard. This Quick Start Guide illustrates the steps for installing and setting up your new Motherboard. This guide provides all users with the basic steps of Motherboard setting and operation. For further information, please refer to the SY-7IWM &...
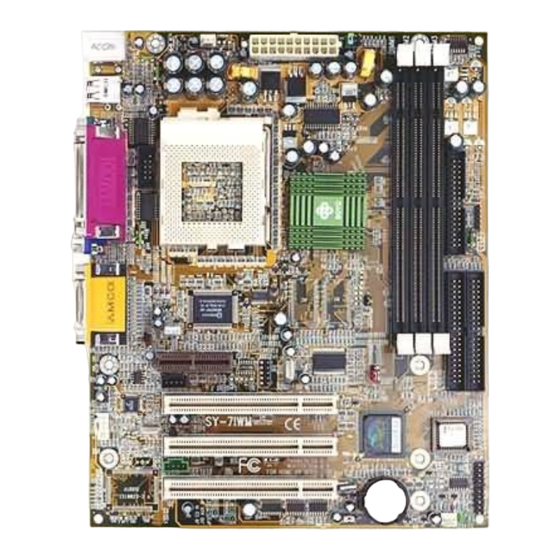
- Page 4 SY-7IWM & SY-7IWM/M Quick Start Guide SY-7IWM & SY-7IWM/M Motherboard Layout PS/2 KB JP15 PS/2 Mouse ATX Power CPUFAN Connector Connector PWRFAN USB 1 USB 2 Socket 370 COM2 COM1 USB 3 Intel FW82810 JOYSTICK SDRAM SDRAM LINE-OUT Winbond W83627HF...
- Page 5 SY-7IWM & SY-7IWM/M Quick Start Guide Key Features Supports Intel Celeron ™ processors Power failure resume Ø Ø (300A-500MHz) Ø Supports onboard hardware monitoring Supports 100 & 66 MHz Front Side Bus and includes Hardware Doctor ™ utility Ø Frequency Ø...
-
Page 6: Installation
Follow the directions in this section which is designed to guide you through a quick and correct method to install your new SY-7IWM & SY-7IWM/M Motherboard. For detailed information, please refer to the SY-7IWM & SY-7IWM/M Motherboard User's guide and Technical Reference online manual on in the CD-ROM package that came with your Motherboard. - Page 7 SY-7IWM & SY-7IWM/M Quick Start Guide Install the Motherboard To perform the installation of your new SY-7IWM & SY-7IWM/M Motherboard, follow the steps below: CPU Installation Step 1. Record the working frequency of your CPU Mark your CPU Frequency: that should be clearly marked on the CPU cover.
- Page 8 Fan, Front Panel Devices (ACPI LED, Internal Speaker, Reset Button, IDE LED, and KeyLock Switch.), Wake-On-LAN card, VGA card, Sound Card, and other devices. For more details on connecting internal and external peripherals to your new SY-7IWM & SY-7IWM/M Motherboard, please refer to SY-7IWM & SY-7IWM/M Motherboard User's Guide and Technical Reference online manual on the CD-ROM.
- Page 9 SY-7IWM & SY-7IWM/M Quick Start Guide Configure Memory Step 3. Your board comes with three DIMM sockets, and provides support up to 512MB main memory using DIMM modules from 8MB to 256MB. Memory Configuration Table Number of DIMM 1 DIMM 2...
- Page 10 SY-7IWM & SY-7IWM/M Quick Start Guide Set the CPU Frequency Step 5. This Motherboard does not use any jumpers to set the CPU operating frequency; the CPU settings can be changed through the BIOS [SOYO COMBO SETUP]. Please refer to Chapter 3 “...
- Page 11 SY-7IWM & SY-7IWM/M Quick Start Guide Note on Over-clocking Capability The SY-7IWM & SY-7IWM/M provides over-clocking capability. Due to the over-clocking setting your system may fail to boot up or hang during run time. Please perform the following steps to recover your system from the abnormal situation : 1.
-
Page 12: Quick Bios Setup
SY-7IWM & SY-7IWM/M Quick Start Guide Quick BIOS Setup This Motherboard does not require any hardware jumpers to set the CPU operating frequency. Instead, CPU settings are software configurable through the BIOS [Soyo Combo Feature]. The [Soyo Combo Feature] menu combines the main parameters that you need to configure your system. - Page 13 SY-7IWM & SY-7IWM/M Quick Start Guide Install Your Operating System After finishing the Hardware installation and BIOS setup, you have to install the operating system before you go to the next step.
- Page 14 SY-7IWM & SY-7IWM/M Quick Start Guide The SOYO CD Your SY-7IWM & SY-7IWM/M Motherboard comes with a CD-ROM labeled "SOYO CD." The SOYO CD contains the user's manual file for your new (1) Motherboard, (2) the drivers software available for installation, and (3) a database in HTML format with information on SOYO Motherboards and other products.
- Page 15 SY-7IWM & SY-7IWM/M Quick Start Guide Please note that if the Start Up program was unable to determine which SOYO Motherboard you own, the manual selection menu will pop up, as shown below. Then select the user's manual file that corresponds to your Motherboard model name and click...
- Page 16 SY-7IWM & SY-7IWM/M Quick Start Guide Driver Installation Please select the driver you want to install and click OK, You will have to restart your system after installation. Only the drivers that are relevant to your board are displayed initially.
- Page 17 SY-7IWM & SY-7IWM/M Quick Start Guide A short description of all available drivers follows: Ø INTEL Whitney VGA Drivers for Win9x In order to be able to make use of the integrated VGA function in your Whitney chipset, you will need to install this driver first. For Windows 95/98 only.
- Page 18 SY-7IWM & SY-7IWM/M Quick Start Guide Step 6. Enter the SOYO CD Click the Enter SOYO CD button to enter the SOYO HTML database. The Start Up program will activate the default HTML browser installed on your system (for example, Internet Explorer or Netscape) to visualize the contents of the SOYO CD.
- Page 19 SY-7IWM & SY-7IWM/M Quick Start Guide Aureal Sound Driver Installation (Applies only to 7IWM board) Installation of the Aureal Sound drivers under Windows 95/98 SYSTEM REQUIREMENTS: 1. Access to Microsoft Windows 95 or Microsoft Windows 98 installationCD-ROM. 2. Good-quality speakers or headphones and connecting cables.
- Page 20 SY-7IWM & SY-7IWM/M Quick Start Guide Vortex Installation & Driver Disk \driv-all\Aureal Windows 95/98 Installation Disk \driv-all\Aureal Vortex Application Setup \driv-all\Aureal\Setup PCI Multifunction Audio Device \driv-all\Aureal UNINSTALLING WINDOWS 95/98 DRIVERS To uninstall the Vortex software, you can use the following procedure: 1.
-
Page 21: Crystal Audio Driver Installation
SY-7IWM & SY-7IWM/M Quick Start Guide Crystal Audio Driver Installation (Applies only to 7IWM/M board) Installing Crystal Audio Drivers under windows 9x 1. Open Device Manager. 2. PCI Multimedia Device will have a yellow marker the first time the operating system is installed. - Page 22 SY-7IWM & SY-7IWM/M Quick Start Guide Special Design Considerations 1. The Headphone does not mute the audio when the headphone slider is adjusted to the minimum value. 2. SW Synth slider jumps to max value, when Synth state is switched from Stop to Play or viceversa.
-
Page 23: Drivers Installation
SY-7IWM & SY-7IWM/M Quick Start Guide The MR (Software Modem Card) Drivers Installation Installation of the MR (Software Modem Card) Drivers under Windows 95/98 To install HAMR56xx for the first time: Plug in the HAMR56xx modem into an AMR slot. - Page 24 SY-7IWM & SY-7IWM/M Quick Start Guide Uninstall Procedure a) Go to Control Panel / Add/Remove Programs b) Select "Uninstall AMR Voice Modem" c) Click on Add/Remove Button d) A confirmation window appears. Click "OK" to proceed. e) HAMR56xx drivers will be uninstalled.
- Page 26 Edition: June 1999 Version 1.0 International Headquarters Korea Branch Office SY-7IWM & SY-7IWM/M Soyo Computer Inc., (Taiwan) SOYO TECHNOLOGY CO., LTD. Tel: 886-2-2290-3300 Tel: 82-2-3272-6481 SERIAL Fax: 886-2-2298-3322 Fax: 82-2-704-2619 Web Site: http://www.soyo.com.tw Web Site: http://www.soyo.co.kr/ E-mail: support@mail.soyo.com.tw Email:soyo@soyo.co.kr Email:soyok@chollian.net USA Branch Office Soyo Tek Inc., (USA)
Need help?
Do you have a question about the SY-7IWM and is the answer not in the manual?
Questions and answers