Table of Contents
Advertisement
Thank you for purchasing Shihlin Electric product. This user manual introduces how to install,
wiring, inspect and operate Shihlin Servo Drive and Motor. Please read related items in this
user manual prior to installation and operation for safety.
■ There are 2 safety notification levels in this user manual: Danger and Caution.
Besides, for those items remark as CAUTION, it may cause bad consequences in some cases,
please follow the instructions to operate due to its importance.
■ Below symbols indicate the items should be followed.
It indicates the FORBIDDEN items.
It Indicates the MANDATORY Items.
In this user manual, NOTE indicates the cautions which may not cause malfunction of the
product, but need pay attention.
Please read this manual carefully and keep it properly to make sure the user can reach it freely.
Safety Precautions
It indicates that it may cause severe or fatal injuries if the
instructions are not followed.
It indicates that it may cause moderate injury or malfunction of the
product if the instructions are not followed.
i
Advertisement
Table of Contents

Related Manuals for Shihlin electric SME Series

Summary of Contents for Shihlin electric SME Series
- Page 1 Safety Precautions Thank you for purchasing Shihlin Electric product. This user manual introduces how to install, wiring, inspect and operate Shihlin Servo Drive and Motor. Please read related items in this user manual prior to installation and operation for safety.
- Page 2 Safety Instruction 1. Electric Shock Prevention Do NOT operate the switch with wet hands, otherwise it may cause electric shock. Any wring or inspection must perform AFTER turning off the power for over 20 minutes, charging indicator is off and voltage test is confirmed, otherwise it may cause electric shock. Well ground the servo drive and motor.
- Page 3 Turn off the servo drive power when problem occurs, otherwise, the high current flow may cause fire disaster. Turn off the power by regenerative abnormal signal when regenerative resistor is used. If there is a regenerative brake transistor fault, which may make the regenerative resistor overheat and may cause fire disaster.
- Page 4 Do NOT congest the vent of servo drive. Otherwise, it may cause a malfunction. Do NOT drop or strike the servo drive and servo motor as they are precision machinery. Consult with Shihlin Electric system service representative if you need keep the product for a long period without using.
- Page 5 (3) Trial run and adjustment. Check the program and parameters before operation. Otherwise, it may lead to malfunction of the machine. Do NOT adjust the parameter settings drastically, otherwise, it may cause some abnormal on the product. (4) Operation Set an emergency stop circuit outside the drive, which can be activated immediately in urgent cases to turn off the power supply.
- Page 6 (5) Maintenance and Inspection Ensure the power LED indicator is off before maintenance or inspection. Only qualified electricians can install, wire, repair and maintain the servo drive and servo motor. Do NOT disassemble the servo motor, otherwise you may get electric shock or injured. When the power is ON, do NOT connect or disconnect the servo drive with motor.
-
Page 7: Table Of Contents
1. Product overview and model description ................1 1.1 Outline ......................... 1 1.2 Product checklist ......................1 1.3 Product model overview ....................2 1.3.1 Servo motor model naming rule ................. 2 1.3.2 Servo drive model naming rule ................5 1.3.3 SDP servo drive and motor ................6 1.4 Servo drive appearance and panel description ............ - Page 8 3.3.2 CN1 signal wire shielding and grounding............31 3.3.3 CN1 Terminal signal description ..............33 3.3.4 Interface wiring diagram .................. 56 3.3.5 The specified DI and DO signal ............... 64 3.4 CN2 encoder signal wiring and description..............65 3.4.1 Encoder connector specification ..............66 3.5 CN2L full-closed loop/linear scale signal and wiring description ........
- Page 9 4.6. Diagnosis mode ......................95 4.6.1. External I/O signal indicator ................96 4.6.2 DO Forced output .................... 98 4.6.3 JOG operation ....................100 4.6.4 Positioning test operation ................101 4.6.5 Auto-offset of analog input ................103 4.6.6 Inertia estimation and tuning by communication software ......104 4.7.
- Page 10 6.2. Torque control mode ....................145 6.2.1. Analog torque command ................146 6.2.2. Offset adjustment of the analog torque command ........147 6.2.3. Torque command smoothing ................ 148 6.2.4. Torque limit of torque control mode............... 149 6.2.5. The speed limit of torque mode ..............149 6.3.
- Page 11 6.6.2 Analog monitor function ................. 196 6.6.3 Operation of electromagnetic brake ............... 199 7. PR (procedure) program control introductions ..............202 7.1 PR introduction ...................... 202 7.2 The difference between the PR mode of SDP and SDA........202 7.3 DI/DO and sequences in PR mode ............... 204 7.4 Parameter setting of PR mode ................
- Page 12 11.4 SME series servo motor general specification ............467 11.4.1 Standard specification of low capacity servo motor ........467 11.4.2 Standard specification of medium capacity servo motor ......469 11.4.3 High inertia motor specification ..............471 11.4.4 (400V)High inertia motor specification ............473 11.5 Motor dimensions ....................
- Page 13 13.3 Absolute battery specifications ................518 14. Appendix ........................520 14.1 Accessories......................520 14.2 Regenerative resistor ..................... 531 14.3 Table of communication address ................532 14.4 Compliance with global standards ................. 537 14.4.1. Safety instructions ..................537 14.4.2. Professional technicians................537 14.4.3.
-
Page 14: Product Overview And Model Description
1. Product overview and model description 1.1 Outline Shihlin general type AC servo includes single mode and multi-mode. Single mode has the following four types of control mode: position mode(terminal input), position mode(internal register), speed mode and torque mode. And multi-mode has the following 8 types of control mode: position mode(terminal input)/speed mode, position mode(terminal input)/torque mode, position mode(internal register)/speed mode, position mode(internal register)/torque mode, speed mode/torque mode, position mode(terminal input)/position mode(internal register),... -
Page 15: Product Model Overview
(1) A servo drive and a servo motor. (2) A UVW motor power cable: its one end with the U, V, W cables connect to the corresponding terminal block, and the other end connects to the UVW connector on the motor. - Page 16 (3) Inertia classification: coding according to motor inertia: Code Classification Low inertia Middle inertia High inertia (4) Motor capacity: motor output power Code 200V motor power(W) 1000 Code 200V motor power(W) 1300 1500 1800 2000 3000 5000 7000 Code 400V motor power(W) 1800 2900 4400 5500 7500 (5) Rated speed: the rated motor speed.
- Page 17 (7) Brake and oil seal: the following codes is to indicate whether the motor is equipped with brake and oil seal. Code Item Brake ● ● - - Oil seal ● ● - - (8) Keyway and outlet type: the following code indicates the configuration of motor keyway and outlet type.
-
Page 18: Servo Drive Model Naming Rule
1.3.2 Servo drive model naming rule 1. Naming rule 2.Description of each coding item (1) Drive code: SD means Servo Drive (2) Product series: P (3) Drive capacity: motor output power. Multiply the motor output power by 1/10 and then indicate it as a three-code number. -
Page 19: Sdp Servo Drive And Motor
1.3.3 SDP servo drive and motor 200VAC system Corresponding Servo drive servo motor SME-L00530○□□□ 100W SDP-010A2C SME-L01030○□□□ SME-L02030○□□□ 200W SDP-020A2C SME-H02030○□□□ SME-L04030○□□□ 400W SDP-040A2C SME-H04030○□□□ SME-L07530○□□□ 750W SDP-075A2C SME-H07530○□□□ SME-H08515○□□□ 1000W SDP-100A2C SME-M10020○□□□ SME-L10020○□□□ SME-M15020○□□□ 1500W SDP-150A2C SME-L15020○□□□ SME-M20020○□□□ 2000W SDP-200A2C SME-L20020○□□□... -
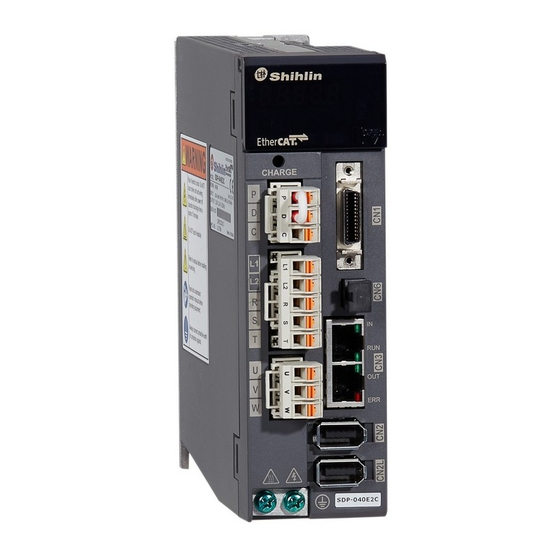
Page 20: Servo Drive Appearance And Panel Description
1.4 Servo drive appearance and panel description 1.4.1 200V drive appearance and panel Operation panel To perform function and parameters setting. Display MODE: Mode selection The 5-digit 7 segment LED 5: add one on the displayer displays the alarm, servo displayed value status, parameter, etc. -
Page 21: Servo Drive Appearance And Panel
1.4.2 400V servo drive appearance and panel Operation panel To perform function and parameters setting. Power indicator MODE: Mode selection If the indicator is on, it means the 5: add one on the servo drive still has high voltage at that time. -
Page 22: Servo Drive Control Modes Introduction
1.5 Servo drive control modes introduction Shihlin drive provides a variety of control modes for you, as detailed in the below table: Mode name Code Description Position mode Drive receives the external position pulse command which is (terminal input) input from terminal and runs the motor to the target position. The drive receives the position command which is provided by Position mode the internal register (64 groups of registers). -
Page 23: Recommended Breaker And Fuse Specification Table
1.6 Recommended breaker and fuse specification table Specification chart of Shihlin servo drive fuse and breaker(200V) Drive model name Fuse Breaker SDP-010A2C SDP-020A2C SDP-040A2C SDP-075A2C SDP-100A2C SDP-150A2C SDP-200A2C SDP-300A2C Specification chart of Shihlin servo drive fuse and breaker(400V) Drive model name Fuse Breaker SDP-200A4C SDP-300A4C SDP-500A4C... -
Page 24: Installation
2. Installation 2.1. Precautions and storage Do not install the product in the location with or nearby inflammable objects. Do not over tighten the cable between the drive and the motor. Do not place any heavy objects on the top of the drive. ... -
Page 25: Installation Direction And Clearances
◆ Locations without high-heating devices. ◆ Locations without floating dust and metal particles. ◆ Locations without corrosive, inflammable gas and liquid. ◆ Locations without water drops, steam, dust or oil dust. ◆ Locations without electromagnetic noise interference. ◆ Select a solid, vibration-free location. 2.3. - Page 26 Installation diagram In order to have adequate air flow for ventilation, you must follow the suggested clearances when installing one or more servo drives (refer to the following diagrams). 50mm (2.0 in.) 20mm 20mm (0.8 in.) (0.8 in.) 50mm (2.0 in.)
- Page 27 100mm (4.0 in.) 40mm 10mm 10mm 10mm 40mm (1.6 in.) (0.4 in.) (1.6 in.) (0.4 in.) (0.4 in.) 100mm (4.0 in.)
-
Page 28: Wiring And Signal
3. Wiring and signal This chapter explains the wiring method of Shihlin servo drive and the definition of signals, as well as the standard wiring diagrams in all modes. 3.1. Connection of power supply and peripheral equipment 3.1.1. Peripheral equipment wiring diagram - 200V system 1. -
Page 29: Peripheral Equipment Wiring Diagram - 400V System
3.1.2. Peripheral equipment wiring diagram - 400V system 1. When external regenerative resistor is used, P and C connect to the resister; P and D are left open. Three-phase power 200-230V 2. When internal regenerative resistor is used, P and C are left open; P and D are short-circuited (connected) Communication software 3. -
Page 30: Description Of Drive Connectors And Terminals
3.1.3 Description of drive connectors and terminals Item code Description Power input for the R, S, T Connect to three-phase AC power main circuit Power input for the L1, L2 / + - Connect to single-phase AC power/DC24V. control circuit Terminal Wire code... - Page 31 Position feedback CN2L Connect to position feedback unit. connector RS-485 connector Connect to RS-485 device. USB connector Connect to USB slot of PC power connector for Connect to battery pack of absolute encoder absolute encoder (optional purchase) Pay special attention to the following when wiring: 1.
-
Page 32: Wiring For Power Supply
3.1.4 Wiring for power supply ⚫ Insulate the connection of the power terminal to avoid the possibility of electric shock. ⚫ The power supply cable(U,V,W) of servo drive and servo motor must be connected correctly to avoid abnormal operation on servo motor. ⚫... - Page 33 400V series: DC 24V Power supply Note: terminal P,N cannot be grounded. ...
-
Page 34: Specifications For The U,V,W Connectors
3.1.5 Specifications for the U,V,W connectors U, V, W wiring connector (female) specifications of low/high inertia motor: Dive capacity Motor model SME-L00530 ○□□□ 100W SME-L01030 ○□□□ SME- 02030 200W □ ○□□□ SME- 04030 400W □ ○□□□ With brake Without brake SME-... - Page 35 U, V, W connector (male) specifications of low/middle/high inertia motor: Drive capacity Motor model SME-H08515 ○□□□ SME- 10020 □ ○□□□ SME- 15020 1.5KW □ ○□□□ SME-L20020 ○□□□ SME-H13015 ○□□□ SME-H18015 ○□□□ SME-L30020 ○□□□ U, V, W connector (male) specifications of middle inertia motor: Drive capacity Motor model SME-M20020...
- Page 36 The following table shows the signal of the UVW connector on the low/middle/high inertia motor : Signal (for motor with electromagnetic brake) (for motor with electromagnetic brake) U, V, W connector (male) specifications of high inertia motor(400V): Drive capacity Motor model SMP-H18015 ○□□□...
- Page 37 The following table shows the signal of UVW connector on high inertia motor(400V). Signal Brake connector (male) specifications of high inertia motor (400V): Drive capacity Motor model SMP-H18015 ○□□□ SMP-H29015 ○□□□ SMP-H44015 ○□□□ SMP-H55015 ○□□□ SMP-H75015 ○□□□ The following table shows the signal of brake connector on high inertia motor(400V). Signal DC24V Note: the wiring above is the connector from the motor itself...
-
Page 38: Wire Selection
3.1.6 Wire selection Wire[mm Power supply wiring(AWG) rive model B1, B2 R, S, T L1, L2 U, V, W P, D, C, N SDP-010A2C SDP-020A2C SDP-040A2C 2(AWG14) 2(AWG14) SDP-075A2C SDP-100A2C SDP-150A2C 2(AWG14) 2(AWG14) 2(AWG14) SDP-200A2C 3.5(AWG12) 3.5(AWG12) SDP-300A2C SDP-200A4C 2(AWG14) 2(AWG14) SDP-300A4C 3.5(AWG12) 3.5(AWG12) - Page 39 The standard is to use 600V vinyl wire, and the wiring length should be less than 30 meters. If the wiring length exceeds 30meters, please consider the voltage drop when selecting wire gauge. According to UL/C-UL (CSA) specifications, you should use UL-certified copper wires ...
-
Page 40: The Function Diagram Of Servo System
3.2. The function diagram of servo system ⚫ 200V system: models of 100W~3kW Power 220V system: single- / Three-phase 200 - 240V External regenerative resistor 750W~3KW P+ D +24V ±15V Protection +24V GATE DRIVER +15V circuit Encoder External speed Current Position Speed... -
Page 41: Wiring For Cn1(I/O Signal)
3.3. Wiring for CN1(I/O signal) 3.3.1. CN1 terminal diagram. Shihlin servo drive provides 12 user-defined digital inputs (DI) and 6 digital outputs (DO), which enable a more flexible communication between the servo drive and the controller. The 12 user- defined DIs are PD02~PD09 and PD21~PD24, and the 6 DOs are PD10~PD14 and PD26. In addition, it provides differential output encoder A+, A-, B+, B-, Z+, Z- signals, analog torque command input, and analog speed command input, its pin diagram is as follows: (1) CN1 connector(female) - Page 42 (2) CN1 connector(male) Front view Side view Rear view CN1 wiring terminal on the back of CN1...
- Page 43 Code Function Code Function Code Function Code Function + 15V power Analog speed +15V power Analog torque (15V) output command/limit (15V) output command/limit (for analog (Note 2) (for analog (Note 2) command) command) Ground for Ground for Ground for analog analog input analog input MON1...
-
Page 44: Cn1 Signal Wire Shielding And Grounding
3.3.2 CN1 signal wire shielding and grounding The both ends of the CN1 signal wire which are the CN1 connector and the upper controller connector, their shielding and grounding wire must be connected to the corresponding pins to effectively achieve the shielding and grounding functions. The shielding of CN1 encoder connector wiring instruction is as follows: 1. - Page 45 4.The last step is to fasten the screw of housing:...
-
Page 46: Cn1 Terminal Signal Description
3.3.3 CN1 Terminal signal description This section introduces the signals which mentioned in section 3.3.1. CN1 terminal signal The detailed description of each signal in CN1 50Pins is as follows The codes of the control modes in the following table are: Pt : position control mode/ position mode(terminal input) Pr : position control mode/position mode(internal register) S: speed control mode... - Page 47 Control Signal name Code Pin NO Function mode Input command pulse train CN1-5 1. In open-collector type(max input frequency is 200kpps) CN1-6 PP-SG is forward pulse train. NP-SG is reverse pulse train. CN1-8 2.In differential line drive type (the max input frequency is 4Mpps) PG-PP is forward pulse train.
- Page 48 difference between A phase and B phase could be defined by the PA39 setting value. CN1-38 Encode Z phase Output the OP signal in differential line pulse differential drive type. CN1-39 output(line driver) Encode Z phase Output the ZERO signal of encoder. pulse train (open CN1-40 Servo motor generates 1 pulse per...
- Page 49 2.Shihlin servo CN1 I/O The table of Shihlin Servo CN1 I/O, digital input and digital output names & abbreviations are as follows: Abbreviation Signal name Abbreviation Signal name SERVO ON CTRG Position command trigger Limit of forward rotation Torque limiting control Limit of reverse rotation speed limiting control Clear...
- Page 50 3. Detailed explanation for DI/DO signal. DI Wiring The users can define the DI function by editing user parameters, see the following table for details: Signal Control Code Function name mode If SON is ON, the basic circuit is on and servo is ready to run(servo ON status).
- Page 51 When TL1 is on, inner torque limit 2 (parameter setting2) will be valid. Input signal Valid torque limit value Parameter setting of PA05. If TLA > PA05 setting => PA05 is valid. Inner If TLA < PA05 setting =>TLA is valid. torque limit If PC25 setting >...
- Page 52 option (VC) (SP3) is Inner speed valid command 1 Inner speed command 2 Inner speed command 3 Inner speed command 4 Inner speed command 5 Inner speed command 6 Inner speed command 7 Torque control mode: which is to select the speed limit. Input signal Parameter Speed limit...
- Page 53 command 5 Inner speed command 6 Inner speed command 7 When start the servo motor , it runs in the following Forward directions: rotation Input signal Servo motor activated rotation direction Stop(servo locked) Stop(servo locked) Reverse 1.If both ST1 and ST2 are ON or OFF during operation, the rotation servo will be decelerated to stop and be locked.
- Page 54 Input signal Torque generation direction No torque generated Forward rotation Reverse torque, reverse rotation rotation regeneration. option Reverse rotation torque, forward rotation regeneration. No torque generated This activated signal sets current position as homing origin Origin ORGP in Pr mode. position Turn the SHOM ON to activate homing.
- Page 55 Limit of Use as limit of forward rotation. When LSP is on, the motor forward can be operated forwardly. rotation Limit of Use as limit of reverse rotation. When LSN is on, the motor reverse can be operated reversely. rotation Inhibit To inhibit pulse input.
- Page 56 Signal Control Code Function name mode Position command POS1 Posi tion Position command POS2 Position ↑ command POS3 ↑ Position command POS4 ↑ ↑ Position command POS5 ↑ Position ↑ command POS6 ↑ Position In Pr mode, when CTRG is on, the position command command CTRG selected by POS1~6 is valid.
- Page 57 Full- closed To temporary stop full-closed loop control function when loop X=1 in PA26. If this DI is on, full-closed control function will control be invalid. switch Full- closed Used for clearing deviation pulse between full-closed linear Pt/Pr error scale and motor encoder. clearance Linear compens...
- Page 58 To use as the handshaking pin for I/O transmission, it is DI4. transmitted by the controller. When ABSQ is OFF means hand- ABSQ that request command issues by the controller; When shaking is fixed ABSQ is ON means that the controller has finished the signal to DI4 ABSD data processing.
- Page 59 DO wiring of CN1 DO function allows users to edit parameters by themselves, detail is in the following table. Control Signal name Code Function mode RD is on when servo is on and ready to Ready operate. ALM is off when power is off or activating protection circuit makes main Alarm signal output circuit open.
- Page 60 When servo motor runs below zero Zero speed speed( 50r/min), ZSP is on. detection The zero speed range can be adjusted by parameter setting. When internal position command is Pr command completion CMDOK completed or stopped, CMDOK is on. output When the motor reaches overload level Overload output setting, the OLW is ON.
- Page 61 PtrM is OFF means Pt-Pr is OFF; PtrM is ON means Pt-Pr is ON. When ABSR is OFF means the servo When DI ABSE is ON, can accept the Request command of PD11 defined ABSQ; When ABSR is ON means the parameter function will data has been prepared after receiving ABSR is fixed...
- Page 62 Software DO 12 S_DOB To output bit11 of PD33 Software DO 13 S_DOC To output bit12 of PD33 Software DO 14 S_DOD To output bit13 of PD33 Software DO 15 S_DOE To output bit14 of PD33 Software DO 16 S_DOF To output bit15 of PD33...
- Page 63 The terminal signal function of the CN1 changes according to the control mode. Please refer to the table below: Recommended setting value for DI function. Signal Function Pt-S Pt-T Pr-S Pr-T code 0x01 Servo ON 0x02 Reset Proportion 0x03 control Torque limit 0x04 DI11...
- Page 64 Electronic 0x0E gear option 2 0x0F Clear Gain switch 0x10 DI12 DI12 DI12 DI12 DI12 DI12 option Control mode 0x11 switch External 0x12 emergency stop Position 0x13 POS1 command 1 Position 0x14 POS2 DI12 DI12 command 2 Position 0x15 POS3 command 3 Position 0x16...
- Page 65 Signal Function Pt Pr S T Pt-S Pt-T Pr-S Pr-T S-T code Event trigger Pr command 0x1E Event trigger Pr command 0x1F Event trigger Pr command 0x20 Event trigger Pr command 0x21 Absolute system DI 0x22 ABSE function 1 Absolute system DI 0x23 ABSC function 2...
- Page 66 Recommended setting value for DO function Signal Function Pt-S Pt-T Pr-S Pr-T code 0x01 Ready Alarm signal 0x02 output 0x03 In-position ready 0x03 Speed attained Home moving 0x04 HOME completion Torque limiting 0x05 control Speed limiting 0x05 control Electromagnetic 0X06 brake interlock 0x07 Warning...
- Page 67 Software 0x0D SWPL positive limit Software 0x0E SWNL negative limit Absolute system 0x0F ABSW warning(Delta) Absolute system 0x10 ABSV data vanish (Mitsubishi) CAP_O Capture 0x11 complete output E-Cam CAM_A 0x12 designated area REA1 output 1 E-Cam CAM_A 0x13 designated area REA2 output 2 Mode switch...
- Page 68 DO code Signal Function Pt Pr S T Pt-S Pt-T Pr-S Pr-T S-T 0x20 S_DO0 Software DO1 0x21 S_DO1 Software DO2 0x22 S_DO2 Software DO3 0x23 S_DO3 Software DO4 0x24 S_DO4 Software DO5 0x25 S_DO5 Software DO6 0x26 S_DO6 Software DO7 0x27 S_DO7 Software DO8 0x28...
-
Page 69: Interface Wiring Diagram
3.3.4 Interface wiring diagram (1) DI in SINK type With internal power supply With external power supply Servo Drive Servo Drive Do not connect VDD and COM+ R: About 6.8kΩ R: About 6.8kΩ 3.5mA when with transistor... - Page 70 (2) DI in source type When using the source type of DI, all DI input signals are in source type. Output in source type is not available. With internal power supply With external power supply Servo Drive Servo Drive 3.5mA when with 3.5mA when with transistor transistor...
- Page 71 (3) Digital output(DO) It can drive lamp, relay and photocoupler. When a relay is loaded, a diode is required, and when an external lamp is loaded, a resistor to suppress the surge current is required. (Allowable current: 40mA or less, surge current: 100mA or less) DO in Source type Relay Load Relay Load...
- Page 72 (4) Speed/torque analog input and MON1, MON2 analog output monitoring. Speed/torque analog input command Note: the upper limit of the VC and TC voltage is 10V. If the voltage is too high, the internal transistor will be burned. MON1, MON2 analog output monitoring Output ±10V Servo Drive Max 1A...
- Page 73 Encoder output type includes open collector type and line drive type. And only CN1-40(OP) provides open collector type output. ※The maximum input current of the pulse detection circuit for open-collector type is 35mA Open collector type Open collector type Output by OP Output by photocoupler Servo Drive ※The maximum output current of the pulse detection circuit for differential type is 20mA...
- Page 74 (6)Pulse command input User can input the pulse command by open collector or line driver type. The maximum pulse input is 4 Mpps for the line driver type and the maximum pulse input is 200 kpps for the open collector type. Open collector type(NPN) Open collector type( NPN) With internal power supply...
- Page 75 Open collector type( PNP) Open collector type( PNP) With internal power supply With external power supply Make sure an external Make sure an external resistor is connected ★ ★ resistor with R=1.2KΩ~2KΩ& 1/4W above is in order to avoid burning the drive. connected, which is to avoid burning the drive.
- Page 76 Differential (Line Driver)type Servo Drive Controller The maximum input pulse frequency is 4Mpps. Metal housing Note 1: It is recommended to use a shielded twisted-pair cable for PP-PG and NP-NG connection.
-
Page 77: The Specified Di And Do Signal
3.3.5 The specified DI and DO signal The preset DI and DO signals of Shihlin Servo are the signals of the position mode. If the preset DI/DO signals are not expected function, or the control mode is changed by modified PA01 setting, you can redo the DI/DO signal setting. -
Page 78: Cn2 Encoder Signal Wiring And Description
3.4 CN2 encoder signal wiring and description. The resolution of the Shihlin servo motor built-in encoder is 23&24-bit. its connector pin assignment and appearance are as below: (1)CN2 connector(Female) 3M connector rear view (2)CN2 connector(Male) Connector side view Molex connector rear view CN2 signal list of incremental/absolute encoder Pin marking Signal... -
Page 79: Encoder Connector Specification
communication 3.4.1 Encoder connector specification See the table below for the Shihlin servo capacity which is applicable to the quick connector: Drive Motor model capacity SME-L00530○□□□ 100W 1 2 3 SME-L01030○□□□ SME-□02030○□□□ 200W 4 5 6 SME-□04030○□□□ 400W 7 8 9 SME-□07530○□□□... - Page 80 See the table below for the Shihlin servo capacity which applicable to the military connector: Drive capacity Motor model SME-H08515○□□□ SME-□10020○□□□ SME-□15020○□□□ 1.5KW SME-□20020○□□□ SME-H13015○□□□ SME-H18015○□□□ SME-□30020○□□□ Pin No. Pin marking Signal Battery ground terminal Vcc(5V) Encoder 5V power supply Encoder communication(+) ENCP Encoder communication(-)
- Page 81 See the table below for the Shihlin servo capacity which applicable to the military connector(400V): Drive Motor model capacity SMP-H18015 ○□□□ SMP-H29015 ○□□□ SMP-H44015 ○□□□ SMP-H55015 ○□□□ SMP-H75015 ○□□□ Pin No. Pin marking Signal Encoder communication(+) ENCP Encoder communication(-) ENCN Vcc(5V) Encoder 5V power supply GNDB...
- Page 82 The wiring ends of the drive and the motor are summarized as follows: Drive terminals Motor wiring ends Quick Military Military Pin No. Pin marking Signal connector connector connector( 400V) Pin No, Pin No pin No. 1, 3 Vcc(5V) Encoder 5V power supply Encoder ground terminal Battery ground terminal Vcc(3.6V)
-
Page 83: Cn2L Full-Closed Loop/Linear Scale Signal And Wiring Description
3.5 CN2L full-closed loop/linear scale signal and wiring description If you need to use full-closed loop control or linear motor drive (using incremental optical scale, Hall sensor and temperature sensor), the pin number and appearance of the connector are as follows: Pin definition of CN2L full-closed loop connector CN2L Pin NO. -
Page 84: Cn3 Communication Port Signal And Wiring Description
3.6 CN3 communication port signal and wiring description CN3 is interface for RS-485 communication, you can connect the drive to PC and perform parameter setting, status monitoring, test operation and other actions by using Shihlin servo communication software. The CN3 provides RS-485 communication interface, which provides long-distance transmission and enables you to connect multiple servo drives simultaneously. -
Page 85: Cn4 Usb Communication Port
3.7 CN4 USB communication port Shihlin servo drive is equipped with USB communication slot(CN4) which is able to plug in and operate conveniently. Same as RS-485, you can connect CN4 to PC with Mini-USB cable and perform parameter setting, status monitoring, test operation and other actions by using Shilin servo communication software. -
Page 86: Cn5 Battery Connector Of Absolute Encoder
3.8 CN5 battery connector of absolute encoder When using the absolute servo motor, an external battery box for absolute encoder is required. CN5 is battery connector, you can set related parameter after the battery is connected. The picture above is wrong The following table shows the standard pin assignment of CN5. -
Page 87: Standard Wiring Instruction
3.9 Standard wiring instruction ● Only qualified engineer can do the wiring. ● Do not wire within 20 minutes after turning off the power, check if there is any residual voltage by electric meter before wiring, otherwise it may cause electric shock. - Page 88 伺服驅動器 Servo Drive regenerative resistor(note2) MCCB There-phase AC200V~240V (Note 5) Encoder Servo motor 伺服馬達 2.5KΩ 1、26 1、3 5KΩ 2、4 3、4、 28、31 3.6V less than 50m ENCP (Note 1) ENCN COM+ CLKP (Note 4) CLKN POS1 Encoder A dIfferential phase POS2 CTRG Encoder B dIfferential phase Encoder Z differential phase...
-
Page 89: Position Control Mode(Pt Mode) Wiring Diagram
3.9.2 Position control mode(Pt Mode) wiring diagram Servo Drive MCCB There-phase regenerative AC200V~240V resistor(note2) (Note 5) 2.5KΩ Encoder 1、26 5KΩ Servo motor 3、4、 28、31 1、3 Differential pulse command input 2、4 less than 50m 3.6V ENCP ENCN CLKP (Note 4) Differential pulse CLKN command input Open collector pulse... -
Page 90: Speed Control Mode (S Mode)Wiring Diagram
3.9.3 Speed control mode (S Mode)wiring diagram Servo Drive regenerative MCCB resistor(note2) There-phase AC200V~240V (Note 5) Encoder Servo motor 1、2 Analog speed command, 2.5KΩ ±10V/rated speed 5KΩ 3、4、 28、31 1、3 2、4 1、2 Analog torque limit, 2.5KΩ less than 50m 3.6V ±10V/max torque 5KΩ... -
Page 91: Torque Control Mode (T Mode)Wiring Diagram
3.9.4 Torque control mode (T Mode)wiring diagram Servo Drive regenerative MCCB resistor(note2) There-phase AC200V~240V (Note 5) Encoder Servo motor 1、26 2.5KΩ Analog speed limit, 5KΩ ±10V/rated speed 3、4、 28、31 1、3 2、4 1、26 less than 50m 2.5KΩ Analog torque command, 3.6V 5KΩ... -
Page 92: 1Pg Wiring Diagram
3.9.5 1PG wiring diagram Servo Drive A(F)X2N PLC MC MCCB There-phase AC200V~240V regenerative resistor(note3) abnormal reset Servo motor stop JOG+ JOG- Encoder homing start ready RD In-position ready INP servo ALM extend connect cable A(F)X2N-1PG STOP COM+ stop DI11 Metal DI12 casing 24、25、50... -
Page 93: 10Pg Wiring Diagram
3.9.6 10PG wiring diagram Servo Drive A(F)X2N PLC MC MCCB There-phase AC200V~240V regenerative resistor(note3) stop abnormal reset Servo motor homing JOG+ JOG- External command signal Encoder M code OFF COM+ 47、49 extend connect cable A(F)X2N-10PG START Start Metal DC 24V casing PG0+ PG0-... -
Page 94: 10Gm Wiring Diagram
3.9.7 10GM wiring diagram A(F)X2N-10GM Servo Drive CON1 MC MCCB COM1 There-phase start START AC200V~240V stop STOP homing regenerative Manually forward rotation resistor(note 3) Manually reverse rotation Servo motor CON1 COM1 Encoder General input COM1 DC 5~24V COM+ General input CON2 7,8, 17,18... -
Page 95: 20Gm Wiring Diagram
3.9.8 20GM wiring diagram A(F)X2N-20GM CON2 COM1 Servo Drive start START MC MCCB stop There-phase STOP AC200V~240V homing Manually forward rotation Manually reverse rotation regenerative resistor(note 3) Servo motor CON1 COM1 Encoder General input COM+ COM1 DC 5~24V General input 7,8, 7,8, 17,18... -
Page 96: Fx3U Wiring Diagram
3.9.9 FX3U wiring diagram FX3U-32MT/ES Servo Drive AC100V~240V MC MCCB There-phase AC200V~240V regenerative resistor(note3) Servo motor 3、4、 28、31 (RD) 24、25、50 Encoder 24、25、50 COM1 COM+ 24、25、50 COM2 FX2N-16EYT COM1 24、25、50 Metal casing FX2N-16EX-ES DI11 Instant stop DI12 Homing 24、25、50 less than 10m JOG(+) JOG(-) Forward rotation command... -
Page 97: Qd75 Wiring Diagram
3.9.10 QD75 wiring diagram (Note3) Servo Drive MC MCCB QD75P There-phase PULSE F AC200V~240V 24、25、50 PULSE COM PULSE R PULSE COM regenerative resistor(note4) QD75D Servo motor DC 24V upper limit signal Encoder lower limit signal stop STOP external signal command PULSER A+ A19 COM+ PULSER A-... -
Page 98: Panel Display And Operation
4. Panel display and operation This chapter describes the panel display of Shihlin Servo Drive and its operation instructions. 4.1. Panel description Display SET Key MODE key UP key Down key Charge LED indicator Name Function Display 5-digit, 7-segment LED displays the monitoring values, parameter numbers, setting values, etc. -
Page 99: Display Procedure
4.2. Display procedure The display on the front of the SERVO AMP displays servo status, performs parameter modification, etc. You can perform parameter setting, abnormal diagnosis, the external control and operation status check. Press MODE,UP, DOWN key once to scroll down to the next display page. The display process of servo panel is as follows Panel display process Initial screen... - Page 100 Displays and sets Pr path Status display parameter 1. One-touch tuning Displays and sets Pr path parameter 2. Alarm display Diagnosis Basic parameter MODE Gain filter parameter Extension parameter Displays and sets Linear motor parameters. DI/DO setting parameter Pr path parameter 1 Pr path parameter 2...
-
Page 101: Status Display
4.3. Status display ◆ The servo operation status displays on the 5-digit 7-segment LED display. ◆ Press the UP and DOWN keys to change the displayed value. ◆ When the power is applied, select the sign on panel and press the "SET" key to display its data. - Page 102 PS : for detailed numerical display, please refer to the parameter numerical display example in section 4.7. Note: when setting the panel parameters, each parameter has the upper and lower limits. (a) When the decimal data is modified, the modification should be within the upper and lower limits.
- Page 103 Motor feedback Motor feedback pulse number (low 5- pulse number digit)(after E-Gear ratio) -99999 FPL.O pulse (low 5-digit) Ex: if the value is 123456789 pulse, it ~99999 (after E-Gear ratio) displays 56789 (Note 1). Input number of Input number of pulse commands (high pulse commands 5-digit) (after E-Gear ratio) -21474...
- Page 104 (2) Torque mode: it displays voltage of -10.00 analog torque command. ~10.00 (1) Position mode, speed mode. It displays rated analog torque 0~300 Torque command/limit. command/limit (2)Torque control mode -300~300 It displays analog torque command. It indicates the load ratio of continuous Effective load rate 0~300 torque, and take rated torque as 100%.
- Page 105 (low 5- digit) displays 56789 (Note 1). (after E-gear ratio) Pulse number of full- It indicates pulse number of full-closed closed loop loop command(high 5- digit) -21474 command pulse If the value is 123456789 pulse, it ~21474 (high 5-digit) displays 1234 (Note 1). (after E-gear ratio) Pulse number of full- Pulse...
-
Page 106: One-Touch Tuning Function
◼ Change of status on display By changing PA01, the 7-segment LED status display items can be changed when the power is on. The initial status display items are changed as follows according to the control mode. Control mode Description Position Motor feedback pulse number (low 5-digit) Position/Speed Motor feedback pulse number (low 5-digit) / Current motor speed... - Page 107 The last alarm in the past is over-voltage (AL.01). The 2nd alarm in the past is low-voltage (AL.02). The 3rd alarm in the past is over-current (AL.03). The 4th alarm in the past is regenerative abnormal (AL.04) The 5th alarm in the past is overload (AL.05).
-
Page 108: Diagnosis Mode
(a). Restart the power. (b). Press SET key at the current alarm screen. (c). Turn on the reset signal(RES). D: use UP or DOWN key move to the next alarm record. 4.6. Diagnosis mode The Diagnosis operation is introduced in the following table. Item Screen display Content... -
Page 109: External I/O Signal Indicator
When using this function, PC 26 will be automatically set to the auto-adjusted value. Please follow the following steps to operate: 1). Enter the automatic offset screen of the diagnosis mode. 2). Press the SET key. 3). Press the UP / DOWN key and select 1 4), Press SET key. - Page 110 Always ON It use 7-segement LED ON/OFF status to indicate. The upper part of each segment is the input signal (DI1~DI10), and the lower part is the output signal (DO1~DO6, OP) and the input signal DI11, DI12. Take the above picture as example, DI1~ DI8, DO1~DO5 are in ON status, DI9~DI12 ,DO6 and OP are in OFF status.
-
Page 111: Do Forced Output
4.6.2 DO Forced output The output signals which does not affect SERVO status can be forced ON/OFF. This function is applicable in output signal wiring inspection, etc. Ensure that no alarm occurs and there is no external command. Ensure that SON-SG is open-circuited when testing. ... - Page 112 Press UP button twice Press and hold SET button for more than 2 seconds Turn ON/OFF the signal below the lighting segment. This part is always ON. It indicates output signal ON/OFF. The content indicates the external I/O output signal are the same.
-
Page 113: Jog Operation
4.6.3 JOG operation JOG operation can be performed when no alarm or warning message occurs. Ensure that SON-SG is open-circuited when testing. Ensure that EMG, LSP, LSN are all on , and if CN1 has no external wiring, you can ... -
Page 114: Positioning Test Operation
Button description is as follows: Button Content Press and hold UP button to run in “UP” CCW direction. Release it to stop. Press and hold DOWN button to “DOWN” run in CW direction. Release it to stop. (2) Status display To verify the SERVO status during JOG operation. - Page 115 The motor will stop suddenly if the communication cable falls off during operation. When the communication software enters the positioning test mode, the panel is showing the following figure: ----this screen display means the servo enters test positioning mode.
-
Page 116: Auto-Offset Of Analog Input
4.6.5 Auto-offset of analog input When the external analog speed command input is 0V, there may still have offset left which rotate the motor slowly. The user can enter the diagnostic mode and select the auto-offset of analog input function to automatically adjust the voltage offset. Please follow the following steps to operate: 電源開啟時,進入速度模式狀態顯示參數... -
Page 117: Inertia Estimation And Tuning By Communication Software
4.6.6 Inertia estimation and tuning by communication software Before performing the positioning test operation, the servo must connect to the Shihlin communication software via RS-485 or USB. Positioning test operation can be performed only when there is no external ... - Page 118 (1) Click [Enable Auto-gain Control Panel]. (2) Set speed acceleration time, deceleration time, S-curve acceleration and deceleration time and JOG speed. (3) If no alarm occurs, Click [Setup] to write the setting value of step (2) to the drive. (4) Click [Servo ON] and the servo motor will be ON. (5) Press JOG ...
- Page 119 The servo will calculate the best gain value automatically after gain estimation. The following table is the estimation item. Parameter Parameter Setting Default Control Name Unit abbreviation code range value mode Resonance suppression low- PB03 0~10000 0.1ms Pt,Pr,S,T pass filter Position feed- forward gain PB05...
-
Page 120: Parameter Mode
4.7. Parameter mode 4.7.1 16 bit parameter setting instruction Some parameter changes become valid only after power cycling (1) Operation instruction The following is an example to illustrate the operation method after power cycling when the control mode (PA01) is changed to speed control mode. Example 1: control mode(PA01)changes to speed control mode. -
Page 121: Bit Parameter Setting Instruction
4.7.2 32 bit parameter setting instruction ⚫ Decimal parameter reading and writing method (positive number) For example: PA19 = 1234567, you can follow below steps to change the parameter value to 1434567. Press SET button once The display shows the low 5-digit data, the lighting 5th decimal point means the low 5-digit data is displaying Press MODE button once The display shows the high 5-digit data, the lighting 4... - Page 122 PA19 value is 1234567 Press SET button once The display shows the low 5-digit data, and the lighting 5th decimal point means low 5-digit data is displaying Press MODE button once The display shows the high-bit data, and the 4th decimal point LED means the high-bit data is displaying Press SET button once The rightmost 7-segment display flicks...
- Page 123 ⚫ Hex parameter reading and writing method For example, PE01 = 0x03760135, you can follow below steps to change the parameter value to 0x03740135 Press SET button once Show low 16-bit data, and the lighting rightmost low bottom line means the low word data is displaying Press MODE button once Show high 16 bit data, the lighting leftmost upper line means the high word data is displaying...
- Page 124 Example of parameter value display Display Item Description in 7-segment LED display Hexadecimal display if value is 0x1234, 1234 will be displayed. 16 bit Decimal positive number display data if value is 2500, 2500 will be displayed. Decimal positive number display if value is -12566,1.2.5.6.6.
-
Page 125: Other Precautions
4.7.3 Other precautions (1). When the screen is in the PA~PL group, after holding the UP or DOWN button for 0.8 seconds, the panel display (PA XX) can quickly go up or down with 0.15s cycle time. (2). When using the communication software to perform JOG, positioning test, and DO forced output functions, the panel screen should be displayed synchronously. -
Page 126: Running Operation
5. Running operation 5.1. Check items Before Running Check carefully on below listed items before the motor runs, this is to avoid unnecessary damage to the motor when applying power to servo motor. ◆ Check if the servo drive power terminals (R,S,T,L1,L2) wiring are correct. ◆... -
Page 127: Test Without Load
5.2. Test without load Before you perform test without load, first remove the load of the servo motor (including the unit, coupling on the shaft, accessories, etc.). After all the load is removed, first check if the motor can run normally by normal operation procedure. And then connect to all the load back. - Page 128 Step 3: during JOG test, press the UP key to run the motor in CCW direction, and press DOWN key to run the motor in CW direction. Release the key to stop. and you can set PC04 to modify the JOG speed. Note: when using Shihlin communication software to perform JOG test, the setting value and range are as follows: Precaution: when using the communication software for JOG test, if the communication cable...
-
Page 129: Positioning Test Without Load
5.2.2. Positioning Test without load You should use Shihlin communication software which is connect by RS-485 or USB to do positioning test without load, which is to confirm whether the speed and direction of rotation are as expected, it is recommended to perform this operation at a low speed. You need set the number of revolutions and pulses for positioning test. - Page 130 Description of buttons are as below: Button Content Press it once, the motor will run in CCW direction “Forward” until reaches target number of revolutions and pulses. Press it once, the motor will run in CW direction until “Reverse” reaches target number of revolutions and pulses. number.
-
Page 131: Tuning Procedure
5.3. Tuning procedure. ●Do not execute extremely adjustment and change on parameters, otherwise it may cause unstable action, 5.3.1. Tuning method and type By the auto gain tuning function, the load inertia can be estimated quickly and accurately, and the appropriate servo gain under different loads can also be quickly searched. If the auto gain tuning mode cannot meet the target, manual tuning mode can be used. - Page 132 Please refer to below recommended tuning procedure and mode. Start Two-axis or multi-axis Load changes enormously One touch tuning Error disposal Execution completed Processing error Auto tuning mode1 Interpolation mode Target achieved Auto tuning mode2 Target achieved Target achieved Manually gain tuning mode Finish If the servo is in first use after installation, a JOG test is required to confirm no abnormal issue...
- Page 133 before using the auto-tuning function. When operating in auto-tuning mode, the servo needs to generate several acceleration/ deceleration commands. After the inertia ratio estimation is driven to a steady state, the inertia ratio estimation and the bandwidth searching can be performed.
-
Page 134: One-Touch Tuning Function
5.3.2. One-touch Tuning Function You can use communication software or panel to perform one-touching tuning function. The relevant parameters which can automatically set by the one-touch tuning function are shown in the table below: Parameter Parameter parameter name abbreviation PA03 ATUL Auto-tuning response level setting PB01... - Page 135 5.3.2.1 One-touch tuning procedure One-touch tuning have simple operation procedure, it provides two types of execution method. In addition, it can be performed only when the servo system runs normally. Start Send control command by host or internally to run Run the the servo motor.
- Page 136 5.3.2.2 One-touch tuning display conversion and procedure (a) Use communication software (i) Three response modes can be selected in one-touch tuning window of the communication software. You can refer to below table for response mode selection. Response mode Description High response For high stiffness systems Middle response For general stiffness systems.
- Page 137 If an error occurs, the error code will display on the error status window. The execution progress will be displayed on the status window, and 100% means fully completed. (iii)Clear and reset There are two methods to clear and reset the tuning related parameters. I: clear: the gain parameters reset to factory default setting.
- Page 138 (i-2)In any screen, hold MODE and UP button at the same time for over 3 seconds to enter AUTO screen and LED blinks. (ii)And then press UP or DOWN button to select one touch tuning response mode. DOWN (iii) After selecting the response mode, press SET button to activate the one-touch tuning function and the execution progress shows on the screen.
- Page 139 procedure are as follows: Stop flag Press SET button during execution shows the stop flag The stop flag and error code displays alternately with 2 seconds interval. Error code Press SET button to eliminate the error and Initial screen back to AUTO screen (v)If an error occurs during the tuning process, the panel screen and troubleshooting methods are as follows: Stop flag...
- Page 140 Press and hold SET button for 2 seconds Reset display After reset or clear is completed, the screen will Initial screen back to initial screen...
- Page 141 5.3.2.3 One-touch tuning error code list and solutions Code Error code Description Solution C000 Cancellation Press STOP or SET during tuning button. C001 Position Position overshot Increase [PA12_INP] setting value. overshot exceeds [PA12_INP] excess position attained range. Execute one-touch Execute one touch tuning when SON is C002 SOV-OFF tuning when SON is off.
- Page 142 should be the 10% or more of rated torque. Load inertia estimation Adjust to semi-auto gain tuning mode, in failure or inertia ratio which the motor will stop load inertia change enormously due estimation, and then execute one-touch to resonance. tuning again.
-
Page 143: Auto Tuning Function
5.3.3 Auto tuning function The auto-tuning function can estimate the load inertia ratio for servo drive in real time, and automatically set the best gain (GAIN value) according to the estimated value and the operation conditions. By using the auto-tuning function, the gain tuning of the servo drive can be performed easily and quickly. - Page 144 estimated automatically, you have to manually set PB06. The related parameters setting are as follows: Parameter Parameter Modifiable or auto- Parameter name abbreviation estimated Auto-tuning response PA03 ATUL Modifiable level setting Servo motor Load inertia PB06 Modifiable ratio PB07 Position loop gain Auto-estimate PB08 Speed loop gain...
- Page 145 To complete the auto-gain tuning, the following are key points: 1. If the servo is sets to auto-gain tuning mode 1, you need accelerate and decelerate the motor first, and the inertia ratio will be estimated base on the current and speed of the motor, this value will update to PB06 and write into EEPROM(every 30 minutes).
- Page 146 Shihlin servo has set the auto gain tuning mode 1 as the factory default setting. Once the motor is accelerated and decelerated, the best controller gain will be automatically set. The user only needs to set the required response level to complete the entire process. The sequence is shown in below.
- Page 147 5.3.3.3 The response of auto tuning mode PA03(response level setting) is for servo overall response level setting, and the response level will impact the entire system bandwidth. Increasing response setting will improve the command traceability and shorten the settling time. But if the response setting is too high, the system will vibrate.
-
Page 148: Tuning In Manual Mode
For the response level setting, it is recommended to adjust response level from low to high gradually. If the default value is too high, it would very likely to cause resonance. The applicable load inertia ratio is a reference data, and its applicable range varies with different systems. - Page 149 Position loop gain (PG1) This parameter determines the response of the position loop. The bigger the PG1 value, the higher the response bandwidth of the position loop. It can decrease the following error and position error, and shorten the settling time. However, if you set the value too high, it may cause the machinery to vibrate or cause overshoot.
-
Page 150: Interpolation Mode
instability of the entire system and increase the phase lag. The recommended setting value is to follow below calculation: Position feed-forward gain (FFC) This parameter can reduce the position error and shorten the settling time. However, if you set the value too high, it might cause overshoot in positioning when sudden acceleration or deceleration occurs. -
Page 151: Position Mode Parameter Setting And Operation
5.4. Position mode parameter setting and operation (1) Apply power to the servo drive After applying power to the servo drive, please switch off the DI SON signal, the servo drive display shows “Servo Motor Rotation Speed “ 2 seconds later automatically. (2) Test operation Use JOG operation to check if the servo is running normally. - Page 152 (5) Command pulse input First run servo motor at low speed and input command pulse train after the rotation direction and speed is confirmed. PP and NP are pulse signal of forward/reverse rotation in open collector type. When differential type signals are applied, you should change the input signal circuit to PP-PG or NP-NG.
-
Page 153: Speed Mode Parameter Setting And Operation
5.5. Speed mode parameter setting and operation (1) Apply power to servo drive After applying power to the servo drive, please switch off the DI SON signal, and then the servo drive display automatically shows “Servo Motor Rotation Speed” 2 seconds later. (2) Test operation Use JOG test to confirm if the servo is running normally. - Page 154 External input signal(Note) Speed command Analog speed command( VC) Inner speed command 1(PC05) Inner speed command 2(PC06) Inner speed command 3(PC07) After selecting target speed, turning on operation command(ST1 or ST2)will rotate the motor. The instruction to run the motor forwardly and reversely are as follows: (Note)External input rotation direction Rotation direction Internal speed command...
-
Page 155: Torque Mode Parameter Setting And Operation
5.6. Torque mode parameter setting and operation (1) Apply power to the servo drive After applying power to the servo drive, please switch off the DI SON signal, the servo drive display shows “U(Torque command voltage)” 2 seconds later automatically. (2) Test operation Use JOG operation to confirm if the servo is running normally. - Page 156 (5) Start Use SP1 and SP2 to select speed limit value. When RS1 is ON, motor runs forwardly , when RS2 is on, the servo runs reversely, the torque is generated. You should run the motor at low speed in the beginning to check the rotation direction. Check the input signal if the direction is incorrect.
-
Page 157: Control Function
6. Control Function 6.1. Selecting the control mode This servo drive provides four basic operation modes, Position(terminal input) mode, Position(internal register) mode, Speed mode, and Torque mode. You can choose either single mode or multi-mode. The following table lists all the modes and corresponding descriptions: PA01 Mode... -
Page 158: Torque Control Mode
Position mode (terminal input) - Pt/Pr/S is switched mutually via the Position mode Pt-Pr-S 0031 signal of DI(LOP). (internal register) - Speed mode Position mode (terminal input) - Pt/Pr/T is switched mutually via the Position mode Pt-Pr-T 0035 signal of DI(LOP). (internal register) - Torque mode. -
Page 159: Analog Torque Command
Speed limit VC Analog speed internal torque command command (PC73~PC75) PC05~PC12 TC1-TC2 signal torque command TC Analog Analog command torque Control mode filter constant signal max output (PC13) option (PA01) (PB19) Torque command drift value (PC27) First select torque control mode in mode option parameter, and then by signals of TC1 and TC2, you can choose command source between external analog voltage and internal register parameter. -
Page 160: Offset Adjustment Of The Analog Torque Command
To set the analog torque command when the input voltage is in maximum(10V). If you set PC13 to 100 and the external input voltage is 10V, the torque command is 100% of the maximum torque. If the input voltage is 5V, the torque command is 50% of the maximum torque, Its conversion relationship is as follows: Torque command = input voltage value / 10 * parameter setting value Torque command(%) -
Page 161: Torque Command Smoothing
Before offset voltage correction Torque command(%) After offset voltage correction Input analog voltage(V) The offset voltage is set by PC27 6.2.3. Torque command smoothing This parameter is to set the filter time constant of torque command. With a proper filter time constant value, you can run the servo motor smoothly even if a sudden change occurs. -
Page 162: Torque Limit Of Torque Control Mode
6.2.4. Torque limit of torque control mode When the torque control mode is performed, there are mainly 2 parameters to control the torque limit function. The description is as follows: Parameter Parameter Setting Default Control Name Unit abbreviation code range value mode Inner torque... - Page 163 Speed limit (Note) Input signal Limit Related DI options Speed limit code range parameter Analog speed ±10V PC12 limit(VC) Speed options Internal -6000 ~ PC05 when SP3 is speed limit 1 6000 invalid(default Internal -6000 ~ value) PC06 speed limit 2 6000 Internal -6000 ~...
- Page 164 The internal speed limit parameters description are as follows: Parameter Default Control Name Setting range Unit code value mode Internal speed 0~Instant PC05 limit1 permissible speed Internal speed 0~Instant PC06 limit2 permissible speed Internal speed 0~Instant PC07 1000 limit3 permissible speed Internal speed 0~Instant PC08...
-
Page 165: Speed Control Mode
6.3. Speed control mode Speed control mode is suitable for precise speed control applications, such as and CNC machines, drilling machine, etc. There are two types of command sources: (1) analog input, (2) internal register. The analog command controls the motor speed by external voltage input. The register input controls the speed in two methods. - Page 166 It is recommended that the user use S-curve smoother and low-pass filter when operating in the speed mode, which can effectively suppress the irregularity of the motor during operation.
-
Page 167: Selecting The Speed Command
6.3.1. Selecting the Speed command There are two methods to input speed command, the first one is to set 7 speed commands by internal parameters. Another is the external input ±10V analog voltage command, It makes totally 8 types of speed command options. Speed (Note) Input Speed... -
Page 168: Scaling Of The Analog Speed Command
◆ When the external input analog speed command is selected, please set the voltage to 0V, and set the value of PC12 which should not exceed the rated speed of the motor, otherwise it may cause damage to the motor and the mechanism. ◆... -
Page 169: Smooth Speed Command
6.3.3. Smooth Speed command If the motor input command changes abruptly, it might cause motor vibrate and noise, or may even cause overshoot. Shihlin servo provides three smooth operation parameters to suppress the negative influence caused by sudden change of the input command. First of all, the speed acceleration time constant can adjust the slope of the change in acceleration, the speed deceleration time constant can adjust the slope of the change in deceleration, and the S-curve acceleration and deceleration time constant can improve the motor stability... - Page 170 S-curve acc. / dec. time constant : The S-curve acceleration and deceleration constant is use three-stage acceleration and deceleration curve to smooth the motor when it starts and stops. Proper setting of STC helps to stabilize the motor operation when starting and stopping. The initial S-curve acceleration and deceleration constant is 0 second.
- Page 171 Speed command low-pass smooth filter time constant : Parameter Parameter Setting Default Control Name Unit abbreviation code range value mode Speed command low-pass smooth SFLT PB18 0~1000 S, T filter time constant Increasing this parameter value will improve smoothness of command curve, and it will decrease the response.
-
Page 172: Torque Limit Of Speed Control Mode
6.3.4. Torque limit of speed control mode When using the speed mode, the main parameters related to the torque limit are PA05 and PC25. The table below shows these two parameters: Parameter Parameter Setting Default Control Name Unit abbreviation code range value mode... - Page 173 (Note) DI signal Valid torque limit value PA05 setting TLA > PA05 setting => PA05 setting TLA < PA05 setting => TLA PC25 setting > PA05 setting => PA05 setting PC25 setting < PA05 setting => PC25 setting TLA > PC25 setting => PC25 setting TLA <...
-
Page 174: Gain Adjustment Of The Speed Loop
6.3.5. Gain adjustment of the speed loop In the Speed control loop, you can adjust many different gain parameters. You can adjust the gain automatically or manually which is set by PA02. If set as auto adjustment, the load inertia ratio will be estimated continuously and the control gain value will be set automatically. - Page 175 When you set PA02 to 0000 or 0001, its mainly effective gain value are speed loop gain (PB08), speed integral gain (PB09), and speed feed-forward gain (PB10). When PA02 is set to 0001, the interference compensator function will be automatically enabled, which can reduce torque ripple, overshoot and speed change rate.
-
Page 176: Resonance Suppression Unit
6.3.6. Resonance suppression unit (1) Automatic high-frequency resonance suppression Due to the limitation of the mechanism, Resonance may occur when the response bandwidth of control system is too large, and this may cause damage on the mechanism. Usually this phenomenon can be improved by increasing the rigidity of the mechanism or reducing the bandwidth of the system, but it will increase the cost and reduce the response. - Page 177 Machine resonance suppression NHF4 PB45 10~4000 1000 frequency 4 Machine resonance suppression NHD4 PB46 0~32 attenuation 4 Machine resonance suppression NHF5 PB47 10~4000 1000 frequency 5 Machine resonance suppression NHD5 PB48 0~32 attenuation 5 Resonance suppression low- PB03 0~10000 0.1ms pass filter Manual mode The drive provides five groups of filters and one group low-pass filters to manually suppress...
- Page 178 operation procedure, please refer to the table below. When PB27 is set to 1 or 2, if the resonance still exists, please check whether one of the parameters of PB02, PB22 and PB46 is 32. If yes, the resonance phenomenon cannot be suppressed by the filter, and it is recommended to reduce the system bandwidth and perform re-estimation.
- Page 179 Moving distance mechanism resonance or not ? set PB27=1 decrease servo lower the detect level bandwidth (PB28) PB27 is automatically set back to 0 after the frequency detection is completed increase PB02, PB22, PB46. if the resonance is if PB02, PB22, PB46 is 32 if PB02, PB22, PB46>0 suppressed Finish...
- Page 180 Parameter Parameter Setting Default Control Name Unit abbreviation code range value mode Auto vibration AVSM PB29 Pt, Pr suppression mode Low-frequency vibration detection PB30 1~8000 pulse Pt, Pr level Low-frequency vibration VSF1 PB31 1~3000 0.1Hz Pt, Pr suppression frequency 1 Low-frequency vibration VSG1...
- Page 181 are resonance attenuation rates. When low-frequency resonance occurs, the user can set PB29 to 1 to enable the auto-suppression function if the resonance frequency is unknown, the drive will automatically detect the resonance frequency, and then set the detected results to the PB31 and PB33 in sequence, and set PB32, PB34 to 1 to enable the auto- suppression function.
-
Page 182: Gain Switch Function
Positioning moving distance if the load cause resonance set PB29=1 Increase PB30 Decrease PB30 If both PB32 and if the vibrate is reduced PB34=1 Finish 6.3.7. Gain switch function Shihlin servo drive provides gain switching function. It can switch the gain on the operating or stopped servo motor. - Page 183 (2).When the load inertia ratio changes greatly during operation, to ensure the stability of the servo system, you can use the gain switching function to change the inertia ratio or gain value. (3).To make the servo system have a higher response or a shorter settling time, you can use the gain switching function to increase the gain.
- Page 184 Speed loop gain PB16 10~500 Pt, Pr, S change ratio Speed integral gain VIC2 PB17 10~500 Pt, Pr, S change ratio The following will explain the related parameters for gain switching. (1). The four parameters, which are servo motor load inertia ratio GD1, position loop gain value PG1, speed loop gain value VG1, and speed integral gain value VIC, (PB06~PB09).
- Page 185 x=7: activate the gain switching when position deviation pulse is less than or equal to SDS setting. x=8: activate the gain switching when servo motor speed is less than or equal to CDS setting. (3). The value of gain switching condition CDS(PB12) The setting value of gain switching condition (kpps, pulse, rpm) changes according to the setting of CDP (PB11).
- Page 186 When performing the gain switching, the original servo gain value will be changed to the ratio value (%)of PG2, VG2, and VIC. Below are examples to illustrate the gain switching operation. Example 1: digital input signal use as switching source. ①.
- Page 187 Name CDP OFF CDP ON CDP OFF Servo motor load inertia ratio → → Position loop gain → → Speed loop gain → → Speed integral gain → → Example 2: take deviation pulse as switching source ①. Relevant parameter setting Parameter Parameter Default...
- Page 188 ③. The states of parameters change Name CDP OFF CDP ON CDP OFF Servo motor load inertia ratio → → Position loop gain → → Speed loop gain → → Speed integral gain → →...
-
Page 189: Position Control Mode
6.4 Position control mode The position control mode is used in where precise positioning is required, such as industrial machinery, processing machines, and so on. There are two types of position control mode: one is terminal input mode, and the other is internal register input mode. The terminal input mode is to receive the pulse command from the controller, and apply this command to control the positioning of the servo motor, and the internal register input mode is to manually input 63 groups of position command values (please refer to Chapter 7), and then define DI functions... - Page 190 command Acc/ Dec digital input DI delay time speed register register register register S-curve 4 groups of electronic PE01 PF33 acc/dec PF49 PF 65 POS1 gear ratio numerator time PF30 constant PA 06 PF48 PF64 PF80 POS6 command PC 32 PC 03 CTRG option...
-
Page 191: External Pulse Command(Pt Command)
6.4.1 External pulse command(Pt command) The pulse command (Pt command) is provided by an external device. You should set PA01 to 0000 and then restart power to activate this parameter. There are three types of user-defined input waveform. each type can be defined positive and negative logic. Positive logic means the pulse is triggered by the rising edge, on the other hand, negative logic means the pulse is triggered by the falling edge. -
Page 192: Internal Position Command (Pr Command)
Pulse logic and format Forward rotation Reverse rotation AB phase pulse train Pulse train + sign Forward/reverse rotation pulse train AB phase pulse train Pulse train+ sign Forward/reverse rotation pulse train If input pulse is line drive type, the maximum frequency is 4Mpps. If input pulse is open collector type, the maximum frequency is 200Kpps. -
Page 193: Position Command Smoothing
Position Related POS6 POS5 POS4 POS3 POS2 POS1 CTRG command parameter PE01 ↑ PE02 PE03 ↑ PE04 PF03 ↑ PF04 PF05 ↑ PF06 PF29 ↑ PF30 Status of POS1 - POS6: 0 means that DI is off (the circuit is open); 1 means that DI is on (the circuit is closed). - Page 194 In addition, speed smoothing for acceleration/deceleration also can help the servo motor to run more smoothly. The speed smoothing for position acceleration/deceleration related parameter is as follows: Parameter Parameter Setting Default Control Name abbreviation code range Unit value mode S-curve acceleration PC03 0~10000...
- Page 195 Forward rated speed Reverse rated speed As can be seen in the above figure, for the forward rotation or reverse rotation command from position command, its acceleration and deceleration time is determined by PF49~PF64. If the internal register is used as position command, to run the motor more smoothly, it is recommended to use the self-defined acceleration/ deceleration time(PF49~PF64) and the S- curve acceleration/deceleration time constants(PC03).
-
Page 196: Electronic Gear Ratio
6.4.4 Electronic gear ratio Users could set different electronic gear ratios to enable the gearing to move different distances. The relevant parameters are as below: Parameter Parameter Setting Default Control Name abbreviation code range Unit value mode Electronic gear PA06 Pt, Pr numerator Electronic gear... -
Page 197: Torque Limit Of Position Loop
Calculation of E-Gear ratio : Before calculating the E-Gear ratio, the user must know the specifications of the system, such as the resolution of the motor encoder is 22bit Pulse/rev, the deceleration ratio of the mechanism, the E-Gear ratio and so on. The E-Gear ratio calculation is as follows: If there is a deceleration ratio between the motor and the loads, you must multiply the deceleration ratio to it, which is revolution number of motor shaft / revolution number of load... -
Page 198: Position Loop Gain
6.4.6 Position loop gain. As the position loop is outside control of speed loop, if the user uses the manual mode to adjust the position loop, it’s necessary to set the speed gain related parameters first (refer to section 6.3.5), and then set the position proportional gain and the position feed-forward gain. The position loop gain can be set to a value of 1/4 ~ 1/6 of speed loop gain. -
Page 199: Dual Control Mode
The position feed-forward gain adjustment method is set from low to high. Theoretically, setting it to 1 should be the best. If the setting is too large, it may cause vibration. In this case, the position feed-forward value should be reduced until no vibration occurs. 6.5 Dual control mode To easily switch control modes frequently, Shihlin servo also provides five dual-modes for user to set manually. -
Page 200: Position/Speed Dual Mode
Control Name Abbr. I/O type CN1 NO. Description mode Options of position/speed control switch mode (Note) Control mode position speed Options of speed/torque control switch mode. (note) Control Described mode Control CN1-21 according to mode speed (Preset) different switching torque control mode Options torque/position... -
Page 201: Speed / Torque Dual Mode
The mode cannot be switched if the motor is running at high speed. When DO ZSP is on, the control mode can be switched, and it is recommended that the user wait for the motor stops completely before mode switching. 6.5.2 Speed / Torque dual mode Before using the speed/torque dual mode, please set PA01 to 1003H. -
Page 202: Torque/Position Dual Mode
It is recommended to switch speed/torque mode after the motor is completely stopped. 6.5.3 Torque/position dual mode It has 2 types: T/Pt and T/Pr. The user can set PA01 to 1005 (T/Pt mode) or 1015 (T/Pr mode). If the motor is running at high speed, the mode switching cannot be performed. When DO ZSP is on, the control mode can be switched. - Page 203 It is recommended that the user performs torque/position mode switching after motor is stopped completely.
-
Page 204: Other Functions
6.6 Other functions ●Before connecting to peripheral devices, turn off the power and wait for 20 minutes or more until the charge LED turns off, and check the residual voltage by meter. Otherwise, an electric shock may occur. ●Please use designated products for peripheral devices to avoid fire or malfunction. - Page 205 The specification of regenerative resistor for 200V models: Specification of built-in The Minimum Consumption power regenerative resistor permissible Drive(W) of built-in resistor resistance Resistance(Ω) Capacitor(W) (Ω) 1000 1500 2000 3000 The specification of regenerative resistor for 400V models: Specification of built-in regenerative The Minimum permissible Drive(W) resistor...
- Page 206 resistor, below is the instruction of selecting the external regenerative resistor capacity: (a) Without external load If the motor is running forwardly and reversely, the regenerated energy from brake will first enter the capacitor of the DC bus. When the voltage of the capacitor exceeds a certain value, the regenerative resistor will consume the excess recharge energy.
- Page 207 Note 1: Es is the regenerated energy of a motor without loading that runs a rated speed then stops. The capacity of regenerative resistor is calculated as follows by using the Es and Ec in the above table: In which N: the Load inertia ratio T: operation cycle(Defined by user) Assuming that the load inertia is N times the motor inertia, when the motor decelerates from 3000rpm to 0, the regenerative energy is (N+1)×Es and the regenerative resistor needs to consume (N+1) ×...
- Page 208 maximum speed is 1000rpm, and the load inertia is 20 times of the motor inertia, then Es = 32.1 x 0.0001 x 1000 / 182 = 17.6 J, and the required regenerative resistor power= 2 x ((20 + 1) x17.6-40.8 ) / 1 = 657W, which is far larger than capacity of built-in regenerative resistor. Therefore, it’s recommended to use the designated 1KW regenerative resistor.
-
Page 209: Analog Monitor Function
reaches 3000 rpm, for a 400W model (rated torque: 1.27Nt-m), the users need to connect an external regenerative resistor which is 2 × (0.5× 1.27) × (3000 × × π/60) = 399W, 100Ω. Note: 1rpm = 2π/60 (rad/s). 6.6.2 Analog monitor function This servo provides 2 analog output channels: MON1 and MON2, which is in CN1- 30(MON1) and CN1-32(MON2) separately, for the users to check the required voltage signal easily. - Page 210 If the analog monitor output (PC14) is set to 0000, the rated speed of the motor is ±3000 rpm (± means forward and reverse rotation), and the current speed of the motor is 3000 rpm in forward direction. The user can measure the analog voltage output of +5V from the CN1-30 terminal.
- Page 211 is set to -500, the analog voltage of MOD can be corrected to the same value as the actual voltage. If the analog voltage of MOD is smaller than the actual voltage, please input a positive value in PC28 or PC29. Analog monitor output ratio The analog monitor output ratio is used to set the resolution of the analog monitor voltage output.
-
Page 212: Operation Of Electromagnetic Brake
6.6.3 Operation of electromagnetic brake The electromagnetic brake operation is based on: (1)When the MBR is OFF, it means that the electromagnetic brake is disabled and the motor is locked; (2)When the MBR is ON, it means that the electromagnetic brake is activated and the motor can run freely. The electromagnetic brake operation can be set by PC40 and PC16. - Page 213 Wiring diagram of electromagnetic brake: Servo motor Servo drive Emergency stop Wrong diode polarity may cause servo drive breakdown. Specification of electromagnetic brake: SME Series H08515/ □10020/ Motor model name H13015/ (○B□□/ L00530/ □02030/ M20020/ L07530 H07530 □15020/ ○D□□) L01030 □04030...
- Page 214 Power consumption 19.5 18.3 ≧19.6 ≧44 ≧74 Friction Torque (N‧m) For the description of ○□□□, please refer to Section 1.3.1 Note: The electromagnetic brake is only for the safety maintenance when motor is stopped, and cannot be used for motor deceleration braking.
-
Page 215: Pr (Procedure) Program Control Introductions
7. PR (procedure) program control introductions 7.1 PR introduction PR (Procedure) program: in the PR mode, the PR program is the smallest unit of the command. It contains one or more programs and there are 64 groups of programs can be programmed. They are a group of homing programs (PATH#0) and 63 groups of PR programs (PATH#01~PATH#63). - Page 216 DI: POSn + CTRG↑ Command trigger method DI: POSn + TRG↑ Event trigger: EV1~EV4 Software trigger: PF82 Including revolution Set 32-bit data directly Position command format number and pulse (different control types have different number. units) Automatically trigger by power on (first servo start) Automatic trigger Trigger by DI:SHOM...
-
Page 217: Di/Do And Sequences In Pr Mode
7.3 DI/DO and sequences in PR mode DI Signal: CTRG, SHOM, STOP, POS1~POS6, ORGP, LSP, LSN, EV1~EV4. DO Signal : CMDOK, MC_OK, INP(Servo In-position ready), ALM, OVF(Position command overflow), SWPL(Software positive limit reached), SWNL(Software negative limit reached). The timing diagram of INP, CMDOK and MC_OK are as below: Command output INP=ON means servo In-position ready. - Page 218 PR command trigger method description Command source Description Use DI: use POS1~6 to assign the triggered. program number, and triggered by rising edge of CTRG. STANDARD CTRG↑+POS1~6 Applicable occasions: PC or PLC issues commands via DI: when STOP is activated, the command will be held. DEDICATED DI: STOP, SHOM DI: when SHOM is activated, it will perform homing.
-
Page 219: Parameter Setting Of Pr Mode
7.4 Parameter setting of PR mode Target speed: PF33~PF48, total 16 groups 15~0 BIT PF33~PF48 Target speed: 1 ~ 3000 (rpm) Acceleration/deceleration time: PF49 ~ PF64, total 16 groups. 15~0 BIT PF49~PF64 Acceleration/deceleration time constant: 1 ~ 65500 (ms) Delay time: PF65 ~ PF80, Total 16 groups 15~0 BIT PF49~PF64 Delay time: 1 ~ 32767 (ms) - Page 220 Definition of PR program path There are a total of 126 parameters which is PE03~PE98 & PF01~PF30 to set 63 groups of PR programs (PATH#01~PATH#63). PATH#01 can be set by PE03 and PE04, PATH#02 can be set by PE05 and PE06. . . PATH#48 can be set by PE97 and PE98, PF#49 can be set by PF01 and PF02.
- Page 221 OPT option Bit 7 Bit 6 Bit 5 Bit 4 (0/8) (0/4) (0/2) (0/1) UNIT AUTO (Unit) (Auto execution) (Interrupt) ※Acceptable DI:STOP and software limit. INS: if set as INS, it means the current PR will interrupt the previous PR during execution. AUTO: when it reaches target speed, the next program will be automatically loaded.
- Page 222 The definition of OPT option is as follows: OPT option Bit 7 Bit 6 Bit 5 Bit 4 (0/8) (0/4) (0/2) (0/1) OVLP (Command type) (overlap) (Interrupt)) CMD option BIT 7 BIT 6 Description Absolute positioning command (position command=DATA) Relative positioning command (Position command=current feedback+DATA) Incremental positioning command(position command=the end of previous command+ DATA)
- Page 223 DLY: the value range is 0~F which can be set as delay time number, and its definition is as follows: DLY value … Corresponding PF80 PF79 PF78 PF77 PF76 … PF69 PF68 PF67 PF66 PF65 parameters Program jump: when TYPE=7, it can jump to the specified PR program number. (Take PATH#01 as an example) 31~28 27~24...
- Page 224 The definition of OPT option is as follows: OPT option Bit 7 Bit 6 Bit 5 Bit 4 (0/8) (0/4) (0/2) (0/1) AUTO ( Write in ROM) (Automatic execution) (Interrupt) INS: if set to INS, it means the current PR will interrupt the previous PR. AUTO: execute the next PR path automatically when the current PR is completed.
- Page 225 SOUR: it is used to set the data source. There are two options: constant or parameter value. SOUR option Description Bit 26 Bit 27 Bit 25 Bit 24 Data source Write destination (SOUR) P□XX Constant P□XX P□XX □: parameter group(A~F) XX: parameter number Source: it has different definition according to SOUR setting as shown in the following table Source 31~28 27~24 23~20 19~16 15~12 11~8...
- Page 226 OVLP: it allows to overlap the next PR command. Set DLY as 0 when it is used. ACC/DEC: the value range is 0~F and it can be set as acceleration / deceleration time number, its definition is as follows: ACC/DEC …...
- Page 227 Homing definition: set by PE01 and PE02. 31~28 27~24 23~20 19~16 15~12 11~8 7~4 3~0 BIT PE01 BOOT DEC1 ACC PATH PE02 ORG_DEF (32 bit) PATH: set the action after homing, and its definition is shown in the table below: PATH option Bit 4~7 Bit 0~3 Description...
-
Page 228: Pr Sequence Status
Bit 28~31 Description NOT execute homing when servo starts for the first time Execute homing when servo starts for the first time ORG_DEF: the coordinate value of the origin and it may not be 0. ORG_DEF format Pulse: (−2 ) ~ (2 The servo does not provide origin stop mode option, which is to set whether to pull back to the origin after completion! Since the motor must decelerate to stop after the origin is found (origin signal or Z pulse), and the stop position will be a little ahead over the origin as shown... - Page 229 perform various control combinations according to the settings, the PR mode of SDP servo provides three sequences which could be linked to the other PR: 1. automatically execute the next program (AUTO), 2.interrupt (INS), 3, overlap (OVLP). Among them, AUTO and interrupt can be applied in all five control types, but the overlap function can only be used when one positioning control program follows by another positioning control program.
- Page 230 Sequential command(AUTO): use the AUTO function to generate a fixed sequence of program command combinations. PATH#12 (AUTO positioning control, incremental positioning path: 104857600 pulse, delay time: 200ms) → PATH#13(Positioning control, absolute positioning: 0 pulse). As shown in the figure below, which is a typical sequential command of positioning control followed by positioning control.
- Page 231 Overlapping command(OVLP): in the sequential command, if one positioning control is followed by another positioning control, the former positioning will control the overlapping of the latter positioning control commands. Overlap is that the acceleration of latter command overlaps the deceleration of former command immediately, and helps this 2 positioning control to transit smoothly.
- Page 232 Interrupt command(INS): it can be applied in any control type, and it is always be set in the latter program. PR mode of SDP servo provides internal INS and external INS. 1.Internal INS: which is a sequential command with interrupt setting in the latter program. The biggest difference from the sequential command is the definition of the delay time.
- Page 233 2.External INS: the biggest difference between internal INS and external INS is the trigger of the latter program with INS. The former is planned by sequential commands, and the latter is triggered by external triggers. In addition, the delay time setting in the previous program is invalid when the external interrupt occurs.
-
Page 234: Parameters
8. Parameters 8.1. Parameter definitions From the perspective of safety and frequency of use, Shihlin drive parameters have below types: basic parameters, gain and filter parameters, expansion parameters, and input/output setting parameters. When you want to adjust parameter reading and writing permissions, you can modify the setting of PA42 to change the setting of expansion parameters. - Page 235 Pr path parameter 1 Related parameter group 1 for Pr position path assignment. (No PE□□) Pr path parameter 2 Related parameter group 2 for Pr position path assignment. (No PF□□) The description of control mode is as follows: Mode Mode name Description code Drive receives the external position pulse command...
-
Page 236: List Of Parameters
8.2. List of Parameters The parameters of Shihlin servo are mainly classified into four categories, they are PA parameter group ~ PF parameter group. PA parameters are basic parameters, such as control mode selection, auto tuning function, etc. The PB parameters are gain and filter parameters. The PB parameters helps the servo motor to run in a more stable state. - Page 237 number Pulse/mm Default Control mode Abbreviation Name Unit value Pr S T Motor crash protect PA15 CRSHA ○ ○ ○ ○ level(torque percentage) Motor crash protect level PA16 CRSHT ○ ○ ○ ○ (protection time) Output overload DO PA17 ○ ○...
- Page 238 position (pulse number) Default Control mode Abbreviation Name Unit value Pr S T Encoder absolute PA33 position (revolution ○ ○ ○ ○ number) I/O communication of PA34(*) ABSM ○ ○ ○ ○ absolute system PA35(*) FNO1 Function option 1 0000h ○...
- Page 239 (2) Gain, filter parameters Default Control mode Abbreviation Name Unit value Pr S T Frequency of Machine PB01 NHF1 resonance suppression 1000 ○ ○ ○ ○ filter 1 Attenuation rate of PB02 NHD1 machine resonance ○ ○ ○ ○ suppression filter 1 Resonance suppression PB03 0.1ms...
- Page 240 Default Control mode Abbreviation Name Unit value Pr S T Torque command filter PB19 ○ time constant Speed feedback filter PB20 SJIT 0.1ms ○ ○ ○ ○ time constant Frequency of machine PB21 NHF2 resonance suppression 1000 ○ ○ ○ ○ filter 2 Attenuation of machine PB22...
- Page 241 Default Control mode Abbreviation Name Unit value Pr S T Low frequency vibration PB34 VSG2 ○ ○ suppression gain 2 PB35 FRCL Friction level ○ ○ ○ compensation Friction compensation PB36 FRCT ○ ○ ○ smoothing time constant Friction compensation PB37 FRCM ○...
- Page 242 Default Control mode Abbreviation Name Unit value Pr S T Bandwidth of machine PB51 NHW1 resonance suppression ○ ○ ○ ○ filter 1 Bandwidth of machine PB52 NHW2 resonance suppression ○ ○ ○ ○ filter 2 Bandwidth of machine PB53 NHW3 resonance suppression ○...
- Page 243 (3) Extension parameters Control mode Default Abbreviation Name Unit value Pt Pr S T PC01 Acceleration time constant ○ ○ PC02 Deceleration time constant ○ ○ S-curve PC03 acceleration/deceleration ○ ○ ○ time constant rpm, PC04 JOG speed command ○ ○...
- Page 244 Default Control mode Abbreviation Name Unit value Pt Pr S T PC19(*) COP2 Alarm record clear option 0000h ○ ○ ○ ○ Servo drive communication PC20(*) ○ ○ ○ ○ device number Communication mode PC21(*) ○ ○ ○ ○ setting Communication protocol PC22(*) 0010h...
- Page 245 Control mode Default Abbreviation Name Unit value Pt Pr S T Capture: start address of PC41 CAST ○ ○ ○ ○ data array Source PC42(■) CAAX Capture: axis position ○ ○ ○ ○ pulse Capture: number of PC43(■) CAND ○ ○...
- Page 246 Control mode Default Abbreviation Name Unit value Pt Pr S T Error offset compensation Source PC58 CSOF for synchronous Capture ○ pulse axis E-Cam: start address of PC59 ECHD ○ data array E-Cam: segment number PC60 ECMN ○ PC61 ECMM E-Cam: cycle number (M) ○...
- Page 247 Control mode Default Abbreviation Name Unit value Pt Pr S T PC75 Inner torque command 1 ○ PC76 Inner torque command 2 ○ PC77 Inner torque command 3 ○ Filter setting for PC78 CXFT synchronous capture axis 0000h ○ Correction E-Cam phase alignment: 000000 PC79...
- Page 248 Default Control mode Abbreviation Name Unit value Pt Pr S T Data arrays read / write PC93(■) AYID ○ ○ ○ ○ address Data arrays read / write PC94(■) AYD0 ○ ○ ○ ○ window 1 Data arrays read / write PC95(■) AYD1 ○...
- Page 249 (4) Input/output setting parameters Control Default mode Abbreviation Name Unit value Pt Pr S T Input signal automatic ON PD01(*) DIA1 0000h ○ ○ ○ ○ option 1 PD02(*) Input signal option 1 0001h ○ ○ ○ ○ PD03(*) Input signal option 2 000Dh ○...
- Page 250 Control Default Abbreviation Name Unit mode value Pt Pr S T Position attained(DO: MC_OK) PD28 MCOK 0000h ○ option PD29(*) Software DI A/B contact setting 0000h ○ ○ ○ ○ DO contact source control PD30(■) SDO 0000h switch(for turret mode) DO communication control PD31(■) OTST 0000h...
- Page 251 (5) PR position path planning parameter group 1 Control mode Abbreviation Name Default value Unit PE01 ODEF Homing definition 00000000h ○ PE02 ODAT Origin definition ○ PE03 PDEF1 PATH#1 definition 00000000h ○ PE04 PDAT1 PATH#1 data ○ PE05 PDEF2 PATH#2 definition 00000000h ○...
- Page 252 Control mode Abbreviation Name Default value Unit PE34 PDAT16 PATH#16 data ○ PE35 PDEF17 PATH#17 definition 00000000h ○ PE36 PDAT17 PATH#17 data ○ PE37 PDEF18 PATH#18 definition 00000000h ○ PE38 PDAT18 PATH#18 data ○ PE39 PDEF19 PATH#19 definition 00000000h ○ PE40 PDAT19 PATH#19 data ○...
- Page 253 Control mode Abbreviation Name Default value Unit PE68 PDAT33 PATH#33 data ○ PE69 PDEF34 PATH#34 definition 00000000h ○ PE70 PDAT34 PATH#34 data ○ PE71 PDEF35 PATH#35 definition 00000000h ○ PE72 PDAT35 PATH#35 data ○ PE73 PDEF36 PATH#36 definition 00000000h ○ PE74 PDAT36 PATH#36 data ○...
- Page 254 Control mode Abbreviation Name Default value Unit PE93 PDEF46 PATH#46 definition 00000000h ○ PE94 PDAT46 PATH#46 data ○ PE95 PDEF47 PATH#47 definition 00000000h ○ PE96 PDAT47 PATH#47 data ○ PE97 PDEF48 PATH#48 definition 00000000h ○ PE98 PDAT48 PATH#48 data ○ PE99 Reserved...
- Page 255 (6)Pr position path planning parameter group 2 Default Control mode Abbreviation Name Unit value Pr S T PF01 PDEF49 PATH#49 definition 00000000h ○ PF02 PDAT49 PATH#49 data ○ PF03 PDEF50 PATH#50 definition 00000000h ○ PF04 PDAT50 PATH#50 data ○ PF05 PDEF51 PATH#51 definition 00000000h...
- Page 256 Default Control mode Abbreviation Name Unit value Pr S T Speed setting of internal rpm, PF34 POV2 ○ position command 2 mm/s Speed setting of internal rpm, PF35 POV3 ○ position command 3 mm/s Speed setting of internal rpm, PF36 POV4 ○...
- Page 257 Default Control mode Abbreviation Name Unit value Pr S T Acceleration/deceleration PF51 POA3 time of internal position ○ command 3 Acceleration/deceleration PF52 POA4 time of internal position ○ command 4 Acceleration/deceleration PF53 POA5 time of internal position ○ command 5 Acceleration/deceleration PF54 POA6...
- Page 258 Default Control mode Abbreviation Name Unit value Pr S T Acceleration/deceleration PF63 POA15 time of internal position 5000 ○ command 15 Acceleration/deceleration PF64 POA16 time of internal position 6000 ○ command 16 Delay time 1 after position PF65 DLY1 ○ reached Delay time 2 after position PF66...
- Page 259 Default Control mode Abbreviation Name Unit value Pr S T Delay time 16 after position PF80 DLY16 5000 ○ reached Deceleration time for auto- PF81 PDEC 00000000h ○ ○ ○ ○ protection command trigger PF82(■) PRCM ○ register PR number triggered by PF83 EVON 0000h...
- Page 260 (7) Motor related parameters Default Motor type Abbreviation Name Unit value PL01 Motor type ○ ○ Motor parameter automatic PL02 identification function and ○ ○ current response setting. Linear motor parameter PL03 ○ ○ confirmation PL04 Encoder type 0x0100 ○ ○...
- Page 261 Default Motor type Abbreviation Name Unit value PL21 Overload decrease gain ○ ○ Cogging compensation PL22 0x1A00 ○ ○ option PL23 Motor temperature sensor ○ ○ Motor over temperature PL24 ○ ○ mode option Motor over temperature PL25 ○ ○ trigger level Motor over temperature PL26...
- Page 262 Default Motor type Abbreviation Name Unit value Pulse loss detection Z PL40 2000 pulse ○ ○ phase interval PL41 Reserved 0.1 mm / 360 PL42 Linear motor pole pitch Electrical ○ angle PL43 Linear motor rated current 0.01A ○ Linear motor maximum PL44 0.01A ○...
- Page 263 To facilitate the user to operate the Shihlin servo with relevant parameters and set appropriate parameters in different modes, below listed the parameters by its categories. Torque control relevant parameters Control Parameter Default mode Abbreviation Parameter function Unit value Pt Pr S T PA01(*) Control mode setting 1000h...
- Page 264 Speed control relevant parameters Control Parameter Default mode Abbreviation Parameter function Unit value Pt Pr S T PA01(*) Control mode setting 1000h ○ ○ ○ ○ PA05 Internal torque limit 1 ○ ○ ○ ○ PA14(*) Encoder output pulse number 10000 pulse/rev ○...
- Page 265 Position control relevant parameters Control Parameter Default mode Abbreviation Parameter function Unit value Pt Pr S T PA01(*) Control mode setting 1000h ○ ○ ○ ○ PA04 HMOV Homing mode 0000h ○ PA05 Internal torque limit 1 ○ ○ ○ ○ PA06 Electronic gear numerator ○...
- Page 266 Filter smoothing and resonance suppression relevant parameters Control Parameter Default mode Abbreviation Parameter function Unit value Pt Pr S T PB01 Frequency of machine resonance ○ ○ ○ ○ NHF1 1000 suppression filter 1 PB02 Attenuation rate of machine ○ ○ ○ ○ NHD1 resonance suppression filter 1 PB03...
- Page 267 PB34 VSG2 Low-frequency vibration ○ ○ suppression gain 2 PB35 FRCL Friction compensation level ○ ○ ○ PB36 FRCT Friction compensation smoothing ○ ○ ○ time constant PB37 FRCM Friction compensation mode option ○ ○ ○ PB38 FFCT Position feed forward filter time ○...
- Page 268 Gain and switching relevant parameters Control Parameter Default mode Abbreviation Parameter function Unit value Pt Pr S T PA02 ATUM AUTO tuning mode setting 0002h ○ ○ ○ ○ Auto-tuning response level ○ ○ ○ ○ PA03 ATUL 0010 setting PB05 Position feed-forward gain 0.0001 ○...
- Page 269 DI/DO relevant parameters Mode Parameter Abbreviation Parameter function Default Unit Pt Pr S T PA12 In-position range 41943 pulse ○ ○ PC17 Zero speed range rpm ○ ○ ○ ○ Electromagnetic brake sequence ○ ○ ○ ○ PC16 output time PD01(*) DIA1 Input signal automatic ON option 1...
- Page 270 Communication relevant parameters Control Parameter Default mode Abbreviation Parameter function Unit value Pt Pr S T Servo drive communication PC20(*) N/A ○ ○ ○ ○ device number PC21(*) Communication mode option N/A ○ ○ ○ ○ PC22(*) Communication protocol option 0010h N/A ○...
- Page 271 Other parameters Control Parameter Default mode Abbreviation Parameter function Unit value Pt Pr S T Special parameter write-in PA40(▲) 0000h ○ ○ ○ ○ function Parameter group write-inhibit PA42(*) 0000h ○ ○ ○ ○ setting PB06 Servo motor load inertia ratio 0.1times ○...
-
Page 272: Parameter Group Introduction
8.3. Parameter group introduction No Abbr. Parameter function and description Mode Default Range Unit PA01 STY Control mode setting value u z y x yx: to set control mode Pulse position mode: PT Inner position mode: PR Speed mode: S Torque mode: T Control mode PT-S PR-S... - Page 273 No Abbr. Parameter function and description Mode Default Range Unit u: DI,DO setting value control u=0: the value of DI, DO(PD02 ~ PD14, PD21~PD24, PD26) are fixed during mode switching, DI, DO can be planned by user at this time. u=1: the value of DI, DO(PD02 ~ PD14, PD21~PD24, PD26) are varied with different control modes during mode switching, DI, DO...
- Page 274 No Abbr. Parameter function and description Mode Default Range Unit PA03 ATUL Auto tuning response level setting 1~32 Auto tuning mode response setting Speed Speed Respon loop Respon loop Response response Response response setting frequency setting frequency (Hz) (Hz) 10.0 67.1 11.3 75.6...
- Page 275 No Abbr. Parameter function and description Mode Default Range Unit Homing mode: PA04 HMOV 0 z y x Limit setting signal setting Homing methods y = 0: return to Z z=0: homing in forward pulse direction define y=1: do not LSP as homing origin return to Z pulse z=1: homing in reverse...
- Page 276 No Abbr. Parameter function and description Mode Default Range Unit TL1 Internal torque limit value 1: PA05 The parameter can limit the torque generated by the servo motor. The unit of parameter setting value is in percentage (%). The calculation is as follows: Torque limit value=maximum current of motor/ motor rated current * the setting value TL Input signals is used to select analog torque limit...
- Page 277 Abbr. Parameter function and description Mode Default Range Unit Electronic gear denominator PA07 (▲) When setting E-Gear ratio, the incorrect setting may cause servo motor suddenly unintended acceleration. Ensure to do the setting when SERVO is OFF. Pr,Pt Note: limitation : 1/50 < (CMX/CDV) < 64000 PA08 HSPD1 Homing high speed option 1 mm/s 2000...
- Page 278 PA11 RES2 Regenerated resistor capacity Model Default below 500W Refer to 750W~1KW the left Watt 1.5KW~3KW 100W table. 3000 Refer to section 14.2 for external resistor capacity. PA12 INP In-position range: In the position control mode, when the deviation between the position command and the actual motor Refer to position is less than the setting value of INP, the INP Pt,Pr...
- Page 279 z: the setting of input pulse filter. z=0: maximum input pulse frequency is 500kpps. z=1: maximum input pulse frequency is 200kpps. z=2: maximum input pulse frequency is 2Mpps. z=3: maximum input pulse frequency is 4Mpps. z=4: maximum input AB phase pulse frequency is 8MPPS.
- Page 280 z=1), Number of pulses per revolution If PA39 is set to 0100h and PA14 is set to 512, the output pulse number per revolution is 2 / 512= 8192(pulse/rev) PA15 Motor crash protect level(torque percentage) CRSHA To set protection level(for the rated torque percentage, 0=turn off , 1 or above =enable PA15.) PA16 Motor crash protect level (protection time)
- Page 281 when the position deviation exceeds this value, AL.08 will occur. PA20 Position pulse frequency excess level 1 OVPL1 When input position pulse frequency exceeds this 4500 value, AL.07 will occur. 18000 PA21 Reserved PA22 Dynamic brake control function (The operation setting of dynamic brake when alarm occurs.) 0: enable the dynamic brake and motor stops immediately.
- Page 282 2.EEPROM has a writing life limit (100,000 times), please set the MCS parameter to 1 if you need frequently write to drive parameters by communication command. 3.If the MCS parameter is not set, the memory may be damaged when the writing limit of EEPROM is reached and AL.0F alarm will occur.
- Page 283 PA27 FELP Low-pass filter time constant for full-closed and semi- closed loop control When the stiffness of the mechanical system between full-closed and semi-closed loop insufficient, set the proper time constant can Pt, Pr enhance the stability of the system. In other words, 1000 temporarily create the semi-closed loop effect, and after stabilizing, the full-closed loop effect is created.
- Page 284 PA31 APST Absolute coordinate system status (Read-only) Bit0: 1 means the absolute position is lost, 0 means normal. Bit1: 1 means low battery voltage, 0 means normal. 0000h Bit2: 1 means the absolute revolution number overflows, 0 means normal 001Fh Bit3: reserved (0) Bit4: 1 means the absolute coordinate has not been set.
- Page 285 Abbr. Parameter function and description Mode Default Range Unit PA35 FNO1 Function option 1 set torque and motor output direction In absolute system, when x of PA35 is changed, homing must be performed after power cycling. y: speed control direction definition y=0: the motor runs forwardly when ST1 is ON.
- Page 286 Abbr. Parameter function and description Mode Default Range Unit PA36 FNO2 Function option 2(reserved for factory test only) 0000h 0000h PA37 FNO3 Function option 3(reserved for factory test only) FFFFh PA38 AOP3 One-touch tuning function option. x: auto gain tuning function x=0: disabled.
- Page 287 Abbr. Parameter function and description Mode Default Range Unit PA39 POL Motor rotation direction option The relation among motor rotation direction, input command pulse train rotation direction and encoder output pulse direction. 0 z y x x: the input pulse command and motor rotation direction option Rotation direction of servo motor Setting...
- Page 288 PA41 Max. speed output setting of encoder POSPD According to the application of the motor, the user sets the actual maximum speed that would be 6300 reached, if the speed exceeds the setting, AL.30 will mm/s occur. 6500 Note: when PA41 set to 0, it indicates this function is disabled.
- Page 289 PA43 ENT Encoder resolution(This is an internal parameter which is for factory test only) PA44 EGM Electronic gear ratio option PA44 = 0: E-Gear ratio is default value(PA06/PA07). PA44 = 1: E-Gear ratio conversion is 1,(use position command pulse number setting per revolution (PA45)).
- Page 290 No Abbr. Parameter function and description Mode Default Range Unit PA45 FBP Position command pulse number setting per revolution. (▲) Pr,Pt 10000 pulse When PA44 = 1, this parameter can set the position command pulse number per revolution. PA46 ATST One-touch tuning operation(Reserved for factory 0000h test only) 0000h...
- Page 291 No Abbr. Parameter function and description Mode Default Range Unit PA50 Homing-Torque attained time setting HMTQT 2000 2000 PB01 NHF1 Frequency of machine resonance suppression filter 1 This parameter is to set the frequency of machine resonance suppression filter 1. The schematic diagram is as follows: 1000 4000...
- Page 292 No Abbr. Parameter function and description Mode Default Range Unit PB04 PST Position command filter time constant This parameter is to set the filter time constant of position command. With an appropriate setting, the motor can run smoothly when the servo drive encounters sudden change...
- Page 293 No Abbr. Parameter function and description Mode Default Range Unit PB07 PG1 Position loop gain Increasing the position control gain can improve the traceability to position command and reduce Pt,Pr rad/s the position errors. But too large setting value may 1024 cause noise and vibration.
- Page 294 rotation speed >= CDS setting. x=5: perform gain switching when CDP is OFF. x=6: perform gain switching when position command frequency <= CDS setting x=7: perform gain switching when position error pulse <= CDS setting x=8: perform gain switching when servo motor rotation speed <= CDS setting PB12 CDS Gain switching condition value kpps...
- Page 295 PB18 SFLT Speed command low-pass filter smooth time constant Increasing time constant will smooth the speed command curve, but it will slow down the response. Note: 0 means this function is disabled. 1000 The actual time to catch the speed command is around 5 times of SFLT.
- Page 296 Abbr. Parameter function and description Mode Default Range Unit PB20 SJIT Speed feedback filter time constant This parameter is to set speed feedback filter time 0.1ms constant. 1000 PB21 NHF2 Frequency of machine resonance suppression 1000 filter 2 This parameter is to set the frequency of machine resonance suppression filter, and the usage is 4000 same as PB01.
- Page 297 PB26 NHD3 Attenuation of machine resonance suppression filter 3 This parameter is to set attenuation rate of machine resonance suppression filter and it should use together with NHF3. Note: 0: turn off Notch filter function PB27 ANCF Auto resonance suppression mode setting 0: fixed.
- Page 298 PB30 VCL Low-frequency vibration detection level setting. When automatic low-frequency vibration suppression is enabled (PB29=1), the system will search automatically. Decreasing the PB30 setting value will increase the detection sensitivity, but it is easy to misjudge noise or other non-main low- pulse frequency vibration as vibration suppression 8000...
- Page 299 No Abbr. Parameter function and description Mode Default Range Unit PB33 VSF2 Low-frequency vibration suppression frequency 2 To set the frequency 2 of low-frequency vibration suppression. 0.1Hz Note: when PB33 is 0, it means the 2nd group of 3000 low-frequency vibration suppression filter is off. PB34 VSG2 Low frequency vibration suppression gain 2 To set the second group of low-frequency vibration suppression gain.
- Page 300 PB39 SVP Synchronous speed control gain: (▲) Increase the synchronous speed control gain to enhance the speed following between two motors. rad/s If the value is too high, it may cause vibration and 8191 noise. PB40 SVI Synchronous speed integral compensation: (▲) Increase synchronous...
- Page 301 No Abbr. Parameter function and description Mode Default Range Unit PB42 SBW Synchronous control bandwidth: (▲) If you are unsure about PB39~PB41 setting, set the value of synchronous control bandwidth instead so that the value corresponds to PB39~PB41. When the deviation between the synchronous control bandwidth and the servo bandwidth is greater, the synchronous following will be better.
- Page 302 PB46 NHD4 Attenuation of machine resonance suppression filter 4 This parameter is to set attenuation rate of machine resonance suppression filter and it should use together with NHF4. Note: 0: turn off Notch filter function. PB47 NHF5 Frequency of machine resonance suppression filter 5 1000 This parameter is to set the frequency of machine...
- Page 303 No Abbr. Parameter function and description Mode Default Range Unit PB51 NHW Width of machine resonance suppression filter 1: This parameter is to set the first group of machine resonance suppression filter width. Note1: if PB02=0, this function is disabled. Note2: PB01, PB02 and PB51 are the first group of machine resonance suppression filter related parameters.
- Page 304 PB55 NHW5 Width of machine resonance suppression filter 5: This parameter is to set the 5th group of machine resonance suppression filter width. Note1: if PB47=0, this function is disabled. Note2: PB46, PB47 and PB55 are 5th group of machine resonance suppression filter related parameters.
- Page 305 No Abbr. Parameter function and description Mode Default Range Unit PC01 STA Acceleration time constant The acceleration time is required when the motor accelerates from 0 rpm to the rated motor speed, which is defined as the acceleration time constant. For example, if the servo motor rated speed is 3000 rpm, this parameter is set to 3000(3s).
- Page 306 the S curve can be added, and there will be a slight deviation in the acceleration/deceleration time. The time of motor accelerate to rated speed = STA + STC. The time of motor decelerate from the rated speed to 0 = STB + STC. PC04 JOG JOG speed command This parameter is JOG speed setting in JOG operation mode.
- Page 307 value is the maximum motor speed. PC08 SC4 Internal speed command 4(Limit 4) In speed control mode, this parameter is used as -6000 internal speed command 4. In torque control mode, this parameter is used as mm/s speed limit 4 and without direction. 6000 Note: the maximum internal speed command value is the maximum motor speed.
- Page 308 No Abbr. Parameter function and description Mode Default Range Unit PC12 VCM Maximum motor speed for analog speed command (▲) Set the motor speed corresponding to 10V (maximum voltage) for the analog speed command. Speed mode: Speed control command = Setting value*input 3000 mm/s 30000...
- Page 309 No Abbr. Parameter function and description Mode Default Range Unit PC14 MOD Analog monitor output: Set the analog monitor output signal, and there are 2 output channels: ch1 and ch2 0 ch2 0 ch1 The setting value of Ch1 and Ch2, and its corresponding output are as follows: 0: motor speed(±10V/2 times rated speed) 0000h...
- Page 310 No Abbr. Parameter function and description Mode Default Range Unit PC17 ZSP Zero speed range: Set the zero speed signal output speed range. If the forward/reverse rotation motor speed is lower mm/s than this parameter setting value, the DO:ZSP will be 10000 PC18 COP1 Stop option and power interruption &...
- Page 311 y=1: motor stops immediately when warning occurs z: set the panel display status after alarm is cleared. z=0: the display stays in alarm screen after alarm is cleared(AL--). z=1: the display go back to the former screen after alarm is cleared. PC20 SNO Servo drive communication device number During communication different device number must...
- Page 312 x=5: 8,O,1 (Modbus, ASCII) x=6: 8,N,2 (Modbus, RTU) x=7: 8,E,1 (Modbus, RTU) x=8: 8,O,1 (Modbus, RTU) y: RS-485 communication speed setting y=0: 4800bps y=1: 9600bps y=2: 19200bps y=3: 38400bps y=4: 57600bps y=5: 115200bps PC23 SIC Serial communication timeout option Time-out duration could be set from 1 to 60 seconds. Note: if it is set to 0, the timeout checking function is disabled.
- Page 313 No Abbr. Parameter function and description Mode Default Range Unit PC24 DMD Drive status display option x: display option after power on(hexadecimal) x=0: motor feedback pulse number (high 5-digit) (before E-Gear ratio) x=1: motor feedback pulse number (low 5-digit) (before E-Gear ratio) x=2: input number of pulse commands (high 5- digit) (before E-Gear ratio) x=3: input number of pulse commands (low 5-...
- Page 314 y: status display according to the control mode after power on y=1: status is displayed according setting value of PC24.x. y=0: the drive status is displayed according to the control mode, and the display status in different control modes is shown in the following table. The drive status Control mode displayed after power...
- Page 315 No Abbr. Parameter function and description Mode Default Range Unit PC25 TL2 Internal torque limit 2 The setting description is the same as PA05. In addition, when using the internal parameter torque limit together with external input signals TL and TL1, different torque limits can be selected.
- Page 316 No Abbr. Parameter function and description Mode Default Range Unit PC31 MOG2 Analog monitor MON2 output proportion: This parameter is to set the maximum proportion of 1~100 analog monitor MON2 output, its function is same as PC30. PC32 CMX2 Electronic gear numerator 2 To set the 2nd group of electronic gear numerator.
- Page 317 PC36 VC/VLA speed voltage linear filter time constant: VMFT PC36 is the moving filter and PB18 is the low-pass filter and. The difference between them is the moving filter can smooth the beginning and end of the step command, while the low-pass filter can only smooth the end of command.
- Page 318 No Abbr. Parameter function and description Mode Default Range Unit PC39 LPS Low-pass filter option 0000h 0 0 0 x 0000h 0: PB03 will be automatically adjusted according to response level setting(invalid when PA02=0) 0001h 1: PB03 need to be set manually. PC40 MBR2 The delay time to release electromagnetic brake MBR when Servo ON.
- Page 319 No Abbr. Parameter function and description Mode Default Range Unit PC44 CACT Capture: activate control: (■) u z y x x(HEX): activate Capture x.bit3 x.bit2 x.bit1 x.bit0 x.Bit0 = 1 Start capturing; after capturing is complete, this bit is set to 0 automatically. PC43>0, the capturing data quantity decrease to 0.
- Page 320 No Abbr. Parameter function and description Mode Default Range Unit PC45 CPRS Capture: reset position after first data captured 10737 Please refer to PC44x. Bit1 description. 41823 Source Note: pay attention to upper limit of the maximum pulse and minimum values when setting this parameter. 10737 41823 PC46 CPMK Capture: masking range...
- Page 321 the value of this parameter. In this case, set PC50.Y to 0 and then to 2 to reset this parameter to the motor feedback position. PC49 CMNO Compare: number of comparing times: (■) When CMP is stopped (PC44 x.Bit0 = 0), the parameter indicates the number of data expected to be compared (readable and writable).
- Page 322 When the last data is compared, clear the PC48 position information to avoid the cumulative error of the first data and the last data. y: source option of Compare y=0: capture axis y=1: auxiliary encoder y=2: motor feedback position y=3: CN1 (pulse command) Note: when the source of Compare is the Capture axis, the source of Capture cannot be changed.
- Page 323 No Abbr. Parameter function and description Mode Default Range Unit PC51 Compare: data shift: CMOF1 -1000 CMP data array, plus PC51 value and PC52 value 0000 are actual compare data. Source The actual data array for comparison =the original pulse comparison data array+PC51+PC52.
- Page 324 No Abbr. Parameter function and description Mode Default Range Unit PC55 CPEX Capture/Compare additional function setting: 0 z y x: CAP other functions x=1: when the CAP is completed, it will not be turned off, however, it will be performed the next cycle operation automatically, and the data 0000h captured by the CAP will still be saved in PC41!
- Page 325 PC57 CSDS Maximum correction rate for synchronous Capture axis: This parameter limits the correction percentage (%) of the synchronous Capture axis. Correction rate = Pulse number output by the synchronous axis / Pulse number input by the synchronous axis. (100 – PC57)% < Correction rate < (100 + PC57)% Correction Synchronous...
- Page 326 PC60 ECMN E-Cam: segment number (N): Indicates that the E-Cam curve is divided into N segments, and the table includes N+1 data. (PC92 - PC59) PC60 × PC62 Note: this parameter is only writable when E-Cam stops (PC66x=0). PC61 ECMM E-Cam: cycle number (M): When source axis receives the pulse number P from the master axis, E-Cam rotates the M cycles defined by PC61.
- Page 327 PC65 PLED1 E-Cam: initial lead pulse before engaged: When the condition to engage E-Cam (PC66z) is met, the pulse number from the master axis has to exceed the value of this parameter for the E-Cam to fully engage. The pulse from the master axis will be Pulse neglected if the initial lead pulse is not reached.
- Page 328 y=1: auxiliary encoder y=2: PR command y=3: time axis (1 ms) y=4: CN1 (pulse command) y=5: synchronous Capture axis (PC53) y=6: analog voltage command (unit: 1M pulse/s per 10V) z: engagement condition (Multiple choice is not allowed) z=0: immediately z=1: DI.CAM trigger z=2: any one position data is captured, trigger by hardware, and which is applicable to engage the working master axis.
- Page 329 Cam function is disabled. ba: disengaged type when the disengagement condition (PC66 u = 2, 4, met, PR(hexadecimal) executed automatically; its number is 00~3F(00 indicates not to continue with a PR command). d: E-Cam engagement status (read-only) d=0: stopped d=1: engaged d=2: pre-engaged PC67 ECRD E-Cam: pulse number upon disengagement Pulse...
- Page 330 PC69 CPCL E-Cam phase compensation-master axis minimum frequency setting: 32767 Kpps Refer to parameter PC68 description for detail. 32767 PC70 E-Cam segment 1 rising-edge phase setting : CMAP1 This parameter is to set E-Cam digital 0~360 Degree output(DO:CAM_AREA) rising-edge phase when E-Cam is engaged.
- Page 331 pulse. PC75 TQ1 Internal torque command 1 -300~ The first internal torque command(100% indicates rated torque) PC76 TQ2 Internal torque command 2 -300~ The 2nd internal torque command(100% indicates rated torque) PC77 TQ3 Internal torque command 3 -300~ The 3rd internal torque command(100% indicates rated torque) PC78 CXFT Filter setting for synchronous capture axis Correction u z y x...
- Page 332 rate and previous error is within the yx set range. (Note: if either z or yx =0, the filter is invalid) No Abbr. Parameter function and description Mode Default Range Unit PC79 ALOP E-Cam alignment: operate condition setting: d c b a u z y x yx: range of filter(0~95%) When DI: ALGN is triggered, the E-Cam phase alignment function is enabled, and the system will...
- Page 333 numbers is not stored in PR. dc: masking range (%) When DI:ALGN is triggered, the next alignment action is allowed only after the increasing pulses of the master axis are greater than the masking distance (M). M ≥ (PC62/PC61) x PC79.dc%. Note: this masking function only allows forward pulse input and does not work for reverse pulse input.
- Page 334 PC82 ALCT E-Cam alignment: control switch: z y x x: E-Cam alignment control Reverse Trigger PR Enable alignment immediately alignment 1: enable. 1: enable. 1: enable. Set this bit The E-Cam When to 1 if the displacement alignment mark is on value is stored in the enabled,...
- Page 335 large amounts of correction during E-Cam alignment. This can also make the operation more stable by avoiding disturbances caused by sensor noise. Note1. y=0 filter is disabled. Note 2: if the setting is too large, the alignment correction cannot performed. recommended value is 3.
- Page 336 No Abbr. Parameter function and description Mode Default Range Unit PC83 CMSK E-Cam master axis pulse masking setting u z y x x: pulse masking function of master axis / pulse input method of master axis Description Slave axis is driven by the actual master axis pulse.
- Page 337 No Abbr. Parameter function and description Mode Default Range Unit Functi Description Slave axis is driven by the actual master axis pulse and the master axis pulse continues to stored internal variable. Command source is frequency transmitted actual master axis (PC66.y) plus virtual pulse frequency...
- Page 338 No Abbr. Parameter function and description Mode Default Range Unit y: masking pulse / virtual pulse correction initial lead setting Function Description Function Virtual pulse number is not written disabled to initial lead pulse(PC65). Write the Write the virtual pulse number to 0→1 lead Initial lead pulse(PC65).
- Page 339 Example: Initiate masking of the actual uzyx = 0x0001 pulse of master axis Continuous forward running uzyx = 0x1402 of master axis at 20 Kpps Continuous reverse running uzyx = 0x2003 of master axis at 32 Kpps Forward JOG of master axis uzyx = 0xFF04 for 255 pulses Reverse JOG of master axis...
- Page 340 No Abbr. Parameter function and description Mode Default Range Unit PC84 CSDS Motion control macro command: command parameter#4: Before executing the macro command, you should set the relevant parameters #4 in advance. FFFFF The function of the parameter is determined by the FFFh macro command.
- Page 341 No Abbr. Parameter function and description Mode Default Range Unit PC88 CSDS Motion control macro command: issue command / read execution result: Write: to issue a macro command (0CBAh). Read: to examine the execution result of a macro command(1CBAh is returned if successful). If you issue command 0001: 1:1001h is returned if successful 099Fh...
- Page 342 PC88 CSDS Command code Create E-Cam table: rotary shear (with synchronous zone) 0006h PC59=Start address ( data array). General PC60=7(this macro is fixed to 7 segments, 8 points.) parameters PA06, PA07 E-Gear ratio need to be set firstly. PC85= A(number of teeth on the motor) x C(cutting count) PC86= B (number of teeth on the cutter) PC87= 1000000 * R * V In which:...
- Page 343 No Abbr. Parameter function and description PC88 CSDS Command code Create E-Cam table: rotary shear (adjustable synchronous 0007h speed zone) PC59 = Start address ( data array) General PC60 = N(30~72)(E-Cam segment number) parameters PA06,PA07 E-Gear ratio need to be set firstly. PC84.H16(high word)(Hex) = S(S-curve smoothing level, range 1 - 4) PC84.L16(low word)(Hex) = W(degree of waiting zone,...
- Page 344 No Abbr. Parameter function and description PC88 CSDS Command Create E-Cam table: rotary shear (adjustable synchronous code 0007h speed zone) 1. This macro automatically calculates the data for the E-Cam table according to the macro parameters, and stores them in the data array specified by PC59. 2.
- Page 345 No Abbr. Parameter function and description PC88 CSDS Command E-Cam curve scaling (PC96) is effective once immediately code 0008h Macro parameter 1. If this macro is triggered, the E-Cam scaling (PC96) becomes effective once immediately when the E-Cam is engaged. 2.
- Page 346 No Abbr. Parameter function and description PC88 CSDS Command Change engaged X position: rotates in forward direction until code 000Ch disengagement condition is met General parameter Macro PC84=new master axis engaged X position(unit: pulse number parameter of master axis) This macro command can change the engaged position immediately even when the E-Cam is engaged, and it will also automatically calculate the remaining engaged length and disengage the E-Cam after rotating one cycle (360°) in the forward direction.
- Page 347 No Abbr. Parameter function and description PC88 CSDS Command Calculate the error between the current position of the E-Cam code 000Dh and indexing coordinates for PR positioning General parameters PC84 = dcba : uzyx(HEX) yx (PR number): 0~0x3F, invalid when value is 0! uz: must set to0...
- Page 348 PC88 CSDS one cycle of E-Cam one cycle of Indexing moving Indexing distance coordin when slave axis movi ng operates distance one cycle E-Cam current position Maximum forward rotation limit Allowable forward rate = If target position is within this range; onwar d trip is in forward direction onward maximum path If target position is within this range;...
- Page 349 Failure code when this macro command is executed, E-Cam is not in F0D1h engaged status. Failure code PC84yx, PR number exceeds the range (1~0x3F). F0D2h Failure code PC86 avoid point or allowable forward rate exceeds the range F0D3h (0 - 100%). Failure code Position correction value does not exist.
- Page 350 No Abbr. Parameter function and description PC88 CSDS Command E-Cam displacement value for PR positioning code 000Eh PC84 = dcba:uzyx(HEX) yx (PR number): 0 ~ 0x3F, invalid when value is 0! uz (maximum allowable alignment correction rate): 0 ~ 0x64 (%) a (triggering specified PR): a = 0: manual trigger.
- Page 351 PC84.uz , which is to limit the maximum allowable correction rate. After replacement, the alignment target is different from PC87. |target position – current position| / (PC62/PC61) <= PC84.uz [%] PC85: this parameter can use for DI time delay compensation, to overcome the deviation at different speed.
- Page 352 No Abbr. Parameter function and description PC88 CSDS Command Calculate the moving distance between the current and target code 000Fh position of the E-Cam for PR positioning General parameter PC84 = dcba:uzyx(HEX) yx(PR number of onward trip): 0~0x3F, invalid when value is 0! uz(PR number of return trip): Macro 0~0x3F, invalid when value is 0!
- Page 353 Failure code When this macro command is executed, E-Cam is not in F0F1h engaged status Failure code PC84.yx , PR onward number exceeds the range: 0~0x3F F0F2h Failure code PC84.uz, PR returning number exceeds the range: 0~0x3F F0F3h Failure code PC86 allowable forward rate exceeds the range: 0~100% F0F5h Failure code...
- Page 354 Abbr. Parameter function and description PC88 CSDS Command code E-Cam immediately pauses for one cycle, and resume 0010h operation in next cycle. General parameter Macro parameter PC84 must set to 0. After the E-Cam is engaged, this macro command can immediately pause the slave axis for one cycle regardless of the current E-Cam angle(one cycle means a 360°...
- Page 355 No Abbr. Parameter function and description Mode Default Range Unit PC89 SPF1 PR special filter setting: u z y x yx: the acceleration time limit PC89.yx = 00: invalid PC89.yx = 1~7F: acceleration time limit: yx * 10[ms] With acceleration time limit(0~1270 ms), if the PR(E- Cam) command changes too drastically, it will cause mechanical vibration and jeopardize the production.
- Page 356 No Abbr. Parameter function and description Mode Default Range Unit PC89 SPF1 z: reserved u: reverse inhibit PC89.u = 0: disabled. PC89.u = 1: enabled. When this function is enabled, the reverse command is inhibited and saved inside. When the value of forward rotation exceeds this reverse value, the forward command output is generated.
- Page 357 No. Abbr. Parameter function and description Mode Default Range Unit PC90 IDXS Indexing coordinates total stroke: Sets the scale of the indexing coordinates, indexing command position, and indexing feedback position. If the value is too small, it may cause errors in the 100000 Pulse indexing coordinates.
- Page 358 No. Abbr. Parameter function and description Mode Default Range Unit PC96 TBS E-Cam: curve scaling: Modifying this parameter to magnify or reduce the E- Cam table without changing the values. Example: when the data in the table is 0, 10, 20, 30, 40, 20, and the scaling is set to 2.000000, which is equal to the data: 0, 20, 40, 60, 80, 40, with the 214700...
- Page 359 No. Abbr. Parameter function and description Mode Default Range Unit PD01 DIA1 Input signal automatic ON option u (EMG) z (LSN) y (LSP) x (SON) x=0: the open/short status of SON-SG is controlled by the external circuit of the drive. x=1: SON-SG is auto short-circuited internally without external wiring.
- Page 360 No. Abbr. Parameter function and description Mode Default Range Unit PD04 DI3 Input signal option 3 To define the function of CN1-16 pin input signal. 0000h CN1-16 can be assigned for any input signal, its 0003h parameter setting method is same as PD02, you can 002Fh refer to PD02 setting description.
- Page 361 PD09 DI8 Input signal option 8 To define the function of CN1-21 pin input signal. 0000h CN1-21 can be assigned for any input signal, its 0011h parameter setting method is same as PD02, you can 002Fh refer to PD02 setting description. PD10 DO1 Output signal option 1 0000h...
- Page 362 No. Abbr. Parameter function and description Mode Default Range Unit PD14 DO5 Output signal option 5 0000h To define the function of CN1-45 pin output signal. 0001h CN1-45 pin can be assigned to any output signal, its parameter setting is the same as PD10, you can 002Fh refer to PD10 setting description.
- Page 363 No. Abbr. Parameter function and description Mode Default Range Unit PD18 DOP2 CR signal clear setting 0 0 0 x x=0: to clear the position pulse error. When CR is triggered at the rising edge, the position pulse error of drive will be cleared to 0 (Pt mode). x=1: to clear the position pulse error.
- Page 364 No. Abbr. Parameter function and description Mode Default Range Unit PD19 DOP3 Alarm code output option: 0 0 0 x Pin number x setting CN1-41 CN1-42 CN1-45 function function function Output an alarm code when an alarm occurs Note: DO function is determined by PD10 ~ PD14 setting.
- Page 365 PD20 DOP4 Operation option when the alarm reset signal is short- circuited. 0000h 0 0 0 x 0000h x=0: PWM signal is off(SERVO ON is disabled) 0001h x=1: PWM power is on(SERVO ON is enabled) PD21 DI9 Input signal option 9 To define the function of CN1-22 pin input signal.
- Page 366 No Abbr. Parameter function and description Mode Default Range Unit PD25 ITST Communication control DI status(HEX): (■) To determine the DI contact status(12 points in total) by bit setting method. Bit 0~11 of PD25 is correspond to DI1~DI12. In binary bits: 0: DI is OFF 1: DI is ON.
- Page 367 Example 2: The external hardware terminals DI12~DI1 are represented by bit11~bit0 in binary values. Bit11~bit0 indicates DI12~DI1 (from left to right). contact source control switch (PD16): 111111000000. external hardware terminal status: 111100001111 (1 means ON, 0 means OFF) Communication control digital input contact...
- Page 368 No Abbr. Parameter function and description Mode Default Range Unit PD26 DO6 Output signal option 6 To define the function of CN1-46 pin output signal. CN1-46 pin can be assigned to any output signal, its parameter setting is the same as PD10, you can refer to PD10 setting description.
- Page 369 No Abbr. Parameter function and description Mode Default Range Unit PD28 Operation option of DO: MC_OK MCOK 0 0 y x x=0: output status is not retained. x=1: output status is retained. y=0: disable position deviation alarm AL.1B. y=1: enable position deviation alarm AL.1B. 0000h 0000h 0011h...
- Page 370 7. Either signal 5 or signal 6 can be output, and the choice is specified in PD28. X. 8. Position deviation: when event 7 occurs, if signal 4 (or 5) is off, it means the position has deviated and AL.1B can be triggered. Note: set whether to enable this alarm with PD28.Y.
- Page 371 PD31 OTST DO communication control contact status(HEX): (■) If DO is controlled by parameter, PD31 can determine DO contact status(6 contacts). Bit0~Bit5 corresponds to DO1~DO6. 0000h Turret 0=DO contact is off. 0000h mode 1=DO contact is on. 003Fh Note, you can refer to PD25 setting. PD32 SDLY Servo ON delay time when SON is ON.
- Page 372 No Abbr. Parameter function and description Mode Default Range Unit PD34 DIS1 DI uninterruptible power switch function d c b a u z y x The 1st group of uninterruptible power uzyx: switch DI Set the 1st group of switchable DI code Set the 1st group of switchable DI code.
- Page 373 No Abbr. Parameter function and description Mode Default Range Unit PE01 PDEF1 Definition of homing 00000 The detailed parameter definition is as 000h~ 00000000h follows: 10FFF F3Fh 31~28 27~24 23~20 19~16 15~12 11~8 7~0 bit BOOT − − DEC1 PATH 1.PATH: path type(bit0~bit7) 0: Stop: homing complete and stop 1~63:Auto: homing complete and execute the specified path.
- Page 374 No Abbr. Parameter function and description Mode Default Range Unit PE02 PDEF1 Origin definition (−2 31~16 15~0 bit ORG_DEF(32bit) PE03 PDEF1 PATH#1 definition 000000 00h~FF The detailed parameters are defined as 00000000h FFFFFF follows: (bit) 31~28 27~24 23~20 19~16 15~12 11~8 PE03 −...
- Page 375 No Abbr. Parameter function and description Mode Default Range Unit PE04 PDAT1 PATH#1 data (−2 PE03 defines the property of the target point; PE04 defines the target position of (Note2) PE03 or the target jumping PATH_NO. Note: PATH: Program 0~4194304 Note2: using non-indexing...
- Page 376 PE14 PDAT6 PATH#6 data Refer to PE04 Refer to description of PE04. PE15 PDEF7 PATH#7 definition 00000000h 00000000h ~FFFFFFFFh Refer to description of PE03. PE16 PDAT7 PATH#7 data Refer to PE04 Refer to description of PE04. PE17 PDEF8 PATH#8 definition 00000000h 00000000h ~FFFFFFFFh...
- Page 377 Parameter function Abbr. Mode Default Range Unit and description PE20 PDAT9 PATH#9 data Refer to PE04 Refer to description of PE04. PE21 PDEF10 PATH#10 definition 0000000 00000000h~ Refer to description of PE03. FFFFFFFFh PE22 PDAT10 PATH#10 data Refer to PE04 Refer to description of PE04.
- Page 378 PE38 PDAT18 PATH#18 data Refer to PE04 Refer to description of PE04. PE39 PDEF19 PATH#19 definition 0000000 00000000h~ Refer to description of PE03. FFFFFFFFh PE40 PDAT19 PATH#19 data Refer to PE04 Refer to description of PE04. PE41 PDEF20 PATH#20 definition 0000000 00000000h~ Refer to description of PE03.
- Page 379 PE56 PDAT27 PATH#27 data Refer to PE04 Refer to description of PE04. PE57 PDEF28 PATH#28 definition 0000000 00000000h~ Refer to description of PE03. FFFFFFFFh PE58 PDAT28 PATH#28 data Refer to PE04 Refer to description of PE04. PE59 PDEF29 PATH#29 definition 0000000 00000000h~ Refer to description of PE03.
- Page 380 PE74 PDAT36 PATH#36 data Refer to PE04 Refer to description of PE04. PE75 PDEF37 PATH#37 definition 0000000 00000000h~ Refer to description of PE03. FFFFFFFFh PE76 PDAT37 PATH#37 data Refer to PE04 Refer to description of PE04. PE77 PDEF38 PATH#38 definition 0000000 00000000h~ Refer to description of PE03.
- Page 381 Parameter function and Abbr. Mode Default Range Unit description PE92 PDAT45 PATH#45 data Refer to PE04 Refer to description of PE04. PE93 PDEF46 PATH#46 definition 0000000 00000000h~ Refer to description of PE03. FFFFFFFFh PE94 PDAT46 PATH#46 data Refer to PE04 Refer to description of PE04.
- Page 382 Parameter function and Abbr. Mode Default Range Unit description PF01 PDEF49 PATH#49 definition 0000000 00000000h~ Refer to description of PE03. FFFFFFFFh PF02 PDAT49 PATH#49 data Refer to PE04 Refer to description of PE04. PF03 PDEF50 PATH#50 definition 0000000 00000000h~ Refer to description of PE03. FFFFFFFFh PF04 PDAT50 PATH#50 data Refer to PE04...
- Page 383 Parameter function and Abbr. Mode Default Range Unit description PF18 PDAT57 PATH#57 data Refer to PE04 Refer to description of PE04. PF19 PDEF58 PATH#58 definition 0000000 00000000h~ Refer to description of PE03. FFFFFFFFh PF20 PDAT58 PATH#58 data Refer to PE04 Refer to description of PE04.
- Page 384 Abbr. Parameter function and description Mode Default Range Unit PF33 POV1 Speed setting of internal position command 1 rpm, 1~6000 mm/s PF34 POV2 Speed setting of internal position command 2 rpm, 1~6000 mm/s PF35 POV3 Speed setting of internal position command 3 rpm, 1~6000 mm/s...
- Page 386 Parameter function and Abbr. Mode Default Range Unit description PF50 POA2 Acceleration/deceleration time of internal position command 2 1~65550 Refer to description of PF49. PF51 POA3 Acceleration/deceleration time of internal position command 3 1~65550 Refer to description of PF49. PF52 POA4 Acceleration/deceleration time of internal position command 4 1~65550 Refer to description of PF49.
- Page 387 PF62 POV14 Acceleration/deceleration time of internal position command 14 3000 1~65550 Refer to description of PF49. PF63 POV15 Acceleration/deceleration time of internal position command 15 4000 1~65550 Refer to description of PF49. PF64 POV16 Acceleration/deceleration time of internal position command 16 5000 1~65550 Refer to description of PF49.
- Page 388 PF74 DLY10 Delay time 10 after position reached 1500 0~32767 Refer to description of PF65. PF75 DLY11 Delay time 11 after position reached 2000 0~32767 Refer to description of PF65. PF76 DLY12 Delay time 12 after position reached 2300 0~32767 Refer to description of PF65.
- Page 389 Parameter function and Abbr. Default Range Unit Mode description PF81 PDEC Deceleration Pr,Pt, time auto- 00000000h 0 ~ FFF0FFFFh protection The parameter setting is divided into 8 parts(hex), which are D, C, B, A, W, Z, Y, and X: Including: 1.
- Page 390 Parameter function and Abbr. Default Range Unit Mode description PF82 PRCM Pr command trigger register 0~~1000 (■) Set value Function start homing 1 ~ 63 To execute the specified PR procedure, which is the same as using DI:CTRG+POSn 64 ~ 9999 You cannot set to 64 ~ 9999 as the value exceeds the valid range.
- Page 391 Abbr. Parameter function and description Mode Range Unit Default PF83 EVON PR number triggered by event rising edge 0000h 0000h~DDDDh N/A Parameter setting: by UZYX. This parameter is to define the executing PR number when EVx is on. no action when EV1 is on X=1~D execute PR# 51 ~ 63 when EV1 is on no action when EV2 is on...
- Page 392 Abbr. Parameter function and description Mode Range Unit Default PF86 SWLP Positive software limit: In PR mode, if the motor moves in the positive direction and its position command pulse number exceeds the value of PF86, AL14 will occur. −2 (Note: position command is before E-Gear ratio).
- Page 393 PF90 BLSF Backlash compensation option Setting value: 0 ~ 2 0: disable. 1: forward direction compensation . 2: reverse direction compensation PF91 Reserved PF99...
- Page 394 No. Abbr. Parameter function and description Mode Default Range Unit PL01 Motor type 0: Shihlin servo motor(PL group parameter is invalid) 0 ~ 2 N/A 1: permanent-magnet synchronous linear motor (LM) 2: SPM rotary motor (for internal test only) PL02 Motor parameter automatic identification function and current response setting.
- Page 395 x: encoder signal type option 1311h x=0: square wave signal(CN2L) (u bit can set 0 or 1) x=1: Endat 2.2 communication signal(CN2) (When use linear motor and Endat 2.2 Linear scale , u bit can only set to 1) u bit=0: output CN2L A/B/Z signal u bit=1: output virtual ABZ signal according to Endat 2.2.
- Page 396 Example: Suppose PA39 is set to 0100h and PA14 is set to 512, The number of pulses output by the linear motor per PL42 length is (PL42 * 100000 / PL05) / 512 (pulse/PL42[mm]), The number of pulses output per revolution of the rotary motor is the number of pulses per revolution / 512 (pulse/rev).
- Page 397 No. Abbr. Parameter function and description Mode Default Range Unit PL07 Motor UVW and Hall sensor phase sequences: 0 0 y x x: the relation of UVW phase sequence and encoder feedback signal x=0: phase sequence is consistent. x=1 phase sequence is reversed.
- Page 398 No. Abbr. Parameter function and description Mode Default Range Unit PL07 y: the relation of motor UVW phase sequence and Hall sensor y=0: phase sequence is consistent. y=1: phase sequence is reversed.
- Page 399 No. Abbr. Parameter function and description Mode Default Range Unit PL08 Hall sensor offset angle: When the Hall sensor makes hysteresis due to different motion directions of the motor, the U phase zero point of the Hall sensor will be based on the central angle of the hysteresis.
- Page 400 PL10 Electrical angle correction function: x: Z phase correction function x=1: add electrical angle which is trigged by z phase signal with PL11 offset angle. y: check Hall sensor move distance 0x00 y=1: if the deviation between commutation angel detected by Hall sensor and actual electrical angle exceeds 90 degree, AL.55 occurs.
- Page 401 PL13 Initial magnetic field detection condition: 0 0 y x x: minimum move angle of magnetic field During initial magnetic field detection, the move angle of motor magnetic field should exceed x * 0.25 degree. y: motor magnetic field recheck move angle During initial magnetic field detection, motor magnetic field move angle is y * 5degree.
- Page 402 No. Abbr. Parameter function and description Mode Default Range Unit PL16 Current loop proportional gain (kp): When reading PL16, it displays the proportional gain value of auto-adjustment. 0~999 This parameter can be manually adjusted base on 9999 user’s requirement. Increasing the value of PL16 can enhance the current loop bandwidth, and it may cause servo unstable and vibration.
- Page 403 PL20 Overload increase gain: Load ratio Operating time -12.00sec * PL-21 -12.30sec * PL-21 -13.60sec * PL-21 -16.30sec * PL-21 -22.60sec * PL-21 100% 120% 263.8sec * PL-20 140% 35.20sec * PL-20 160% 17.60sec * PL-20 180% 11.20sec * PL-20 200% 8.00sec * PL-20 220%...
- Page 404 No. Abbr. Parameter function and description Mode Default Range Unit The operation time is continuous operation time in different load ratio. When the time exceeds the level, AL.05 will occur. Below picture take load rate 200% as example. If operate the motor base on the above operating cycle, AL.05 will not occur.
- Page 406 No. Abbr. Parameter function and description Mode Range Unit Default PL23 Motor temperature sensor: 0 0 0 x x=0: no motor temperature sensor x=1: use NTC temperature sensor 0 ~ 3 x=2: use PTC temperature sensor x=3: use normally closed temperature switch. Note: Connect the 2 pin of motor temperature sensor to the temperature detection pin of CN2L..
- Page 407 PL26 Motor over temperature release level 100000 PL27 Motor over temperature timeout setting 0~300 PL28 Permanent-magnet rotary motor pole number 2~20 pole PL29 Permanent-magnet rotary motor rated current 0.01A 4000 PL30 Permanent-magnet rotary motor maximum current 0.01A 12000 PL31 Permanent-magnet rotary motor rated speed 3000 6000 PL32...
- Page 408 No. Abbr. Parameter function and description Mode Range Unit Default PL38 Pulse loss detection function: 0: disable 0 ~ 1 1: when encoder type is square wave(PL04.x = 0), it is enabled. PL39 Pulse loss detection threshold: When PL38 = 1 and the Z phase signal is output for the first time, every two Z pulse interval must meet the following two conditions, otherwise AL.57 will be triggered.
- Page 409 No. Abbr. Parameter function and description Mode Range Unit Default PL44 Linear motor maximum current 0.01A 12000 PL45 Linear motor maximum speed 5000 mm/s 15999 0.01N PL46 Linear motor force constant 177362 0.001 PL47 Linear motor phase resistance 100000 0.01 PL48 Linear motor phase inductance 65189...
- Page 410 Table 8.1 Digital input (DI) descriptions Setting DI name Description value 0x01 When this signal is turned on, the servo is on. When alarm occurs, some of alarm can be released by turning on this 0x02 signal. When this signal is on, it switches the speed controller from proportion 0x03 integral type to proportion type.
- Page 411 POS3 0x15 Position command option 3 in internal register position mode. When this signal is on, it triggers operation command of internal register CTRG 0x16 position mode. Limit of forward rotation. 0x18 0x19 Limit of reverse rotation. POS4 0x1A Position command option 4 in internal register position mode. POS5 0x1B Position command option 5 in internal register position mode.
- Page 412 Table 8.2 Digital output (DO) descriptions Setting Description name value 0x01 When servo is on and ready to operate, RD-SG is short-circuited. ALM-SG is open-circuited when power is off or activating protection circuit makes main circuit open. 0x02 If no alarm occurs, ALM-SG is short-circuited 1 second after power is In position mode, INP-SG is short-circuited when deviation pulse number is in the positioning range.
- Page 413 this DO is on, otherwise, it is off. When position command is smaller than software reverse limit(PF87), SWNL 0x0E this DO is on, otherwise, it is off. The related alarms of Delta absolute encoders will be indicated by this ABSW 0x0F DO output When the position of the Mitsubishi absolute system is lost, ABSV is on.
-
Page 414: Communication Function
9. Communication function 9.1 Communication hardware interface and wiring This servo drive has the serial communication function of RS-485 and plug-and-play universal USB. By using this function, it can drive the servo system, change parameters and monitor the status of the servo system. However, RS-485 and USB communication functions cannot be used at the same time, and the wiring instructions of RS485 and USB are as follows: RS-485 (1) External schematic diagram... - Page 415 (2) Wiring diagram Recommendation: if the communication is likely to be interrupted, you can short circuit the GND of the communication device (or the terminal with the same communication protocol such as HMI) and the GND (PIN8) of the servo controller CN3 to reduce communication failure.
- Page 416 (1) External schematic diagram Please use standard Mini-USB cable. It is recommended to use the USB cable with a magnetic ring, which has stronger anti-interference function. CHARGE SDP-010A2C...
-
Page 417: Communication Specifications
9.2 Communication specifications. When using RS-485 communication function to operate servo drive, the communication specifications of SERVO AMP are as follows: (1) Device number setting (PC20) Refer to PC20 and its setting range is 1~32. (2) Communication response delay time(PC21) x=0: delay time is within 1ms, x=1: delay time is over 1ms (3) Communication protocol option (PC22) -
Page 418: Modbus Communication Protocol
9.3 Modbus communication protocol To communicate with the computer, each servo drive must set its device number(PC20) firstly, and then the computer controls the individual servo drives according to the device number. The communication method is MODBUS Networks, and there are two mode of MODBUS network communication: ASCII (American Standard Code for Information Interchange) and RTU (Remote Terminal Unit). - Page 419 10 bit frame structure (for 7-bit data length) (c)Communication data structure Bit code Name Description Start character ‟:” (3AH) of ASCII. Device number 1 byte consists of 2 ASCII codes Function code 1 byte consists of 2 ASCII codes DATA(n-1) ………...
- Page 420 End1 End code 1 (0DH) of ASCII (CR) End0 End code 0 0AH of ASCII (LF) The detailed descriptions in the communication data format box are as follows: STX(Communication start) ’:’ Character ADR(Communication device number) Communication device number is 1~32. For example: if communicate with the servo drive in device number 18 (hexadecimal 12H): ADR=’1’,’2’...
- Page 421 2nd data address 0101H End1 0DH(CR) LRC check End1 0DH(CR) End0 0AH(LF) End0 0AH(LF) Example 2: function code 06H, writing 1 single word For example: write 325 (0145H) to the starting address 0100H of the servo drive with device number 01H. Command message( Host) Response message( Slave) Start data...
- Page 422 Example 3 : function code 10H, writing multiple words Example: write the data of 2 byte groups 0BB8H and 0000H to the starting address 0112H of the servo drive with device number 01H.That is, 0BB8H is written to 0112H and 0000H is written to 0113H.
- Page 423 LRC error check(ASCII mode) The error check in ASCII mode is LRC (Longitudinal Redundancy Check). To calculate the LRC value: add all the data from ADR to the last one, take the result by using 256 as the unit, and the excess part is removed(for example, the result obtained after adding is 128H in hexadecimal, then only 28H is taken), and then calculate complement of 2.
-
Page 424: Rtu Mode
9.3.1 RTU mode (a) Code description. Each 8-bit data consists of two 4-bit hexadecimal characters. For example: 1-byte data is expressed as 62H. (b) Communication data structure Data frame is as below: Bit code Name Content Start word To keep an idle more than 6mS Device 1 byte number... - Page 425 Example 1: function code: 03h, reading N words. The maximum allowable data(N) in one single access is 29, for example: read 2 words consecutively from the start address 0200H of the servo drive device number 01H. Command message(Host) Response message(Slave) Data quantity(byte) 00H(high byte)
- Page 426 Example 3 : function code 10H, writing multiple words. Write the data of 2 byte groups 0BB8H and 0000H to the starting address 0112H of the servo drive with device number 01H, that is, 0BB8H is written to 0112H and 0000H is written to 0113H. The maximum allowable data in one single access is 10.
- Page 427 Note: after calculating the CRC error check value, fill in the low byte of the CRC value in the command message first, and then fill in CRC high byte. Please refer to below example: Example: read 2 words from the start address 0101H of the servo drive with device number 01H.
- Page 428 if( reg_crc & 0x01 ) /*LSB(bit 0 ) = 1 */ reg_crc = (reg_crc >> 1)^0xA001; else reg_crc = (reg_crc>>1); return reg_crc; (c) Function code and error code. The function code and error code of the servo drive is introduced as follows: Function code Description Read parameter Read-only parameter(Read-only)
- Page 429 Error code 02H indicates the received parameter address is wrong. The parameter address range should be within 0x0000~0x20FF. Error code 03H indicates the received parameter value is out of range, The parameter value range is mainly judged as follows: 1. Check whether the number of read data exceeds the range and current data (word) ranges is from 1 to 29 words.
-
Page 430: Write And Read Communication Parameters
9.4 Write and read communication parameters. (1) Status monitor(Read-only) Communication Data Content address length 0x0000 Motor feedback pulses (after E-Gear ratio) [pulse] 2word Input number of pulse commands (before E-Gear 2word 0x0002 ratio)[pulse] 0x0004 Number of pulses error(after E-Gear ratio) [pulse] 2word 0x0006 Pulse command input frequency [Hz]... - Page 431 0x0016 DC bus voltage [V] 2word 0x0018 Load to motor inertia ratio [times] (Display 1 decimal point) 2word 0x001A Instantaneous torque [%] 2word 0x001C Regeneration load ratio [%] 2word The motor feedback pulse number of full-closed encoder 2word 0x001E [pulse] 0x0020 Z phase offset [pulse] (Note 1) 2word...
- Page 432 (2) Digital IO monitor(Read-only) (a) IO pin status Communication Data Content address length 0x0204 To show the ON/OFF status of DI pin, the pin assignment 1word is as follows Bit7 Bit6 Bit5 Bit4 Bit3 Bit2 Bit1 Bit0 Bit number DI1 Pin number Bit15 Bit14 Bit13 Bit12 Bit11 Bit10 Bit9 Bit8 Bit number DI12 DI11 DI10 DI9 Pin number...
- Page 433 IO pin function Communication Data Content address length 0x0206~0x020D Display the current DI/DO pin function definition, the pin 1word assignment is as follows. Note: if DI/DO functions are not applicable to the current control mode, it will return 0. Example: if in speed control mode currently, PD07=0x000B, then the bit0~bit7 of Address 0x0208 will return 0.
- Page 434 Address: 0x020B Bit0~bit7 Bit8~Bit15 Bit number DI11 DI12 Pin number 0x00~0x2F 0x00~0x2F Function code Address: 0x020C Bit8~bit15 Bit0~bit7 Bit number Pin number 0x00~0x3F 0x00~0x3F Function code Address: 0x020D Bit8~bit15 Bit0~bit7 Bit number Pin number 0x00~0x3F 0x00~0x3F Function code Address: 0x020E Bit8~bit15 Bit0~bit7 Bit number Pin number...
- Page 435 Note 1: the DI function selection definition table is as follows: 0x07 0x06 0x05 0x04 0x03 0x02 0x01 0x00 Function code Signal 0x0F 0x0E 0x0D 0x0C 0x0B 0x0A 0x09 0x08 Function code SHOM ORGP ST2/RS1 ST1/RS2 Signal 0x17 0x16 0x15 0x14 0x13 0x12...
- Page 436 0x0106 The 6th alarm in the past 1word 0x0107 The 7th alarm in the past 1word 0x0108 The 8th alarm in the past 1word 0x0109 The 9th alarm in the past 1word 0x010A The 10th alarm in the past 1word 0x010B Alarm occurrence...
- Page 437 If “0x1EA5” is written to this address, it will clear all the alarm 1word record and occurrence time. 0x0131 When reading this address, it will return the last alarm record. The setting range is 0~0xFFFF. (5)Parameter reading and writing (readable and writable) Communication Data Content...
- Page 438 (6) Reset to the factory default value(readable and writable) Communication Data Content address length After writing data 0x1EA5 to this address, all parameters of PA~PF and PL group will be reset to the default value, and the writing will be completed after 3 seconds. 0x0140 The setting range is 0~0xFFFF 1word...
- Page 439 SDI8 SDI7 SDI6 SDI5 SDI4 SDI3 SDI2 SDI1 Pin name Bit12~Bit31 Bit11 Bit10 Bit9 Bit8 All these bit values should be set to 0. SDI12 SDI11 SDI10 SDI9 Note: cautions for test mode (terminal forced output control, JOG test, positioning test) When using the communication commands in the test mode, the user must pay attention to the following matters, otherwise the drive will not work normally in the test mode.
- Page 440 Step 2: enter Forced DO mode and write data 0x0002, the definition of its communication address is as follows: Communication Setting Data Content address range length To switch operation mode 0000: exit test mode 0001: reserved 0000 0x0901 0002: DO forced output(Output signal 1word forced output) 0004...
- Page 441 Step 3: set the acceleration/deceleration time constant of JOG mode. Communication Data Content address length To set acceleration/ deceleration time constant in JOG 1word 0x0902 mode and positioning mode. (range: 0~20000)(unit: ms) Step4: set JOG speed command and activate it. Communication Data Content...
- Page 442 Step3: set the acceleration /deceleration time constant. Communication Data Content address length To set acceleration and deceleration time constant in JOG 0x0902 1word mode and positioning mode. Step 4: set positioning speed command Communication Data Content address length To input the speed command in JOG and positioning mode 0x0903 1word...
-
Page 443: Troubleshooting
10.Troubleshooting ⚫ When an alarm occurs, eliminate its root cause first to ensure safety. Wait until the alarm is cleared and then restart operation, otherwise, it may cause injury. ● When an alarm such as AL03, AL05, AL10, AL.34 occurs, please check the root cause and eliminate it, turn off the power for more than 30 seconds to cool down the temperature of power module, and then restart the power to avoid servo drive damage which is caused by the repeated occurrence of... - Page 444 AL.0B 0 Encoder error 1 ○ AL.0D 0 Fan error ○ AL.0E 0 IGBT overheat ○ AL.0F 0 Memory error ○ AL.10 0 Overload 2 ○ AL.11 1 Motor combination error ○ AL.20 1 Motor collision error ○ ○ ○ AL.21 1 Motor UVW cable disconnection ○...
- Page 445 Warning elimination method Power Press SET button in current Reset Display Alarm name OFF→ON warning screen (RES) signal AL.12 Emergency stop AL.13 Forward and reverse limit error After eliminating the cause, it can be automatically AL.14 Software positive limit released. AL.15 Software negative limit AL.16 Early overload warning AL.17 ABS timeout warning...
- Page 446 Causes and corrective actions AL.01 Over voltage Alarm cause Checking method Corrective action Main circuit voltage Use a voltmeter to check whether Use the correct voltage exceeds the rated the main circuit input voltage is source or connect to the allowable value.
- Page 447 AL.02 Under voltage Alarm cause Checking method Corrective action The input voltage of Check if the input voltage wiring Recheck the voltage the main circuit is for the main circuit is normal. wiring. lower than the allowable rated value. No voltage input to the Use a voltmeter to check if the Recheck the voltage main circuit.
- Page 448 AL.04 Regenerative error Alarm cause Checking method Corrective action Invalid regenerative Check if the regenerative brake Send your servo drive brake transistor. transistor is short-circuited. back to the distributor or manufacturer. The regenerative Check the connection of the Reconnect the resistor is disconnected regenerative resistor.
- Page 449 AL.07 Abnormal pulse command Alarm cause Checking method Corrective action The frequency of the Use the pulse frequency tester to Correctly set the pulse pulse command is over check the input frequency frequency the rated value. Input pulse command Replace the input pulse command device. device error AL.08 Excessive deviation of position control Alarm cause...
- Page 450 AL.0A Serial communication timeout Alarm cause Checking method Corrective action Servo drive has not received the Check if the Replace the cable or communication message for a communication cable is reconnect the wiring. long time broken or loose. Improper parameter setting for Check the setting value of Correctly set the PC23.
- Page 451 AL.0F Memory error Alarm cause Checking method Corrective action Memory data access Reset parameter or reset power. If the issue persists after abnormal. reset, send the servo back to the distributor or manufacturer. AL.10 Overload 2 Alarm cause Checking method Corrective action Mechanical collision.
- Page 452 AL.14 Software positive limit error Alarm cause Checking method Corrective action In Pr Mode, when 1.The software positive limit is Adjust the pulse number of the position calculated based on the position current position command command pulse command rather than the actual to be smaller than the number exceeds the feedback position, because the...
- Page 453 AL.16 Early overload warning Alarm cause Checking method Corrective action The load exceeds 1. Check whether the load is 1. Refer to AL.05 corrective the setting time of overloaded. action. the protection curve 2. Check whether the PA17 2. Increase the setting *PA17.
- Page 454 AL.19 Pr command error Alarm cause Checking method Corrective action The position Incremental system: Execute homing. command counter If in PR mode, the motor keeps running in overflows. a single direction, it will cause the feedback position register overflow and the coordinate system fail to reflect the correct position.
- Page 455 AL.21 Motor UVW cable disconnection Alarm cause Checking method Corrective action When Motor U,V,W Check if the Motor U,V,W cable Reconnect the U,V,W cable disconnection is loose. cables. is detected. AL.22 Encoder communication error. Alarm cause Checking method Corrective action The encoder has 1.
- Page 456 AL.24 Motor encoder type error Alarm cause Checking method Corrective action The incremental motor is 1.Check the motor is To use absolute type of not able to perform incremental type or function, you have to use absolute type function. absolute type encode. absolute motor.
- Page 457 AL.27 Encoder error 4 Alarm cause Checking method Corrective action The internal memory of 1. Check if the grounding 1. Connect the U,V,W the encoder error. of motor is normal. ground terminal (green 2. Check if the encoder wire) to the heat sink signal line is separated base of the drive.
- Page 458 AL.29 Encoder error 5 Alarm cause Checking method Corrective action The move distance of the Check if the absolute motor Re-execute homing absolute position revolution operating revolution number and initialize absolute number is out of range. is within the range between - coordinate according 32768 and +32767.
- Page 459 AL.2C Absolute encoder error 3 Alarm cause Checking method Corrective action Replace the battery when the drive Do not replace or Re-execute homing control power is OFF. remove the battery when and initialize absolute the drive control power is coordinate according OFF.
- Page 460 AL.2F Regenerative energy error Alarm cause Checking method Corrective action When the regenerative 1. Check if the 1. Adjust the load rate exceeds 100%. acceleration/deceleration acceleration time is too short. /deceleration time, or 2. Check if the frequency of reduce the frequency forward and reverse of forward and reverse rotation is too fast.
- Page 461 AL.32 Control circuit error 2 Alarm cause Checking method Corrective action FPGA is abnormal. Restart the drive. If the issue persists, send your servo drive back to the distributor or manufacturer. AL.33 Memory error 2 Alarm cause Checking method Corrective action Cache memory is abnormal.
- Page 462 AL.51 Motor parameter automatic identification error Alarm cause Checking method Corrective action when the motor is 1. Check if input values of 1.Input the actual value executing the PL02 Motor the resolution and pole and then executing auto Parameter auto pitch are correct.
- Page 463 AL.54 Motor parameter is out of range Alarm cause Checking method Corrective action When the motor executes the Check if the motor Check the value of PL02 motor parameter automatic resistance (PL47), motor resistance identification function, the motor inductance (PL48) values (PL47) and resistance (PL47) and inductance are out of range or are...
- Page 464 AL.58 Excessive position deviation after initial magnetic field detection Alarm cause Checking method Corrective action During initial magnetic field 1. check if the command is 1.Do not input the detection, it will check if the issued right after the command right after position deviation is within the power is applied apply power to the...
- Page 465 AL.1C Early overload warning 4 Alarm cause Checking method Corrective action The load duration Check whether the load exceeds 1. Refer to AL.34 overload exceeds the warning the motor capacity. 4 alarm instruction. time of protection curve. AL.61 Parameter group source of PR is out of range Alarm cause Checking method Corrective action...
- Page 466 AL.63 The writing parameter value using PR is out of range. Alarm cause Checking method Corrective action The writing parameter value of PR Check whether the writing Clear the alarm by command(TYPE=8) is out of parameter value is out of any of the following range.
-
Page 467: Specifications
11. Specifications 11.1 Servo drive standard specifications. 200V series specifications Drive Model Type SDP-□□□A2C L005 L020 L040 L075 L100 L150 L200 L300 Servo Motor type L010 SME-□□□□ M100 M150 M200 M300 H020 H040 H075 H085 H130 H180 1.0KW 3.0KW Motor capacity 200W 400W 750W... - Page 468 Drive Model Type SDP-□□□A2C L005 L020 L040 L075 L100 L150 L200 L300 Servo Motor type L010 SME-□□□□ M100 M150 M200 M300 H020 H040 H075 H085 H130 H180 1.0KW 3.0KW Motor capacity 200W 400W 750W 1.5KW 2KW 100W 850W 1.3KW 1.8KW Over current, under voltage, over voltage, overheat, overload(electron accumulated heat) , fan error protection, pulse command error protection, encoder error protection, regenerative error protection, over speed...
- Page 469 Drive Model Type SDP-□□□A2C L005 L020 L040 L075 L100 L150 L200 L300 Servo Motor type L010 SME-□□□□ M100 M150 M200 M300 H020 H040 H075 H085 H130 H180 1.0KW 3.0KW Motor capacity 200W 400W 750W 1.5KW 2KW 100W 850W 1.3KW 1.8KW Speed control Analog speed command 1:2000, Internal speed command 1:5000 range...
- Page 470 Drive Model Type SDP-□□□A2C L005 L020 L040 L075 L100 L150 L200 L300 L010 Servo Motor type M100 M150 M200 M300 SME-□□□□ H040 H075 H020 H085 H130 H180 1.0KW 3.0KW Motor capacity 200W 400W 750W 1.5KW 2KW 100W 850W 1.3KW 1.8KW Servo on, forward and reverse rotation limit , pulse deviation elimination, torque direction option, speed command selection, position command selection, forward and reverse rotation command, proportional control...
- Page 471 Weight(kg) Note: *1 when command is at the rated speed, the speed change rate calculation is: (rotational speed with no load - rotational speed with full load) / rated speed.
- Page 472 400V series specifications Drive Model Type SDP-□□□A4C Servo Motor type H180 H290 H440 H750 SMP-□□□□ Motor capacity 1.8K 2.9K 4.4KW 5.5KW 7.5KW Voltage Three-phase 380〜480VAC 50/60Hz Permissible voltage Three-phase 323〜528VAC variation 50/60Hz Permissible frequency ±5% variation Voltage 0~240VAC 8.4 A 11.9 A 16.5 A 20.8 A 27.2 A...
- Page 473 Drive Model Type SDP-□□□A4C Servo Motor type H180 H290 H440 H550 H750 SMP-□□□□ Motor capacity 1.8K 2.9K 4.4KW 5.5KW 7.5KW Safety function Input pulse Line driver: 500Kpps(low speed)/8Mpps(high speed); frequency Open collector: 500Kpps Command pulse CCW pulse train +CW pulse train; pulse train + sign; mode AB phase pulse train.
- Page 474 Drive Model Type SDP-□□□A4C Servo Motor type H180 H290 H440 H550 H750 SMP-□□□□ Motor capacity 1.8K 2.9K 4.4KW 5.5KW 7.5KW Command source External analog voltage input/Internal register setting Smoothing Low-pass filter smoothing method Analog torque 0~±10VDC / Maximum torque(input impedance 10~12kΩ) command input Internal parameter setting or external analog input setting Speed limit...
-
Page 475: Interface And Out Dimensions Of The Servo Drive
11.2 Interface and out dimensions of the servo drive 200V series Shihlin SDP Item A frame B frame C frame 100~400W 0.75~1kW 1.5~3kW H (mm) L (mm) D (mm) Screw hole 2-M5 3-M5 3-M5 400V series Shihlin SDP Item D frame 2~7KW H (mm) L (mm) -
Page 476: Dimensions Of Servo Drive
11.3 Dimensions of servo drive 200V AC system SDP-010A2C, SDP-020A2C, SDP-040A2 C(100W~400W) Unit[mm] Ground terminal screw screw torque Dimensions of the servo drive may be updated without prior notice. ... - Page 477 200VAC system SDP-075A2C, SDP-100A2C(750W, 1KW) Unit[mm] Ground terminal screw screw torque Dimensions of the servo drive may be updated without prior notice. ...
- Page 478 200VAC system SDP-150A2C, SDP-200A2C, SDP-300A2 C(1.5KW~3KW) Unit[mm] Ground terminal screw screw torque Dimensions of the servo drive may be updated without prior notice. ...
- Page 479 400VAC system SDP-200A4C, SDP-300A4C, SDP-500A4C, SDP-700A4C(2KW~7KW) Unit[mm] Ground terminal screw screw torque Dimensions of the servo drive may be updated without prior notice. ...
- Page 480 11.4 SME series servo motor general specification Standard specification of low capacity servo motor 11.4.1 Motor type□□□□ L005 L010 L020 L040 L075 Flange number □40 □60 □80 Rated output capacity Rated torque(Note 1) 0.16 0.32 0.64 1.27 Maximum torque 0.48 0.96...
- Page 481 Motor type□□□□ L005 L010 L020 L040 L075 Input voltage V DC: 26.4V~ 21.6V Brake holding torque Power consumption Current 0.24 0.32 0.35 consumption impedance Ω 92.4 75.4 @20℃ Brake release time Brake close time 0.33 0.45 0.85 1.23 2.24 Motor weight(Note 2) (0.55) (0.67) (1.23)
- Page 482 11.4.2 Standard specification of medium capacity servo motor Motor type□□□□ L100 L150 L200 L300 M100 M150 M200 M300 Flange number □130 □176 Rated output capacity 1000 1500 2000 3000 1000 1500 2000 3000 Rated torque(Note 1) 4.78 7.16 9.55 14.3 4.78 7.16 9.55...
- Page 483 Motor type□□□□ L100 L150 L200 L300 M100 M150 M200 M300 mm 50 Radial loading Axial loading Input voltage V DC 24V ± 10% Brake holding Nm 16 torque Power consumption Current 0.95 1.41 consumption Impedance Ω @20℃ Brake release ms 95 time Brake close...
- Page 484 11.4.3 High inertia motor specification Motor type□□□□ H020 H040 H075 H085 H130 H180 Flange number □60 □80 □130 Rated output capacity 1300 1800 Rated torque(Note 1) 0.64 1.27 11.5 Maximum torque 2.24 4.45 13.8 23.2 28.7 Rated speed 3000 1500 Maximum speed 6000 3500...
- Page 485 Motor type□□□□ H020 H040 H075 H085 H130 H180 Radial loading Axial loading Input voltage DC 24V ± 10% Brake holding torque Power consumption Current 0.32 0.33 0.95 consumption impedance Ω 75.4 72.0 @20℃ Brake release time Brake close time 0.86 1.25 2.27 Motor weight(Note 2)
- Page 486 11.4.4 (400V)High inertia motor specification Motor series Motor type□□□□ H180 H290 H440 H550 H750 Flange number □130 □180 Rated output capacity 1800 2900 4400 5500 7500 Rated torque(Note 1) 11.5 18.6 28.4 Maximum torque 28.7 45.1 71.1 87.6 Rated speed 1500 Maximum speed 3000...
- Page 487 Note 1: in the vertical lift or reciprocating mechanism application, please make sure the average load rate is below 75%. (refer to section 12.1 for S-T curve) Note 2: () is the rotor inertia and weight with electromagnetic brake. Note 3: the motor IP65 protection test is for the motor body, excluding the output shaft and the connector itself.
- Page 488 11.5 Motor dimensions Dimensions of 300rpm motor. 11.5.1 Dimension(mm) Model ψS ψF LR MH 64.5 SME-L005(B) (99.2) 2-ψ4.5 SME-L010(B) (114.7) SME-L020(B) SME-H020(B) (112) 4-ψ5.8 SME-L040(B) SME-H040(B) (132) 101.2 SME-L075(B) (140.2) 7.5 34.5 52 4-ψ6.6 101.2 SME-H075(B) (145.5) LM ( ): length of model with brake...
- Page 489 Dimensions of 2000rpm motor 11.5.2 Dimension(mm) Model ψS ψF SME-L100 55.5 (161) 141.5 SME-L150 (175.5) SME-L200 84.5 (190) 145 4-ψ9.0 SME-L300 113.5 (219) SME-M100 55.5 (161) 141.5 SME-M150 (175.5) SME-M200 61.5 (189) 18.5 74 200 4-ψ13.5 SME-M300 91.5 (219) LM ( ): length of model with brake...
- Page 490 Dimensions of 1500rpm motor 11.5.3 Dimension(mm) Model ψS ψF LA LB LF LR LP MH LM SME-H085(B) 55.5 (161) 141.5 SME-H130(B) 4-ψ9.0 (175.5) SME-H180(B) 84.5 (190) LM ( ): length of model with brake...
- Page 491 (400V) dimensions of 1500rpm motor 11.5.4 Dimension(mm) Model ψS ψF ψHB 184.9 ψ ψ SMP-H180(B) 4-ψ9.0 128.5 104.5 0.022 (217.4) LM ( ): length of model with brake.
- Page 492 Dimension(mm) Model ψS ψF ψHB 173.3 SMP-H290(B) 118.5 (231) 0.01 ψ 197.3 SMP-H440(B) 142.5 (255) ψ 200 4-ψ13.5 135.5 236.3 173.5 SMP-H550(B) (278) (172.5) ψ 282.3 219.5 SMP-H750(B) (324) (218.5) LM ( ): length of model with brake...
- Page 493 11.5.5 Dimension of servo motor keyway D type keyway applicable model: L005(B) / L010(B) General keyway Dimension Model L020(B) \ L040(B) M4x depth 15 H020(B) \ H040(B) L075(B) M5x depth 20 H075(B) L100(B) \ L150(B) \ L200(B) \ L300(B) M8x depth 20 M100(B) \ M150(B) M200(B) \ M300(B) M8x depth 20...
- Page 494 Dimension Model H085(B) \ H130(B) \ H180(B) M5x depth 12 Dimension Model depth SMP-H180(B) depth SMP-H290(B) \ H440(B) M12x depth SMP-H550(B) \ H750(B) M16x...
- Page 495 11.6 Electromagnetic Interference Filter (EMI Filter) To comply with EMI command of EN specification, it is recommended to use the following filters: Servo drive Recommended filter SDP-010A2C NF312C5/05 SDP-020A2C SDP-040A2C NF312C10/05 SDP-075A2C NF312C20/05 SDP-100A2C SDP-150A2C SDP-200A2C NF312C30/05 SDP-300A2C SDP-200A4C NF312C20/05 SDP-300A4C SDP-500A4C NF312C30/05...
- Page 496 11.7 EMI interference countermeasure The following figure shows the recommended wiring diagram of the servo drive on the distribution board: Distribution box Distribution grounding metal box Thick grounding wire Grounding terminal Magnetic buckle U shape metal piping clamp Thick grounding wire Short cable Figure 1: recommended wiring diagram The selection of motor power cable and the installation of related accessories are the key to...
- Page 497 The EMI filter and the servo drive should be installed on the same wiring metal panel, and the wiring should be as short as possible. The servo drive and EMI filter installed on the wiring metal panel must be fixed tightly, and the two fixed metal panel contact surface should be in good contact (the isolation paint needs to be removed).
- Page 498 12. Features 12.1 Motor T-N curve/S-T curve ⚫ Motor performance with three-phase 200V power: torque feature will be weaker when voltage is insufficient. 【SME-L005】 【SME-L010】 【SME-L020】...
- Page 499 【SME-L040】 【SME-L075】 【SME-L100】 【SME-L150】...
- Page 500 【SME-L200】 【SME-L300】 【SME-M100】 【SME-M150】...
- Page 501 【SME-M200】 【SME-M300】 【SME-H020】 Short duration running range Continuously running range Speed(rpm)
- Page 502 【SME-H040】 Short duration running range Continuously running range Speed(rpm) 【SME-H075】 Short duration running range Continuously running range Speed(rpm) 【SMP-H085】 Short duration running range Continuously running range Speed(rpm) Surrounding air temperature...
- Page 503 【SME-H130】 Short duration running range Continuously running range Speed(rpm) Surrounding air temperature 【SME-H180】 Short duration running range Continuously running range Speed(rpm) Surrounding air temperature This feature is applicable to three-phase 200-240V power. 【SMP-H180】 Short duration running range Continuously running range Speed(rpm)
- Page 504 【SMP-H290】 Short duration running range Continuously running range Speed(rpm) 【SMP-H440】 Short duration running range Continuously running range Speed(rpm) 【SMP-H550】 Short duration running range Continuously running range Speed(rpm)
- Page 505 【SMP-H750】 Short duration running range Continuously running range Speed(rpm) This feature is applicable to three-phase 380~480V power. ...
- Page 506 12.2 Overload protection feature Overload protection is to prevent the servo motor from operating under overload conditions. The Causes of overload are as follows: (1) The inertia ratio is too large. (2) Acceleration /deceleration time which cannot be reached theoretically is set when loaded. (3) The motor operating torque exceeds the rated range and the operating time is too long.
- Page 507 When the load reaches 300%, the operation time is 3.33 seconds. When the load reaches 300%, the operation time is 5.51 seconds.
- Page 508 When the load reaches 300%, the operation time is 5.51 seconds. When the load reaches 300%, the operation time is 5.51 seconds.
- Page 509 When the load reaches 300%, the operation time is 5.51 seconds.
- Page 510 13.Absolute servo system Absolute servo system includes servo drive, absolute servo motor and absolute encoder cable (including battery box). The absolute position detection system does not store the data in the PLC controller, it detects the absolute position of the machine and store the data by battery power.
- Page 511 (4) Change the E-Gear ratio after setting the origin. (5) Alarm code output occupies the DO hardware. How to replace the battery (1) When the drive displays alarm AL.2D, which means the voltage is too low, please replace the battery immediately to avoid data loss. (2) When the battery voltage is less than 2.
- Page 512 communication or DI/DO, the overall pulse number calculation is as follows. Total pulse number = r (number of revolutions) x 4194304 + pulse number (0~4194303). If the motor has rotated 10 cycles with 50000 pulse, the total pulse number is as follows according to the above calculation: The total pulse value = 10 x 4194304+ 50000 = 41993040 (pulse)
- Page 513 Update encoder absolute position (PA30=1 or PA30=2) READ PA31 Absolute coordinate system status PA32 Encoder absolute position (pulse number) PA33 Encoder absolute position (revolution number)
- Page 514 13.1 Mitsubishi Absolute Position Detection System This section mainly introduces the use of Mitsubishi PLC with SDP servo to read absolute position by DIO communication. 13.1.1 Signal description When transmitting absolute position data, the signal of CN1 terminal will be changed. Signal Code CN1 Pin...
- Page 515 13.1.2 Start procedure (1) Install absolute motor and battery (2) Parameter setting Set PA28 to 1, and set absolute system. Set PA34 to □□□1, and restart the drive to set the Mitsubishi absolute position detection system. And then cycling power to activate the parameter setting. (3) [AL.2A Absolute encoder error 1] Alarm release When the battery is replaced and the power is turned on for the first time, an "AL.2A Absolute Encoder error 1"...
- Page 516 13.1.3 Absolute position data transmission protocol (1) Data transmission procedure After the power is applied, the PLC reads the current position of the drive when each time SON is turned on. Focus When ABSM is off, If you turn SON on, the main power circuit will be invalid.
- Page 517 (2) Transmission method In the absolute position detection system, when SON is turned on, ABSM must be turned on to transmit the current position of the drive to the host controller. If ABSM is turn off, the main power circuit will be off. (a)Timing diagram (1) After the ABS data transmission is completed, RD turns on and ABSM is OFF.
- Page 518 (4) The output signal functions of ABST, ABSB0 and ABSB1 will change according to the status of ABSM. CN1 pin Output signal number ABSM OFF ABSM ON WNG Warning/ CMDOK internal position command is ABS Data bit 0 completed TLC torque limit control ABS data bit 1 ZSP zero speed is detected.
- Page 519 (5) If PLC confirms that ABST is closed, it will read ABS data (2bit) and close ABSR. (6) The drive turns ABST on to prepare for the next data transfer. Repeat the operation of ③~⑥ until the transmission of 32-bit data and 6-bit checksum data is completed. (7) After the PLC finish receiving the data, it will confirm that the 19th ABST state has been turned on, and then ABSM is turned off.
- Page 520 will be released automatically when ABSM is turned on. (1) Timeout check when ABSR data requested signal is off. After the ABST ready signal is on, if the ABSR data requested signal is not turned on within 5 seconds, [AL.17 ABS timeout warning] will occur. (2) Timeout check when ABSR data requested signal is on.
- Page 521 (4) ABSM signal check in ABS transmission mode If the ABSM signal is turned off during ABS transmission, [AL.17 ABS timeout warning] will occur. This example is to turn ABSM OFF before the 19th ABST data ready. (5) SON signal check in ABS transmission mode If the SON signal is turned off during the ABS transmission, [AL.17 ABS timeout warning] will occur.
- Page 522 Checksum error When the checksum error is detected, the ABS data transmission will be restarted. After the ABSM is closed for 10mSec, the SON will close, and then turn them on after 20mSec at least. If the absolute position data transmission fails even after 3 retry, the ABS checksum error will occur.
- Page 523 Clear alarm When an alarm is detected by the servo, SON will be OFF, and ABSM can not be received when there is an alarm. It can only be received when the alarm is cleared. After the alarm is cleared, ABSM can be turned on.
- Page 524 (4) Homing Focus Please perform the homing when the motor stops, otherwise the origin position may shift. Move to the target origin position by manual operation (JOG, test positioning). If turning on CR for over 20mSec, the current position is regarded as the ABS origin and the data is stored in the non-volatile memory (the maximum number of writing is 1 million).
- Page 525 13.2 Delta absolute position detection system This section mainly introduces the use of Delta PLC with SDP servo to read absolute position by DIO communication. Signal description 13.2.1 When transmitting absolute position data, the signal of CN1 terminal will be changed. Signal Code CN1 Pin...
- Page 526 Please refer to the following wiring example for details. Need planning Need planning Start procedure 13.2.2 (1) Install absolute motor and battery. (2) Parameter setting. PA28 is set to 1 which is absolute system setting. Set PA34 to □□□0, and restart the drive to set the Delta absolute position detection system.
- Page 527 (a) When setting absolute system. (b) When changing servo drive. (c) When changing servo motor. (d) When absolute position loss [AL.2C Absolute encoder error 3] alarm occurs. When setting an absolute position system, you can establish an absolute coordinate position by the origin setting.
- Page 528 Use parameter settings to initialize absolute coordinates 13.2.4 You can write PA29 to perform absolute coordinate initialization by panel operation or communication command. When PA29 is set to 1, the absolute coordinates will be reset immediately. Please use the homing to initialize the coordinates in Pr mode. Bit79~Bit64 Bit63 ~ Bit32 Bit31 ~ Bit16...
- Page 529 Absolute position data transmission protocol 13.2.5 The description of communication procedure. 1. When starting communication, the controller will enable ABSE signal and start DI/DO communication of absolute system. After Ts digital input filter time, DI4, DO2 and DO3 will switch to ABSQ, ABSR, ABSD. 2.
- Page 530 4. When the host controller detects that the ABSR is at the high level, it will immediately read the data on the ABSD. And then set the ABSQ to the high level to notify the drive for data reading competition. 5.
- Page 531 13.3 Absolute battery specifications Cautions for use Carefully read the following safety cautions. Only use the specified batteries to avoid damage or dangerous conditions. 1. Make sure the installation location is free of vapor, corrosive and inflammable gas. 2. Correctly place the battery into the battery box to avoid short-circuit. 3.
- Page 532 Battery life The figure above is the life curve provided by the battery manufacturer. If the absolute encoder current consumption is 90µA, the battery life is about 20000hr, which is equivalent to 2.3 years.
- Page 533 14. Appendix 14.1 Accessories Item Name Model name L(mm) Low/High inertia (50W~750W) SDH-ENCNL encoder connector Encoder Low/Middle/High inertia (850W~3KW) SDH-ENCNM connector encoder connector (CN2) (400V)High inertia (1.8KW~7.5KW) SDP-ENCNM encoder connector Low/High inertia(50W~750W) SDH-ENL-2M-L/H 2000±100 encoder cable 2M Low/High inertia(50W~750W) SDH-ENL-5M-L/H 5000±100 encoder cable 5M Low/High...
- Page 534 (400V)High inertia (1.8KW) SDP-PWCNH1 power connector (400V)High inertia (2.9KW/4.4KW) SDP-PWCNH2 power connector (400V)High inertia (5.5KW/7.5KW) SDP-PWCNH3 power connector (400V)High inertia (1.8KW~7.5KW) SDP-BKCNS1 brake connector Low/High inertia (50W~750W) SDA-PWCNL1-2M-L/H 2000±100 power cable 1(without brake) Low/High inertia (50W~750W) SDA-PWCNL1-5M-L/H 5000±100 power cable 2(without brake) Low/High inertia (50W~750W) SDA-PWCNL1-10M-L/H 10000±100...
- Page 535 Middle inertia(2KW/3KW) SDA-PWCNM2-2M-L/H 2000±100 power cable 1(without brake) Middle inertia(2KW/3KW) SDA-PWCNM2-5M-L/H 5000±100 power cable 2(without brake) Middle inertia(2KW/3KW) SDA-PWCNM2-10M-L/H 10000±100 power cable 3(without brake) Middle inertia(2KW/3KW) SDA-PWCNM2B-2M-L/H 2000±100 power cable 1(with brake) Middle inertia(2KW/3KW) SDA-PWCNM2B-5M-L/H 5000±100 power cable 2(with brake) Middle inertia(2KW/3KW) SDA-PWCNM2B-10M-L/H 10000±100 power cable 3(with brake)
- Page 536 USB to RS-485 ADAPTER USB01 Data transmission cable 1.5meters SNKCBL1R5GTN2 1500 Communication cable Data transmission cable 3meters SNKCBL3GTN2 3000 (CN3) Data transmission cable 5meters SNKCBL5GTN2 5000 Data transmission cable 10meters SNKCBL10GTN2 10000 I/O connector I/O connector SDA-CN1 (CN1) I/O cable SDA-TBL05M 500±10 I/O cable...
- Page 537 ❖ Encoder connector ⚫ Part number: SDH-ENL Low inertia: 50W, 100W, 200W, 400W, 750W High inertia: 200W, 400W, 750W ⚫ Part number: SDH-ENM Low inertia: 1 W, 1.5 W, 2.0 W, 3.0 Middle inertia: 1 W, 1.5 W, 2.0 W, 3.0 High inertia: 850W, 1.3 W, 1.8 ⚫...
- Page 538 Encoder cable ⚫ Low inertia encoder cable: 50W, 100W, 200W, 400W, 750W ⚫ High inertia encoder cable: 200W, 400W, 750W ⚫ Low inertia encoder cable: 1 W, 1.5 W, 2.0 W, 3.0 ⚫ Middle inertia encoder cable: 1 W, 1.5 W, 2.0 W, 3.0 ⚫...
- Page 539 ❖ Power connector ⚫ Part number: SDA-PWCNL1 (50W, 100W, 200W, 400W, 750W without brake) SDA-PWCNL2 (50W, 100W, 200W, 400W, 750W with brake) ⚫ Part number: SDA-PWCNM2 (Middle inertia 2 W, 3 ⚫ Part number: SDP-PWCNH1(400V High inertia 1.8 ⚫ Part number: SDP-PWCNH2(400V High inertia 2.9 W, 4.4...
- Page 540 ⚫ Part number: SDP-PWCNH3(400V High inertia5.5 W, 7.5 ⚫ Part number: SDP-BKCNS1(400V High inertia 1.8 W, 2.9 W, .4.4 W, 5.5 W, 7.5 ❖ Power cable ⚫ Low inertia power cable: 50W, 100W, 200W, 400W, 750W ⚫ High inertia power cable: 200W, 400W, 750W ⚫...
- Page 541 ⚫ Middle inertia power cable: Middle inertia 2 W, 3 ⚫ (400V)High inertia power cable: 1.8 W, 2.9 W, .4.4 W, 5.5 W, 7.5...
- Page 542 ❖ USB communication cable for drive and computer Part number: SDA-USB3M ❖ Full-closed loop(differential A,B,Z type) Part number: SDP-CN2 ❖ I/O cable Part number: SDA-CN1 ❖ STO communication cable Part number: SDP-CN6...
- Page 543 ❖ I/O cable Part number: SDA-TBL05M, SDA-TBL1M, SDA-TBL2M ❖ I/O terminal block Part number: SDA-TBL50 Absolute encoder accessory: Absolute encoder battery set Absolute encoder battery Part number: SDH-BAT-SET Part number: SDH-BAT...
- Page 544 14.2 Regenerative resistor Built-in regenerative resistor specification Drive model Resistance PA10 PA11 Capacity name value Regenerative Regenerative resistance (Ω) resistance value capacity. SDP-010A2C SDP-020A2C SDP-040A2C SDP-075A2C SDP-100A2C SDP-150A2C SDP-200A2C SDP-300A2C ★When using external regenerative resistor, the terminal P,D should be open-circuited. Resistor Part Specification of external resistor(proposed) Number...
- Page 545 14.3 Table of communication address address address address address PA01 0x0300 PA16 0x031E PA31 0x033C PA46 0x035A PA02 0x0302 PA17 0x0320 PA32 0x033E PA47 0x035C PA03 0x0304 PA18 0x0322 PA33 0x0340 PA48 0x035E PA04 0x0306 PA19 0x0324 PA34 0x0342 PA49 0x0360 PA05 0x0308...
- Page 546 address address address address PC01 PC26 PC51 PC76 0x0500 0x0532 0x0564 0x0596 PC02 PC27 PC52 PC77 0x0502 0x0534 0x0566 0x0598 PC03 PC28 PC53 PC78 0x0504 0x0536 0x0568 0x059A PC04 PC29 PC54 PC79 0x0506 0x0538 0x056A 0x059C PC05 PC30 PC55 PC80 0x0508 0x053A 0x056C...
- Page 547 address address address PE01 PE34 PE67 0x0700 0x0742 0x0784 PE02 PE35 PE68 0x0702 0x0744 0x0786 PE03 PE36 PE69 0x0704 0x0746 0x0788 PE04 PE37 PE70 0x0706 0x0748 0x078A PE05 PE38 PE71 0x0708 0x074A 0x078C PE06 PE39 PE72 0x070A 0x074C 0x078E PE07 PE40 PE73 0x070C...
- Page 548 address address address PF01 PF34 PF67 0x0800 0x0842 0x0884 PF02 PF35 PF68 0x0802 0x0844 0x0886 PF03 PF36 PF69 0x0804 0x0846 0x0888 PF04 PF37 PF70 0x0806 0x0848 0x088A PF05 PF38 PF71 0x0808 0x084A 0x088C PF06 PF39 PF72 0x080A 0x084C 0x088E PF07 PF40 PF73 0x080C...
- Page 549 address address address PL01 PL21 PL41 0x0E00 0x0E28 0x0E50 PL02 PL22 PL42 0x0E02 0x0E2A 0x0E52 PL03 PL23 PL43 0x0E04 0x0E2C 0x0E54 PL04 PL24 PL44 0x0E06 0x0E2E 0x0E56 PL05 PL25 PL45 0x0E08 0x0E30 0x0E58 PL06 PL26 PL46 0x0E0A 0x0E32 0x0E5A PL07 PL27 PL47 0x0E0C...
- Page 550 14.4 Compliance with global standards 14.4.1. Safety instructions Before installing this equipment, please read this manual carefully to ensure use it correctly. This section explains the safety regulations for users and equipment operation. To avoid the possibility of electric shock, please turn off the power for more than 20 minutes until the charging indicator is off and the voltage test is confirmed, and then It can be wired or inspected, otherwise it may cause electric shock.
- Page 551 The SDP servo drive has overload protection function. (It is specified based on 120% of the rated current of the servo drive (full load current).) (c) Motor overheat protection There is no temperature sensor inside the motor, and the SDP series do not have overheat protection.
- Page 552 Correct use 14.4.4. The use of equipment must comply with the specifications (voltage, temperature, etc. , please refer to section 12.1 for details). (1) Power cable Refer to section 3.1.6 for detailed power cable selection instruction. Note 1: when connecting to the terminal block, use the screws included with the terminal block.
- Page 553 14.4.5. Basic inspection and maintenance 14.4.5.1.Basic inspection It is recommended that the user do the following inspection regularly. Please carefully check whether the servo drive is powered off and the charging indicator is off before performing the following inspection: ◆ Check whether the screws of the terminal block, drive installation part, servo motor and mechanism connection are loose, if yes, please tighten it.
- Page 554 14.4.5.3 Parts service life The lifetime of the parts may be changed due to the user's operating environment. When an abnormality occurs, it needs to be replaced immediately. Please contact the distributor for replacing parts. The service life of the parts is as follows: Component Approximate Description...
- Page 555 14.5 Manual version and revision history Manual version: V1.00 Release month: July, 2022...
Need help?
Do you have a question about the SME Series and is the answer not in the manual?
Questions and answers