Table of Contents
Advertisement
Available languages
Available languages
Quick Links
Advertisement
Table of Contents

Related Manuals for Ciro Mazzoni I3VHF Stealth Loop


Summary of Contents for Ciro Mazzoni I3VHF Stealth Loop
- Page 1 ITALIANO...
- Page 2 Realizzazione meccanica Introduzione Speciali macchine ed attrezzature provvedono al taglio e alla preparazione del STEALTH LOOP STEALTH Grazie per aver scelto The profilato in modo tale da garantire l’integrità strutturale di THE LOOP Una scelta che ti porta a possedere ed usare il miglior loop magnetico mai realizzato nel panorama mondiale.
- Page 3 TENSIONE E’ PERICOLOSA. SEGUIRE LE ISTRUZIONI PER LA VOSTRA SICUREZZA. 1 tastiera USB per ATU 1 cavo motore – lunghezza 5 metri Leggere attentamente il manuale prima dell’utilizzo. 1 manuale di istruzioni Ciro Mazzoni Radiocomunicazioni non si assume alcuna responsabilità se si utilizzano pratiche di posizionamento ed utlilizzo pericolose.
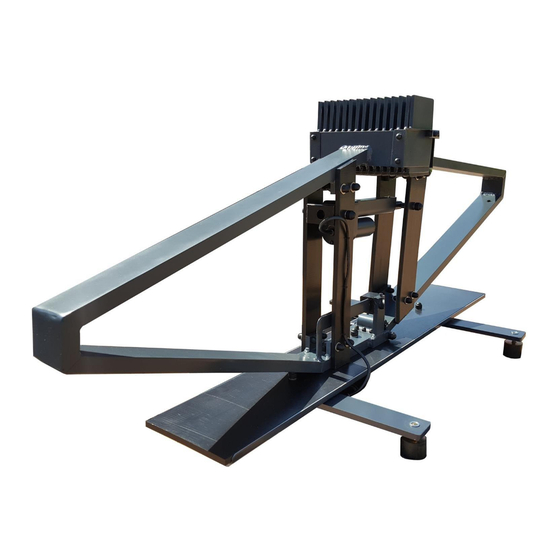
- Page 4 STEALTH LOOP STEALTH LOOP Dove e come posizionare The Caratteristiche elettriche e meccaniche The Caratteristiche elettriche STEALTH LOOP Per prima cosa, rimuovi The dall’imballo. Copertura continua da 6.6 – 29.8 MHz Appoggiala su una superficie riflettente, connetti il cavo motore (in dotazione) ed il R.O.S.
-
Page 5: Auto Detect
Caratteristiche meccaniche AUTOMATIC TUNER UNIT A.T.U. 2.0 Istruzioni per il corretto utilizzo dell’ATU 2.0 Dimensioni antenna: 1370x500x260 mm Tungsten Inert Gas Lega di alluminio 60/60 elettrosaldato a T.I.G. ( All’accensione, sul display appare la versione del firmware installata Elemento tubolare 60x20mm – spessore 2mm Dopo 3 secondi, il display mostrerà... - Page 6 Se comandando il motore, il led blu non si accende, significa che il motore non assorbe corrente. VERIFICA A.T.U. E ANTENNA IN MODO MANUALE Le cause possibili: per controllo cavi e connessioni motore non collegato o non correttamente collegato: verificare il cavo comando motore e relative connessioni con Premere il tasto / per 3 secondi l’AUTODETECT MODE...
- Page 7 FULL AUTO MODE SEMI AUTO MODE Premere il tasto – per 3 secondi Premere il tasto – per 3 secondi Sul display apparirà la scritta SET FULL AUTO? Scorrere le opzioni con il tasto + e selezionare SET SEMI AUTO? e premere ENTER Premere ENTER Premendo in sequenza tasto + è...
-
Page 8: Usb Media
PROCEDURA PER L’AGGIORNAMENTO DEL FIRMWARE ALLA PRIMA ACCENSIONE - staccare il connettore di alimentazione ed il tastierino dal dispositivo Alla prima accensione, l’ATU è in “manual mode” e puoi digitare la frequenza - sul sito www.loopantennai3vhf..com, nella sezione SERVICES - DOWNLOAD, - direttamente dalla tastiera. - Page 9 accendi l’ATU per prima cosa devi selezionare il modello della tua LOOP ANTENNA premi il tasto – per 3 seccondi il display mostrerà SET FULL AUTO? premi il tasto + key una volta. Il display mostrerà SET ANT. TYPE ...
-
Page 10: Risoluzione Dei Problemi
Con l'obiettivo di migliorare costantemente i propri prodotti, Ciro Mazzoni Radiocomunicazioni si riserva il diritto di modificare le specifiche tecniche contenute nel presente manuale senza preavviso. Il manuale aggiornato è sempre disponibile per il download sul nostro sito. - Page 11 I prodotti LOOP ANTENNA by I3VHF (di seguito “Prodotti”), compresi tutti i dispositivi LOOP Antenna Prodotto non sono coperti da garanzia legale di Mazzoni. original accessories (di seguito “Prodotti”) prodotti da Ciro Mazzoni Radiocomunicazioni snc (di La garanzia legale è esclusa per i transistors amplificatori finali R.F. La garanzia legale è esclusa per seguito “Mazzoni”) sono coperti dalla garanzia legale per qualsiasi difetto di conformità,...
- Page 12 Introduction STEALTH LOOP Thank you for purchasing The You are the owner of the best magnetic loop ever produced worldwide, professional or otherwise. We are certain that, after having carefully read this manual, correctly placed the STEALTH LOOP antenna and familiarised yourself with The this product will bring you a great deal of enjoyment and satisfaction.
- Page 13 PLACEMENT OF THIS PRODUCT NEAR POWER LINES IS DANGEROUS. FOR YOUR SAFETY, FOLLOW THE BELOW INSTALLATION INSTRUCTIONS. Read carefully this instruction manual before use. Ciro Mazzoni Radiocomunicazioni assumes no liability if incorrect or dangerous placement practices are used. the antenna must be placed at a minimum distance of 5 meters from people or...
- Page 14 choose the safest place for positiong the antenna the use of the antenna on a vehicle is allowed only when the vehicle is completely STEALTH LOOP Where and how to place THE stationary position the antenna away from high, medium and low-tension electrical cables, ...
- Page 15 STEALTH LOOP Mechanical specifications Electrical and mechanical specifications of Electrical specifications Antenna dimensions: 1370x500x260 mm (53.94x19.68x10.24in) Continuous frequency coverage 6.6-29.8 MHz Tungsten Inert Gas Aluminum alloy 60/60 T.I.G. welded ( S.W.R. 1,3:1 (typical) Tubular elements 60x20mm (2.36x0.79in)- 2mm thickness (0.08in) Front to back ratio: 6 dB All stainless steel hardware Front to side ratio: 25 dB...
- Page 16 AUTOMATIC TUNER UNIT 2.0 If, when tuning the loop, the blue LED does not light up, this could mean that the motor is not drawing any current. Instructions for correct usage of the A.T.U. 2.0 Possible reasons for this include: plug in the power supply and turn on the device.
- Page 17 If the minimum level of SWR is > 3, the red LED flashes and most popular HF radios on the market: ICOM by ICOM CI-IV remote control cable CI-1 the message "WARNING: SWR> 3 - PRESS ANY KEY" will show. (or by opt.
-
Page 18: Updating The Firmware
SEMI AUTO MODE press the – key for 3 seconds UPDATING THE FIRMWARE scroll through the options using the button + then, choose SET SEMI AUTO? and press ENTER • Disconnect the power connector and the keypad on the device scrolling through the options using the + button, you can choose one of the •... -
Page 19: First Turn On
FIRST TURN ON At the first turn on, the ATU is in “manual mode” and you can digit the frequency directly from the keyboard. STEALTH LOOP Now you can try to test the proper functioning of THE STEALTH LOOP place The on a flat reflective surface ... -
Page 20: Troubleshooting
TROUBLESHOOTING turn on the ATU first of all you have to set your type PROBLEM CAUSE SOLUTION press the – key for 3 seconds the cable from check or replace the display will show SET FULL AUTO? antenna to ATU is the cable ... - Page 21 The purchaser has to inform Mazzoni’s representative in the specific Country where the Product has been purchased, within the applicable warranty period for information regarding warranty service With a constant concern for improvement, Ciro Mazzoni Radiocomunicazioni reserves the right to modify the technical specifications provided in their manual, at any time, at their discretion.
- Page 22 What the warranty does not cover: Product that has had the serial number removed or made illegible. Defects or damage from improper use of the Product in other than its normal way of manner. Defects or damage from misuse, accident, water, natural events or neglect. Defects or damage from improper testing, operation, maintenance, installation, alteration, modification or adjustment other than published in the manual.
- Page 23 Einführung Mechanischer Aufbau STEALTH LOOP Vielen Dank für Ihre Entscheidung zum Kauf der Mit speziellem Werkzeug wurden die Aluminiumprofile präzise und passgenau zusammengefügt, um so die bestmögliche strukturelle Stabilität der Sie sind nun Besitzer der besten magnetic Loop, die weltweit je produziert wurde, STEALTH LOOP ob professionell oder anderweitig.
- Page 24 Ciro Mazzoni Radiocomunicazioni übernimmt keine Haftung für unsachgemäßen oder riskanten Aufbau der Antenne. STEALTH LOOP Wohin platziert man die Die Antenne muss aus Sicherheitsgründen mind. 5m Abstand von Mensch oder Tier haben. Diese Antenne kann fast von überall aus arbeiten.
- Page 25 STEALTH LOOP STEALTH LOOP Elektrische und mechanische Spezifikation der Wo und wie stelle ich die auf ? STEALTH LOOP Elektrische Spezifikationen Nach dem Auspacken der stellen Sie diese auf einen reflektierenden Untergrund und schließen das Motorkabel (beiliegend) und das Durchgehender Frequenzbereich von 6.6-29.8 MHz Antennen-Koaxkabel an die entsprechenden Buchsen der Antenne an.
- Page 26 Mechanische Spezifikationen AUTOMATIC TUNER UNIT ATU 2.0 Antennenmaße: 1370 x 500 x 260 mm (53.94 x 19.68 x 10.24 in) Anleitung zur richtigen Anwendung der A.T.U. 2.0 Aluminiumlegierung 60/60 T.I.G (Wolfram schutzgasgeschweißt) Schließen Sie das Netzteil an und schalten Sie die ATU ein. Das Display zeigt Aluminiumprofile 60 x 20 mm (2.36 x 0.79 in) bei 2 mm Wandstärke (0.08 in) die momentan installierte Firmware-Version an.
- Page 27 Falls beim Abstimmen Ihrer Loop Antenne die blaue Motor-LED nicht leuchten Falls der Wert des gemessenen SWR > 3 ist, blinkt die rote LED und sollte, bedeutet das, dass der Motor keinen Strom zieht, was folgende Gründe die Meldung "WARNING: SWR> 3 - PRESS ANY KEY" wird angezeigt. haben könnte: Der Motor ist nicht richtig oder auch gar nicht angeschlossen: Motorkabel und dessen Anschlüsse überprüfen per AUTODETECT MODE...
- Page 28 Kabel sind IMMER optional und erhältlich im www.ciromazzoni.com/shop FÜR TRANSCEIVR UND ATU DIE GLEICHE WÄHLEN, WENN SIE DIE Ihrem Ciro Mazzoni Vertragshändler. SCHNITTSTELLE EINRICHTEN (siehe Manual Ihres Transceivers). Beachten Sie die nun folgende Anleitung, die Betriebsart Ihrer Wahl einzu- bestätigen Sie die Wahl Ihrer Baudrate mit der Taste ENTER stellen und Ihren angeschlossenen Transceiver-Typ der ATU 2.0 mitzuteilen.
- Page 29 SEMI AUTO MODE (Halbautomatischer Betrieb) UPDATING DER FIRMWARE drücken Sie die – Taste für 3 Sekunden scrollen Sie durch die angebotenen Optionen mit der + Taste, entscheiden • trennen Sie die ATU 2.0 vom Steckernetzteil (Rückseite) und vom Keypad (USB- Sie für SET SEMI AUTO? und bestätigen dies mit der Taste ENTER Stecker Vorderseite).
-
Page 30: Erstes Einschalten
ERSTES EINSCHALTEN Beim ersten Einschalten befindet sich die ATU 2.0 im “MANUAL MODE” und die Frequenz lässt sich direkt vom Keypad aus eingeben. STEALTH LOOP Jetzt können Sie sofort die einwandfreie Funktion Ihrer testen: STEALTH LOOP stellen Sie die auf eine flache, reflektierenden ... - Page 31 Zuallererst müssen Sie den -Typ anmelden Keyboard Keyboard ist beschädigt Keyboard ersetzen Drücken Sie dazu die – Taste für 3 Sekunden reagiert Das Display zeigt SET FULL AUTO? nicht/schreibt Keyboard vielleicht nicht USB-Stecker Drücken Sie die + Taste einmal. Das Display zeigt jetzt SET ANT. TYPE nicht richtig angesteckt andrücken/einstecken...
- Page 32 Höhe für eine Baby Umfang und Zeitraum für Garantieleistungen Boden/Reflektor Loop ist z.B. 1,50m)) Ciro Mazzoni Radiocomunicazioni snc gewährt eine Garantie für die bei MAZZONI hergestellten LOOP Koaxkabel hat Kabel überprüfen ANTENNEN by I3VHF („Produkt“), einschließlich allen Original Zubehörs der LOOP ANTENNEN bei Kurzschluss materiellen Schäden von Werkstoff und Verarbeitung unter normalen Nutzungsbedingungen und...
- Page 33 Handbuch, das Teil des Produkts ist. Wie kann ich die Garantie beanspruchen: Der Käufer hat MAZZONI oder seine offiziellen Vertreter in seinem Land, in dem das Produkt erworben wurde, innerhalb der anwendbaren Garantiezeit über einen möglichen Garantiefall zu informieren. Was die Garantie nicht umfasst: Produkte, deren Seriennummer entfernt oder unkenntlich gemacht wurden.