CHEFMAN Die-Cast Electric Deli Slicer RJ49-BLACK-V2-DS Manual
- Manual (20 pages)
Advertisement
QUICK START GUIDE
BEFORE FIRST USE
- Carefully remove slicer from box.
- Carefully remove and discard plastic guards from blade and back support plate. Remove any other plastic wrapping, shipping materials, and stickers.
- Carefully remove the blade as directed in the User Guide. Carefully wash blade with soapy water and dry well.
- Before returning the blade to the slicer, wipe the food carriage and housing with a clean damp cloth.
- Return blade to slicer as directed in the User Guide.
HOW TO OPERATE SLICER
- Set the slicer on a hard, flat surface free from any obstructions or heating elements, and plug in power cord.

- Place food on food carriage and secure with food holder.

![]()
Always use food holder when slicing to ensure your fingers stay away from the blade. - Turn the slicer on and turn the dial to adjust the blade to your desired thickness.

- Using the food holder, slide the food carriage back and forth across the blade.

![]()
The slicer should only be run for 10 minutes at a time to avoid overheating the motor. - When you are done, turn the power switch to OFF and unplug the slicer; the blade will not immediately come to a stop.


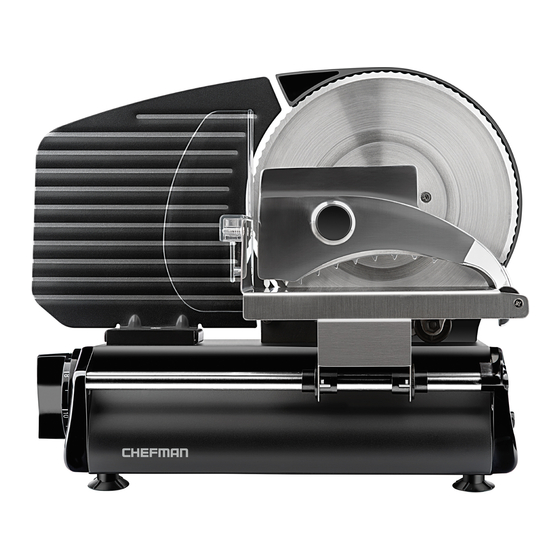
FEATURES

- Back support plate
Sturdy backing keeps slicing steady - On/off switch
Powers the single-speed blade - Thickness adjustment knob
Set to slice from paper-thin to ½ inch thick - Slicing blade
Serrated, 8 ⅝ -inch blade made from strong stainless steel - Blade locking mechanism
Keeps blade locked in place - Power cord
Short cord for use on countertop - Food holder
Sharp prongs and a sure-grip handle holds food securely in place - Carriage rod release mechanism
Hard black plastic piece that slides right to allow for easy release of food carriage - Sliding food carriage
Moves food across slicing blade - Nonslip feet
Keeps slicer securely in place with no sliding - Housing
Durable die-cast aluminum - Carriage rod
Ensures carriage glides smoothly
USER GUIDE

READ ALL INSTRUCTIONS BEFORE USE
For your safety and continued enjoyment of this product, always read the instruction manual before using.
SAFETY INSTRUCTIONS
IMPORTANT SAFEGUARDS
When using electrical appliances, basic safety precautions should always be followed including the following:
- READ ALL INSTRUCTIONS.
- Unplug from outlet when not in use, before putting on or taking off parts, and before cleaning.
- To protect against risk of electrical shock, do not put appliance in water or other liquids.
- This appliance should not be used by or near children or individuals with certain disabilities.
- This appliance is not intended for use by persons (including children) with reduced physical, sensory or mental capabilities, or lack of experience and knowledge, unless they have been given supervision or instruction concerning the appliance by a person responsible for their safety.
- Children should be supervised to ensure that they do not play with the appliance.
- Avoid contact with all moving parts.
- Never put the unit near a hot burner, in an oven or in a dishwasher.
- Do not operate the appliance with a damaged cord or plug, or after the appliance malfunctions. Return to the nearest authorized dealer or contact Chefman Customer Service.
- Do not use outdoors or for anything other than intended use.
- Never feed food by hand; always use the pusher. Keep hands, hair, clothing and utensils away from blade during operation to reduce the risk of personal injury and/or damage to the meat slicer.
![]()
The cutting blade is SHARP. Handle with care both when using and cleaning the product.- Do not let cord hang over edge or table or counter, come into contact with sharp edges or touch hot surfaces.
- Do not pull on power cord to disconnect.
- Always place the appliance on a firm and stable surface when not in use.
- The use of attachments not recommended or sold by Chefman may cause fire, electric shock or injury.
- Never use abrasive cleaning agents or abrasive cloths when cleaning the unit.
- Do not use fingers to scrape food away from the cutting blade while the appliance is plugged in. Serious injury may result.
- Use the unit only when it is completely assembled.
- Do not leave the meat slicer unattended while the unit is running.
- Before using for the first time, remove all packaging and stickers and wash and dry parts.
- Do not use the product for slicing frozen foods, bones, foods with large kernels or packaged foods.
- To avoid overheating the motor, do not use the slicer for more than 10 minutes continuously. Allow the motor to cool between uses.
![]()
The cutting blade continues to rotate for a short period of time after the slicer is switched off. To avoid the risk of injury, avoid the blade when the unit is still rotating.- For the purposes of product storage after use, always return the slice thickness dial to the start position
HOUSEHOLD USE ONLY
SAVE THESE INSTRUCTIONS
SHORT CORD INSTRUCTIONS
A short power supply cord is provided to reduce the hazards of entanglement or tripping over a longer cord. Longer detachable power supply cords or extension cords are available and may be used if care is exercised in their use. If a longer detachable power supply extension cord is used:
- The marked electrical rating of the extension cord should be at least as great as the electrical rating of the appliance.
- The cord should be arranged so that it will not drape over the countertop or tabletop where it can be pulled on by children or tripped over unintentionally.
POWER CORD SAFETY TIPS
- Never pull or yank on the cord or the appliance.
- To insert the plug, grasp it firmly and guide it into the outlet.
- To disconnect appliance, grasp the plug and remove it from the outlet.
- Before each use, inspect the power cord for cuts and/or abrasion marks. If any are found, this indicates that the appliance should be serviced, and the power cord replaced. Please contact Chefman® Customer Support for assistance.
- Never wrap the cord tightly around the appliance, as this could place undue stress on the cord where it enters the appliance and cause it to fray and break.
DO NOT OPERATE APPLIANCE IF THE POWER CORD SHOWS ANY DAMAGE OR IF THE APPLIANCE WORKS INTERMITTENTLY OR STOPS WORKING ENTIRELY.
California Proposition 65: (Applicable for California Residents only)

Cancer and Reproductive Harm - www.P65Warnings.ca.gov.
 Do not place the appliance on a stovetop or any other hot surface.
OPERATING INSTRUCTIONS
BEFORE FIRST USE
Before using the slicer for the first time, please read all instructions and safety information.
- Carefully remove slicer from box.
- Carefully remove and discard plastic guards from blade and back support plate. Remove any other plastic wrapping, shipping materials, and stickers.
- The blade is shipped with a coating of mineral oil that will need to be washed off before first use. Carefully remove the blade. Carefully wash blade with soapy water and dry well.
NOTE: It's advisable to wear mesh safety gloves when handling the sharp blade. - Before returning the blade to the slicer, wipe the food carriage and housing with a clean damp cloth.
- Return blade to slicer as directed.
TO OPERATE SLICER
Once you get the hang of it, using the deli slicer is easy. Please read all operating instructions before you begin.
- Set the slicer on a hard, flat surface free from any obstructions or heating elements, and plug in power cord.
NOTE: The slicer is easiest to use when positioned with long side perpendicular to the counter so that the short side with the power switch and thickness dial faces the user. - Slide the food carriage toward the dial side of the slicer and carefully swing food holder down to make room for the food.
- Place food to be sliced onto the food carriage so that the side you want sliced is against the back support plate.
- Secure food in place by pressing the food holder into the side of the food side or by lowering the food holder onto the top of the food.
![]()
Always use food holder when slicing to ensure your fingers stay away from the blade. - Turn the slicer on. This will cause the blade to turn.
- Turn the dial to adjust the blade to your desired thickness.
- While lightly pressing on the food with the food holder, slide the food carriage so that the food contacts the blade. Continue sliding until the carriage can go no further. Make the next slice by sliding the carriage back to its starting point.
NOTE: The slices will fall to the other side of the blade. - Continue sliding the food carriage back and forth at a moderate speed until slicing is done.
![]()
The slicer should only be run for 10 minutes at a time to avoid overheating the motor. - If you need more time, let the slicer cool before slicing again. When you are done, turn the power switch to OFF and unplug the slicer. Be careful as the blade will not immediately come to a stop.
- Turn the dial back to thickness starting point.
CLEANING AND MAINTENANCE
It's necessary to clean the slicer at regular intervals as perishable food scraps can accumulate on the slicer or behind the cutting blade.
- Before starting to clean the slicer, switch it off and unplug it. This is very important as inadvertently starting the blade while cleaning can lead to injury.
- The blade and the entire food carriage are removeable, and both are dishwasher safe. Follow the instructions and diagrams to remove blade and food carriage. Handle both very carefully as parts are sharp. The parts may also carefully washed by hand with soapy water, rinse, and dried.
- Wipe down the slicer's housing with a slightly damp cloth. Do not use any cleaning powders, scouring pads or hard brushes.
- Carefully reinstall the blade and food carriage by the slicer by following the directions.
- Before running the slicer, make sure that the food carriage and blade have been reinstalled correctly. If you hear any odd sounds when you turn the slicer on, immediately turn it off. Wait for the blade to stop moving, and check that the blade is on properly.
HOW TO REMOVE SLICING BLADE

Be sure the slicer is turned off and unplugged before removing or reassembling the blade.
To remove the slicing blade:
- Turn the center locking mechanism clockwise to unlock the blade. As you turn the mechanism, carefully hold onto the blade to prevent it from falling as the mechanism is loosened.

- Carefully pull the blade off the unit. Do NOT hold it by its edges.

To put slicing blade back on:
- Holding blade by pinching the center locking mechanism, line up center extensions on back side of blade with unit.

- Once blade is on, carefully rotate the blade until it clicks into its secured position.

- Turn center lock mechanism counterclockwise to lock the blade into place.


HOW TO REMOVE FOOD CARRIAGE
The entire food carriage assembly can be removed from the unit to enable easy and thorough cleaning. Be careful when handling it as the heavy food holder moves and has sharp areas on it.
To remove food carriage:
- Slide the black plastic carriage rod release mechanism to the right. This will free the carriage rod from the unit.

- Carefully slide the food carriage off the carriage rod.

NOTE: The food carriage rod can also be fully removed from the housing.


To put food carriage back on:
- If necessary, slide the carriage rod release mechanism to the right to release the carriage rod. Or, if rod was removed from slicer, reinsert rod into left side of unit, leaving right side free.
- Carefully slide the food carriage assembly back on to the carriage rod. It's a good idea to hold the sliding food holder in place as you do so.
- To reinsert rod on right side, move the carriage rod release mechanism to the right to make room for the rod. Reinsert the rod, then let go of the mechanism so that it slides left to secure the rod in place.
FOOD SLICER TIPS
- To ensure hands are kept away from blade while slicing, hold food mover handle with right hand and place fingertips of left hand on the plastic guide behind handle and use both hands to move food carriage.
- Put a piece of foil or parchment paper down along backside of slicer to catch food.
- Check the thickness of your first couple of slices, then adjust slicer as necessary.
- Do not slice frozen meat, meats with bones, or fruits or vegetables with hard pits, such as an avocado.
- If using slicer to slice raw meat, clean it well before using to slice something else.
- Use cut-resistant safety gloves when handling blade.
- Keep the slicer unplugged when not in use.
- For safe storage after use, always return the slice thickness dial to the start position.
TERMS & CONDITIONS
Limited Warranty
Our products are backed by a limited 1-year warranty. To register, follow the instructions on the Chefman® Warranty Registration page in this User Guide.
We offer a limited 1-year warranty from the date of purchase. This warranty is void without proof of purchase within the USA, Canada or Mexico. Service centers and retail stores do not have the right to alter or change the Terms & Conditions of this warranty.
WHAT THE WARRANTY COVERS
- Manufacturer Defects
Chefman® products are warranted against defects in material and workmanship for a period of 1 year from the date of purchase, when used in accordance with the Chefman® User Guide. - Qualified Replacements
If your product does not work as it should, we will send you a new one. If the product is no longer available, we will replace it with an identical product or one that is comparable.
THIS WARRANTY DOES NOT COVER
- Misuse - Damage that occurs from neglectful or improper use of products; damage that occurs as a result of usage with incompatible voltage. See Safety Instructions for information on proper use.
- Poor Maintenance - General lack of proper care. See Cleaning and Maintenance Instructions for information on proper maintenance.
- Commercial Use - Damage that occurs from commercial use.
- Altered Products - Damage that occurs from alterations or modifications by any entity other than Chefman®; removal of rating label.
- Catastrophic Events - Damage that occurs from fire, floods or natural disasters.
- Loss of Interest - Claims of loss of interest or enjoyment.
CHEFMAN® WARRANTY REGISTRATION
Register your product to extend your warranty for 3 months.
What do I need to register my product?
- Contact Information
- Model Number
- Proof of Purchase (i.e. online confirmation, receipt, gift receipt)
- Date code


How do I register my product?
We offer 2 convenient ways to access the Chefman® registration form:
- Visit chefman.com/register.
- Scan the QR code below to access the form:
![]()

Need more information?
Please visit us at Chefman.com
OTHER LIMITATIONS: ALL WARRANTIES OF ANY KIND WHATSOEVER, EXPRESS, IMPLIED AND STATUTORY, ARE HEREBY DISCLAIMED. ALL IMPLIED WARRANTIES OF MERCHANTABILITY AND FITNESS FOR A PARTICULAR PURPOSE ARE HEREBY DISCLAIMED, PROVIDED THAT IF ANY IMPLIED WARRANTIES OF ANY KIND IS REQUIRED BY ANY JURISDICTION, INCLUDING MERCHANTABILITY AND FITNESS FOR A PARTICULAR PURPOSE, THE DURATION OF SUCH IMPOSED IMPLIED WARRANTY IS LIMITED TO ONE (1) YEAR. THIS WARRANTY DOES NOT COVER, AND CHEFMAN® SHALL NOT BE LIABLE, FOR INCIDENTAL, INDIRECT, SPECIAL OR CONSEQUENTIAL DAMAGES, INCLUDING WITHOUT LIMITATION, DAMAGE TO, OR LOSS OF USE OF THE PRODUCT, OR LOST SALES OR PROFITS OR DELAY OR FAILURE TO PREFORM THIS WARRANTY OBLIGATION. THE REMEDIES PROVIDED HEREIN ARE THE EXCLUSIVE REMEDIES UNDER THIS WARRANTY, WHETHER BASED ON CONTRACT, TORT OR OTHERWISE.
This Warranty gives you specific legal rights, and you may also have other rights that vary from state to state or Province to Province. Some states or Provinces do not allow the exclusions or limitations set forth in this Warranty, so the above limitations or exclusions may not apply to you depending on the jurisdiction of purchase.
Chefman® is a registered trademark of RJ BRANDS, LLC. ETLCM is a registered certification mark of Intertek Testing Services NA, Inc.

CHEFMAN.COM | @MYCHEFMAN
© CHEFMAN 2019

Documents / Resources
References

Download manual
Here you can download full pdf version of manual, it may contain additional safety instructions, warranty information, FCC rules, etc.
Download CHEFMAN Die-Cast Electric Deli Slicer RJ49-BLACK-V2-DS Manual
Advertisement


Need help?
Do you have a question about the RJ49-BLACK-V2-DS and is the answer not in the manual?
Questions and answers