Advertisement
Safety Instructions
Please read the instruction manual before using this device and follow all the safety instructions to avoid damage caused by improper use.
- Keep the instruction manual for future reference. Should this device be given to a third party, then this instruction manual must also be handed over.
- Use this device solely for its intended purpose.
- Always supervise the device during use!
- Never look straight into the lens when the projector is switched on, you might cause damage to your eyes.
- This device is not suitable for use by persons with limited physical, sensory or mental abilities (including children), or use by persons with limited experience and/or knowledge of this device unless they possess the relevant safety knowledge or instructions on how the device is to be used. Children should be supervised to ensure they do not play with the device.
- The device is only suited to indoor use.
- Always place the projector on a clean, straight surface, especially when mounted on the tripod.
- Do not place any objects on the projector.

Danger of electric shock!
- Do not immerse the device in water or use it near water.
- Do not operate the device with wet hands or while standing on a wet floor. Never touch the power plug with wet or damp hands.
- Do not attempt to repair the device yourself. Repairs must be carried out by a qualified professional only.
- Check the power cord and plug regularly for any damage. If the power cord of this device is damaged, it must be replaced by the manufacturer or its customer service or a similarly qualified person in order to avoid hazards.
- Do not operate the device if it has fallen on the floor or has been damaged in any other way. In such cases, the device must be taken to a specialist workshop for inspection and, if necessary, repair.
- Connect the mains adaptor at an easily accessible socket, so that you can disconnect the device quickly from the mains supply in an emergency. Pull the mains adaptor out of the socket, in order to disconnect the device completely. Use the mains adaptor as a decollator that should be accessible at any time.
![]()
- For the purposes of charging the battery, only use the detachable supply unit provided with this appliance.

Danger of overheating!
- Keep the device away from all hot surfaces and naked flames.
- Do not cover the device while in use.
- Do not use the device on a pillow or other soft surfaces.
- Keep the device well ventilated.
This device is suitable exclusively for private household use.
Before first use
- Unpack the device and check if all parts are there and undamaged. Should this not be the case, return the product to retailer for replacement.
- Danger of suffocation! Keep all packaging materials away from children.
- Remove all protective foils and packaging material prior to use.
In the box
Mini DLP LED projector 1x
Mini tripod 1x
Power adapter 1x
Remote control 1x
HDMI cable 1x
User manual 1x
Notes on batteries (remote control)
- Only use top-quality batteries. Cheap batteries could leak and damage the device as a result.
- If the battery leaks, remove it with a cloth and dispose of it accordingly. Ensure that leaking battery acid does not come into contact with skin and eyes. If you do get battery acid in your eyes, flush them thoroughly with lots of water and consult a physician immediately! If battery acid comes into contact with your skin, wash the affected area with lots of water and soap.
- If the device is not to be used for an extended period of time, then the battery should be removed, as the device could become damaged should it leak. If the device functions weaken, replace the battery.
- Batteries do not belong in household waste! Expired batteries must be disposed of in an environmentally friendly way and according to the applicable legal regulations.
- Batteries are very dangerous if swallowed. Please keep the batteries and the device components away from children at all times. If a battery is swallowed, seek medical attention immediately.
- Batteries must not be recharged or activated with other means, dismantled, thrown into fire or short-circuited.
- Remove the battery prior to disposing of the device.
Inserting Batteries (remote control)
- Open the battery compartment.
- Insert two 1.5V LR03/AAA batteries (not supplied) into the battery compartment. Please note the polarity diagram printed inside the battery compartment.
- Replace the battery compartment cover, making sure it is closed firmly.
Cleaning and care

Before cleaning the device, switch it off and disconnect it from the power supply.

Never immerse the device in liquids.

Do not use alcohol, acetone, benzine, abrasive cleaning agents, etc. to clean plastic components. Do not use hard brushes or metal objects.
Only wipe the device with a dry cloth.
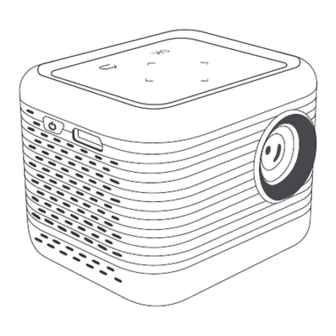
Parts
Front

TOP / navigation panel

 up
up
 right
right
 down
down
 left
left
 confirm
 return
BACK

LEFT SIDE

REMOTE CONTROL
When using the remote control, it must be pointed at the infra red receiver at the back of the projector.

CHARGE PROJECTOR
Stick the jack plug of the mains adaptor into the DC 5V jack on the back of the projector.
Connect the mains adaptor to an appropriate power outlet.
The projector must be switched off for charging.
The charge indicator next to the jack flashes red. When the battery is charged, the charge indicator continuously shines red.
Note the battery indicator in the top right corner of the home screen, to check if the battery needs charging.
TURN PROJECTOR ON/OFF
To turn the projector on, press and hold the power switch ON/OFF on the left side of the device for two seconds.
To switch the projector off, press the power button ON/ OFF on the left side of the device or press the Power button  on the remote control.
ADJUST FOCUS
When the projector is switched on, turn the focus wheel at the back of the device to adjust the focus.
ADJUST VOLUME
Press the volume + button on the remote control to increase volume.
Press the volume - button on the remote control to decrease volume.
MUTE VOLUME
To temporarily stop the sound, press the mute button on the remote control. Press the button again to start the sound again. 
USB IN
Insert a USB-device into the USB port at the back of the projector.

Use the navigation panel on top of the projector or the navigation ring on the remote control to select:
- PICTURE
![]()
- MUSIC
![]()
- VIDEO
![]()
OR - TXT (document mode)
![]()


Confirm you choice with OK.
HDMI IN
Connect the projector and an external source device with the HDMI cable.

Use the navigation panel on top of the projector or the navigation ring on the remote control to choose HDMI
Confirm you choice with OK.

The signal of the source device will be projected.
AUDIO OUT
To use external speakers or headphones, insert their 3.5mm plug into the AUDIO OUT jack at the back of the projector.
The sound will be transmitted through your external speakers or your headphones.
PROJECTION SETTINGS
Use the navigation panel on top of the projector or the navigation ring on the remote control to choose
SETTINGS

Under SETTINGS, use the navigation panel on top of the projector or the navigation ring on the remote control to select:
- Time
![]()
- Volume
![]()
- Projection Mode
![]()
- Brightness
![]()
- Language
![]()
- Upgrade
![]()


Confirm you choice with OK.
TIME SETTINGS
Settings → Time → OK

Use the navigation panel on top of the projector or the navigation ring on the remote control to set or change time and date.


Use the left and right cursor  to select year - month - day - hour - minutes.
Use the up and down cursor  to set the date and the time. Press
  to finish the date and time setup and to return to the SETTINGS menu.
VOLUME SETTINGS
Settings → Volume → OK

Use the navigation panel on top of the projector or the navigation ring on the remote control to adjust the volume.


Use the right cursor  to increase the volume.
Use the left cursor  to decrease the volume.
Press to return to the SETTINGS menu.
PROJECTION MODE
Settings → Projection Mode → OK

Depending on the position the projector is in, select the appropriate projection mode.

Front Projection

Rear Projection

Ceiling Projection

Rear Ceiling Projection
Press to return to the SETTINGS menu.
BRIGHTNESS SETTINGS
Settings → Brightness → OK

Use the navigation panel on top of the projector or the navigation ring on the remote control to adjust the brightness.


Use the right cursor to increase brightness.
Use the left cursor to decrease brightness.
Press to return to the SETTINGS menu.
LANGUAGE SETTINGS
Settings → Language → OK

Use the navigation panel on top of the projector or the navigation ring on the remote control to adjust the language.

Use the left and right cursor to select the language.
Confirm you choice with OK.
Press to return to the SETTINGS menu.
UPGRADE
Settings → Upgrade → OK


Save new firmware on a USB-stick. Insert the USB-stick into the USB port at the back of the projector. Follow the prompts to upgrade.
TECHNICAL DATA
- Input Rating: 5V,2A(Max)
- USB output rating: 5V,0.1A(Max)
- Fully charged in about 6 hours
- Play time: up to 1.5 hours (80% brightness)
- Battery capacity: 2500mAh
Documents / ResourcesDownload manual
Here you can download full pdf version of manual, it may contain additional safety instructions, warranty information, FCC rules, etc.
Advertisement

Need help?
Do you have a question about the 43078004 and is the answer not in the manual?
Questions and answers