Advertisement

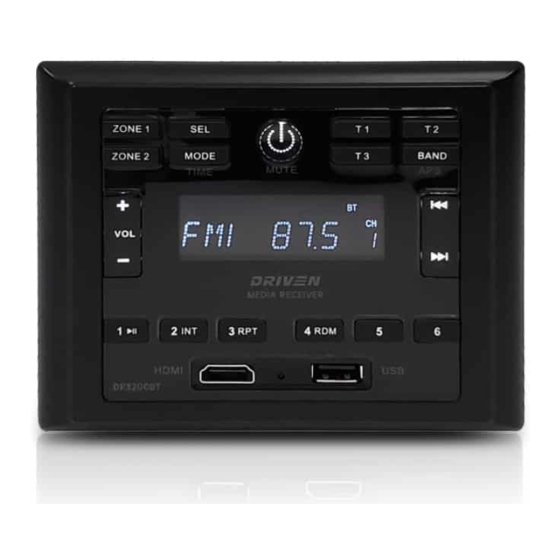
Front Panel Diagram

- Zone 1
Speakers on/off - Zone 2
Speakers on/off - Selectable Sound Settings
Bass/Trebble/Sub/Zone Volume/EQ - Mode
USB/BT/HDMI/RADIO/AV1/AV2 (Short press to toggle between sources) - Power On/Off — Mute
Short press to turn on. Long press to turn off. (Short press while powered on to mute) - T1
Interior Speaker LED (T1 output switch, turn on/off) - T2
Exterior Speaker LED (T2 output switch, turn on/off) - T3
Optional Function (T3 output switch, turn on/off) - Band/Tuner Selection
APS, FM1, FM2, FM3, AM1, AM2 - Volume
VOL+ / VOL- - Track Select / Radio Station Search
Previous - Track Select / Radio Station Search
Next - Play Pause / P1
Radio Mode: Short press to select station P1, Long press to save station in P1. (USB Mode: Play / Pause) - INT / P2
Radio Mode: Short press to select station P2, Long press to save station in P2. (USB Mode: Song browsing) - RPT / P3
Radio Mode: Short press to select station P3, Long press to save station in P3. (USB Mode: Repeat playlist) - RDM / P4
Radio Mode: Short press to select station P4, Long press to save station in P4. (USB Mode: Randomize playlist) - P5
Radio Mode: Short press to select station P5, Long press to save station in P5. - P6
Radio Mode: Short press to select station P6, Long press to save station in P6. - HDMI
Input - Reset
Press to master reset the unit - USB
Input
Remote Control Diagram

Note: DR3200REM optional remote available, sold seperately.
Remote Control Buttons
- Power
- Mute
- Mode
- Zone 1
- Zone 2
- Band
- Forward
- Previous
- Play / Pause
- Volume
- Trigger Functions
Installation
Location
- Choose a mounting location away from humid areas, water sources, burning products or any equipment that can radiate heat.
- Select an area on the wall or cabinet, which is free from cable, fuel or brake lines.
- Ensure when the stereo is mounted in the cut out that the wires at the rear of the unit are not pressed against the heat sink.
Installing the unit
- Before finally installing the unit, connect the wiring temporarily and make sure the unit and the system function properly.
- Fix the unit to the wall using 4 self-tapping screw as indicated in the illustration.

- Carefully remove the plastic frame from the front panel of the unit.
- Fix the unit in place with the 4 included #8 pan head self-tapping screws.
- Replace the plastic from on the front panel of the unit.
Connections
Wiring Diagram

Harness Pin Connections

4-Speaker (2 zone) Wiring
 Wiring")
Note: All speakers must be connected as shown. If one wire is removed or improperly connected then all speakers on the relevant zone will not function as intended. Connection with incorrect speaker polarity will lead to poor sound quality or speaker damage.
Operation
Common Operation
- To power the unit On/Off
When the unit is powered Off, it may be switched On by pressing the POWER button. When the unit is switched On, press and hold the POWER button to switch it off. - To select a function mode
Press MODE button repeatedly on on the front panel to select the corresponding mode. (FM/AM, AV1, AV2, BLUETOOTH, HDMI) - To adjust the volume level
During playback, press VOLUME+ or VOLUME- button on the front panel to increase or decrease the volume. - To mute or resume the sound
During playback, short press POWER button on the front panel to mute sound. Repeat this to disable mute function. - To check speaker output status and select speaker output
Short-press ZONE 1 or ZONE 2 button on the front panel to check the speaker output status.
Press and hold ZONE 1 or ZONE 2 button on the front panel to turn ON/OFF the corresponding speaker output, "Z 1 ON/OFF" or "Z 2 ON/OFF" will be displayed on the LCD. - To set the sound mode and menu
Press and hold SEL button to turn on BASS, then press SEL button repeatedly to select or circulate through TRE (treble), EQ OFF (FLAT/AMERICA3/AUSTRALIA/EUROPE), press VOLUME+/- to change the settings. Press SEL button to confirm your selection.- VOL LAST / VOL DEFA
VOL LAST: The last volume level setting will be saved automatically after the unit is swithced off, and restored after powered on.
VOL DEFA: Press SEL button on the front control panel, the AVOL mark will be displayed on LCD. Use VOLUME +/- to set the volume level as a constant value. - VOL LAST / VOL DEFA
In Radio mode, with the DX/LOCAL selection you can change the attenuator settings at the input stage of the radio. This selection helps to avoid overloading the radio when strong (local) stations are received. Select DX (DISTANT) mode to receive far/weak radio stations (highest sensitivity settings are enabled) and select LOCAL for very strong stations (which are located nearby).
NOTE: This button is only for FM reception. In AM mode, LOC is in valid.
- VOL LAST / VOL DEFA
- To display and adjust the time
Press and hold MODE button to display time.
Press and hold MODE button for ~ 2 seconds until the time displays then release and hold MODE button again until the hour begins to flash. Use VOLUME+/- button to adjust the hour. While hours is flashing, hold MODE button until minutes begin to flash then Use VOLUME+/- button to adjust the hour. - To reset the unit
- Press RESET button with a cuspidal object. The unit will be reset to factory default settings.
Radio Operation
- To select radio band
Press BAND button repeatedly to select a desired radio band in sequence and circulating as:
-->FM1-->FM2-->FM3-->AM1-->AM2 - To search for radio station manually or automatically
- In radio mode, press << / >> button to search your desired radio stations up/down manually.
- Press and hold << / >> button to search for the strongest station up/down automatically. - To store current station or turn on a preset one
- If you want to store the current station, press and hold one of the digit butttons form 1~6 to store the current station on the designated preset. You can store up to 30 presets.
- Press one of the 6 buttons from 1~6 to enter the preset station in current band.
- To auto search and store the top 6 strongest stations In radio mode, press and hold BAND button on the front panel, the unit will start to search the available stations and check the signal strength from the lowest frequency. The top 6 strongest stations will be saved to the corresponding preset numbered band 1~6.
USB Operation
- To insert or pull out the USB stick
To play the tracks in USB disk, insert the USB disk into the USB port. The playing mode will be changed to USB mode automatically and the USB indicator will be displayed on the LCD. - Press << or >> button to play previous or next track.
- To fast forward or backward
Press and hold << or >> button to play backward or fast forward, release to resume normal playback. - To play previous or next 10th track.
Press 5 or 6 button to play previous or next 10th track. - How to use 1/PLAY/PAUSE button
During playback, press 1/PLAY/PAUSE button to pause playback,
Press 1/PLAY/PAUSE button again to resume,
Press and hold 1/PLAY/PAUSE button to select the first track to play. - To repeat track(s)
- During playback, press 3/RPT button briefly to play the current track repeatedly. RPT ONE will be displayed on LCD.
- Press RPT button twice to play the track(s) in the album repeatedly. RPT DIR will be displayed on LCD.
- Press RPT button three times to repeat all tracks. RPT ALL will be displayed on LCD.
- Press RPT button four times to cancel the RPT function, RPT OFF will be displayed on LCD. - To play tracks at random
During playback, press RDM button to play all tracks at random. Press it again to cancel. - To search a track
Press USB button, TRK 0/00/000 (depending on the total tracks that are saved in the USB disk) will be displayed on the LCD and the place marker in the 0 position will begin flashing.
After inputing your desired track, press 1/PLAY/PAUSE button to play the track to be selected.
Bluetooth Operation
Pair and Connect
- Click the MODE button on the DR3200BT front panel to go to Bluetooth mode.
- You should see NOT PAIR displayed on the LCD. If you see BT LINK and the Bluetooth icon is on, that means DR3200BT is already connected to another device. You can clear it by pressing and holding the BT button for ~2 seconds until NO LINK is shown, then continue with the rest of the steps below.
- Go to the Bluetooth menu of your device.
- Ensure Bluetooth is turned On.
- Select the device named DRIVEN.
- If the pairing and connection is successful, the mobile will show connected while DR3200 will show BT LINK and the Bluetooth icon on LCD.
Note: DR3200BT supports NFC pairing. The NFC detection area is on the right of the Power button.
Disconnect and Reconnect
- Bluetooth connection of mobile devices typically covers a 33 ft (10m) open-field range. DR3200BT "remembers" the last connected device. The unit will disconnect from any device that goes out-of-range, DR3200BT will auto-reconnect to your device once it is back in range.
- If you explicitly disconnect the Bluetooth link by pressing the corresponding menu item in your device the DR3200BT will not auto-reconnect.
- If you turn off Bluetooth from your device while the unit is connected, DR3200BT will not auto-reconnect when you turn on the device's Bluetooth option. Some devices will try to reconnect with the last Bluetooth connected device.
- However, if you turn off Bluetooth on the device after an out-of-range disconnection, DR3200BT will auto-reconnect once you turn on Bluetooth on the device when it is within range.
- Note that whenever disconnected, the DB3200BT can be paired and connected by any other Bluetooth device.
Forget (or Unpair)
- You can explicitly forget (or unpair) DB3200BT in mobile. If you do that while connected in range, DB3200BT will be properly notified and all settled.
- If you do that after being disconnected while out-of-range, DB3200BT will still auto connect with the device. If this happens, you can press and hold the BT button for ~2 seconds on DB3200BT to clear its memory.
Audio Playback
- When audio is streamed from mobile to DB3200BT, BT AUDIO is shown on the LCD.
- You can control the trick modes (play, stop, next, prev) either from your device or DB3200BT.
- If you hear no sound or very low volume output, please check the volume on your device, then adjust the volume on the DB3200BT to the level of your choice.
Specifications
| General | |
| Supply Voltage | DC 12V |
| Current Consumption | Max. 5A |
| Power Output | 4 x 9 W RMS (4 Ohm speakers) |
| Number of Channels | 4 Channels |
| Mounting Dimensions (W x H x D) | 3.80 x 3.80 x 3.14 in 96.7 x 96.7 x 79.8 mm |
⠀
| AM Section | |
| Frequency Range | 522kHz - 1620kHz (USA) |
| Effective Sensitivity | 40dBu |
| Preamp Output | 1V Output |
⠀
| FM Section | |
| Frequency Range | 87.5mHz - 107.9mHz (U.S.A.) |
| Effective Sensitivity | Max. 5A |
⠀
| USB Playback | |
| Audio Format | MP3, WMA |
| Frequency Characteristics | 20Hz - 100Hz <= 5dB 10kHz - 20kHz <= 5dB |
| Signal to Noise Ratio (SNR) | 1V Output |
LIMITED WARANTY
Driven warrants any products purchased in the U.S.A. from an authorized Driven dealer.
All Products are warranted to be free from defects in material and workmanship under normal use and service for a period of one (1) year. This warranty applies to the original purchase only.
Driven will either repair or replace (at its own discretion) any unit that has been found to be defective and under warranty provided the defect occurs within the one (1) year warranty period.
This limited warranty does not exted to units that have been subjected to misuse, abuse, neglect, or accident. In Driven's judgement, products that show evidence of having been altered, modifed, or serviced without Driven's TM authorization, will be ineligible under this warranty.
To Obtain warranty service please contact your retailer or visit our website at www.drivenelectronics.com

Designed and Engineered in the U.S.A.
Documents / Resources
References
Download manual
Here you can download full pdf version of manual, it may contain additional safety instructions, warranty information, FCC rules, etc.
Advertisement

Need help?
Do you have a question about the DR3200BT and is the answer not in the manual?
Questions and answers