Advertisement
Advertisement
Table of Contents

Related Manuals for Tech Gelato TG300P

Summary of Contents for Tech Gelato TG300P
- Page 1 TG300P table top soft ice cream machine User Manual...
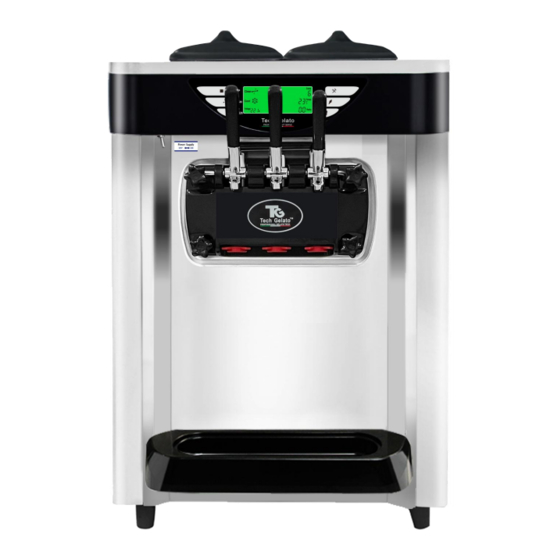
- Page 2 Introduction of the machine 5 inch LCD table top ice cream machine, stainless steel panel and auto-return handel design, easy to operate. Pre cooling keep the materials fresh ,and making ice cream faster. The capacity of machine is 18-22L/H; It is made with famous brand low temperature technology compressor and environmental-friendly coolant;...
- Page 3 Parameter of machine Size 540*665*1375(L*W*H) Cylinder volume 1.2L Hopper volume Cooling capacity 18-22L /H Compressor CROSS/GREEN Voltage 110V/60Hz Puffing method air pump inside Full stainless steel 304 no residue hopper; Full stainless steel 304 integrated stretched hopper. Product configuration Full stainless steel 304 evaporator and beater Optional function Pre-cooling system/Hopper beater/ Touch button screen.
- Page 4 TechGelato™ Manufacturing TG300P Series (Sofe ice cream machine)...
-
Page 5: Operation Interface
Operation interface Every display represents the mode machine is in. STOP: Stop all the action SET: To set parameter of machines CLEAN: Machine will be in clean state HARD/SOFT: Adjust hardness or softnessof ice cream COOL: Machine will be in cool state... - Page 6 Detail Information of Display Display Contents Display Contents Represents machine is in clean state . Upper temperature represents hopper temperature. At this time only beaters in the cylinder are Represents it lacks raw material in the hopper stirring , pour water can clean the machine. The number represents the time left to start Represents machine is in stand by mode .
- Page 7 SET of Parameters In the standby mode , press "SET" for 5 sec, flickers,this is setting for softness / hardness.Again press "SET" for 5 sec , at the top right corner four figures flickers , it's numbers' of cones , at this state,press " softness" for 5 sec .,numbers of cones become 0 . Again press "SET" for 5 sec .,"...
-
Page 8: Machine Appearance
Machine Appearance Control panel Water outlet valve Thickened water outlet valve Fasten screw Ware well and durable Fasten screw Water drip tray New upgrades More suitable for body mechanics More convenient,more easy... -
Page 9: Very Important
Very important • After receive the equipment, it is very necessary to to carry out a depth of cleaning to the equipment before using it, in order to ensure food safety and health. - Page 10 Prepare for the disinfectant Prepare for the things below: 1: Brush of different size 2: disinfectant 3: disinfectant effervescent tablet...
- Page 11 Equipment removal Put in clear water Gradually removed Gradually remove the head of the machine, the coupling, the coupling, the mixer, the blade of the mixer, the head of the mixer, and the sealing ring of the head,Spare parts including, discharge handle, lateral pin of discharge handle,valve pole,seals for valve pole, water drip tray, e.g. are put into a basin, add clean water and one piece of disinfectant effervescent tablet, use a towel and clean them up.
-
Page 12: Cleaning Parts
Cleaning parts Clean the discharge door Cleaning the cylinder beater Cleaning the D-ring of discharge door Clean the discharge head seal Cleaning the flute Clean the handle Cleaning the rear sealing ring After cleaning, dry the water on all parts and install them on the machine in the following order... - Page 13 Smudge Vaseline Feeding stem Coupling seals Vaseline Discharge handle horizontal tip D-type sealing ring Smudge vaseline to rubber parts before installing parts (In order to extend the service life of the parts, use a little bit more.)
-
Page 14: Equipment Installation
Equipment installation Installed in the ice cream machine freezer in the Put the rear sealing ring on the stainless steel end of the beater, please apply innermost groove, insert the card into the petroleum jelly lubricant before installation extension when there will be a sense of expansion when installed in place. -
Page 15: Final Cleaning
Final cleaning Injection water Pour out the waste water fclean the feeding pipe 1.Add 5 liters of water plus a Disinfection tablets to the hopper of the machine and clean the feeding pipe with a brush. Press the cleaning button for 5- 10 minutes and then pour out the hot water.3 times or more than 3 times, pour into the hopper until the hot water is poured out again and again. - Page 16 Ice cream making Make sure that the above work is done and you can start making ice cream...
- Page 17 Ice cream making Crispy cone ice Cup type strawberry cream ice cream Generally, can make the ice cream when the shape rate arrive at 66% or more , but if it reach to 80%,the ice cream will be tastier.
- Page 18 Cleaning parts Before starting the machine, please make sure that all the preparatory work are finished and the machine without any problem...
- Page 19 Final cleaning Injection water Pour out the waste water fclean the feeding pipe 1.Add 5 liters of water plus a Disinfection tablets to the hopper of the machine and clean the feeding pipe with a brush. Press the cleaning button for 5- 10 minutes and then pour out the hot water.3 times or more than 3 times, pour into the hopper until the hot water is poured out again and again.
-
Page 20: Daily Operation
Daily operation ( during the daytime) Pour hot water into hopper Let the dirty out Add 5 litres of boiled water (above 95 degrees) to the hopper, plus a disinfectant tablet.Press the cleaning button for 10 minutes and then pour out the hot water.3 times or more than 3 times, pour into the hopper until the hot water is poured out again and again. - Page 21 Closed at night Before Close , if there still left some or even no ice cream liquid in the cylinder, and the next day also sold normally, we suggest to do the cleaning for the machine. Pour water Turn off the powe Clean machine If there is left some ice cream machine material, you can pour it out and keep it fresh in the refrigerator in order to be use again in the next day.
- Page 22 Precautions (hygiene) Please clean carefully the ice cream that sticks to the plastic head outlet and fully sterilize it with disinfectant 1. Please spray 3-5 times of disinfectant to the plastic head outlet to drop the attached ice cream down 2.
- Page 23 Precautions Tighten D rings Tighten outlet head nut evenly The bulge of sealant seal of the outlet head must be matched with the concave part of the outlet head. If cannot match, it will lead to spill ice cream around the outlet head. Please tighten the outlet head nut when installing, which in order to prevent ice cream from leakage...
- Page 24 Precautions The power supply must be up to 3000w and the best is to be equipped with independent 10A air switch Factory set is 4 level, please do not change at random, high level will lead to freezing cylinder, and the machine will be wearing out.
- Page 25 Thanks watching...
Need help?
Do you have a question about the TG300P and is the answer not in the manual?
Questions and answers