
Subscribe to Our Youtube Channel
Related Manuals for Ninja FOODI OP350ANZ


Summary of Contents for Ninja FOODI OP350ANZ
- Page 1 OP350ANZ OWNER’S GUIDE FOODI® 11-IN-1 6L MULTI COOKER AU ninjakitchen.com.au NZ ninjakitchen.co.nz...
-
Page 2: Table Of Contents
CONTENTS for purchasing the Ninja® Foodi® 11-in-1 6L Multi Cooker Important Safeguards . . . . . . . . . . . . . . . . . . . . . . . . . . . . . . . . . 2 REGISTER YOUR PURCHASE Parts &... -
Page 3: Important Safeguards
18 This appliance is for household use DO NOT immerse cord, plugs, or main instructed in a Ninja® Foodi® recipe. only. DO NOT use this appliance for unit housing in water or other liquid. - Page 4 IMPORTANT SAFEGUARDS HOUSEHOLD USE ONLY • READ ALL INSTRUCTIONS BEFORE USE 48 The cooking pot, Cook & Crisp™ Basket 51 Let the appliance cool for 36 Caution should be used when searing 43 If the lid will not turn to unlock, this or Plate, and reversible rack become approximately 30 minutes before meats and sautéing.
-
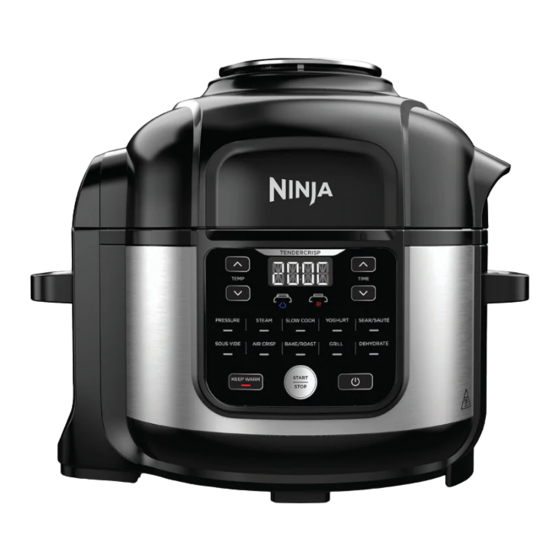
Page 5: Parts & Accessories
PARTS & ACCESSORIES A Cook & Crisp™ Plate B Nesting Grill Rack C 6 L Removable Cooking Pot D Crisping Lid E Heat Shield F Control Panel G Cooker Base (power cord not shown) H Pressure Lid Pressure Release Valve Float Valve K Silicone Ring L Anti-Clog Cap... -
Page 6: Using The Control Panel
USING THE CONTROL PANEL BEFORE FIRST USE Remove and discard any packaging REMOVING & REINSTALLING material, promotional labels, and tape THE ANTI-CLOG CAP HH:MM from the unit. Make sure that the anti-clog cap is in the 2 Please pay particular attention to correct position before using the pressure operational instructions, warnings, lid. -
Page 7: Using Your Foodi® 11-In-1 6L Multi Cooker
USING YOUR FOODI® 11-IN-1 6L MULTI COOKER SWAP THE TOP Air Crisp 4 Add ingredients to the pot. Close the Bake/Roast lid and press the START/STOP button The two lids allow you to seamlessly With the pot installed, place the Place ingredients in the pot or into the to begin cooking. -
Page 8: Grill
USING YOUR FOODI® 11-IN-1 6L MULTI COOKER – CONT . Grill Dehydrate 4 Press the PRESSURE button, the unit NOTE: To reduce the risk of injury from Place the nesting grill rack in the pot will default to high (Hi) pressure. Set unintended contact with hot foods, liquids NOTE: The DEHYDRATE function is not and follow directions per recipe. -
Page 9: Natural Pressure Release Vs. Quick Pressure Release
USING YOUR FOODI® 11-IN-1 6L MULTI COOKER – CONT . NATURAL PRESSURE RELEASE INSTALLING & REMOVING USING THE COOKING FUNCTIONS 4 Use the up and down TIME arrows to set the cook time 1-minute increments up to VS . QUICK PRESSURE RELEASE THE PRESSURE LID WITH THE PRESSURE LID 1 hour, and in 5-minute increments from... -
Page 10: Steam
USING YOUR FOODI® 11-IN-1 6L MULTI COOKER – CONT . 5 Press the START/STOP button to Steam 5 The unit will automatically preheat Slow Cook begin cooking. to bring the steaming liquid to a boil. Install the cooking pot in the cooker Install the cooking pot in the cooker The display will show PRE during this base. -
Page 11: Yoghurt
USING YOUR FOODI® 11-IN-1 6L MULTI COOKER – CONT . Yoghurt 5 Press START/STOP to begin Sear/Sauté 3 Press the START/STOP button to pasteurisation. begin cooking. Install the cooking pot in the cooker base. Add desired amount of milk 4 To turn off the Sear/Sauté function, press to the pot. -
Page 12: Sous Vide
USING YOUR FOODI® 11-IN-1 CLEANING & MAINTENANCE 6L MULTI COOKER – CONT . Sous Vide 5 Press the START/STOP button to begin Cleaning: Dishwasher & Hand-Washing preheating. 6 The unit will beep when preheat is NOTE: For best results when using the complete and ADD FOOD will show on Sous Vide function, do not use the unit the display. -
Page 13: Troubleshooting Guide
TROUBLESHOOTING GUIDE Why is my unit taking so long to come to pressure? How long does it take to “ADD POT” error message appears on display screen . come to pressure? • Cooking pot is not inside the cooker base. Cooking pot is required for all functions. •... -
Page 14: Helpful Tips
HELPFUL TIPS ONE (1) YEAR LIMITED • For consistent browning, make sure ingredients are arranged in an even layer in the REPLACEMENT WARRANTY Cook & Crisp Plate or cooking pot with no overlapping. If ingredients are overlapping, make sure to shake them halfway through the set cook time. •... - Page 15 Illustrations may differ from actual product. We are constantly striving to improve our products, therefore the specifications contained herein are subject to change without notice. FOODI and NINJA are registered trademarks of SharkNinja Operating LLC. COOK & CRISP is a trademark of SharkNinja Operating LLC.
Need help?
Do you have a question about the FOODI OP350ANZ and is the answer not in the manual?
Questions and answers