Table of Contents
Advertisement
LevMixer
Single-Use Mixing System
OPERATOR MANUAL
Models DB-300, DB-300C
Pall Life Sciences. USA: Port Washington, NY, USA 1 800 717 7255 toll free (USA),+1 516 484 5400 phone,
biopharm@pall.com e-mail, www.pall.com. Europe: Fribourg, Switzerland +41 (0)26 350 53 00 phone,
LifeSciences.EU@pall.com e-mail. Asia-Pacific : +65 6389 6500 phone, sgcustomerservice@pall.com e-mail
© 2012, Pall Corporation. Pall, Allegro, Kleenpak, Stax and the Allegro Design are trademarks of Pall Corporation. ®
indicates a trademark registered in the USA and TM indicates a common law trademark.
Filtration.Separation.Solution is a service mark of Pall Corporation.
USD 3184
®
Advertisement
Table of Contents

Related Manuals for Pall LevMixer DB-300

Summary of Contents for Pall LevMixer DB-300
- Page 1 OPERATOR MANUAL Models DB-300, DB-300C Pall Life Sciences. USA: Port Washington, NY, USA 1 800 717 7255 toll free (USA),+1 516 484 5400 phone, biopharm@pall.com e-mail, www.pall.com. Europe: Fribourg, Switzerland +41 (0)26 350 53 00 phone, LifeSciences.EU@pall.com e-mail. Asia-Pacific : +65 6389 6500 phone, sgcustomerservice@pall.com e-mail ©...
- Page 2 6. For full compliance with CE specifications, be sure the appropriate ground connection is made. 7. For technical assistance contact the sales organization from which you purchased the product or Pall Life Sciences directly 8. Each LevMixer mixing bag contains a magnetic impeller, ®...
- Page 3 Document #: 020-17475-00 Revision: E Page #: 3 of 63 9. Keep the supplied magnetic shields on bags, magnetic chargers, and impellers when not in use. DO NOT open the machine or control box while the Drive Unit is plugged in. DO NOT submerge the drive in water.
-
Page 4: Table Of Contents
Document #: 020-17475-00 Revision: E Page #: 4 of 63 TABLE OF CONTENTS A. SAFEGUARDS & PRECAUTIONS ...................2 TABLE OF CONTENTS .....................4 C. SPECIFICATIONS ......................5 D. OVERVIEW ........................7 PRINCIPLE OF OPERATION ...................7 MIXING SYSTEM COMPONENTS AND ACCESSORIES ..........9 G. SUPERCONDUCTING DRIVE UNIT CONTROL ............14 H. -
Page 5: Specifications
Document #: 020-17475-00 Revision: E Page #: 5 of 63 SPECIFICATIONS Table1. Specifications sheet Footprint (in. & mm) WxLxH: 16” x 44” x 36” (compact configuration) 16” x 51.6” x 36” (expanded) Control box, cart, & mixer 304L Stainless Steel enclosure material: Control box, cart, &... -
Page 6: Overview
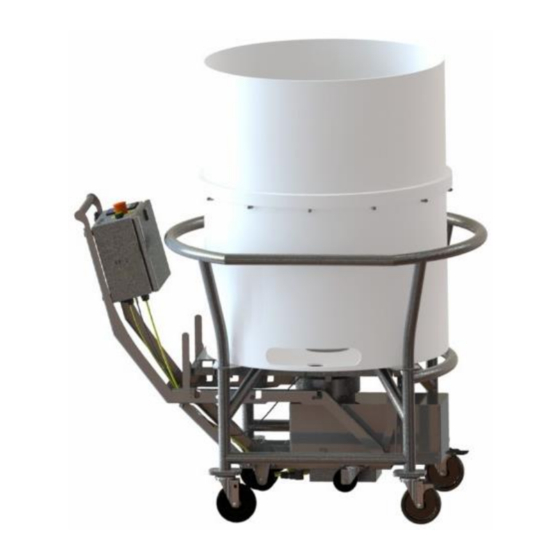
2. Elevated Retaining Tank (either on dolly or with integrated legs) 3. Drive Port that couples drive unit with bag The mixing system can accommodate a variety of standard and custom-designed single-use mix bags available from PALL LifeSciences. PRINCIPLE OF OPERATION The LevMixer ’s mixing technology is based on non-contact magnetic coupling... - Page 7 Document #: 020-17475-00 Revision: E Page #: 7 of 63 superconductor interaction ties the two bodies together resulting in a very stable mechanical coupling with finite equilibrium separation. This peculiar stability cannot be attained in conventional mixer designs that employ two permanent magnets. The Cryogenic temperatures (approx.
-
Page 8: Mixing System Components And Accessories
Document #: 020-17475-00 Revision: E Page #: 8 of 63 MIXING SYSTEM COMPONENTS AND ACCESSORIES Figure 2: Main components of LevMixer system. - Page 9 Document #: 020-17475-00 Revision: E Page #: 9 of 63 Figure 3: From left to right, Magnetic Charger (DBCI001), Shield for Magnetic Charger, (DBAK011) and Magnetic Charger (DBCI001) coupled with Shield. During the charging procedure, the ball bearing (red in far left picture) should rest on the surface of the levitation head of the drive unit. Figure 4: From left to right, Magnetic Charger (DBCI005), Shield for Magnetic Charger, (DBAK011) and Magnetic Charger (DBCI005) coupled with Shield.
- Page 10 Document #: 020-17475-00 Revision: E Page #: 10 of 63 Figure 5: (Top) Drive-bag interface. (Bottom) Interface is installed in the railed port of the dolly (held in place by the O-ring).
- Page 11 Document #: 020-17475-00 Revision: E Page #: 11 of 63 Figure 6: Magnetic clamp (left) and centering aligner (right). Figure 7: Magnetic clamp is assembled with centering aligner prior to attachment to the bag.
-
Page 12: Superconducting Drive Unit Control
Document #: 020-17475-00 Revision: E Page #: 12 of 63 G. SUPERCONDUCTING DRIVE UNIT CONTROL Note: the Superconducting drive unit is sealed for water/spray resistance and has a splash resistant control box. General Overview Direct reading of impeller speed of rotation is provided by a sensor ring on the levitation head. - Page 13 Document #: 020-17475-00 Revision: E Page #: 13 of 63 leaving other functions of the drive unit in operation. To reset the unit release the E-stop button by pulling it up until it clicks, then acknowledge the alarm on the touch screen. IMPORTANT! If the drive unit charging phase has not been completed it is possible the Levmixer will not levitate correctly.
-
Page 14: Charging The Superconductors
Pall single-use mixing bags employ the 4-magnet set-up as a standard, although the 6-magnet format is available for select applications. - Page 15 Document #: 020-17475-00 Revision: E Page #: 15 of 63 4. Press the main power button on the control box; the button will illuminate when activated. The cryocooler and touch screen will activate. A PLACE CHARGER IMMEDIATELY notification will be displayed on the touch screen to remind the user to complete step 3.
- Page 16 Turn the system off for at least 25 minutes and repeat the set up procedure. If the problem continues, contact a technical representative from your distributor or Pall Life Sciences directly.
-
Page 17: Dolly - Tank Assembly
The tank hole should fit loosely around the Interface. 3. When using PALL standard containers and dollies, tanks up to and including 350L use a centrally located impeller and therefore use the central port dolly configuration. PALL standard 500L bags use off-center impeller and therefore use the off-center port dolly configuration. - Page 18 Document #: 020-17475-00 Revision: E Page #: 18 of 63 2. To set the rails for the central (15”) port position set the right and left adjusters so that the side with word “CENTER” is visible on both. See figures 13 and 14. Ensure that the two dot marks on the right adjuster are located next to the two dot marks on the rail and single dot mark of the left adjuster is located next to the single dot mark on the left rail.
-
Page 19: Bag-Interface Assembly
Document #: 020-17475-00 Revision: E Page #: 19 of 63 J. BAG-INTERFACE ASSEMBLY Figure 17: Assembly of dry bag with interface Procedure: 1. Carefully open the EXTERNAL packaging of the mixing bag. A protective shield is magnetically attached to the outside of the bag over the Impeller seat. This shield must be removed from the bag before assembling the interface. -
Page 20: Inserting Mixing Bag Into Container
Document #: 020-17475-00 Revision: E Page #: 20 of 63 INSERTING MIXING BAG INTO CONTAINER Figure 18: Bag-Tank Assembly Procedure: 1. Place the mixing bag in the tank by aligning the magnetic clamp with the large pre- cut port on the bottom. Pull the bottom drain tube through the drain port opening. 2. -
Page 21: Coupling The Bag With Superconducting Drive Unit
Document #: 020-17475-00 Revision: E Page #: 21 of 63 COUPLING THE BAG WITH SUPERCONDUCTING DRIVE UNIT For compact drive unit model see also Section S. The unit can be used in one of two configurations: standard or expanded. The configurations can be switched following the procedure described in Section O. - Page 22 Document #: 020-17475-00 Revision: E Page #: 22 of 63 Figure 20: Universal Latch Removal – Step 1 Figure 21: Universal Latch Removal – Step 2 Initial latch position before removal is shown. Rotate the latch clockwise until the axle flats are aligned with the horizontal slots.
- Page 23 Document #: 020-17475-00 Revision: E Page #: 23 of 63 2. Make sure that the universal latch is installed in the correct position to match the rail port intended for connection. See Figure 19 for corresponding latch and port positions. Pull the latch back towards the handle as shown in Figure 20.
-
Page 24: Mixing
Document #: 020-17475-00 Revision: E Page #: 24 of 63 M. MIXING 1. On the touch screen choose the mode of operation and set parameters/recipe for the mixing run. Start run 3. For additional instruction on using the operator interface, see section P DO NOT attempt to mix in empty or dry bags. -
Page 25: Maintenance & Care Of Superconducting Drive Unit
Document #: 020-17475-00 Revision: E Page #: 25 of 63 O. MAINTENANCE & CARE OF SUPERCONDUCTING DRIVE UNIT The LevMixer Superconducting Drive is designed to operate with minimal ® maintenance. However, to minimize wear it is recommend that the drive be unplugged if it is not in use for more than 24 hours. - Page 26 Document #: 020-17475-00 Revision: E Page #: 26 of 63 O.2 TROUBLESHOOTING Table 3 lists ways for resolving possible problems. Contact technical service if problems persist. Table3. Troubleshooting Problem Description Possible Reason Corrective Action Unit does not start Main power fuse Contact service personnel when power button is is burned out...
- Page 27 Document #: 020-17475-00 Revision: E Page #: 27 of 63 Problem Description Possible Reason Corrective Action Impeller Coupling Sensor ring Install Sensor ring on levitated head Alarm removed from levitated head Sensor ring cable Connect the sensor ring cord to connector is disconnected on rear of control box (Figure 9).
- Page 28 Document #: 020-17475-00 Revision: E Page #: 28 of 63 Pull out the carriage screws at the four frame connection points and remove the two bushings installed in the side tabs. Hold the frame at the heavier control box side to prevent it from tipping.
- Page 29 Document #: 020-17475-00 Revision: E Page #: 29 of 63 Figure 27: Frame adjustment elements O.3.2 Sensor ring replacement: If replacement of sensor ring is required perform the following steps: Unlock the cable clamps on the frame and release the sensor ring cable. ...
- Page 30 Secure the connector holding cap by rotating it clockwise. Tighten the cap firmly to seal the connection. *Use only power cords provided by PALL for replacement. Figure 29: Power cord replacement O.3.4 SD micro card replacement: Micro SD cards with up to 2.0 GB of Flash memory are compatible with the Memory slot.
- Page 31 Document #: 020-17475-00 Revision: E Page #: 31 of 63 To remove the Micro SD card Push down on the top of the card gently to release the spring. The card will pop up for removal. d) Close the Control Box door and lock it by rotating the latch 90⁰ in a clockwise direction using a flat-head screwdriver.
- Page 32 Document #: 020-17475-00 Revision: E Page #: 32 of 63 O.3.6 LED bulb replacement: To change the LED bulb (see figures 32 and 33): Switch the unit off and unplug it from the external power source. Unlock control box by rotating the latch counterclockwise using a flat-head screwdriver.
- Page 33 Document #: 020-17475-00 Revision: E Page #: 33 of 63 Figure 34: Removing filter cover Figure 35: Replacing filter membrane O.3.8 Speed Calibration Verification: Equipment recommended: Test Impeller: accessory item #LT-DBAK007T equipped with piece of reflective tape (tachometer accessory) on side surface. Optical Tachometer: Omega HHT13 or equivalent UNIT CONDITION: charged properly and have corresponding impeller coupled above the levitated head.
- Page 34 Document #: 020-17475-00 Revision: E Page #: 34 of 63 Table4. Rotational Speed Calibration Test Measurements External External Panel Panel External Panel Point Tachometer Tachometer Tachometer reading Tachometer Tachometer (RPM) Reading reading Reading allowable (RPM) allowable (RPM) range Deviation Deviation range (RPM) falls within...
-
Page 35: Operator Control Interface Guide
Document #: 020-17475-00 Revision: E Page #: 35 of 63 P. OPERATOR CONTROL INTERFACE GUIDE P.1 Navigating the Levmixer control screen Each screen in the LevMixer control software has a number of common elements. 1. The window bar shows the name and/or status of each screen. 2. - Page 36 When the drive unit is turned on the cryocooler will start operating immediately. The system will display the Pall LevMixer screen (see Figure 40) with the software revision number shown. The unit will then automatically enter Power up mode. An interactive power up process begins when the power up screen opens.
- Page 37 Document #: 020-17475-00 Revision: E Page #: 37 of 63 Figure 40: LevMixer screen Figure 41: Place charger screen Readiness of the unit for levitation is indicated by a blinking READY button on the screen after completion of the power up process. Selecting this button brings the system to the Main Menu screen where the user can choose the mode of operation to prepare for mixing.
- Page 38 Document #: 020-17475-00 Revision: E Page #: 38 of 63 Screen controls require that he user select the type of charger needed for the impeller to be used for mixing (4-mag or 6-mag). This is a necessary step in the completion of power up.
- Page 39 Document #: 020-17475-00 Revision: E Page #: 39 of 63 If the mixer is powered-off without using the shutdown procedure the “Unscheduled Power Off” message with time stamp will appear during power-up. Read the screen directions carefully and select Acknowledge to continue. For normal shutdowns follow the shutdown procedure available through the Main menu screen.
- Page 40 Document #: 020-17475-00 Revision: E Page #: 40 of 63 To simplify exchange of recipes between drive units a Migration function is available at the Supervisor level. The feature allows Import/Export of the entire library from/to a removable memory card (See O.3.4 and P.8 for details). Operators can load, start recipe run and view a recipe’s instructions.
- Page 41 Document #: 020-17475-00 Revision: E Page #: 41 of 63 When failure mode is activated during a recipe run the job is paused automatically and can be resumed upon failure reset. “Unscheduled Finish” is displayed with a time stamp, run duration and name of the recipe after finishing the recipe run. To resume to the Auto Mode screen press the OK button.
- Page 42 Document #: 020-17475-00 Revision: E Page #: 42 of 63 Figure 49: Recipe Editor screen To edit the name under which a recipe is stored, follow these steps: 1. Press Select on the Automatic Mode screen. The Recipe Selector screen opens. 2.
- Page 43 Document #: 020-17475-00 Revision: E Page #: 43 of 63 Setting Up a Manual Job Parameters available for a manual job are speed of rotation of impeller (RPM) and duration of run (hh:mm). Previous settings are remembered until they are changed manually.
- Page 44 Document #: 020-17475-00 Revision: E Page #: 44 of 63 Stopping a Manual Mode Job (Timed Run) Timed runs will automatically stop when the scheduled run time is complete. The screen will display “Successful Finish” with a time stamp and run duration. To resume to the Manual Mode screen press the OK button.
- Page 45 Document #: 020-17475-00 Revision: E Page #: 45 of 63 When the control is switched to a remote panel the “Remote Control” status is indicated in the window status bar. Figure 54: Remote mode screen To switch control back to the LevMixer, press and hold the Switch Control Back to Local button on the Remote Mode screen.
- Page 46 Document #: 020-17475-00 Revision: E Page #: 46 of 63 Upon alarm reset the system will return to one of the following: a) Manual Mode idle condition: if at the moment of alarm the mixer is in Remote mode or idled in Manual mode. b) Manual Mode pause condition: if at the moment of alarm the mixer is in Manual mode.
- Page 47 Document #: 020-17475-00 Revision: E Page #: 47 of 63 b) On the failure detection screen identify the Motor failure in the blinking bullet. Note: the date and time of the failure event is indicated on this screen. c) Press the RESET button to return the unit to operation. The screen will open with a request to turn off power to reset the failure signal.
- Page 48 Document #: 020-17475-00 Revision: E Page #: 48 of 63 Press the setup button on the Main menu screen Select the “Date/Time” function using the up and down arrows Press the curved arrow to go to the next screen ...
- Page 49 Document #: 020-17475-00 Revision: E Page #: 49 of 63 Figure 59: Import/Export screen Figure 60: Confirmation screen 7. Import of Recipe library from memory card Insert a SD card into the Memory slot (See section O) Login to the system as Supervisor ...
- Page 50 Document #: 020-17475-00 Revision: E Page #: 50 of 63 P.9 Finishing Mixing Run Each time upon finishing run the notification to operator is exposed on screen. Details of the notification depend on events during process. Possible scenarios are provided in the Table 5.
-
Page 51: Spare Parts & Standard Accessories Lists
Document #: 020-17475-00 Revision: E Page #: 51 of 63 Q. SPARE PARTS & STANDARD ACCESSORIES LISTS Table7. Spare parts and accessories (See Figure 2, 61, 62 and 68) Item Description Catalog number Accessories US Power Cord LT-SVSP365 EU Power Cord LT-SVSP366 6-magnet Impeller LT-SVSP311... - Page 52 Document #: 020-17475-00 Revision: E Page #: 52 of 63 For compact drive unit model see Section S. Figure 61: Levmixer components.
- Page 53 Document #: 020-17475-00 Revision: E Page #: 53 of 63 Figure 62: Levmixer components (bottom view)
-
Page 54: Electrical Schematic
Document #: 020-17475-00 Revision: E Page #: 54 of 63 R. ELECTRICAL SCHEMATIC Figure 63: Electrical Schematic. Control Box (See Table 8 for Remote Control I/O chart) - Page 55 Document #: 020-17475-00 Revision: E Page #: 55 of 63 Figure 64: Electrical Schematic. Cage...
- Page 56 Document #: 020-17475-00 Revision: E Page #: 56 of 63 Table8. Remote Control I/O Chart (See schematic in Figures 63 and 64) ANALOG I/O CONNECTOR CIRCUITS PIN# CIRCUIT DESCRIPTION RANGE CALIBRATION 2, 3 Speed output 4-20mA 0-210 RPM 4mA=0% of range 20mA=100% of range 4, 5 Speed set point input 0-10VDC 0-210 RPM...
- Page 57 Document #: 020-17475-00 Revision: E Page #: 57 of 63 48 VDC power supply 48V power supply input harness Cryocooler controller Cryocooler controller output harness Cryocooler harness Power harness Signal harness Terminating plug...
-
Page 58: Compact Model
Document #: 020-17475-00 Revision: E Page #: 58 of 63 S. COMPACT MODEL All that described in sections A to T is applicable to compact model DB-300C except Sections I, O.3., Figure 61 and partially in Sections L, N. Compact model was developed for applications that are critical in regard of space occupied by equipment in the room. - Page 59 Document #: 020-17475-00 Revision: E Page #: 59 of 63 Figure 66: Compact Drive connected to tank Version of the drive port for permanent connection instead of rails has locking mechanism mounted on the bottom of tank (see Figure 66). It holds the drive in place levelled correctly when it is positioned for mixing (closed position) while allow drive unit to be turned down to disconnect it from impeller and bag (open position, see Figure 67).
- Page 60 Document #: 020-17475-00 Revision: E Page #: 60 of 63 Figure 68: Components of Compact version of Levmixer . For numbered spare parts see Table in Section Q...
-
Page 61: Levmixer - Service
The Mixing system was developed exclusively for mixing fluids and solids in fluids in specially designed bags. The machine should only be used for this purpose to ensure a long service life. Should your Magnetic Mixer require service, contact: North America: PALL Life Sciences 20 Walkup Drive Westborough, MA 01581 E-mail: PASS_Support@pall.com Europe:...
Need help?
Do you have a question about the LevMixer DB-300 and is the answer not in the manual?
Questions and answers