Table of Contents
Advertisement
Advertisement
Table of Contents

Related Manuals for Stryker Endoscopy 1088


Summary of Contents for Stryker Endoscopy 1088
-
Page 3: Table Of Contents
..... 24 Using the Up and Down Buttons Cleaning and Maintaining the 1088 Camera . . . 25 ......25... - Page 4 ......29 Maintaining the 1088 Camera ......29 Replacing the Fuses .
-
Page 5: Warnings And Cautions
Warnings and Cautions Warnings and Cautions Please read this manual and follow its instructions carefully. The words warning, caution, and note carry special meanings and should be carefully reviewed: Warning The personal safety of the patient or physician may be involved. - Page 6 The warranty is void if any of these warnings is disregarded. Stryker Endoscopy accepts full responsibility for the effects on safety, reliability, and performance of the equipment only if: •...
-
Page 7: Symbol Definitions
In addition to the cautionary symbols already listed, other symbols found on the 1088 Camera and in this manual have specific meanings that clarify the proper use and storage of the 1088 Camera. The following list defines the symbols associated with this product. -
Page 9: Product Description And Intended Use
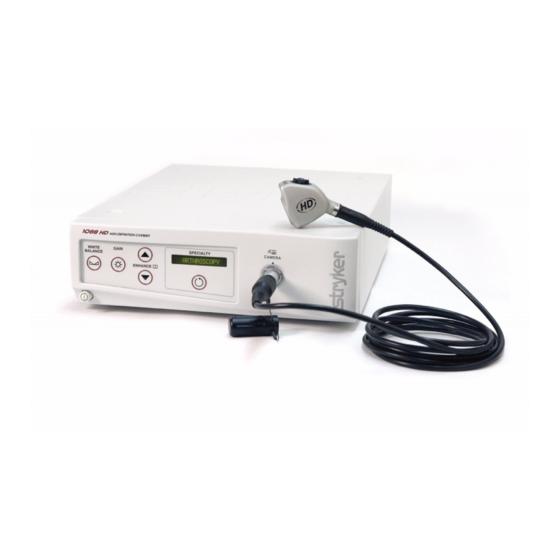
The Camera Console The camera console is the control center for the 1088 Medical Video Camera and processes the video and photographic images captured during the surgical procedure. The front console panel features controls... - Page 10 Figure 1a: The 1088 Camera console, front panel 14 15 16 17 18 Figure 1b: The 1088 Camera Console, rear panel...
- Page 11 5. Specialty Screen: Displays which surgical preset has been selected 6. Specialty Button: Selects different surgical presets 7. Camera Connector: Connects to the 1088 Camera Head 8. Sidne™ Port: Connects to the Sidne™ Console to enable voice operation 9. Ethernet Port: Provides an ethernet connection for remote diagnoses and future software upgrades 10.
-
Page 12: The Camera Head
(see the Operating the Camera Head section of this manual). Figure 2 below lists the features of the camera head. Figure 2: The 1088 HD Camera Head 1. Soaking Cap: Protects the cable connector during cleaning and sterilization 2. -
Page 13: The Coupler
Product Description and Intended Use The Coupler The coupler threads on to the face of the camera head, enabling a scope to be attached to the camera. It provides a focusing ring to adjust image sharpness. The features of the coupler are listed in Figure 3 below. Figure 3: The coupler 1. -
Page 14: Setting Up The 1088 Camera
Setting Up the 1088 Camera Note Stryker Endoscopy considers instructional training, or in- service, as an integral part of the 1088 Medical Video Camera. Your local Stryker Endoscopy sales representative will perform at least one in-service at your convenience to help set up your equipment and instruct you and your staff on its operation and maintenance. - Page 15 • If desired, connect any remote outputs using the remote cables supplied with the 1088 Camera. (See Diagram 2.) Devices connected to the remote outputs of the 1088 Camera can be operated by using the buttons on the camera head. See the “Operating the Camera Head”...
- Page 16 Wiring Diagram 1: Camera, Light Source and Flat-Panel Monitor Flat-Panel Monitor DVI-I / VGA Adapter 1088 Camera X7000 Light Source...
- Page 17 Setting Up the 1088 Camera Wiring Diagram 2: Camera, Light Source, SDC Pro HD, Sidne™, and Flat-Panel Monitor StrykerVision 1 Monitor Sidne™ 1088 Camera X7000 Light Source SDC HD...
- Page 18 Wiring Diagram 3: Camera, Light Source, Flat-Panel Monitor, and CRT Monitor StrykerVision 1 Monitor DVI-I / VGA Adapter 1088 Camera X7000 Light Source CRT Monitor Note If you are using any device with unterminated analog video inputs, you must connect a cable from the VIDEO OUT of that device to the VIDEO IN on the monitor.
-
Page 19: Setting Up The Camera Head
Setting Up the 1088 Camera Setting Up the Camera Head 1. Connect the camera head to the console. • Unscrew the soaking cap from the cable connector if necessary. • Align the red dot on the cable connector with the red dot on the camera-connector port on the front console panel (see Figure 4). -
Page 20: Setting Up The Coupler
Setting Up the Coupler 1. Attach the coupler to the camera head. • Twist the camera end of the coupler into the camera head (clockwise) until it forms a tight seal (see Figure 5). Figure 5: Attaching a coupler to the camera head Caution Do not overtighten the coupler, as this may damage the front window of the camera. - Page 21 Setting Up the 1088 Camera 2. Attach an endoscope to the coupler. • Remove the red dust cap if it is present. • Push down on the endobody clamp (a) and insert the scope into the scope end of the coupler (b). (See Figure 6.) Figure 6: Attaching an endoscope to the camera head •...
-
Page 22: Operating The 1088 Camera
“Setting Up the 1088 Camera” section of this manual. Warning Before using the 1088 Camera in a surgical procedure, test all components to ensure proper function. Ensure that a video image appears on all video monitors before beginning any procedure. -
Page 23: Using The Gain Button
• Laparoscopy • ENT • Microscope • Flex Scope The selected type will display on the specialty screen on the 1088 front console panel. Using the Light/Zoom Switch The Light/Zoom switch on the rear console panel determines the function of the arrow buttons on the camera head. (See also the “Using the Camera Head Buttons”... -
Page 24: Using The Shutter Switch
• Choose PAL for PAL analog outputs. Controlling Remote Video Accessories The 1088 Camera can remotely control two video accessories (such as the SDC Pro, a VCR, or a photo printer), enabling the user to capture images or start and stop video recording by pressing the buttons on the camera head. -
Page 25: Using The Camera Head Buttons
Using the Camera Head Buttons The camera head contains a diamond-shaped, four-button pad that offers hand control of the 1088 Camera (see Figure 7). The functions of each button are described in the following pages. Figure 7: The camera head buttons. -
Page 26: Using The W Button
Using the W Button The W button activates the white-balance function or the light/zoom function. • Press the W button for more than one second to activate the white-balance function. (The white-balance function may also be initiated using the WHITE BALANCE switch on the front console panel. -
Page 27: Cleaning And Maintaining The 1088 Camera
Cleaning and Maintaining the 1088 Camera Cleaning and Maintaining the 1088 Camera Cleaning the Camera Console Warning Disconnect the console from the AC power source before cleaning. Should the camera console need cleaning, wipe it down with a sterile cloth and mild cleaning solution. -
Page 28: Disinfecting The Camera Head
Never soak a cut or a broken cable because moisture will seep into the camera head and cause damage. Return any camera with a damaged cable to the Stryker Endoscopy Repair Department for service. Never soak the camera and cable in the same tray with sharp instruments. -
Page 29: Sterilizing The Camera Head
Cleaning and Maintaining the 1088 Camera Sterilizing the Camera Head Caution If the coupler and camera head are sterilized as a single unit, disconnecting the coupler will compromise the sterility of the two products. 100% Ethylene Oxide Gas Caution Always install the soaking cap prior to sterilization. -
Page 30: Steris System
Steris System Caution Always install the soaking cap prior to sterilization. 1. Clean and prepare the camera head and cable as recommended in the Cleaning and Disinfection sections. Ensure the soaking cap is installed. 2. Sterilize the camera head and cable using Steris® System 1 with Steris®... -
Page 31: Using Sterile Drapes
Refer calibration and operating difficulties not detailed in this manual to your Stryker Endoscopy sales representative. Disposing of the 1088 The 1088 must be disposed of according to local laws and hospital practices. The device does not contain any hazardous materials. -
Page 32: Troubleshooting
• Ensure GAIN is OFF. Noise or snow on • Plug the electrocautery generator into a picture when separate electrical outlet and separate the 1088 using power cord from the electrocautery power cord. electrocautery • Separate the camera cable from the... - Page 33 Troubleshooting Problem Possible Solution Image is not • Release the scope from the coupler and then centered reconnect it. Make sure the scope is seated correctly in the coupler. Variability in • Perform the white-balance procedure. (See the color “Using the White Balance Switch” section of this reproduction manual.) between different...
- Page 34 Problem Possible Solution White balance • See the solution for “Picture is too dark.” (WB) not good • See the solution for “Picture is too bright.” • Perform the white-balance procedure with the light source connected to the scope. Use metal- halide or xenon lighting (no fluorescent lighting).
-
Page 35: Electromagnetic Compatibility Tables
1088 Camera. Guidance and Manufacturer's Declaration: Electromagnetic Emissions 1088 Camera is intended for use in the electromagnetic environment specified below. The customer or the user of 1088 Camera should ensure that it is used in such an environment. Emissions test Compliance... - Page 36 Guidance and Manufacturer's Declaration: Electromagnetic Immunity 1088 Camera is intended for use in the electromagnetic environment specified below. The customer the user of 1088 Camera should ensure that it is used in such an environment. Electromagnetic IEC 60601 Test Immunity Test...
- Page 37 Electromagnetic Compatibility Tables Guidance and Manufacturer's Declaration: Electromagnetic Immunity 1088 Camera is intended for use in the electromagnetic environment specified below. The customer or the user of 1088 Camera should ensure that it is used in such an environment. Immunity...
- Page 38 RF transmitters, an electromagnetic site survey should be considered. If the measured field strength in the location in which the 1088 Camera system is used exceeds the applicable RF compliance level above, the 1088 Camera system should be observed to verify normal operation. If abnormal performance is observed, additional measures may be necessary, such as reorienting or relocating the 1088 Camera unit.
-
Page 39: Technical Specifications
Technical Specifications Technical Specifications Imaging System 1/3” Progressive Scan CCDs High Definition Scanning System Horizontal: 47.536 kHz Vertical: 60.02 Hz Video Outputs Digital/Analog: Two Digital Video Interface (DVI)/RGBHV 1280 x 1024 (SXGA)resolution Connector: 29-pin DVI-I Composite: One NTSC or PAL standard 1.0V P-P (75 Ohms) Connector: BNC coaxial Y/C:... - Page 40 Operating Conditions Temperature: 0° to 40° C Relative Humidity:10% to 75% Transport & Storage Conditions Temperature: -20° to 60° C Relative Humidity: 10% to 75% Atmospheric Pressure: 700 hPa to 1060 hPa Input Electrical Ratings 100-240V ~ 50/60 Hz 0.6A Total Shipping Weight 11 lbs (5.0 kg) Dimensions...
-
Page 41: Warranty
These products are being sold only for the purpose described herein, and such warranty only runs to the purchaser. In no event shall Stryker Endoscopy be liable for any breach of warranty in any amount exceeding the purchase price of the product. -
Page 42: Service And Claims
2. Package all the components carefully in the original shipping container if possible. 3. Ship the camera, pre-paid and insured to: Stryker Endoscopy Customer Service Attention: Repair Department 5900 Optical Court San Jose, CA 95138 Stryker and Stryker Endoscopy are registered trademarks of Stryker Corporation. -
Page 43: International Service
International Service International Service For service in the USA, call your Stryker Endoscopy representative or Stryker Endoscopy Customer Service at 1-800-624-4422. Outside of the USA, please contact your Stryker Endoscopy distributor at one of the following locations: Stryker Corporation Stryker European Rep - RA/QA... - Page 44 Section 1, Taipei, TAIWAN, R.O.C. 1021 Copenhagen, Denmark Phone:886-2-2322-2895 Phone:45 33 9360 99 Fax:886-2-2357-8543 Fax:45 33 9320 69 Stryker U.K. Ltd. MANUFACTURER Hambridge Road Stryker Endoscopy Inc. Newbury 5900 Optical Court Berkshire RG14 5 EP San Jose, CA 95138 United Kingdom Phone:44-1635-262400 Phone:408-754-2000 Fax:44-1635-262464...
- Page 46 5900 Optical Court San Jose, CA 95138 1-800-624-4422 1-800-729-2917 1000-400-675 Rev. A...
Need help?
Do you have a question about the 1088 and is the answer not in the manual?
Questions and answers
¿Como se puede desactivar los botones del cabezal?