Table of Contents
Advertisement
Quick Links
Advertisement
Table of Contents

Related Manuals for Stryker Endoscopy X7000


Summary of Contents for Stryker Endoscopy X7000
-
Page 3: Table Of Contents
Product Description / Intended Use ....5 Setting Up the X7000 ......8 . - Page 4 Other Service ........33...
-
Page 5: Warnings And Cautions
5. Attempt no internal repairs or adjustments not specifically detailed in this operating manual. 6. Never sterilize any part of the X7000 console. 7. Disconnect the X7000 from the electrical outlet when inspecting the fuses. The warranty is void if any of these warnings is disregarded. - Page 6 Stryker Endoscopy accepts full responsibility for the effects on safety, reliability, and performance of the equipment only if: • Readjustments, modifications, and/or repairs are carried out exclusively by Stryker Endoscopy. • The electrical installation of the relevant operating room complies with the applicable IEC, CEC, and NEC requirements.
-
Page 7: Product Description / Intended Use
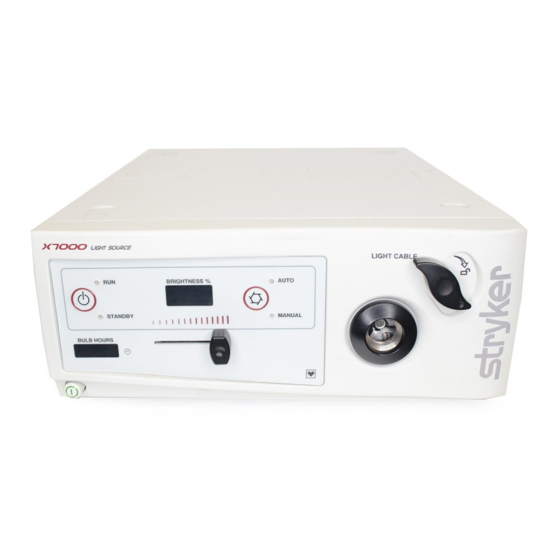
The X7000 uses a 300-watt xenon lamp to generate bright, crisp light, which it delivers to the surgical site via a fiberoptic light cable. The X7000 is compatible with all Stryker light cables, and, with the proper light cable and adapters, can connect to any flexible or rigid endoscope. - Page 8 13 14 15 Figure 1: The X7000 console, front panel (top) and rear panel (bottom)
- Page 9 Product Description / Intended Use Power Button: Powers the unit on and off. Bulb-Hours LCD: Displays the total number of hours the lamp has operated since the last lamp change. STANDBY LED: Illuminates when the unit is operating in the STANDBY mode.
-
Page 10: Setting Up The X7000
Stryker Endoscopy sales representative to schedule an inservice after the equipment has arrived. Note When selecting a setup location for the X7000, consult the “Electromagnetic Compatibility” section included in this manual to determine the best location. To set up the X7000, make the following connections: •... -
Page 11: Connecting The Camera And Monitor
X7000 Camera Monitor Figure 2: A sample system including a medical camera, monitor, and the X7000 1. Connect a BNC cable to the VIDEO IN port (a) on the rear panel of the X7000. 2. Connect the other end of the BNC cable to the VIDEO OUT port (b) on the rear panel of the camera. -
Page 12: Connecting The Light Cable
Warning Use only nonconductive fiberoptic cables with the X7000 to maintain electrical isolation. Note The X7000 Xenon Light Source is compatible with all Stryker Light Cables. 1. Lock open the cable clamp by turning the jaw handle clockwise until it stops (see Figure 3). - Page 13 Setting Up the X7000 2. Insert a clean, dry fiberoptic cable into the cable port until the jaw latch releases and the jaw clamps the cable in place (see Figure 4). Pull gently on the fiber optic cable to test that it is securely seated in the cable port.
-
Page 14: Operating The X7000
To power on the X7000: 1. Confirm that the X7000 contains a properly installed lamp. If no lamp is installed, follow the instructions in the “Replacing the Lamp” section of this manual before proceeding. -
Page 15: Selecting The Operation Mode
• STANDBY mode: The STANDBY mode is used when the X7000 is powered on but not in immediate use. It reduces the light output to a minimum and minimizes the heat generated at the tip of an unattended light cable or scope. -
Page 16: Receiving Feedback From The X7000
The heated scope and adapter may cause burns. Receiving Feedback from the X7000 The X7000 provides feedback through the Brightness LCD and the Bulb- Hours LCD. • The Brightness LCD shows the intensity level of the light as a percentage between 0 and 100. -
Page 17: Safety Shutoff
The lamp is kept off because the Return the X7000 for bulb fan-sensing circuit has repair. detected an error. BULB The X7000 does not detect a lamp. Install a Stryker lamp. If the condition persists, return the X7000 for repair. OVER... -
Page 18: Checking The Esst Feature
To verify the ESST feature is active, perform the following test before every surgical procedure: 1. Set up the X7000 system with an ESST light cable and scope, and then power on the system. 2. Place the X7000 in RUN mode. -
Page 19: Using The Ethernet Interface
This system feature is not necessary for regular light- source operation. 1. Prior to powering on the X7000, connect one end of a CAT5 ethernet cable to the Ethernet Port on the rear console panel, and the other end to the existing hospital network. -
Page 20: Cleaning And Maintenance
Cleaning the X7000 Warning Unplug the X7000 before cleaning the unit. 1. Clean the external surfaces of the X7000 using a cloth or sponge dampened with a mild detergent or disinfectant. 2. Clean and maintain the light cable according to the manufacturer’s instructions. -
Page 21: Replacing The Lamp Module
Wait at least three minutes for the lamp to cool before handling it. To replace the lamp module, 1. Power down the X7000. 2. Open the lamp door (see Figure 5). Figure 5: Opening the lamp door Note If the unit is on, opening the lamp door will turn off the bulb. - Page 22 7. Power on the bulb (if not already on) and verify that the hour meter reads “0.” Note Using a non-Stryker replacement bulb module will result in no light output. Note Do not operate the X7000 with a burned out lamp or with no lamp installed.
-
Page 23: Replacing The Fuses
Warning To avoid the risk of fire, use only 5.0A 250V fuses. 4. Reinstall the fuse holder. Disposing of the X7000 The device must be disposed of according to local laws and hospital practices. The device does not contain any hazardous materials. -
Page 24: Troubleshooting
Replace the lamp if necessary. • Ensure the light cable is correctly engaged with the cable port. As a safety feature, the X7000 will provide no light output unless a fiberoptic light cable is properly seated in the cable port. - Page 25 • Ensure the lamp has adequate lamp life remaining. The display on the Bulb-Hours LCD should be less than 500 total hours. • Ensure the X7000 is in RUN mode. (The RUN LED should be illuminated.) If necessary, press the Mode button to switch from STANDBY to RUN.
- Page 26 VIDEO-IN connector. Adjust the brightness control setting as necessary. Note Stryker Endoscopy has designed the AUTO-shutter feature of the X7000 for use only with Stryker Endoscopy medical video cameras. The AUTO feature may not provide sufficient light when connected to non-Stryker Endoscopy medical video cameras.
-
Page 27: Technical Specifications
Technical Specifications Technical Specifications Electrical Primary: 100 - 240VAC, 50/60 Hz, 450W Fuses (2): 5.0A 250V Dimensions Height: 5.0” (12.7 cm) Width: 12.5” (31.8 cm) Depth: 16.8” (42.7 cm) Weight: 18.0 lbs. (8.2 kg) Fiber Optic Cable Range: 2 mm to 6.5 mm diameter Lamp Type: 300 Watt Xenon Cermax (Elliptical) - Page 28 Patent Protection U.S. #5,850,496 and 6,110,107. Other patents pending. Stryker European Representative: Stryker France ZAC Satolas Green Pusignan Av. De Satolas Green 69881 MEYZIEU Cedex France...
-
Page 29: Electromagnetic Compatibility Tables
X7000. Guidance and Manufacturer's Declaration: Electromagnetic Emissions X7000 is intended for use in the electromagnetic environment specified below. The customer or the user of X7000 should ensure that it is used in such an environment. - Page 30 Guidance and Manufacturer's Declaration: Electromagnetic Immunity X7000 is intended for use in the electromagnetic environment specified below. The customer or the user of X7000 should ensure that it is used in such an environment. Electromagnetic IEC 60601 Test Immunity Test...
- Page 31 RF transmitters, an electromagnetic site survey should be considered. If the measured field strength in the location in which the X7000 system is used exceeds the applicable RF compliance level above, the X7000 system should be observed to verify normal operation. If abnormal performance is observed, additional measures may be necessary, such as reorienting or relocating the X7000 unit.
- Page 32 Recommended Separation Distances Between Portable and Mobile RF Communications Equipment and the X7000 System The X7000 system is intended for use in an electromagnetic environment in which radiated RF disturbances are controlled. The user of the X7000 system can help prevent electromagnetic...
-
Page 33: Warranty
Endoscopy authorized service personnel. The customer is responsible for returning the defective equipment to the factory at his or her own expense. Stryker Endoscopy or its representative will service the unit, repair or replace any defective parts thereof, and return the unit to the customer. -
Page 34: Service And Claims
A replacement part may not appear the same as the original, but all parts with the same part number will be completely interchangeable. © Stryker and Stryker Endoscopy are registered trademarks of Stryker Corporation. - Page 35 Other Service Other Service For service in the U.S.A., call your Stryker Endoscopy representative or call Stryker Endoscopy Customer Service at 1-800-624-4422. Outside of the U.S.A., please contact your Stryker Endoscopy distributor at one of the following locations: Stryker Corporation...
- Page 36 Section 1, Taipei, TAIWAN, R.O.C. 1021 Copenhagen, Denmark Phone:886-2-2322-2895 Phone:45 33 9360 99 Fax:886-2-2357-8543 Fax:45 33 9320 69 Stryker U.K. Ltd. MANUFACTURER Hambridge Road Stryker Endoscopy Inc. Newbury 5900 Optical Court Berkshire RG14 5 EP San Jose, CA 95138 United Kingdom Phone:44-1635-262400 Phone:408-754-2000 Fax:44-1635-262464...
- Page 38 5900 Optical Court San Jose, CA 95138 1-800-624-4422 1-800-729-2917 1000-400-651 Rev. C...
Need help?
Do you have a question about the X7000 and is the answer not in the manual?
Questions and answers