
Related Manuals for AREBOS Deluxe AR-HE-OB710

Summary of Contents for AREBOS Deluxe AR-HE-OB710
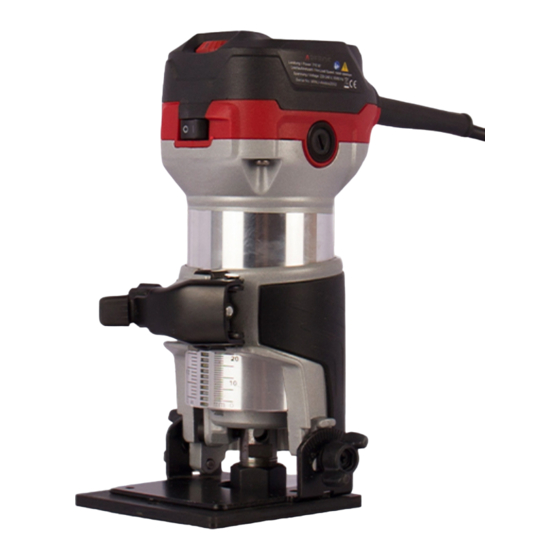
- Page 1 User’s manual – A S Trimmer Deluxe REBO Trimmer Deluxe AR-HE-OB710 Please follow all security measures in this user´s manual to ensure a secure use. Thank you for trusting in AREBOS.
-
Page 2: Table Of Contents
User’s manual – A S Trimmer Deluxe REBO List of Content 1. Security Instructions ..............3 1.1 Symbols ............................3 1.2 General Safety Instructions ......................3 1.3 Work area safety ........................... 3 1.4 Electrical safety..........................4 1.5 Personal Safety ..........................4 1.6 Power tool use and care ........................ -
Page 3: Security Instructions
User’s manual – A S Trimmer Deluxe REBO Please read and save these instructions. Read through this user’s manual carefully before using product. Protect yourself and others by observing all safety information, warnings and cautions. Failure to comply with instructions could result in personal injury and/or damage to product or property. -
Page 4: Electrical Safety
User’s manual – A S Trimmer Deluxe REBO 1.4 Electrical safety • Power tool plugs must match the outlet. Never modify the plug in any way. Do not use any adapter plugs with earthed (grounded) power tools. Unmodified plugs and matching outlets will reduce risk of electric shock. -
Page 5: Service
User’s manual – A S Trimmer Deluxe REBO the power tool or these instructions to operate the power tool. Power tools are dangerous in the hands of untrained users. • Maintain power tools. Check for misalignment or binding of moving parts, breakage of parts and any other condition that may affect the power tool’s operation. -
Page 6: Parts List
User’s manual – A S Trimmer Deluxe REBO • Save these instructions. • WARNING: DO NOT let comfort or familiarity with product (gained from repeated use) replace strict adherence to safety rules for the subject product. MISUSE or failure to follow the safety rules stated in this instruction manual may cause serious personal injury. -
Page 7: Electronic Function
User’s manual – A S Trimmer Deluxe REBO • CAUTION: Before plugging in the tool, always check to see that the tool is switched off. • To start the tool, press the "ON ( I )" side of the switch. •... -
Page 8: Operation
User’s manual – A S Trimmer Deluxe REBO 1. Tighten 2. Loosen 3. Shaft lock CAUTION: • Do not tighten the collet nut without inserting a bit, or the collet cone will break. • Use only the wrenches provided with the tool. •... -
Page 9: Templet Guide (Optional Accessory)
User’s manual – A S Trimmer Deluxe REBO • NOTE: Moving the tool forward too fast may cause a poor quality of cut, or damage to the bit or motor. Moving the tool forward too slowly may burn and mar the cut. The proper feed rate will depend on the bit size, the kind of workpiece and depth of cut. -
Page 10: Straight Guide (Optional Accessory)
User’s manual – A S Trimmer Deluxe REBO can be calculated by using the following equation: Distance (X) = (outside diameter of the templet guide - router bit diameter) / 2 5.3 Straight guide (optional accessory) • The straight guide is effectively used for straight cuts when chamfering or grooving. Bolt Guide Plate Straight Guide... -
Page 11: Circular Work
User’s manual – A S Trimmer Deluxe REBO 5.4 Circular work 1. Wing Nut 2. Guide Plate 3. Straight Guide 4. Central hole 5. Bolt • Circular work may be accomplished if you assemble the straight guide and guide plate as shown in the figures. -
Page 12: Trimmer Guide (Optional Accessory)
User’s manual – A S Trimmer Deluxe REBO less than 6 mm in diameter into the center hole to secure the straight guide. Pivot the tool around the nail in clockwise direction. 5.5 Trimmer guide (optional accessory) • Trimming, curved cuts in veneers for furniture and the like can be done easily with the trimmer guide. -
Page 13: Base Protector Removed From The Tilt Base (Optional Accessory)
User’s manual – A S Trimmer Deluxe REBO • Place the tool onto the tilt base and close the locking lever at the desired protrusion of the bit. For desired angle, tighten the clamping screws on its sides. • Firmly clamp a straight board to the workpiece and use it as a guide against the tilt base. Feed the tool in the direction of the arrow. - Page 14 User’s manual – A S Trimmer Deluxe REBO • Install the pulley on the tool by pressing the shaft lock and firmly tightening the pulley with a wrench. 1. Collet nut 2. Collet cone • Place the collet cone and screw the collet nut on the offset base as shown in the figure. •...
- Page 15 User’s manual – A S Trimmer Deluxe REBO Offset base (optional accessory) can also be used with a trimmer base and a grip attachment (optional accessory) for more stability. 1. Screws 2. Offset base plate 3. Upper section of the offset base •...
-
Page 16: Adjusting The Depth Of Cut When Using The Plunge Base (Optional Accessory)
User’s manual – A S Trimmer Deluxe REBO • To use the tool as a router, install the tool on a plunge base (optional accessory) by pressing it down fully. Either knob type grip or bar type grip (optional accessory) can be used according to your work. - Page 17 User’s manual – A S Trimmer Deluxe REBO • Place the tool on a flat surface. Loosen the lock lever and lower the tool body until the bit just touches the flat surface. Tighten the lock lever to lock the tool body. •...
-
Page 18: Straight Guide (Optional Accessory)
User’s manual – A S Trimmer Deluxe REBO • Install the straight guide on the guide holder (optional accessory) with the wing nut. • Insert the guide holder into the holes in the plunge base and tighten the wing bolts. To adjust the distance between the bit and the straight guide, loosen the wing nut. -
Page 19: Templet Guide (Optional Accessory)
User’s manual – A S Trimmer Deluxe REBO • If the distance (A) between the side of the workpiece and the cutting position is too wide for the straight guide, or if the side of the workpiece is not straight, the straight guide cannot be used. -
Page 20: Dust Nozzle Sets
User’s manual – A S Trimmer Deluxe REBO 5.12 Dust nozzle sets For the trimmer base 1. Dust Nozzle 2. Thumb Screw 3. Trimmerbase For the plunge base (optional accessory) • Use the dust nozzle for dust extraction. Install the dust nozzle on the tool base using the thumb screw so that protrusion on the dust nozzle fit to the notch in the tool base. -
Page 21: Maintenance
User’s manual – A S Trimmer Deluxe REBO 6. Maintenance • CAUTION: Always be sure that the tool is switched off and unplugged before attempting to perform inspection or maintenance. • Never use gasoline, benzine, thinner, alcohol or the like. Discoloration, deformation or cracks may result. -
Page 22: Disposal Instructions
User’s manual – A S Trimmer Deluxe REBO 7. Disposal Instructions 7.1 Disposal of the packaging • Please make reference to the guidelines and standards for appropriate disposal of the packaging valid in your region. In part, the package may consist of plastic bags - watch this respect, with special care to ensure that this is out of the reach of children. -
Page 23: Eu Declaration Of Conformity
Authorised representative for the technical documentation: Korhan Canbolat Office address: Canbolat Vertriebs GmbH Gneisenaustraße 10-11 D-97074 Würzburg Return address can be found in the imprint: https://www.arebos.de/impressum/ VAT identification number: DE 263752326 Court of the Commercial Register is Würzburg, HRB 10082 WEEE Reg.-No. DE 61617071...
Need help?
Do you have a question about the Deluxe AR-HE-OB710 and is the answer not in the manual?
Questions and answers