Table of Contents
Advertisement
MTU-5C Quick
Start Guide for MT
MTU-5C (components) ............................ 2
Creating a Configuration File .................... 3
Configuration Creator ..............................
Electric Channel Settings .........................
Magnetic Channel Settings .......................
Saving a Configuration File .......................
MTU-5C Connections ............................. 8
SD Card - Recording Data ....................... 9
Stopping a recording ...........................
Importing - Field QC ............................... 11
Field QC .............................................. 12
Process Data .........................................
View Recording Details ............................
Technical Support Contact ....................... 15
Version: 220412
ID: DAA19
4
5
.
6
7
...10
.
13
14
1
Advertisement
Table of Contents

Related Manuals for Phoenix Geophysics MTU-5C


Summary of Contents for Phoenix Geophysics MTU-5C
-
Page 1: Table Of Contents
MTU-5C (components) ……………………..2 MTU-5C Quick Creating a Configuration File ……………….. 3 Configuration Creator ………………………... Electric Channel Settings …………………..Start Guide for MT Magnetic Channel Settings ………………….. Saving a Configuration File ………………….. MTU-5C Connections ……………………….. 8 SD Card - Recording Data ………………….. 9 Stopping a recording ………………………... -
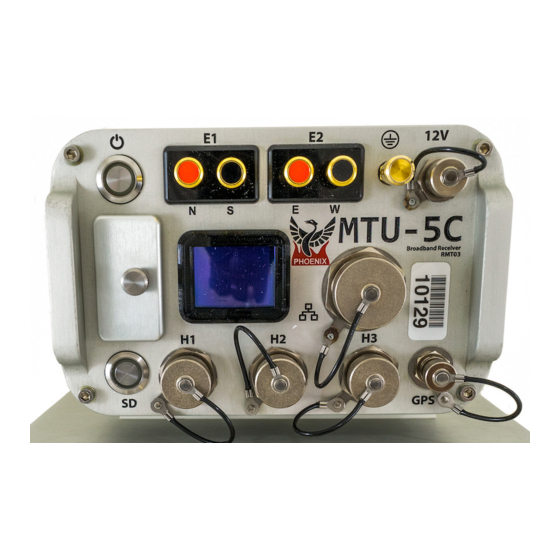
Page 2: Mtu-5C (Components)
Components Power/Record button and indicator Display E1 (Ex) electrode connectors E2 (Ey) electrode connectors Ground electrode connector 12VDC power input LAN connector GPS antenna connector H1 (Hx) magnetic sensor connector H2 (Hy) magnetic sensor connector H3 (Hz) magnetic sensor connector SD card button and indicator 10 SD card slot and cover... -
Page 3: Creating A Configuration File
Creating a MT - Configuration File Open EMpower, click the Prepare button and complete the required information 1. Select the Receiver Type 2. Recording 2.1. MT - Configuration Creator Use the Calibration and System Test options as needed 3. Calibration 3.1. -
Page 4: Configuration Creator
Configuration Creator 1. Check that the Receiver type is MTU-5C 2. Select the Schedule 1.1. Manual or Automatic Start 1.2. Or for a specific schedule use, Single Shot, Daily or Weekly and click Add Schedule to define the time and date 3. -
Page 5: Electric Channel Settings
Electric Channel Settings 1. Select the Electric channel 2. Enable or Disable the channel(s) ○ Disable the channel(s) If you do not plan to use them during the recording (This will save space on the SD card) 3. Complete the information in the Electric channel settings Channel settings can be configured by using... -
Page 6: Magnetic Channel Settings
Magnetic Channel Settings 1. Select the Magnetic channel 2. Enable or Disable the channel(s) ○ Disable the channel(s) if you do not plan to use them during the recording (This will save space on the SD card) 3. Fill in the required information on the Magnetic channel settings Some channel settings can be configured by... -
Page 7: Saving A Configuration File
Saving a Configuration File 1. Insert the SD Card ○ The computer must be equipped with an SD card slot or use a USB card reader 2. Click the File menu ○ Save or Ctrl+S ○ Select the SD card ○... -
Page 8: Mtu-5C Connections
MTU-5C Connections Start by connecting: Ground electrode Electrodes to channel E1(Ex) (N+, S-) and channel E2(Ey) (E+, W-) Magnetic sensors to channels H1(Hx), H2(Hy) and H3(Hz) GPS antenna 12V DC Power Source Network connector In the field, it is often most efficient to connect the... -
Page 9: Sd Card - Recording Data
SD Card - Recording Data Recording Press the power button briefly and release 1. Insert the SD card and close the cap Starting Acquiring GPS Ready 2. To turn on the receiver, press the Power button briefly, wait until both LEDs are solid blue Automatic Start 2.1. -
Page 10: Stopping A Recording
Stopping a recording Press the Power button briefly and release 1. Press the Power button briefly and release to stop Recording Saving Completed recording ○ Wait until both LEDs are steady blue 2. Turn off the receiver by pressing the Power button for Keep pressing the power button 3 sec and a few seconds, until the LEDs will flash red release... -
Page 11: Importing - Field Qc
Importing and Field QC 1. Click the Field QC button 2. Select View data 3. Select the SD card ○ The recording creates two folders, log and recdata 4. Open the recdata folder ○ Select the recording file ○ Click Choose Recording Start Time (GPS timezone) Recording... -
Page 12: Field Qc
Field QC Review and Process the recorded information 1. Review the Electrode Resistance values and make the necessary corrections ○ Electrode Distance (m) to GND ○ E-Azimuth ○ External Filter 2. Ensure that the magnetic sensors were detected This section can also be used to input additional field information if desired and make the necessary corrections ○... -
Page 13: Process Data
Process Data 1. Click the Process button ○ Verify that the channels and references selected are the desired ones 2. Define the time period by entering a start and end date/time 3. Enable the electric power grid filter that corresponds to the frequency carried by the power lines in the survey region (50Hz, 60Hz or None) -
Page 14: View Recording Details
View Recording Details Review that the following levels are within valid limits for quality control: 1. Battery Voltage 2. Internal Temperature 3. Number of Satellites 4. Saturated Frames ○ If saturation is not close to ~0%, review the channel configuration (see pages 4 - , the channel gain might be too high and/or there is artificial noise on your... -
Page 15: Technical Support Contact
Technical Support Contact Please check out the FAQs https://phoenixgeophysics.freshdesk.com/ Or email us at: support@phoenix-geophysics.com...
Need help?
Do you have a question about the MTU-5C and is the answer not in the manual?
Questions and answers