
Related Manuals for Amplyus miniPCR bio mini16

Summary of Contents for Amplyus miniPCR bio mini16
- Page 1 User’s guide ©2013-2020 Amplyus LLC. miniPCR bio and the miniPCR bio logo are trademarks of Amplyus LLC mini16 user’s guide support@minipcr.com...
-
Page 2: Table Of Contents
TABLE OF CONTENTS Quick start guide Warranty Overview Features Technical specifications What’s included Components Optional accessories Getting started Download Connect Software operation Creating and saving protocols Protocol options Running and monitoring protocols Hardware operation Loading your samples Quickguide to LED interface Troubleshooting and maintenance Troubleshooting Care &... -
Page 3: Quick Start Guide
QUICK START GUIDE 1 -- Download software from minipcr.com/downloads 2 -- Connect mini16 to your device using USB or Bluetooth Devices tab > ® 3 -- Library tab Create a PCR, heat block, linear ramp or FLEX program > 4 -- Run by clicking the play symbol to upload the program and start the run 5 --... -
Page 4: Warranty
Amplyus’ sole liability, under this Limited Warranty, for failure to repair or replace miniPCR thermal cyclers after a reasonable number of attempts, is limited to the replacement of the Product or, at Amplyus’ sole discretion, the refund of the original purchase price of the Product. -
Page 5: Overview
OVERVIEW FEATURES Dual Bluetooth and USB conectivity ® Programmable via Windows, Mac, iPhone, iPad, Android and Amazon Fire PCR, touchdown PCR, heat block, linear ramp and FLEX programming modes FLEX mode allows for user-defined combinations of up to 15 programming steps Portable and durable construction 16 x 0.2 ml PCR tube capacity (strip compatible) On-device microprocessor runs autonomously... -
Page 6: What's Included
TECHNICAL SPECIFICATIONS (Cont.) Control System: Embedded thermistors, adaptive PID algorithm Temperature Range: Ambient – 99°C Dimensions: 2” x 5” x 4” (5.1 cm x 12.7 cm x 10.2 cm) Weight: 1 lb. (450 g) approx. Internal Memory: Stores current program Power Supply: AC 100-240 V, 50-60 Hz, 90 W Battery: Optional Li-Ion miniPCR™... -
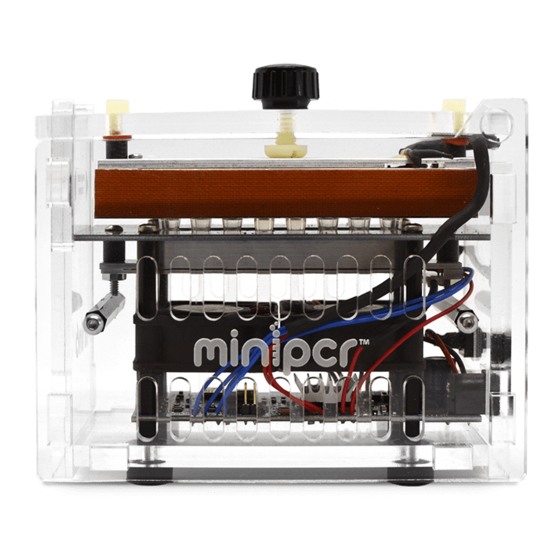
Page 7: Components
COMPONENTS Lid adjustment knob Lid safety latch (pinch both sides to open) Heated Lid Sample-holding block for 16 x 0.2 ml microtubes LED status indicators OPTIONAL ACCESSORIES miniPCR™ Power Pack, 20,000 mAh Li-Ion Battery (QP-1000-13) Portable solar panel (contact team@minipcr.com) support@minipcr.com mini16 user’s guide... -
Page 8: Getting Started
GETTING STARTED DOWNLOAD THE miniPCR ® (FREE DOWNLOAD) miniPCR App v2.0 or higher is needed to run mini16. 1 -- Visit www.minipcr.com/downloads and select your platform of choice (Windows, Mac, iOS, Android, Amazon Fire). Minimum system requirements are listed on the website. iOS users: visit Apple App Store. -
Page 9: Connect
CONNECT Establishing a Bluetooth (BLE) connection (iOS, Windows, Mac, Android, ® Amazon Fire and Chromebook) Note: make sure Bluetooth ® is turned on on your device. 1 -- Turn on the mini16 using the on/off switch on the back of the unit. A flashing blue LED on the front of the mini16 indicates that it is ready to connect to your device. - Page 10 CONNECT (continued) Establishing a USB connection (Windows, Mac, Android and Amazon Fire)* * USB connection not supported for Chromebook. 1 -- Using: USB-A USB-A to USB-A cable supplied Connect the miniPCR supplied USB cable to the computer and the back of the mini16. Using: USB-C USB-C OTG adapter required.
- Page 11 OPTIONAL CONFIGURATIONS Establishing connections to multiple miniPCR units This procedure works for both BLE and USB connections. 1 -- Go to Devices to see the list of available mini16 units. Note: it is possible to connect mini8 and mini16 units simultaneously*. 2 -- All units connected through USB will automatically appear as ‘Connected’...
-
Page 12: Software Operation
SOFTWARE OPERATION miniPCR App v2.0 or higher is needed to run mini16*. * Chromebook users: Beta version available on Google Play. CREATING AND SAVING PROTOCOLS You can program mini16 in four different modes: PCR, heat block, linear ramp and FLEX (includes touchdown PCR) 1 -- Open the miniPCR™... - Page 13 CREATING AND SAVING PROTOCOLS (cont.) PCR mode Input temperatures up to 99 °C, step times up to 9999 and cycles up to 99. Heated lid is turned on by default. This setting mantains the lid at approximately 105 °C to prevent condensation on the caps of the tubes.
- Page 14 CREATING AND SAVING PROTOCOLS (cont.) Linear ramp mode Select the initial and final temperatures and the ramp time between the two. A heating or cooling ramp can be programmed. Heated lid is turned on by default. This setting mantains the lid at approximately 10 degrees above the current temperature. Win / Mac Mobile / iOS / Amazon Fire Flex Mode...
-
Page 15: Protocol Options
PROTOCOL OPTIONS Editing protocols 1 -- Click or tap on the desired protocol from your Library to show available options: Run, View/Edit, Copy, Delete . Click View/Edit. Win / Mac Mobile / iOS / Amazon Fire 2 -- Update protocol parameters (e.g. change the number of cycles, temperature, etc.) 3 -- Click “Save Only”... -
Page 16: Running And Monitoring Protocols
RUNNING AND MONITORING Starting the run 1 -- Set the Auto Start on or off according to your needs (see ‘Auto Start feature’ section below). 2 -- Move the power switch on the back of the mini16 to the ON position. 3 -- Connect your miniPCR thermal cycler via USB cable or Bluetooth... - Page 17 Auto Start feature The Auto Start feature controls whether a run will start automatically when the power switch is flipped to the ON position. This feature is set for each mini16 unit in the Devices tab. The Auto Start selection remains in the mini16 memory until it is changed from the software. Auto Start OFF (default) •...
- Page 18 Monitoring the run 1 -- Click on “[miniPCR name]” tab (Windows/Mac) or the highlighted active protocol in the Library tab (iOS, Android, Amazon Fire) to monitor run status. • Protocol name and parameters • Status: Running, Stopped, Paused, Cool down, Finished and No power. Note: If status ‘No power’...
- Page 19 IMPORT / EXPORT LIBRARY - EXPORT DATA - LANGUAGE Import / export data. The protocol library includes all saved protocols and can be shared among users and devices by exporting and importing it. The libraries are stored with extension ‘.plf’. Export data.
-
Page 20: Hardware Operation
HARDWARE OPERATION LOADING YOUR SAMPLES 1 -- Open the lid by pinching the side tabs on the front plate of your miniPCR machine ® (indicated by arrows). Use your thumb and index fingers to pinch, and lift the lid with your other hand. -
Page 21: Quickguide To Led Interface
QUICK GUIDE TO LED INTERFACE All LEDs flashing: protocol uploaded or device initializing Blue LED flashing: mini16 available for Bluetooth ® pairing Blue LED on: mini16 paired via Bluetooth ® Green, Yellow, and Red LEDs cycling: mini16 ready for protocol run. Press “Run” to start Green, Yellow, and Red LEDs on: protocol complete... -
Page 22: Troubleshooting And Maintenance
TROUBLESHOOTING AND MAINTENANCE TROUBLESHOOTING Lid won’t latch: ensure tubes are properly inserted into block and lid is at maximum height (turn knob counterclockwise). Run won’t start: ensure power supply is plugged into AC outlet and the power supply LED is on. Check miniPCR power switch is in the ON position. Ensure protocol uploads and LEDs blink. -
Page 23: Care & Maintenance
CARE & MAINTENANCE miniPCR thermal cyclers do not require regular maintenance. They can be cleaned ® using water or an acrylic cleaning agent. They should not come into contact with organic solvents or corrosive solutions. Ensure that no liquid enters the device. For safety reasons, the device must be switched off and disconnected from the power supply before cleaning. -
Page 24: Operating Conditions
OPERATING CONDITIONS miniPCR thermal cyclers are designed to be safe to operate under the following conditions: ® • Indoor use • Altitude up to 2,000 m • Temperature 9 °C to 40 °C • Maximum relative humidity 80% for temperatures up to 31 °C, decreasing linearly to 50% relative humidity at 40 °C •...
Need help?
Do you have a question about the miniPCR bio mini16 and is the answer not in the manual?
Questions and answers