Table of Contents
Advertisement
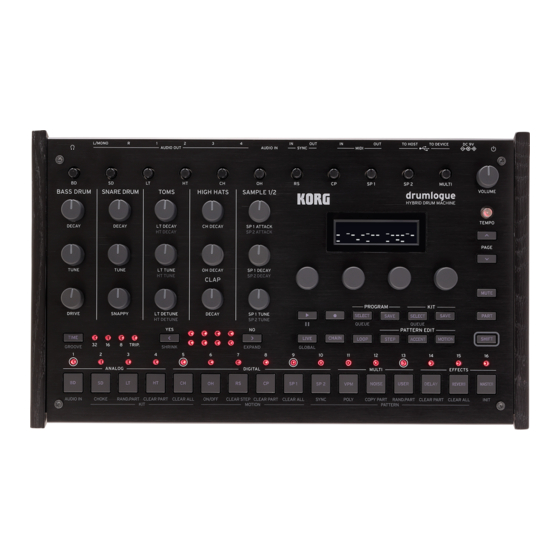
drumlogue
HYBRID DRUM MACHINE
L/MONO
BD
BASS DRUM
SNARE DRUM
DECAY
TUNE
DRIVE
TIME
32
GROOVE
1
2
BD
SD
AUDIO IN
CHOKE
R
1
2
3
AUDIO OUT
SD
LT
HT
CH
TOMS
HIGH HATS
DECAY
LT
DECAY
CH DECAY
HT
DECAY
TUNE
LT
TUNE
OH DECAY
HT
TUNE
CLAP
SNAPPY
LT
DETUNE
DECAY
HT
DETUNE
YES
<
16
8
TRIP.
SHRINK
3
4
5
6
ANALOG
LT
HT
CH
OH
RAND.PART CLEAR PART
CLEAR ALL
ON/OFF
CLEAR STEP CLEAR PART CLEAR ALL
KIT
Owner's Manual
4
IN
OUT
IN
AUDIO IN
SYNC
MIDI
OH
RS
CP
SAMPLE 1/2
SP 1
ATTACK
SP 2 ATTACK
SP 1
DECAY
SP 2
DECAY
SP 1
TUNE
SELECT
SP 2
TUNE
QUEUE
NO
>
LIVE
CHAIN
LOOP
EXPAND
GLOBAL
7
8
9
10
11
DIGITAL
RS
CP
SP 1
SP 2
VPM
SYNC
POLY
MOTION
OUT
TO HOST
TO DEVICE
DC 9V
SP 1
SP 2
MULTI
VOLUME
drumlogue
HYBRID DRUM MACHINE
TEMPO
PAGE
MUTE
PROGRAM
KIT
SAVE
SELECT
SAVE
PART
QUEUE
PATTERN EDIT
STEP
ACCENT
MOTION
SHIFT
12
13
14
15
16
MULTI
EFFECTS
DELAY
NOISE
USER
REVERB
MASTER
COPY PART
RAND.PART CLEAR PART
CLEAR ALL
INIT
PATTERN
E 1
Advertisement
Table of Contents

Related Manuals for Korg drumlogue


Summary of Contents for Korg drumlogue
- Page 1 HYBRID DRUM MACHINE Owner’s Manual L/MONO TO HOST TO DEVICE DC 9V AUDIO OUT AUDIO IN SYNC MIDI SP 1 SP 2 MULTI VOLUME BASS DRUM SNARE DRUM TOMS HIGH HATS SAMPLE 1/2 drumlogue HYBRID DRUM MACHINE TEMPO DECAY...
-
Page 2: Table Of Contents
Table of contents Introduction ...........3 Miscellaneous ........53 Main Features ............. 3 Restoring the Factory settings ....53 Block Diagram ............ 4 Preset programs/Drum kits ......54 Panel description and functions ..5 Specifications ........56 Front panel ............5 MIDI Implementation Chart ......57 Rear Panel ............ -
Page 3: Introduction
Introduction Thank you for purchasing the Korg drumlogue hybrid drum machine. To help you get the most out of your new instrument, please read this manual carefully. Main Features • In addition to analog and digital sound sources with basic drum tones, this product is equipped with a multi engine including Noise, VPM, and User Synth sources, enabling you to make a wide range of sounds. -
Page 4: Block Diagram
Block Diagram... -
Page 5: Panel Description And Functions
AUDIO OUT AUDIO IN SYNC MIDI SP 1 SP 2 MULTI VOLUME BASS DRUM SNARE DRUM TOMS HIGH HATS SAMPLE 1/2 drumlogue HYBRID DRUM MACHINE TEMPO DECAY DECAY DECAY CH DECAY SP 1 ATTACK DECAY SP 2 ATTACK PAGE TUNE... - Page 6 While holding down this button, operate the knob or button to which the shift function is assigned. For example, you can edit HT TUNE (high tom tuning) by turning the kit control LT TUNE (low tom tuning) knob while holding down the SHIFT button. drumlogue HYBRID DRUM MACHINE TEMPO PAGE...
- Page 7 Display This display shows information such as the current program, drum kit, and pattern step as well as various parameter setting values. Parameter knobs 1 to 4 Select the item shown on the display or change the parameter value. If setting items span over multiple pages, the indicator such as "1/2"...
-
Page 8: Rear Panel
LOOP button Press this button when using Loop mode ("Loop mode" p.21). STEP button For each step of the pattern, press this button to set the step parameters such as the step on/off status and the probability at which a sound is produced when the step is on. -
Page 9: Making Connections
SYNC IN, SYNC OUT jacks Connect to the SYNC IN and OUT jacks on the KORG Volca series, to synchro- nize with the output pulses and steps. The SYNC OUT jack outputs a 5V pulse, 15 ms long at the beginning of each step. Use a stereo mini-cable for this connection. - Page 10 AUDIO OUT L/MONO and R. MIDI device MIDI IN, OUT connectors: Use these connectors to connect the drumlogue to an external MIDI device for exchanging MIDI messages. Make sure that the MIDI channels are set appropriately ("Connecting Devices via MIDI" p.49).
-
Page 11: Operation Guide
4 hours have elapsed with no operation of the knobs, switches, or buttons of the drumlogue. By default, the factory setting for the Auto Power Off is enabled. The Auto Power Off can be disabled using the steps below. -
Page 12: Quick Start
AUDIO IN SYNC MIDI Selecting a program SP 1 SP 2 MULTI VOLUME S DRUM SNARE DRUM TOMS HIGH HATS SAMPLE 1/2 drumlogue HYBRID DRUM MACHINE TEMPO DECAY DECAY DECAY CH DECAY SP 1 ATTACK DECAY SP 2 ATTACK PAGE TUNE... - Page 13 Playing a rhythm pattern SP 1 DECAY SP 2 DECAY PROGRAM SP 1 TUNE SELECT SAVE SELECT SAVE SP 2 TUNE QUEUE QUEUE PATTERN EDIT 1, 2 > LIVE CHAIN LOOP STEP ACCENT MOTION EXPAND GLOBAL Press the (PLAY) button. The rhythm pattern of the currently selected program is played.
-
Page 14: Programs And Drum Kits
You can select one of the three multi-sound sources. What is the drum kit? A "drum kit" is constituted of the parameter values of all 13 parts. The drumlogue can store up to 128 drum kits (16 kits for each BANK A to H). -
Page 15: How To Make A Sound
AUDIO IN SYNC MIDI Saving a Program SP 1 SP 2 MULTI VOLUME BASS DRUM SNARE DRUM TOMS HIGH HATS SAMPLE 1/2 drumlogue HYBRID DRUM MACHINE TEMPO DECAY DECAY DECAY CH DECAY SP 1 ATTACK DECAY SP 2 ATTACK PAGE TUNE... -
Page 16: Using The Sequencer
Using the Sequencer Transport Playing and stopping a pattern (During pattern edit) When you press the STEP button, the following is displayed. As in Live mode, press the (PLAY) button to play or stop the pattern. You can pause a pattern by pressing the (PLAY) button while holding down the SHIFT button. - Page 17 Swing16: Gives regular swing in 16th note units. Even steps are slower and weak- er, and odd steps are stronger. Swing8: Gives regular swing in eighth note units. Makes the back beat to the beginning of the beat slow and weak, and the front beat strong. ConstOffset: Evenly delays or strengthens all steps.
- Page 18 (b) The LEDs on the bottom indicate the bars to be edited. Used for pattern editing. If you press the (YES) button or (NO) button, you can change the bar to < be edited (1 ... 4). You can also reduce the number of bars (SHRINK) by pressing (YES) button while holding down the SHIFT button, and increase the <...
-
Page 19: Editing A Pattern
Editing a Pattern STEP button (Step entry of notes) Enter notes in a step. You can enter notes using buttons 1 to 16. You can also edit the sound extensively for each step. If you hold down buttons 1 to 16, the screen below appears. You can edit the target parameter by turning parameter knobs 1 to 4 while holding down the STEP button. -
Page 20: Chain Mode
RAMP [Flat, Fall, Rise, Random] Sets the curve of RATCHET. Flat: Produces a drum roll at the same volume. Fall: Produces a drum roll while lowering the volume. Rise: Produces a drum roll while raising the volume. Random: Makes the volume of each drum roll random. MOTION button (Setting the motion for each step) Set the motion for each step. -
Page 21: Loop Mode
When you press the CHAIN button, "Set Queue" is displayed, and you can change the next program to be played. Deleting a program from CHAIN Press the CHAIN button to enter Chain mode. Hold down buttons 1 to 16 corresponding to the order of CHAIN you want to delete;... - Page 22 MODE [MOMENT, SELECT] Sets the LOOP method. You can press any number of buttons. MOMENT: LOOP is enabled while you are pressing one or more of buttons 1 to 16. LOOP is canceled when you release your finger from all of buttons 1 to 16. SELECT: Of buttons 1 to 16, the button you pressed is set as the step to be looped.
-
Page 23: Using The Shift Function
Using the SHIFT function You can access various SHIFT functions of this unit by pressing buttons 1 to 16 while holding down the SHIFT button. There are many useful features for editing QUEUE QUEUE sequencer steps. PATTERN EDIT < > LIVE CHAIN LOOP... - Page 24 GROUP [OFF, 1...4] Sets the group to apply the priority. Each time you press buttons 1 to 13, the part switches between OFF and 1. PRIORITY [LOW, MID, HIGH] Sets the priority of the part. RAND.PART (KIT) (Button 3) Sets the parameters of the current part (various parameters and SOUND SELECT on the PARAMETERS page) with random values.
- Page 25 SYNC (Button 10) Returns the playback position of the current part to the first step. POLY (Button 11) Makes each part independent without aligning the beginning of pattern playback with the longest pattern part. COPY PART (Button 12) Copies and pastes the pattern data. The pattern data of the current part is copied, and the LEDs of buttons 1 to 13 of the pasted part blink.
-
Page 26: Sound Source Parameters
Sound Source Parameters Analog sound source parts (BD, SD, LT, HT) BD (Bass drum) Control knob DECAY [0...1023] Adjusts the sounding length of the drumhead. The greater the value, the longer the sound. TUNE [0...1023] Adjusts the pitch of the bass drum. DRIVE [0...1023] Adjusts the distortion amount of the bass drum. - Page 27 RESON(CUTOFF RESONANCE) [0.0%...100.0%] Adjusts the cutoff resonance of the filter. If you increase the value, the filter oscillates, which may cause the sound to continue. MIX/ROUTE [L100%...L1%, C, R1%...R100%] Adjusts the pan pot (left and right stereo localization). DELAY [0.0%...100.0%] Adjusts the feed amount of the delay effect.
- Page 28 SNAP.LV (SNAPPY LEVEL) [0.0%...100.0%] Adjusts the snappy volume of the snare drum. CUTOFF [L0.0%...L99.5%, THRU, H0.5%...H100.0%] Adjusts the cutoff frequency of the filter. You can select the low-pass filter, no filter (THRU), or the high-pass filter. RESON (CUTOFF RESONANCE) [0.0%...100.0%] Adjusts the cutoff resonance of the filter.
- Page 29 SOUND SELECT LAYER [01..10] Select the layer sound type of low tom or high tom. A short PCM sample is layered on the low tom and high tom analog sound sourc- es, allowing you to change the tone character of the attack. PARAMETERS SWEEP [0.0%...100.0%]...
-
Page 30: Digital Sound Source Parts
Digital sound source parts (CH, OH, RS, CP, SP1, SP2) CH, OH, RS, CP (Closed hi-hat, Open hi-hat, Rimshot, Clap) Control knob CH DECAY [0...1023] Adjusts the sounding length of the closed hi-hat. The greater the value, the longer the sound. OH DECAY [0...1023] Adjusts the sounding length of the open hi-hat. - Page 31 DECAY (RS only) [0.0%...100.0%] Sets the decay time. The greater the value, the longer the sound. START [0.0%...100.0%] Sets the start position of sample playback. [0.0%...100.0%] Sets the end position of sample playback. CUTOFF [L0.0%...L99.5%, THRU, H0.5%...H100.0%] Sets the cutoff frequency of the filter. You can select the low-pass filter, no filter (THRU), or the high-pass filter.
- Page 32 SP1, SP2 (Sample sound sources 1, 2) Control knob SP1 (SP2) ATTACK [0...1023] Adjusts the attack time of sample sound source 1 (or 2). The greater the value, the slower the sound rises. SP1 (SP2) DECAY [0...1023] Adjusts the decay time of sample sound source 1 (or 2). The greater the value, the longer the sound.
-
Page 33: Multi-Sound Source Parts (Vpm, Noise, User)
MIX/ROUTE [L100%...L1%, C, R1%...R100%] Adjusts the pan pot (left and right stereo localization). SPREAD [<100%...<1%, 0, >1%...>100%] Adjusts the spread of sound (stereo feeling). DELAY [0.0%...100.0%] Adjusts the feed amount of the delay effect. REVERB [0.0%...100.0%] Adjusts the feed amount of the reverb effect. MASTER [ON, BYPASS] Sets the master effect to On or Bypass. - Page 34 [AR, ASR, GATE] Select the type of EG (Envelope Generator). AR: AR-type EG (Attack, Release) ASR: ASR-type EG (Attack, Sustain, Release) GATE: GATE-type EG (On/Off only) ATTACK [0.0%...100.0%] Sets the attack time. The greater the value, the slower the sound rises. RELEASE [0.0%...100.0%] Sets the release time.
- Page 35 NOISE SOUND SELECT ALGO [LPF 2, LPF 4, BPF 2, BPF 4, HPF 2, HPF 4, DECIM] Select the noise sound type. The low pass (LPF), band pass (BPF), and high pass (HPF) provide two types of filters: -12dB/oct and -24dB/oct. DECIM is the noise source that uses sampling rate decimation.
- Page 36 USER SOUND SELECT SELECT [---, Nano, ...] Select the user synth to load. At the time of shipment from the factory, the user synth "Nano" developed in col- laboration with Sinevibes is installed on this unit. Parameters vary depending on the user synth. For explanations about functions other than nano, refer to the manual for each user synth.
- Page 37 EG TIME [0%...100%] Adjusts the EG time. The greater the value, the slower the change in EG. PITCH EG [-100%...100%] Adjusts the amount of EG applied to the pitch. CUT. EG [-100%...100%] Adjusts the amount of EG applied to the filter cutoff. LFO TYPE [Tri, Saw, Sqr, Trap, Peak, S&H, Random] Select the LFO (Low Frequency Oscillator) waveform.
-
Page 38: Effects (Delay, Reverb, Master)
Effects (DELAY, REVERB, MASTER) This unit provides three effect sections in which DELAY and REVERB are placed in an independent send bus, and MASTER is placed inline in the final mix bus. DELAY SENDS DELAY PRE-MASTER MIX POST-MASTER MIX SIDECHAIN AUDIO IN/ ANALOG/ MASTER FX... - Page 39 You can select the low-pass filter or the high-pass filter. CUTOFF [0.0%...100.0%] Sets the cutoff frequency of the filter. SAT. (SATURATION) [0.0%...100.0%] Sets the saturation level of the filter. ROUTE [NORMAL, CROSSED, P-PONG] Sets the feedback signal route. NORMAL CROSSED P-PONG PARAMETERS - For Mono/Mono BPM TIME...
- Page 40 TRACKING [0.0%...100.0%] Adjusts the amount that simulates the tracking sensitivity of the tape head. TONE [0.0%...100.0%] Adjusts the sound quality of the delay effect. SAT. (SATURATION) [0.0%...100.0%] Sets the saturation level of the filter. ROUTE [NORMAL, CROSSED, P-PONG] Sets the feedback signal route. NORMAL CROSSED P-PONG...
- Page 41 PARAMETERS TIME [0.0%...100.0%] Adjusts the reverb time. INPUT [0.0%...100.0%] Adjusts the signal level of the reverb input. BRIGHT [0.0%...100.0%] Adjusts the tone (brightness) of the reverb. RISE (Riser only) [0.0%...100.0%] Adjusts the pitch-shifted reverb sound signal on the octave. DIVE (Submarine only) [0.0%...100.0%] Adjusts the pitch-shifted reverb sound signal below the octave.
- Page 42 RELEASE [50ms...1s] Adjusts the release time of the compressor. RATIO [1...10] Adjusts the compression ratio of the compressor. MAKEUP [0.00dB...8.00dB] You can increase the overall gain of the signal to compensate for compression. KNEE [0.00dB...8.00dB] Adjusts the smoothness at the beginning of the compressor effect. SIDECH (SIDECHAIN) [OFF, ON] If you want to enable the input signal from SIDECHAIN, set this parameter to ON.
- Page 43 BOOST [0.0dB...12.00dB] Adjusts the boost amount. You can increase up to 12 dB. PARAMETERS - For EQ Three [-64.0dB...6.0dB] Adjusts the boost/cut amount in the low range. [-64.0dB...6.0dB] Adjusts the boost/cut amount in the mid range. HIGH [-64.0dB...6.0dB] Adjusts the boost/cut amount in the high range. GAIN [-6.0dB...6.0dB] Adjusts the gain of the entire input signal.
-
Page 44: Global Parameters
Global Parameters Press the LIVE button while holding down the SHIFT button to enter Global mode. In Global mode, you can make settings related to the input/output and hardware of this unit. QUEUE QUEUE PATTERN EDIT < > TIME LIVE CHAIN LOOP STEP... - Page 45 32ND, 16TH, 8TH: Quantizes the input timing deviation with the fineness of the 32nd, 16th, and 8th notes, respectively. The deviated input is recorded on the closer one of the previous and next inputs. UI DEFAULTS (Button 2) PRM DISP (PARAMETER DISPLAY) [NORMAL, ALL] NORMAL: Shows only key information such as the name of the program or drum kit, SELECT/SAVE, etc.
- Page 46 INDIV. OUT1 (Button 4) OUT 1 [BD, SD, LT, HT, CH, OH, RS, CP, SP1, SP2, MULTI] Sets the part to be output from the AUDIO OUT1 jack on the rear panel. OUT 2 [BD, SD, LT, HT, CH, OH, RS, CP, SP1, SP2, MULTI] Sets the part to be output from the AUDIO OUT2 jack on the rear panel.
- Page 47 In order to achieve synchronization with other units, the polarity of the SYNC IN jack may need to be changed. RISE: The drumlogue will sync to the pulse as it rises to its crest (the highest point) of the waveform.
- Page 48 In order for other units to correctly sync with the drumlogue, the polarity of the SYNC OUT jack may need to be changed. RISE: The drumlogue will create a sync pulse as it rises to its crest (the highest point) of the waveform.
-
Page 49: Understanding Midi And Computers
MIDI data can also be exchanged between the drumlogue and your personal computer using a single USB cable. The drumlogue lets you assign MIDI control change numbers (CC#) to the major parameters that affect the sound, and control these parameters from an external MIDI sequencer while you play the tone generator. -
Page 50: Midi-Related Settings
You also might want to use the drumlogue as both an input device for playing notes and as a MIDI tone generator. In either case, you’ll need to connect the MIDI OUT connector to the MIDI IN connector on both the drumlogue and the external MIDI sequencer or computer. -
Page 51: Connecting A Computer
You can play music by connecting a MIDI controller, etc. to this jack. For example, if you connect KORG nanoPAD 2, you can trigger and play each part with Velocity. Devices with high current consumption (5V/200mA or more) other than a... - Page 52 <supported format and encodings> drumlogue natively uses WAV files encoded in 32 bit float with a sampling rate of 48KHz. WAV files encoded in signed 16/24/32 bit PCM and other common sampling rates are supported, but will be automatically converted upon startup.
-
Page 53: Miscellaneous
Miscellaneous Restoring the Factory settings You can restore the drumlogue’s preset Programs and global settings to their origi- nal factory-set state at any time. Begin with the drumlogue turned Off. While holding down the SHIFT button and the (REC) button, turn the drumlogue On. -
Page 54: Preset Programs/Drum Kits
Preset programs/Drum kits Bank Program Name Drum Kit Name Author Tempo Length Komputer Komputer Kit KORG Inc. Electrogram Electrogram Kit Hercelot Humid Basement Humid Base Kit SEKITOVA Hard GT Hard GT Kit Hercelot Digitono Digitono Kit KORG Inc. Noid Noid Kit KORG Inc. - Page 55 01-16 Init Program Init Kit KORG Inc. 01-16 Init Program Init Kit KORG Inc. All Programs and Drum Kits were made by SEKITOVA, Hercelot and KORG Inc. For more information about the authors please visit: - SEKITOVA https://sekitova.net/ - Hercelot https://www.hercelot.com/...
-
Page 56: Specifications
Specifications Polyphony: 11 voices (User synths may be played polyphonically via MIDI, the actual voice count will depend on the synth's implementation) Sound source system: Analog sound source x 4, Digital sound source x 6 (PCM x 4, User sampling sound source x 2), Multi-sound source (VPM, NOISE, User Synth) Number of Programs (including rhythm patterns): 128 (64 preset programs by factory default) -
Page 57: Midi Implementation Chart
*4 : In addition to Korg exclusive messages, Inquiry is supported. *5 : When the GLOBAL setting CLOCK SOURCE is INT, the drumlogue will not receive signals. The drumlogue will receive signals when set to AUTO. This is the factory default implementation. - Page 58 Signals are transmitted on the channel corresponding to the part. *2 : When the GLOBAL setting MIDI RX PRG CHG is ON, the drumlogue will receive signals; and when the GLOBAL setting MIDI TX PRG CHG is ON, the drumlogue will transmit signals.
- Page 59 © 2022 KORG INC. www.korg.com Published 06/2022...
Need help?
Do you have a question about the drumlogue and is the answer not in the manual?
Questions and answers
Necesito disparar los sonidos vía midi