Table of Contents
Advertisement
Quick Links
Advertisement
Table of Contents

Related Manuals for Kingwell JZ-300

Summary of Contents for Kingwell JZ-300
-
Page 2: Table Of Contents
2.1.2 Keyboard…………………………….. ……….. ……….. ….. ….. ……………4 2.2 Working principle …………………………….. ……….. ………………………5 3. Technical characteristic 4. Using the JZ-300 4.1 Turning the Power ON …………………………….. ……….. …………….. 4.2 Standard measured …………………………….. ……….. ……..……….. 7 4.3 Sample measured …………………………….. ……….. ………..………… 7 5. -
Page 3: Summarize
The interface we design the menu type, because it is simple and easy to understand. Our JZ-300 is not only widely used on Quality department about the color difference, but also used on the school teaching, scientific research, and color design. -
Page 4: Accessory
□ gterm, this would cause instrument accuracy reduced and performance fault. Do not use the JZ-300 in areas where dust, smoke, corrosive gases into □ the instrument inside, it may cause the damage of instrument. Do not use the JZ-300 near equipment which produces a strong magnetic □... -
Page 5: Architectural Feature And Working Principle
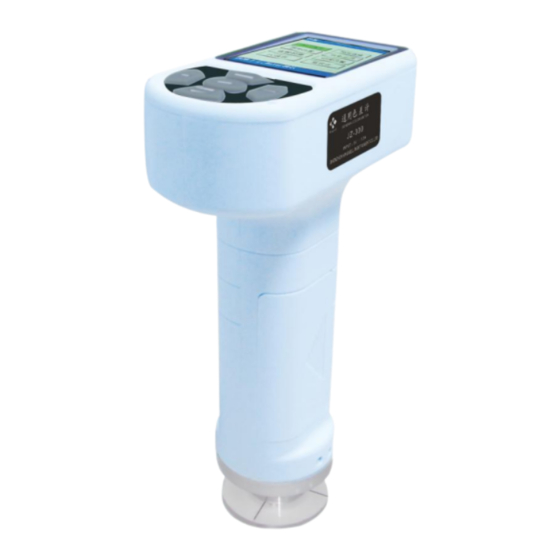
2 Architectural feature and working principle 2.1 Architectural feature 2.1.1 Colorimeter 1 USB port 2 Micro- printer port 3 AC adapter port 4 Test key 5 Keyboard 6 Screen 7 On/off 8 Dust cap 2.1.2 Keyboard... -
Page 6: Working Principle
2.2 Working principle According to the light of tristimulus principle established by CIE, the standard illuminant irradiates to the object surface, it would spread to the micro-computer to calculation and analysis after the sensor receives the reflected light information. The color space would display the digital color data at the same time, and calculate the color difference between the sta- ndard and sample, formula as follows: △... -
Page 7: Technical Characteristic
Optional accessory Micro-printer 4 Using the JZ-300 Operating instruction of JZ-300(General colorimeter) 4.1 Turning the Power ON: Insert 4 AA size batteries or connect the AC/DC adapter, and turn the power ON in the side face, the JZ-350 would enter the operation interface after... -
Page 8: Standard Measured
4.2 Standard measured When turn it on, the instrument would automatically enter the test interface, the default mode, Illuminant and Color space is single mode, D65/10° and L*a*b. The measuring aperture should closely fit the measured object, then press the ”Test” key to start standard test, as shown below: 4.3 Sample measured Press the “Test”... -
Page 9: Function Menu
5 Function menu Press the “Menu” key to enter the function menu interface, four functions to select, <<Test mode>>, <<Tolerance setup>>, <<Color space>>, <<PC communication>>. 5.1 Test mode Select the <<Test mode>> in Function menu and press “Enter” key to enter the test mode interface, it has two modes to select: Single mode and Average mode. -
Page 10: Single Mode
5.1.1 Single mode It would enter the sampling test interface after you select the <<Single mode>>, you can do sampling test directly, the default mode is Single mode. 5.1.2 Average mode Now we are enter the average times interface, the Average mode is suitable for testing uneven color and large areas surface. -
Page 11: Tolerance Setup
After select the desired average times, press the ”Enter” key to enter the <<Average mode>> interface for testing. Notes: The times and the sample measurement times is same, as shown below: 5.2 Tolerance setup Tolerance setup is setting the qualified color difference data, which should be the maximum, allowable;... -
Page 12: Color Space
‘’Enter’’ key. 5.4 PC communication The JZ-300 can connect the computer through our software, it would extend more functions of the instrument. Check the software instructions carefully about the function details of... -
Page 13: Micro- Printer
Safety instruction If the JZ-300 would not use for a long time, disconnect the AC outlet to prevent battery damage and corrosion the instrument. If it is DC power, also need remove the battery, it may damage the JZ-300. -
Page 14: Driver Description
USB connection interface when you press Enter key. 7.3 USB installation □ Put the CD to the CD-ROM, and the USB cable insert the USB port of JZ-300, it would appear” Found new hardware”, as shown below,... - Page 15 □ It would popup the dialog box. □ Click ‘’Next’’ to install, or install the specific location from the list.
-
Page 16: Driver Description
□ 4 ‘’Browse’’ to find the ‘’Drive file’’ in the CD-ROM directory, and click ‘’Next’’, the installation wizard will automatically install the driver. □ Click ‘’Finish’’, the driver is installed. -
Page 17: Software Instructions
8 Software instructions 8.1 Interface description The main software interface has two parts: toolbar and 4 functions 1. Related information: you can set it in the software system, and it would display it when you print. 2. Measurement interface: show the related data of the standard measured and sample measured. -
Page 18: Standard Managed
8.3 Standard managed Two measurement modes to choose: Single mode, Average mode Single mode: suitable for measurement the color-difference comparison of one position, uniform color Average mode: suitable for measurement the large areas and the comparison of uneven color 8.4 Tolerance judgment We can set for the total color difference data of △... -
Page 19: Print Function
8.6 Computer connection Click the button to check the connection between JZ-300 and computer. Note: After the JZ-300 connected with the PC, press the ‘’Connect’’ can communication with the computer, and you can press ‘’Connect’’ to reconnection if it interrupt, no need to reopen the program. -
Page 20: Troubleshooting Guide
D、no power D 、 Change the battery or use the DC adapter 3、Crash of the JZ-300 A、the key pressed too fast A 、 It need pause when pressed the button.
Need help?
Do you have a question about the JZ-300 and is the answer not in the manual?
Questions and answers