Advertisement
Available languages
Available languages
Quick Links
Advertisement

Related Manuals for bq Tesla W8


Summary of Contents for bq Tesla W8
- Page 3 Tesla W8 ESPAÑOL Tesla W8 Gracias por elegir Tesla W8. Antes de usar su tablet, lea detenidamente esta guía rápida. Contenido del paquete Antes de usar su tablet por primera vez, por favor, compruebe el contenido del paquete. Si alguno de los siguientes elementos no está incluido, diríjase al distribuidor en el que adquirió...
- Page 4 Para obtener la versión más actualizada del manual de usuario visite www.bqreaders.com. bq no se hace responsable de los problemas de rendimiento ni de las incompatibilidades provocadas por la modificación de parámetros de registro por parte del usuario.
- Page 5 A continuación: orden de opciones o menús para llevar a cabo un paso. Marcas comerciales El logo de bq es una marca registrada de Mundo Reader, S.L. Intel® es un logo y marca registrada de Intel Corporation. Microsoft Windows es el nombre de uno de los sistemas operativos propiedad de Microsoft Corporation.
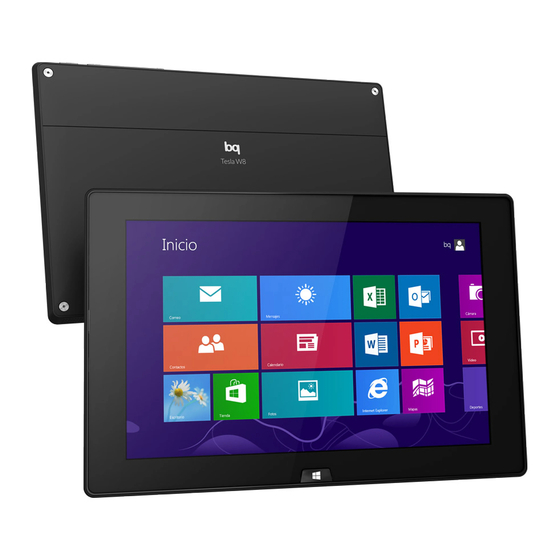
- Page 6 ESPAÑOL Tesla W8 Vistas generales del dispositivo...
- Page 7 Tesla W8 ESPAÑOL Botones y conexiones Botón de Pulse prolongadamente el botón de encendido para arrancar el encendido dispositivo. Pulse brevemente para encender la pantalla cuando el dispositivo esté en reposo. Teclas de Permiten ajustar el volumen multimedia de la tablet.
-
Page 8: Primeros Pasos
ESPAÑOL Tesla W8 PRIMEROS PASOS Mantenga el botón de encendido pulsado para encender la tablet Cargar la batería (al menos 4 horas) Conecte aquí el cargador para recargar la batería del dispositivo. Por favor, tenga en cuenta que el conector del cargador no es micro-USB. No intente conectar un... - Page 9 Tesla W8 ESPAÑOL Insertar tarjeta SD WINDOWS 8 Deslice el dedo por la pantalla para acceder a todos los contenidos.
- Page 10 ESPAÑOL Tesla W8 Aviso sobre el uso de la funcionalidad “Snap” La resolución del monitor integrado en este sistema está por debajo del umbral necesario para simultanear apps, una nueva funcionalidad que permite mostrar dos apps de Windows al mismo tiempo, una al lado de la otra. Esta funcionalidad puede ser activada adjuntando un monitor externo que soporte una resolución de pantalla de 1366 x 768 o superior.
- Page 11 Tesla W8 ESPAÑOL Su PC Windows 8 también admite una combinación de teclas para acceder a la BIOS fuera de Windows. Antes de arrancar el dispositivo presione y mantenga la tecla de subir volumen y presione el botón de encendido. El PC entrará en la BIOS con la función táctil activada. Si no quiere cambiar nada, presione por favor “Continuar” para arrancar en Windows 8. También es posible acceder a estas características desde Windows 8. Para acceder a las utilidades de instalación: 1.
- Page 12 ESPAÑOL Tesla W8 Para accede al menú de arranque: 1. Abra la barra de navegación presionando la tecla Windows + C (en su teclado externo) 2. Haga clic en “configuración” 3. Haga clic en “cambiar configuración de PC” 4. Haga clic en “Uso general” 5. Baje hasta abajo y haga clic en ”Inicio Avanzado” > “Reiniciar ahora” 6. Haga clic en “Usar un dispositivo” (seleccione uno en función de la unidad de almacenamiento que vaya a utilizar) 7. Se encuentra en el menú de arranque...
- Page 13 Tesla W8 ESPAÑOL CREAR UNA COPIA DE SEGURIDAD USB Crear el driver de recuperación Windows 8 incluye una herramienta de creación de un disco de recuperación USB. Windows le comunicará el tamaño de la unidad de recuperación, de forma que utilice un USB con una capacidad al menos igual a la indicada. Crear un driver de recuperación borrará cualquier dato almacenado en su USB. Asegúrese de que transfiere cualquier información importante de su USB a otro dispositivo de almacenamiento antes de utilizarlo para crear su driver de recuperación.
- Page 14 ESPAÑOL Tesla W8 esté seleccionada y pulse o haga clic en “Siguiente”. 4. En la siguiente pantalla, el sistema le indicará el tamaño de la unidad de recuperación, y le pedirá que conecte un USB con una capacidad al menos igual a la indicada en su Tablet PC.
- Page 15 Tesla W8 PORTUGUÊS Tesla W8 Obrigado por ter escolhido Tesla W8. Antes de utilizar o seu tablet, leia com atenção esta guia rápida. Conteúdo da caixa Antes de utilizar o seu bq, é favor verificar o conteúdo da caixa. Se algum dos elementos seguintes não se encontrar dentro da caixa, dirija-se ao distribuidor onde...
- Page 16 Parte do conteúdo e dos serviços aos quais este dispositivo dá acesso pertencem a terceiros e estão protegidos por direitos de autor, patente, marca registada e/ ou outras leis de propriedade intelectual. A bq não garante o conteúdo nem os serviços oferecidos.
- Page 17 A seguir: A ordem das opções ou menus que deverá selecionar para levar a cabo um passo. Marcas comerciais O logotipo bq é uma marca registada do Mundo Reader, S.L. Intel® é uma marca e logotipo registado do Intel Corporation. Microsoft Windows é o nome de um dos sitemas operativos da Microsoft Corporation.
- Page 18 Tesla W8 PORTUGUÊS Vista geral do dispositivo...
- Page 19 Tesla W8 PORTUGUÊS Botões e portos Botão de ligar Mantenha o botão carregado durante uns segundos para ligar a unidade. Para ativar o ecrã carregue brevemente no botão ligar. Teclas de Permitem ajustar o volume multimédia do tablet. volume Microfone Regista áudio.
-
Page 20: Primeiros Passos
Tesla W8 PORTUGUÊS PRIMEIROS PASSOS Mantenha pressionado o botão ligar para ligar sua tablet. Carregar a bateria (pelo menos 4 horas) Conete aqui o carregador para carregar a bateria do dispositivo. Por favor, tenha em conta que o conetor do carregador não é micro-USB. Não tente conetar um... - Page 21 Tesla W8 PORTUGUÊS Insira o cartão SD WINDOWS 8 Desliza o dedo na ecrã para acessar todo o conteúdo.
- Page 22 Tesla W8 PORTUGUÊS Aviso sobre a utilização da funcionalidade “Snap” A resolução do monitor integrado neste sistema está abaixo do limiar necessário para simultanear apps, uma nova funcionalidade que permite mostrar duas apps do Windows ao mesmo tempo, uma ao lado da outra. Esta funcionalidade pode ser ativada ligando um monitor externo que suporte uma resolução de ecrã de 1366 x 768 ou superior.
- Page 23 Tesla W8 PORTUGUÊS O seu PC Windows 8 também oferece uma hot-key para aceder à BIOS fora do Windows. Antes de arrancar o dispositivo prima e mantenha premida a tecla de subir volume e prima o botão ligar. O PC irá entrar na BIOS com a função táctil ativada. Se não quiser mudar nada, prima por favor “Continuar” para arrancar o Windows 8. Também é possível aceder a estas características no Windows 8 Para aceder às utilidades de instalação: 1. Abra a barra de navegação premindo a tecla Windows + C (no seu teclado externo) 2.
- Page 24 Tesla W8 PORTUGUÊS Para aceder ao menu de arranque: 1. Abra a barra de navegação premindo a tecla Windows + C (no seu teclado externo) 2. Clique em “Configuração” 3. Clique em “modificar configuração do PC” 4. Clique em “Utilização geral” 5. Vá até baixo e clique em ”Início Avançado” > “Reiniciar agora” 6. Clique em “Utilizar um dispositivo” (selecione um em função da unidade de armazenamento que for utilizar) 7. Encontra-se no menu de arranque...
- Page 25 Tesla W8 PORTUGUÊS CRIAR UMA CÓPIA DE SEGURANÇA USB Criar o driver de recuperação O Windows 8 inclui uma ferramenta de criação de um disco de recuperação USB. O Windows irá comunicar-lhe o tamanho da unidade de recuperação, de forma que deverá utilizar uma memória USB com uma capacidade no mínimo igual à indicada. Criar um driver de recuperação irá apagar qualquer dado armazenado na sua memória USB. Verifique que todas as informações da sua memória USB são...
- Page 26 Tesla W8 PORTUGUÊS selecionada e prima ou clique em “Seguinte”. 4. 4. No ecrã seguinte, o sistema irá indicar-lhe o tamanho da unidade de recuperação, e pedir-lhe que ligue uma memória USB com capacidade pelo menos igual à indicada no seu Tablet PC. 5. 5. Prima ou clique na memória USB que deseja utilizar para realizar o seu disco de recuperação e a seguir prima ou clique em “Seguinte”.
- Page 27 Tesla W8 INGLÉS Tesla W8 Thank you for choosing Tesla W8. Before using your tablet, carefully read this quick- start guide. Content of package Before using your tablet for the first time, please check the content of the package. If any of the following items is not in the package, contact the retailer where you purchased the device. Tesla W8 Mains charger Documents...
- Page 28 Parts of the content may not exactly match the operation of the product owing to firmware updates of the device. For the latest version of the user manual, visit www.bqreaders.com. bq is not liable for any performance problems or incompatibilities caused by the user’s editing of the registry. Part of the content and services accessed through this device belong to third parties and are protected by copyright, patent, registered trademark and/or other intellectual property laws. bq does not guarantee the content or the services...
- Page 29 Tesla W8 INGLÉS Instructional icons Alert: Important tips and notifications about how to use your new device. > Next: Indicates the next step in a sequence. Trademarks bq’s logo is a registered trademark of Mundo Reader, S.L. Intel® is a registered trademark of Intel Corporation. Microsoft Windows is the name of one of the Microsoft Corporation’s operative systems. Microsoft Office is an office suite owned by Microsoft Corporation. Wi-Fi®, Wi-Fi CERTIFIED and Wi-Fi logos are registered trademarks of Wi-Fi Alliance.
- Page 30 Tesla W8 INGLÉS View of the device...
- Page 31 Tesla W8 INGLÉS Buttons and ports Power button Long press to switch on the device, short press to turn on the screen when the device is in suspended mode. Volume keys Enable the adjustment of multimedia volume on the tablet. Microphone Captures and records sounds. slot SD cards can be inserted into the device in order to increase its storage capacity.
-
Page 32: Getting Started
Tesla W8 INGLÉS GETTING STARTED Press and hold the power button to switch on the tablet Charger the battery (at least 4 hours) Use provided charger to charge the battery. Please note the connector is not microUSB. Do not try to use a microUSB charger, which may damage the connector. - Page 33 Tesla W8 INGLÉS Insert SD card WINDOWS 8 Slide your finger across the screen to access all content.
- Page 34 Tesla W8 INGLÉS No Snap Feature Support Disclaimer The integrated display resolution of this system is below the threshold for snaping apps, a new feature that allows two Windows apps to be viewed simultaneously side by side. This feature may be enabled by attaching an external display which supports a screen resolution of 1366 x 768 or higher. How to get into BIOS in Windows 8 Windows 8 doesn’t really shut down the tablet completely, but puts it into hibernation state. This is called “hybrid shutdown”, and was invented to speedup...
- Page 35 Tesla W8 INGLÉS Your Windows 8 PC also provides hot-key to access BIOS outside of Windows. Before you boot up the device, press and hold “Vol-up” key and press “Power button key”. The PC will enter BIOS with touch function enabled. If you don’t want to change anything, please press “Continue” to boot into Windows 8. It is also possible to access these features from within Windows 8. To enter Setup Utility: 1. Open the Charm Bar by pressing Windows Key-C 2. Click on Settings 3. Click on Change PC Settings 4. Click on General 5. Scroll to the bottom and click on Advanced Start up > Restart Now 6. Click on Troubleshoot 7. Click on Advanced Options 8. Click on UEFI Firmware Settings...
- Page 36 Tesla W8 INGLÉS To access the Boot Menu: 1. Open the Charm Bar by pressing Windows Key-C 2. Click on Settings 3. Click on Change PC Settings 4. Click on General 5. Scroll to the bottom and click on Advanced Start up > Restart Now 6. Click on Use A Device 7. Click on Boot Menu...
-
Page 37: Create A Usb Recovery Drive
Tesla W8 INGLÉS CREATE A USB RECOVERY DRIVE Create the recovery drive Windows 8 include a built-in tool to create a USB recovery drive. Windows will let you know how big the recovery partition is, and you’ll need a USB flash drive at least that big. Creating a recovery drive will erase anything already stored on your USB flash drive. Make sure to transfer any important data from your USB flash drive to another storage device before using it to create a USB recovery drive. - Page 38 Tesla W8 INGLÉS 4. On the next screen, find the size of the recovery partition, and then insert a USB flash drive into your PC that is at least this size. 5. Tap or click the USB drive you would like to use for your recovery disk, then tap or click Next. 6. Tap or click Create. The recovery image and necessary recovery tools will be copied to your USB flash drive, which will take a while, depending on your PC and the size of the recovery image. 7. When the process is done, do one of the following: If you want to keep the recovery partition on your PC, tap or click Finish. If you want to remove the recovery partition from your PC, and free up disk space, tap or click Delete the recovery partition. Then tap or click Delete. This will free up the disk space used to store your recovery image. When the removal is done, tap or click Finish. 8. Remove your USB flash drive. Note: This is now your Windows 8 recovery drive, so keep it in a safe place and don’t use it to store other files or data.
Need help?
Do you have a question about the Tesla W8 and is the answer not in the manual?
Questions and answers