Keit IRmadillo User Manual
Hide thumbs
Also See for IRmadillo:
- User manual (107 pages) ,
- User manual (14 pages) ,
- User manual (17 pages)

Related Manuals for Keit IRmadillo


Summary of Contents for Keit IRmadillo
- Page 1 DOC0935 IRmadillo User Manual ASM0627-10-Z-Cx-Ex-Gx-D3x www.keit.co.uk support@keit.co.uk 26 July 2022 12:02...
-
Page 2: Table Of Contents
Electrical safety ....................... 3 1.4. Pressure and temperature limits ................3 1.5. Operating environment limits .................. 4 How to Power, Purge and Connect the IRmadillo ............5 2.1. Powering the IRmadillo ................... 5 2.1.1. Uninterruptible power supply (UPS) ..............5 2.1.2. - Page 3 Inclined Stand – ASM0916 ..................35 5.7. 5.7.1. Safety ......................36 5.7.2. Installation ..................... 36 5.8. Ingold DN40 ......................37 5.8.1. Safety ......................37 5.8.2. Installation ..................... 38 Troubleshooting ......................39 DOC0935 (26 July 2022 12:02) www.keit.co.uk Back to Table of Contents...
-
Page 4: Safety
Refer to the product label to confirm the limits. Do not exceed the pressure limits on the product label as this could be dangerous and will invalidate the warranty. If in doubt, contact Keit for advice before installing the spectrometer. DOC0935 (26 July 2022 12:02) www.keit.co.uk... -
Page 5: Operating Environment Limits
(Note: maximum inlet pressure of 1 barg CAUTION with a flow rate 0.5 to 2 litre/min). When purging with nitrogen, ensure there is adequate ventilation to prevent asphyxiation; an oxygen sensor is WARNING recommended. DOC0935 (26 July 2022 12:02) www.keit.co.uk Back to Table of Contents... -
Page 6: How To Power, Purge And Connect The Irmadillo
Overvoltage Category CAT II 2.1.1. Uninterruptible power supply (UPS) To ensure a reliable supply of power to the IRmadillo, we strongly recommend use of an uninterruptible power supply (UPS). Contact support@keit.co.uk for further information. 2.1.2. Power cable The power cable for the IRmadillo is a permanently connected flying lead passed through a cable gland;... -
Page 7: Purging The Irmadillo
(IR) light. The IRmadillo is fitted with a single body purge inlet and a breather in the probe. The Inlet is shipped with a blanking plug that needs to be removed before use. -
Page 8: How To Connect Data Communications
2.3. How to connect data communications Like the power cable, the IRmadillo is supplied with dual flying leads for communication that are permanently connected through cable glands. You must ensure that the cables are DOC0935 (26 July 2022 12:02) www.keit.co.uk... -
Page 9: Connecting To The Internal Controller
Figure 5: CNLinko LP16 RJ45 socket 2.3.1. Connecting to the internal controller To set up the IRmadillo in preparation for install, remote access is needed. This is performed via Remote Desktop Connection from a local-access computer. A connection summary for Remote Desktop connection is available below. - Page 10 Page 9 To connect to the instrument: Once you have connected the IRmadillo controller using one of the above configurations, open Remote Desktop Connection on the local-access computer. This is normally located here: Start Menu → Windows Accessories → Remote Desktop Connection Alternatively, you can find it by pressing the ...
-
Page 11: Checking For Warnings And Checking The Probe Is Clean
When you have connected to the powered-on IRmadillo the KeitSpec application should load automatically. It is important to confirm that the system is working without errors: information on IRmadillo warnings and errors can be found in DOC0893 KeitSpec Software User Manual section 1 Getting Started. -
Page 12: Recognising If The Probe Is Clean
Figure 9: Sharp spikes within the region indicating an unclean probe A peak at 1400 cm indicates that there is some water on the probe. This could indicate poor purge quality. DOC0935 (26 July 2022 12:02) www.keit.co.uk Back to Table of Contents... -
Page 13: Taking A Background
DOC0893 KeitSpec Software User Manual Section 1 Getting Started. 2.6. Installation best practice Having cleaned the probe and taken a background spectrum, the IRmadillo is ready to be inserted into the reaction/process of interest. Probe installation is unique for each application. Safe installation of the probe into the process is the responsibility of the user and should be assessed by a suitably trained person. - Page 14 • The body of the IRmadillo should not be placed in direct sunlight or near a heat source. The instrument has internal temperature control, but this rating is limited and model dependant. Direct heat sources can force the instrument beyond its operating range and cause damage.
-
Page 15: Maintenance
3.2. Maintenance & support programme (MSP) The MSP is for those customers who purchase an IRmadillo and want the assurance that their instrument will receive regular system maintenance to operate smoothly and uninterrupted. The service package provides a comprehensive set of health checks, upgrades and remote support to keep the IRmadillo functioning at the highest level. -
Page 16: Use At High Temperature
800-1800 cm (contrast with Figure 8, above). If evidence of emitter ageing is seen, it may be required to take a new background scan to remove this effect – contact Keit for advice. DOC0935 (26 July 2022 12:02) www.keit.co.uk... -
Page 17: Remote Health Check
Page 16 3.4. Remote health check Keit can perform an annual examination of your system’s health data remotely to determine if any servicing needs to be carried out. This includes review of internal diagnostics for warnings and errors, component performance for signs of premature ageing, and evaluation of background reference spectra history for signs of operator error or progressive damage. -
Page 18: Components
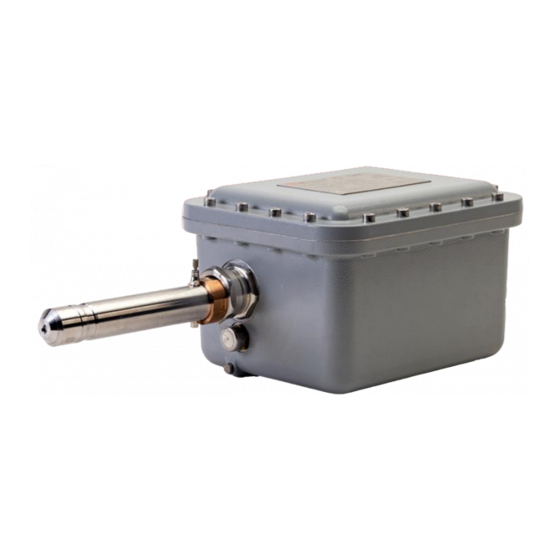
Page 17 4. COMPONENTS This section contains general information about the IRmadillo spectrometer, such as the constituent components and internal controller specifications. 4.1. IRmadillo spectrometer Figure 15: ASM0627-10-Z-Cx-Ex-Gx-D3x front and top of the instrument (A) Product label The product label specifies the model of instrument with permissible environmental and analyte operating conditions, along with applicable certification. - Page 19 The connection is a Legris push-fit fitting. Rigid or fixed piping may be used if the fitting is compatible and mechanical stress is avoided. More detail on how to purge the instrument is given in Section 2.2 Purging the IRmadillo. (G) Communication gland This is the connection from the spectrometer for remote access, network connection or DCS.
-
Page 20: Dust Caps
Install your preferred anti-virus if required 4.3. Storage conditions When installed with purge and power, the IRmadillo can thermally control its internal temperatures up to the limit specified on the product label. However, if the system is to be stored before its use Keit recommends an air-conditioned environment. -
Page 21: Accessories
For volatile substances it is recommended to keep the plugging cap in place during use. Figure 17: Sample cell fitted to IRmadillo probe 5.1.1. Maintenance Inspect the O-ring regularly and replace if it has visually degraded, whether through swelling or other damage;... -
Page 22: Flow Cell
ATR. This is an alternative to installing the IRmadillo into a main pipeline. It is fixed in place using a tri clamp that locates over the rear of the flow cell and two semi- circular collars that fit around the probe;... -
Page 23: Low Flow Cell - Asm1222
Page 22 Table 4 – Specifications and safety limits (high flow cell) Parameter High Flow Cell Pressure Refer to IRmadillo product label Analyte Temperature Refer to IRmadillo product label Body Material Corrosion-resistant metal O-ring Seal FFKM (Kalrez) Port Size 3/4” NPT... -
Page 24: Tri-Port Flow Cell - Asm1101
Page 23 Figure 19: Low flow cell fitted to IRmadillo probe Table 5 - Specifications and safety limits (low flow cell) Parameter Low Flow Cell Pressure Refer to IRmadillo product label Analyte Temperature Refer to IRmadillo product label Body Material... - Page 25 The flow cell can be rotated through 360° to accommodate the user’s installation. Figure 20: Tri-port flow cell fitted to IRmadillo probe Table 6 - Specifications and safety limits (tri-port flow cell)
-
Page 26: Safety
Prevent load being applied to the instrument by the installation. Connections must not apply forces to the flow cell or the IRmadillo probe. Such loads increase the likelihood of leakage and could cause the spectral performance of the instrument to become inconsistent. -
Page 27: Safety
Keit at enquiries@keit.co.uk. It is important to follow these instructions completely to ensure safe use of the flanged probe. Figure 21: IRmadillo with a welded flange probe 5.3.1. Safety The flange and hub form a seal with the process pipework and as... -
Page 28: Installation
The probe body and hub are manufactured from Hastelloy as standard, which is resistant to many aggressive chemicals. However, you are advised to check with Keit before installing on a new process. Before beginning installation, ensure that the gasket is in good condition and that the sealing faces are not scratched or dented. - Page 29 Figure 23: Front view of lap-joint flange, hub and bolt holes. Tighten bolts in steps in order 1-2-3-4 to ensure even compression of the gasket Ensure that the bolts are sufficiently tight to prevent a leak from your pipework. DOC0935 (26 July 2022 12:02) www.keit.co.uk Back to Table of Contents...
-
Page 30: Maintenance
Page 29 5.3.3. Maintenance Keit recommends regular inspection of the integrity of the welds on the front and rear in line with local safety procedures. Inspection of the sealing weld will require removal of the flange and spectrometer from the pressure vessel and can be completed as part of regular inspection/maintenance of the spectrometer and pipework. -
Page 31: Safety
O-ring in the narrower O-ring groove. If the IRmadillo is not going to be installed into the pipe immediately the blanking plug can be positioned with the grooved side aligning with the rear of the port tube. This is held in place using the sanitary tri clamp. -
Page 32: Safety
The flange and hub form a seal with the process pipework and as such are safety critical to prevent an accidental discharge of the WARNING process media. Keit recommends regular inspection of the integrity of the welds on the front and rear in line with local safety procedures. -
Page 33: Installation
If the IRmadillo is not going to be installed into the pipe immediately, the blanking plug can be positioned with the groove aligning with the rear of the port tube and held in place using the sanitary tri clamp. -
Page 34: Cradle - Asm1453
5.6. Cradle - ASM1453 A mounting system for the IRmadillo spectrometer is available to simplify the installation process. The cradle allows for easy installation of the spectrometer into a pipeline with bolting positions for lap joint flange and hub complying with ASME/ANSI B16.5 or other flange options. -
Page 35: Safety
The flange and hub form a seal with the process pipework and as such are safety critical to prevent an accidental discharge of the WARNING process media. Keit recommends regular inspection of the sealing components in line with local safety procedures. The spectrometer and cradle assembly weighs ~32.5kg. Please CAUTION ensure adequate support. -
Page 36: Maintenance
5.6.3. Maintenance Keit recommends regular inspection of the integrity of the welds on the front and rear in line with local safety procedures. Inspection of the sealing weld will require removal of the flange and spectrometer from the pressure vessel and can be completed as part of regular inspection/maintenance of the spectrometer and pipework. -
Page 37: Safety
Page 36 Figure 27: IRmadillo on an inclined stand 5.7.1. Safety The spectrometer and inclined stand assembly weighs ~24kg. Use WARNING caution when handling to avoid injury. 5.7.2. Installation Assemble the inclined stand to the desired height; two positions are possible. For technical drawings, contact Keit at enquiries@keit.co.uk. -
Page 38: Ingold Dn40
Page 37 5.8. Ingold DN40 A version of the IRmadillo spectrometer probe is available to allow connection to reaction vessels or process pipework fitter with an Ingold DN40 port. The probe tube is fitted with a Ingold DN40 nut that can be fitted to compatible ports. For technical drawings, contact Keit. -
Page 39: Installation
Avoid applying stress to the probe by ensuring that the nut and threaded section of the Ingold port align before tightening or bolting the spectrometer in place. Figure 29: Fitting an Ingold IRmadillo probe into an Ingold Port DOC0935 (26 July 2022 12:02) www.keit.co.uk... -
Page 40: Troubleshooting
Page 39 6. TROUBLESHOOTING If you encounter any issues either during installation or during use of the IRmadillo please contact Keit (support@keit.co.uk). Below are some examples of issues that may be experienced with potential solutions to the problem. Table 10 – Troubleshooting guide... - Page 41 Page 40 Issue Cause Potential Solution Damage to ATR element Contact Keit Clean the probe. See Contamination of ATR Section 2.4 Checking for element warnings and checking the Unrepeatable probe is clean measurements Dip probe misaligned by Contact Keit inappropriate use...
Need help?
Do you have a question about the IRmadillo and is the answer not in the manual?
Questions and answers