Table of Contents
Advertisement
Quick Links
a Manuel d'Instructions b Manual de lnstrucciones c Manual de Instruções
d Manuale di Istruzioni f Instrukcja Obsługi
a Caméra intérieure rotative connectée
b Cámara interior rotativa conectada
c Câmara interior rotativa conectada
d Telecamera interna girevole connessa
f Inteligentna wewnętrzna
połączona kamera obrotowa
m Indoor connected rotative camera
m Instructions Manual
Advertisement
Table of Contents

Related Manuals for LEXMAN 83634731


Summary of Contents for LEXMAN 83634731
- Page 1 a Caméra intérieure rotative connectée b Cámara interior rotativa conectada c Câmara interior rotativa conectada d Telecamera interna girevole connessa f Inteligentna wewnętrzna połączona kamera obrotowa m Indoor connected rotative camera a Manuel d’Instructions b Manual de lnstrucciones c Manual de Instruções d Manuale di Istruzioni f Instrukcja Obsługi m Instructions Manual...
- Page 2 Câble 1,40m Broche de réinitialisation Gabarit de perçage...
-
Page 3: Mise En Route
Étape 2 Dans l’onglet “mes objets”, cliquez sur le bouton “+”. Étape 3 Sélectionnez la marque LEXMAN et choisissez le produit dans la liste. Étape 4 Suivez les instructions décrites sur les écrans de l’application. L’App ENKI reconnaîtra automatiquement votre objet. -
Page 4: Présentation Du Produit
PRÉSENTATION DU PRODUIT Voyant lumineux Haut parleur Lentille Micro Interface électrique Base VUE DE FACE VUE DE DOS Bouton Logement pour Haut parleur de réinitialisation carte MicroSD RESET VUE LATÉRALE VUE DE DESSUS... -
Page 5: Installation De La Carte Microsd
INSTALLATION DE LA CARTE MICROSD La caméra prend en charge les cartes MicroSD d’une capacité de 4 à 128 Go (classe 6 ou plus). Veuillez insérer la carte MicroSD dans le logement de la carte microSD conformément à l’illustration suivante. Remarque : Veuillez insérer la carte microSD lorsque la caméra est hors tension. - Page 6 INSTALLATION OPTIMUM DE LA CAMÉRA AUTRE INSTALLATION POSSIBLE DE LA CAMÉRA Installation murale Posée...
- Page 7 INSTALLATION MURALE DE LA CAMÉRA...
- Page 8 En cas d’installation murale, le redressement de l’image dans l’application, ne sera pas assuré dans toutes les directions.
- Page 9 Spécifications (usage intérieur uniquement) 2400 - 2483,5 MHz Bande de fréquence À poser ou à fixer au mur Fixation 20 dBm Émission radio maximum -10°C > 50°C Température de fonctionnement Jusqu’à 85 Humidité de fonctionnement sans condensation -20°C à 60°C Température de stockage Fabricant : Adeo Services Adaptateur...
- Page 10 - Si vous devez nettoyer le produit, utilisez un chiffon doux. - Tout matériau entre le produit et votre émetteur Wi-Fi réduit la distance de fonctionnement. (principalement: mur béton armé, mur béton, surfaces métalliques). Prenez cela en compte pour définir le positionnement de votre produit.
-
Page 11: Réinitialisation De La Caméra
RÉINITIALISATION DE LA CAMÉRA 1. Assurez-vous que l’appareil est sous tension. 2. Insérez délicatement la broche de réinitialisation (fournie) dans le trou de réinitialisation pendant 10 secondes. 3. La réinitialisation est terminée lorsque le signal sonore est entendu et que le voyant bleu clignote pour le jumelage Wi-Fi. - Page 14 Cable 1,40 m Clavija de reinicio Plantilla de perforación...
-
Page 15: Puesta En Marcha
Paso 2 En la pestaña “mis objetos”, haga clic sobre el botón “+”. Paso 3 Seleccione la marca LEXMAN y elija el producto en la lista. Paso 4 Siga las instrucciones descritas en las pantallas de la aplicación. La App ENKI reconocerá automáticamente su objeto. -
Page 16: Presentación Del Producto
PRESENTACIÓN DEL PRODUCTO Indicador luminoso Altavoz Lente Micro Interfaz eléctrica Base VISTA FRONTAL VISTA TRASERA Botón Ranura para Altavoz de reinicio tarjetas MicroSD RESET RESET VISTA LATERAL VISTA SUPERIOR... -
Page 17: Instalación De La Tarjeta Microsd
INSTALACIÓN DE LA TARJETA MICROSD La cámara admite tarjetas MicroSD con una capacidad de 4 a 128 GB (clase 6 o superior). Inserte la tarjeta MicroSD en la ranura para tarjetas microSD de acuerdo con la siguiente ilustración. Observación: Inserte la tarjeta microSD cuando la cámara esté apagada. - Page 18 INSTALACIÓN ÓPTIMA DE LA CÁMARA OTRA INSTALACIÓN POSIBLE DE LA CÁMARA Instalación de pared Colocación...
- Page 19 INSTALACIÓN DE PARED DE LA CÁMARA...
- Page 20 En caso de instalación de pared, la recuperación de la imagen en la aplicación, no estará asegurada en todas las direcciones.
- Page 21 Especificaciones (solamente para uso interior) 2400-2483,5 MHz Banda de frecuencia Para colocar o para fijar en la Fijación pared 20 dBm Emisión de radio máxima -10°C > 50°C Temperatura de funcionamiento Hasta un 85 % sin condensación Humedad de funcionamiento -20°C a 60°C Temperatura de almacenamientode Fabricante: Adeo Services Adaptador...
- Page 22 - Si tiene que limpiar el producto, utilice un paño suave. - Cualquier material entre el producto y su emisor Wi-Fi reduce la distancia de funcionamiento. (principalmente: muro de hormigón armado, muro de hormigón, superficies metálicas). Tenga esto en cuenta a la hora de definir el posicionamiento de su producto.
- Page 23 REINICIO DE LA CÁMARA 1. Asegúrese de que el aparato está encendido. 2. Inserte suavemente el pin de reinicio (suministrado) en el orificio de reinicio durante 10 segundos. 3. El reinicio se completa cuando se se oye el pitido y el indicador azul parpadea para el emparejamiento Wi-Fi.
- Page 26 Cabo 1,40 m Pino de reinicialização Gabarito de perfuração...
-
Page 27: Colocação Em Funcionamento
Étapa 2 No menu «meus objetos», clique no botão «+». Étapa 3 Selecione a marca LEXMAN e escolha o produto da lista. Étapa 4 Siga as instruções descritas nos ecrãs da aplicação. A aplicação ENKI reconhecerá automaticamente o seu objeto. -
Page 28: Apresentação Do Produto
APRESENTAÇÃO DO PRODUTO Indicador luminoso Alto-falante Lente Microfone Interface elétrica Base VISTA FRONTAL VISTA TRASEIRA Botão de Slot para Alto-falante reinicialização o cartão microSD RESET RESET VISTA LATERAL VISTA MÁXIMA... - Page 29 INSTALAÇÃO DO CARTÃO MICROSDA A câmara aceita os cartões MicroSD com uma capacidade de 4 a 128 GB (classe 6 ou superior). Insira o cartão MicroSD no slot de cartão microSD de acordo com a ilustração a seguir. Nota: Insira o cartão microSD quando a câmara estiver desligada. Micro SD...
- Page 30 INSTALAÇÃO ÓTIMA DA CÂMARA OUTRA INSTALAÇÃO POSSÍVEL DA CÂMARA Instalação na parede Pousada...
- Page 31 INSTALAÇÃO DA CÂMARA NA PAREDE...
- Page 32 No caso de instalação na parede, a recuperação da imagem na aplicação, não será garantida em todas as direções.
- Page 33 Especificações (utilização unicamente no interior) 2400 - 2483,5 MHz Banda de frequência A pousar ou a fixar na parede Fixação 20 dBm Emissão rádio máxima -10°C > 50°C Temperatura de funcionamento Até 85% sem condensação Humidade de funcionamento -20°C a 60°C Temperatura de armazenamento Fabricante: Adeo Services Adaptador...
- Page 34 - Se precisar limpar o produto, use um pano macio. - Qualquer material entre o produto e o transmissor Wi-Fi reduzirá a distância de funcionamento. (principalmente: parede de betão armado, parede de betão, superfícies metálicas). Tome isso em consideração ao definir o posicionamento do produto.
- Page 35 REINICIALIZAÇÃO DA CÂMARA 1. Certifique-se de que o aparelho esteja ligado. 2. Insira delicadamente o pino de reinicialização (fornecido) no orifício de reinicialização durante 10 segundos. 3. A reinicialização está concluída quando o sinal sonoro é ouvido for ouvida e o LED azul piscar para o emparelhamento de Wi-Fi.
- Page 38 Cavo 1,40 m Perno di reset Sagoma di foratura...
-
Page 39: Descrizione Del Prodotto
Aprire l’applicazione ENKI e connettersi. Fase 2 Nel menù “i miei oggetti” cliccare sul pulsante “+” Fase 3 Selezionare la marca LEXMAN e selezionare il prodotto dalla lista. Fase 4 Seguire le istruzioni date nelle schermate dell’applicazione. L’Applicazione ENKI riconoscerà automaticamente il tuo oggetto. -
Page 40: Presentazione Del Prodotto
PRESENTAZIONE DEL PRODOTTO Spia luminosa Altoparlante Obiettivo Microfono Interfaccia elettrica Base VISTA FRONTALE VISTA POSTERIORE Pulsante Alloggio per Altoparlante di reset scheda MicroSD RESET RESET VISTA LATERALE VISTA SUPERIORE... - Page 41 INSTALLAZIONE DELLA CARTA MICRO SD La telecamera riconosce le schede Micro SD di una capacità da 4 a 128 Gb (classe 6 o più). Si prega di inserire la scheda Micro SD nell’apposito alloggio come visibile sull’immagine seguente. Nota: Si prega d’inserire la scheda micro SD quando la telecamera è spenta e non è...
- Page 42 INSTALLAZIONE MIGLIORE DELLA TELECAMERA ALTRA INSTALLAZIONE POSSIBILE DELLA TELECAMERA Installazione murale Posata...
- Page 43 INSTALLAZIONE MURALE DELLA TELECAMERA...
- Page 44 In caso d’installazione murale, il raddrizzamento dell’immagine nell’applicazione, non sarà assicurato per tutte le direzioni.
- Page 45 Specifiche (uso interno solamente) 2400 - 2483,5 MHz Banda di frequenza Da posare o fissare al muro Fissaggio +20 dBm Emissione radio max -10°C > 50°C Temperatura di funzionamento: Fino a 85% senza condensazione Umidità di funzionamento: Tra -20° e 60°C Temperatura di conservazione Fabbricante: Adeo Services Adattatore...
- Page 46 - Se si deve pulire il prodotto, usare un panno morbido. - Qualsiasi materiale si trovi tra il prodotto e l’emittente Wi-Fi riduce la distanza di funzionamento (per lo più: muro di cemento armato, muro in cemento, superfici metalliche). Tenerne conto per definire la posizione del prodotto. - Contattare il rivenditore per ottenere aiuto in caso di problemi con il prodotto e non cercare di smontare o riparare il prodotto senza autorizzazione.
- Page 47 RESET DELLA TELECAMERA 1. Assicurarsi che il dispositivo sia collegato alla rete elettrica. 2. Inserire delicatamente il perno di reset (incluso) nel foro di reset per 10 secondi. 3. Il reset si conclude quando si sente il bip e che la spia blu lampeggi per l’abbinamento Wi-Fi.
- Page 50 Kabel 1,40 m Pin do resetu Szablon do wiercenia...
-
Page 51: Opis Produktu
Otwórz aplikację ENKI i zaloguj się. Etap 2 W zakładce «moje obiekty» kliknij na przycisk «+». Etap 3 Wybierz markę LEXMAN i wybierz produkt z listy. Etap 4 Postępuj zgodnie z instrukcjami wyświetlanymi na ekranach aplikacji. Aplikacja ENKI automatycznie rozpozna Twój obiekt. -
Page 52: Prezentacja Produktu
PREZENTACJA PRODUKTU Lampka kontrolna Głośnik Obiektyw Mikrofon Interfejs elektryczny Podstawa WIDOK Z PRZODU WIDOK Z TYŁU Przycisk Gniazdo kart Głośnik reset MicroSD RESET RESET WIDOK Z BOKU WIDOK Z GÓRY... - Page 53 INSTALOWANIE KARTY MICROSD Kamera obsługuje karty MicroSD o pojemności od 4 do 128 GB (klasa 6 lub wyższa). Proszę włożyć kartę MicroSD do gniazda kart microSD zgodnie z poniższą ilustracją. Uwaga: Kartę microSD należy wkładać przy wyłączonej kamerze. Micro SD...
- Page 54 OPTYMALNA INSTALACJA KAMERY ALTERNATYWNA INSTALACJA KAMERY Montaż ścienny Zainstalowana...
- Page 55 MONTAŻ ŚCIENNY KAMERY...
- Page 56 W przypadku montażu na ścianie rektyfi kacja obrazu w aplikacji nie będzie zapewniona we wszystkich kierunkach.
- Page 57 Specyfikacje techniczne (tylko do użytku w pomieszczeniach) 2400-2483,5 MHz Pasmo częstotliwości Wolnostojący lub montaż na ścianie Montaż 20dBm Maksymalna emisja radiowa -10°C > 50°C Temperatura pracy Do 85% bez kondensacji Wilgotność robocza -20°C do 60°C Temperatura przechowywania Producent: Adeo Services Adapter Identyfikator modelu: LEXCAM-PS01 Napięcie wejściowe: 100-240 V...
- Page 58 - Jeśli musisz wyczyścić produkt, użyj miękkiej szmatki. - Jakikolwiek materiał znajdujący się pomiędzy produktem a nadajnikiem Wi-Fi zmniejsza zasięg funkcjonowania. (głównie: ściana żelbetowa, ściana betonowa, powierzchnie metalowe). Należy wziąć to pod uwagę przy wyborze położenia swojego produktu. W przypadku jakichkolwiek problemów z produktem należy skontaktować...
- Page 59 INICJALIZACJA (RESET) KAMERY 1. Upewnić się, że urządzenie jest pod napięciem. 2. Delikatnie wsunąć pin resetujący (w zestawie) w otwór resetujący naciskając przez 10 sekundy. 3. Resetowanie jest zakończone po usłyszeniu sygnału dźwiękowego i miga niebieski dioda LED oznaczająca pomyślne parowanie z siecią Wi-Fi.
- Page 62 Cable 1,40m Reset pin Drilling template...
-
Page 63: Getting Started
Step 2 In the «my items» tab, click on the «+» button. Step 3 Select the LEXMAN brand and choose the product from the list. Step 4 Follow the instructions described on the screens of the application. The ENKI App will automatically recognize your object. -
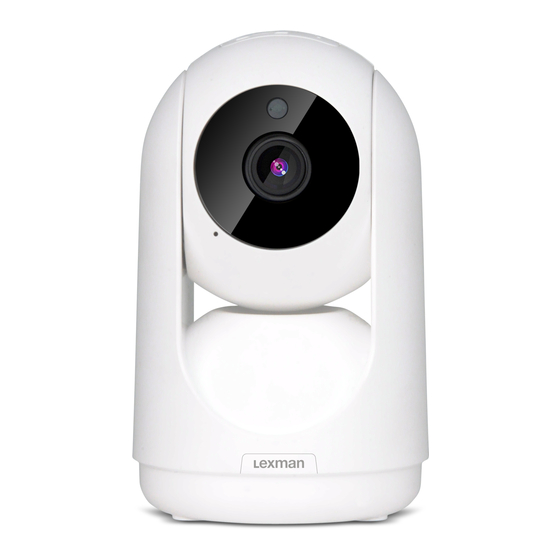
Page 64: Product Presentation
PRODUCT PRESENTATION Indicator light Speaker Lens Micro electrical interface Base FRONT VIEW BACK VIEW Reset MicroSD Speaker button card slot RESET RESET SIDE VIEW BOTTOM VIEW... -
Page 65: Installing The Microsd Card
INSTALLING THE MICROSD CARD The camera supports MicroSD cards with a capacity of 4 to 128 GB (Class 6 or higher). Please insert the MicroSD card into the microSD card slot according to the following illustration. Note: Please insert the microSD card when the camera is turned off. Micro SD... - Page 66 OPTIMUM CAMERA INSTALLATION OTHER POSSIBLE CAMERA INSTALLATION Wall mounted Free standing...
- Page 67 WALL MOUNTED INSTALLATION OF THE CAMERA...
- Page 68 If the camera is installed on the wall, image adjustment in the application will not be guaranteed in all directions.
- Page 69 Specifications (indoor use only) 2400-2483,5 MHz Frequency band Free standing or wall mounted Mounting 20dBm Maximum radio emission -10°C > 50°C Operating temperature Up to 85% non-condensing Operating humidity -20°C to 60°C Storage temperature Manufacturer: Adeo Services Adapter Model Identifier: LEXCAM-PS01 Input voltage: 100-240 V AC input frequency: 50/60 Hz Output voltage: 5.0 V...
- Page 70 - If you need to clean the product, use a soft cloth. - Any material between the product and your Wi-Fi transmitter will reduce the operating distance. (Mainly: reinforced concrete wall, concrete wall, metal surfaces). Take this into account when defining the positioning of your product.
-
Page 71: Resetting The Camera
RESETTING THE CAMERA 1. Make sure the camera is turned on. 2. Gently insert the reset pin (provided) into the reset hole for 10 seconds. 3. The reset is complete when the sound signal is heard and the blue light flashes for Wi-Fi pairing. - Page 76 Isolation classe 2 / Aislamiento clase 2 / Isolamento de classe 2 / Isolamento di classe 2 / Klasa izolacji2 / Insulation 2 Made in China FR/ES/PT/IT/PL/EN ADEO Services 135 rue Sadi Carnot - CS 00001 - 59790 RONCHIN - France...
- Page 77 ES: CÁMARA DE VIGILANCIA CONECTADA PARA INTERIORES Y EXTERIORES |Tipo de producto | PT: CÂMERA DE VIGILÂNCIA CONECTADA PARA INTERIOR E EXTERIOR 83634731; 83634730 - EAN Code: 3276007384956; 3276007394351 Product Reference|Référence produit|Referencia del producto|Referência do Industrial Type Design Reference: indoor camera:LEXCAM-RI01...
- Page 78 IT: TELECAMERA DI SORVEGLIANZA COLLEGATA PER INTERNI ED ESTERNI Tipologia di prodotto|Rodzaj produktu| PL: WEWNĘTRZNA I ZEWNĘTRZNA PODŁĄCZONA KAMERA NADZORU 83634731; 83634730 - EAN Code: 3276007384956; 3276007394351 Industrial Type Design Reference: indoor camera:LEXCAM-RI01 Riferimento del prodotto|Referencje produktu| outdoor camera: LEXCAM-FE01...
Need help?
Do you have a question about the 83634731 and is the answer not in the manual?
Questions and answers