
Related Manuals for Ideal Vacuum XGC-520

Summary of Contents for Ideal Vacuum XGC-520
- Page 1 Dual Capacitance Manometer Gauge Controller (DCM) USER MANUAL Model XGC-520 (P1010127) DCM-09232022 - V 1.2...
-
Page 2: Warranty
WARRANTY Ideal Vacuum Products warrants to the original purchaser this product to be free from defects in workmanship and materials for a period of one (1) year from the original delivery date. The liability of Ideal Vacuum under this warranty is limited to servicing, adjusting, repairing or replacing any unit or component part which, at Ideal Vacuum’s sole discretion, is determined to have failed... -
Page 3: Table Of Contents
Available RS-232 Serial Commands ................25 Serial Command Usage ....................26 4.2.1 Status Query Commands ..................26 4.2.2 Input Commands ....................28 4.2.3 Reset Commands ....................30 4.2.3 Power Commands ....................30 2019-2022 © Ideal Vacuum Products, LLC | (505) 872-0037 info@idealvac.com www.idealvac.com DCM-09232022 - V 1.2... - Page 4 Table 5 - DB15 RS-232 I/O connector on back of DCM ............11 Table 6 - Factory defaults ......................19 Table 7 - Remote serial commands ..................25 2019-2022 © Ideal Vacuum Products, LLC | (505) 872-0037 info@idealvac.com | www.idealvac.com DCM-09232022 - V 1.2...
-
Page 5: Safety
SAFETY IMPORTANT SAFETY INFORMATION Thank you for purchasing this equipment from Ideal Vacuum Products. We want you to operate it safely. h Read this manual before installing or operating this equipment. Failure to follow the warnings and instructions may result in serious injury or equipment damage. -
Page 6: General Information
GENERAL INFORMATION INTRODUCTION The Ideal Vacuum Products (IVP) XGC-520 Dual Capacitance Manometer Gauge Controller (DCM) is an inexpensive solution for pressure readout of up to two Capacitance Diaphragm Gauges (CDG’s). The IVP DCM controller provides enhanced accuracy with intelligently designed features for simple user control and easy system integration. -
Page 7: Features
8-N-1, no hardware handshake Operating Temperature Range 0 to 50° C Enclosure Size 1/8-DIN Input Power 100-240 VAC, 50/60 Hz Table 1 - Technical specifications 2019-2022 © Ideal Vacuum Products, LLC | (505) 872-0037 info@idealvac.com www.idealvac.com DCM-09232022 - V 1.2... -
Page 8: Dimensional Drawings
DCM snug in the panel. side rail side rail set screw set screw Figure 2 - Rails for panel mounting 2019-2022 © Ideal Vacuum Products, LLC | (505) 872-0037 info@idealvac.com | www.idealvac.com DCM-09232022 - V 1.2... -
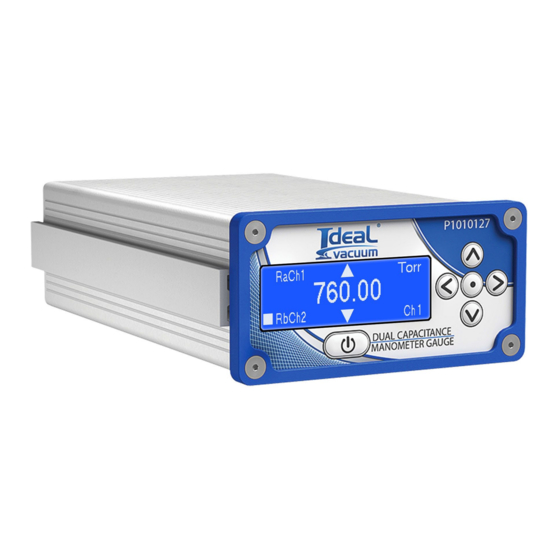
Page 9: Front Panel Display And Controls
Navigation direction arrows Menu item or value Current pressure units Gauge channel Saved setpoint indicator Relay on indicator Table 2 - Front panel feature descriptions 2019-2022 © Ideal Vacuum Products, LLC | (505) 872-0037 info@idealvac.com www.idealvac.com DCM-09232022 - V 1.2... -
Page 10: Back Panel Power And I/O Connections
The shield wire must be grounded before the signal wires exit the connector. h The ground wire should be the absolute minimum length within the connector. 2019-2022 © Ideal Vacuum Products, LLC | (505) 872-0037 info@idealvac.com | www.idealvac.com DCM-09232022 - V 1.2... -
Page 11: Sensor Connector Pinouts (Db9)
Table 5 - DB15 RS-232 I/O connector on back of DCM To make it easier to wire relay and serial cable connections, we recommend using a DB-15 male to terminal block breakout board adapter (P1012800). 2019-2022 © Ideal Vacuum Products, LLC | (505) 872-0037 info@idealvac.com www.idealvac.com... -
Page 12: Installation
2. Connect the sensor cable between the CDG and the DCM. 3. Plug in the DCM’s power cord. 4. Press the Power button on the DCM. Figure 8 - Simplified DCM installation 2019-2022 © Ideal Vacuum Products, LLC | (505) 872-0037 info@idealvac.com | www.idealvac.com DCM-09232022 - V 1.2... -
Page 13: Operation
The controller translates the voltage signal into pressure units which are displayed on the controller screen. Different diaphragm materials and thicknesses set the gauge to a specific pressure measuring range. 2019-2022 © Ideal Vacuum Products, LLC | (505) 872-0037 info@idealvac.com www.idealvac.com... - Page 14 Heated CDG models are available which help keep process gases from condensing inside the gauge tube and on the diaphragm. 2019-2022 © Ideal Vacuum Products, LLC | (505) 872-0037 info@idealvac.com | www.idealvac.com...
-
Page 15: Navigating Menus And Setting Parameters
A “SAVED!” screen message confirms that the new value or selection has been stored. After a save, you are automatically returned to the originating sub-menu (i.e., Units, Full Scale, Setpoints, etc.). 2019-2022 © Ideal Vacuum Products, LLC | (505) 872-0037 info@idealvac.com www.idealvac.com... -
Page 16: Menu Flowchart
Units Adjust DCM Calibrate +/- Value +/- Value Zero Zero Clear? Zero Set? Settings Brightness High Medium Buzzer Reset Figure 12 - Menu flowchart 2019-2022 © Ideal Vacuum Products, LLC | (505) 872-0037 info@idealvac.com | www.idealvac.com DCM-09232022 - V 1.2... -
Page 17: Startup
DCM by pressing the power button below the screen. Figure 13 - Power button The Ideal Vacuum splash screen will appear, then show the firmware version number. After initializing, the DCM shows gauge pressure in the center of the home screen. The current Channel is displayed in the bottom right of the screen. -
Page 18: Changing Pressure Measurement Units
7. Press the LEFT arrow button to go back to the home screen (first tier in the flowchart). The Channel 1 pressure now reads in mBar. 2019-2022 © Ideal Vacuum Products, LLC | (505) 872-0037 info@idealvac.com | www.idealvac.com DCM-09232022 - V 1.2... -
Page 19: Full Scale
Screen Brightness Medium Button Beeper Table 6 - Factory defaults When reconfiguring a system, or preparing a new experiment, always unplug, then reset the DCM. 2019-2022 © Ideal Vacuum Products, LLC | (505) 872-0037 info@idealvac.com www.idealvac.com DCM-09232022 - V 1.2... -
Page 20: Channels, Relays, And Setpoints Overview
Below, the (low) setpoint thresholds for both relays have been reached and the screen shows that both relays are energized. 2019-2022 © Ideal Vacuum Products, LLC | (505) 872-0037 info@idealvac.com | www.idealvac.com... -
Page 21: Programming Setpoints
RaCh1 (above), you must select Relay a. At the Set Channel screen (next page), press the DOWN arrow button twice. At the Disable screen, press the SELECT/ENTER button. The setpoint will be deleted. 2019-2022 © Ideal Vacuum Products, LLC | (505) 872-0037 info@idealvac.com www.idealvac.com DCM-09232022 - V 1.2... - Page 22 9. Press SELECT/ENTER. The setpoint is SAVED! Press the LEFT arrow button to go to the home screen. The home screen now shows that both relays have programmed setpoints (RaCh1 and RbCh2). Neither relay is currently energized. 2019-2022 © Ideal Vacuum Products, LLC | (505) 872-0037 info@idealvac.com | www.idealvac.com DCM-09232022 - V 1.2...
-
Page 23: Dcm Adjustment
5. To zero the gauge, press the UP or DOWN arrow button to go to the Set? screen. 6. At the Set? screen, press SELECT/ENTER. The DCM automatically subtracts the voltage offset required to obtain zero volts, which then forces the home screen to display “N.C.” 2019-2022 © Ideal Vacuum Products, LLC | (505) 872-0037 info@idealvac.com www.idealvac.com... -
Page 24: Calibrating A Gauge
To remove calibration offset and show true (absolute) pressure, set the MF on the DCM to 1.00 (the default) or use the rstcal1 serial command (p.28). 2019-2022 © Ideal Vacuum Products, LLC | (505) 872-0037 info@idealvac.com | www.idealvac.com DCM-09232022 - V 1.2... -
Page 25: Remote Operation
Resets DCM to all factory defaults (VISA) Power Turns the DCM on Turns the DCM off and de-energizes relays Table 7 - Remote serial commands 2019-2022 © Ideal Vacuum Products, LLC | (505) 872-0037 info@idealvac.com www.idealvac.com DCM-09232022 - V 1.2... -
Page 26: Serial Command Usage
Gauge’s Full Scale No gauge 20 mTorr 50 mTorr 100 mTorr 1 Torr 2 Torr 10 Torr 100 Torr 1000 Torr 5000 Torr 10,000 Torr 2019-2022 © Ideal Vacuum Products, LLC | (505) 872-0037 info@idealvac.com | www.idealvac.com DCM-09232022 - V 1.2... - Page 27 <high value> <low value> <relay status> <channel#> Relay status: 0 = relay off; 1 = relay on Description: Gets the serial number of the DCM. Returns: <######> 2019-2022 © Ideal Vacuum Products, LLC | (505) 872-0037 info@idealvac.com www.idealvac.com DCM-09232022 - V 1.2...
-
Page 28: Input Commands
Behaves similar to setcal1 (above) The DCM stores and uses the setcal1 and setcal2 values internally as entered, but rounds off their values for display on screen. 2019-2022 © Ideal Vacuum Products, LLC | (505) 872-0037 info@idealvac.com | www.idealvac.com DCM-09232022 - V 1.2... - Page 29 0 = Success, 2 = voltage is too high setz2 Description: Sets Channel 2 zero voltage offset to the gauge’s current output voltage. Behaves similar to setz1 (above) 2019-2022 © Ideal Vacuum Products, LLC | (505) 872-0037 info@idealvac.com www.idealvac.com DCM-09232022 - V 1.2...
-
Page 30: Reset Commands
Description: Resets all DCM parameters to factory defaults (VISA). Returns: 0 = success 4.2.3 POWER COMMANDS Description: Turns the DCM on. Description: Turns the DCM off and de-energizes relays. 2019-2022 © Ideal Vacuum Products, LLC | (505) 872-0037 info@idealvac.com | www.idealvac.com DCM-09232022 - V 1.2... - Page 31 Ideal Vacuum Products, LLC. 5910 Midway Park Blvd NE Albuquerque, NM 87109 Phone: (505) 872-0037 Fax: (505) 872-9001 Web: idealvac.com...
Need help?
Do you have a question about the XGC-520 and is the answer not in the manual?
Questions and answers