Table of Contents
Advertisement
Quick Links
Advertisement
Table of Contents

Related Manuals for Onick LSP320

Summary of Contents for Onick LSP320
- Page 1 Onick LSP320 Hand-Held Laser Laser Velocimeter User Manual - 1 -...
-
Page 2: Table Of Contents
(1 CONTENT INDEX Edition) Section #1 - Introduction ..................Package . - Page 3 Restore Factory Settings ................. . . Formatting SD Card .
-
Page 4: Section #1 - Introduction
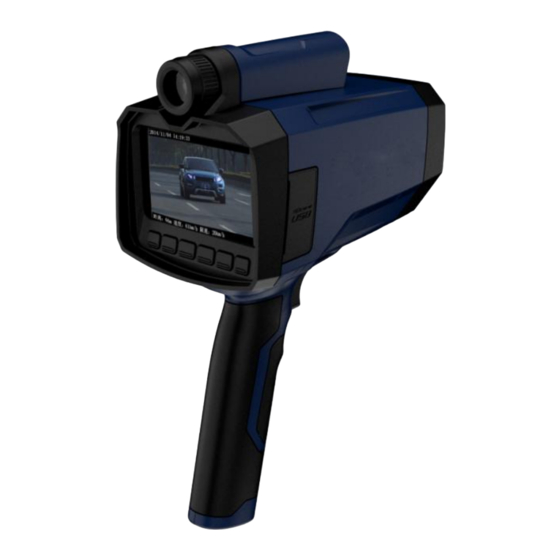
Section #1 - Introduction Congratulations on your purchase of the Onick LSP320 handheld laser speed forensics instrument This device is a portable unibody laser speed gun camera, which is capable of accurately measuring the real-time speed of a vehicle while at the same time measuring its distance. It has the function of taking static images and video recording for vehicles out of speed limit. -
Page 5: Product View Illustration
Li-ion battery will become unstable (potential danger) in high or low temperatures. Charging temperature range 0° C to +45° C (+32° F to +113° F) Storage temperature range -20° C to +60° C (-4° F to +140° F) When using, charging or storing batteries, in event of the following conditions, please terminate use of batteries immediately. -
Page 6: Battery Handle Installation
When battery is being charged, do not place battery close to fire or expose it under sun. When battery turns hot, the built-in safety device will be activated to prevent battery from charging. Heating battery will damage the safety device, thus causing additional heat; crack or burn of battery. Warning: Li-ion Battery will become unstable (potential danger) in high or low temperatures. -
Page 7: Real-Time Clock
When connecting USB cable to the computer and the device is power on, use my computer or Microsoft windows file explorer to find SD card. When operating files, files are encrypted and need to be via the software that accompanies the product to view images. When not operating files, the device will automatically power off according to the time set normally. -
Page 8: Display Info And Icons
Switch measurement mode Move cursor up and down. When standby, it can be used to adjust volume. There are 4 levels of volume. Standby: enter image/video replay. Exit settings POWER button is the red button aviation socket at side. It can be used for power on and off. Display Info and Icons System date and time GPS positioning status when showing icon... -
Page 9: Starting-Up System Parameter Settings
When errors occur, shut down and restart. If error remains, please contact local distributor. Power Off Press the POWER button once and a box to confirm to shut the device down will pop up in the screen. If clicking “Yes”, wait for 10s for the system to shut down. When the system crashes unexpectedly, long press POWER button and system will restart. -
Page 10: Menu Homepage
. Distance Only Mode: only measure the distance Capture Speed: Capture speed limit is the snapshot threshold value. The device will take snapshots when vehicles’ speed equals to or exceeds snapshot speed. Use a stylus or keyboard on touch screen to input. -
Page 11: Camera Settings Page
PICS: Static image folder. View images according to time order. VIDS: Video storage folder. View videos according to time order. Camera Settings Page On homepage, click icon to enter. Operate by buttons or touch. Shutter/Gain There are two modes: Auto/Manual for the settings of camera exposure parameters and image gains. If shutter is too big, it leads to shadowing of moving objects and image ambiguity;... -
Page 12: Auto Exposure Brightness
Graph 1 Graph 2 Auto Exposure Brightness It is valid in Auto Exposure Mode. Select target levels to make image brightness comply with different requirements, medium by default. Brightness/HDR/BLC Image brightness parameters adjustment. Increasing values will raise image brightness. It is mainly applied to improve image brightness in relatively dim environment. -
Page 13: Digital Zooming
Digital Zooming When digital zooming is on, there will be magnified and zoomed icons, providing 4x magnification view. Image Info Overlays The video pixel size is 640x320 by default. Currently settings disabled. Data Encryption Image encryption settings, ON: encrypt data via AES128; OFF: The data is not encrypted. After data is encrypted, must use software that accompanies the device to view images. -
Page 14: Best Focus Distance
The device can switch among 3 kinds of units: Metric System: kilometer/hour and meter Imperial: mile/hour and feet UK: mile/hour and meter Best Focus Distance In Auto Mode, you can change the distance at which to take static image snapshots. Input new values according to the reminders of the dialogue box and the icons on the screen. -
Page 15: Operator Name
Operator Name Use a stylus or keyboard on touch screen to input info. Road Location Street name and city, etc. Use a stylus or keyboard on touch screen to input info. Operator ID Additional info, like official number or level of police. Use a stylus or keyboard on touch screen to input a maximum of 14 digits. -
Page 16: Language
Language It is language setting for menu, text and voice info. The default language is English. Time Info Settings Set date and time. When receiving the device, set Time Zone correctly. Parameters Setting Page On homepage, click icon to enter. Use buttons or touch screen to operate. Nothing-is-done Power-off Time Power-off time for the device. -
Page 17: Touch Screen Calibration
GPS update time interval; used for updating date, time and location of device. Touch Screen Calibration LCD touch screen calibration. When during usage finding misalignment between touch location and actual location, it means that the device is in need of calibration. After entering calibration program, use a stylus to point at the center of the rectangle displayed, complete the setting orderly. -
Page 18: Device Info
For user password changing, please click menu to pop up a dialogue box. Input the original user password and then input new password twice. If password is correct, click OK to confirm. The password is changed successfully. Exit the dialogue box. Device Information On main menu, click icon to enter and view device info. -
Page 19: Cursor Icon Settings
Cursor Icon Settings On main menu homepage, click icon to enter. Then click icon to select type of aiming rectangle in the center of image when measuring speed and taking snapshots. Please use buttons or stylus to select the type of aiming rectangle needed. Cursor Location Settings Note: Please do not change at random. -
Page 20: Section #5 - Image View Software
Then restart the device. The device will automatically load the updates files to update. The update process interface is as below. Please hold on for a few seconds. The device will automatically power off after finishing updates, which means that update is done and the device will be using the newest firmware next time it starts Section #5 - Image View Software Software Function Introduction It is mainly used to read the videos and images encrypted by the device. -
Page 21: Video Area
Exit Exit current software. Cross Aiming Cross Icons The software provides 3 types of aiming cross icons for users to select. Selection Parameters Setting Able to set relevant properties of camera. SD Card Status View SD card status Manage Image Export Info According to user settings, select to display relevant info on the image displayed in Big Configuration Image Area. -
Page 22: Export To Disk
Video files shown as below: Static image shown as below: Remark: when opening images that have related videos, the related videos will also be opened. Export to Disk - 22 -... -
Page 23: Video Snapshots
Click File→Export to Disk. This operation can export data in SD card to current computer. Please select target path, as shown in the graph below: Video Snapshots Click File → Video Snapshots and it will show the interface below. Save to the path you select. Step 1: Connect SD card to computer and open respective video play file. -
Page 24: Export Current Images
Export Current Images Click File→Export Current Image. Select files that need to be saved. Clicks “save”, as shown in the graph below: Batch Export Images Click File→ Batch Export Images. Click start to export image info to computer. Batch Export Videos Click file→Batch Export Videos. -
Page 25: Printing
Printing Click File → Print. Click “OK” to print image shown in the file, as below: Exit Click File → Exit to close the file. Parameter Settings Click Manage→Parameters Settings Set related properties of the device, as below - 25 -... -
Page 26: Sd Card Status
SD Card Status Click Manage→SD Card Status to display SD card status, as shown in the graph Image Export Info Settings Click Manage→Image Export Info Setting. The textbox in the graph is for setting the text to be shown in image and printing. -
Page 27: Small Image Area Shortcuts
From left to right, they are respectively shortcuts of “Show cross on image”, “Save Image”, “Image zoom-in”, “Image zoom-out”, “Image zoom in and out scrolling functions” Thank you for purchasing the Onick LSP320 handheld laser speed forensics instrument! For more product information, please visit: www.onick.com.cn...
Need help?
Do you have a question about the LSP320 and is the answer not in the manual?
Questions and answers