Advertisement
Quick Links
Weight Limit:
Daybed: 400 Lb / 181 Kg
Trundle: 250 Lb / 113 Kg
KT. - 2019/10/23
4241419CLUK(Grey Velvet) 4242919CLUK(Green Velvet)
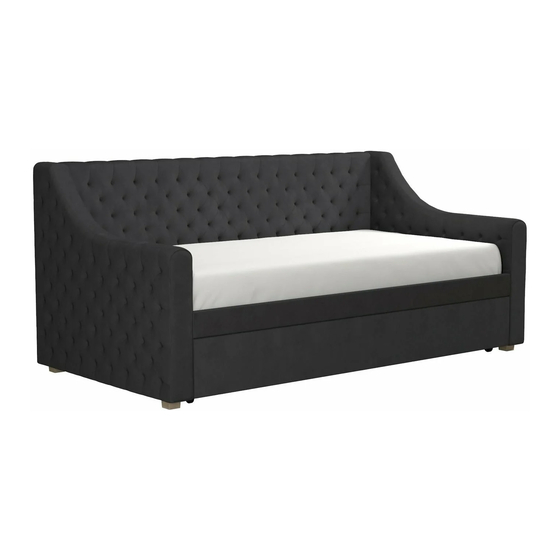
Upholstered Daybed and Trundle
Thank you for purchasing from Dorel UK!
DO NOT RETURN TO THE STORE !
If parts are missing or damaged, we will gladly ship your
replacement parts free of charge.
Call 01942 524100
Date of Purchase
IMPORTANT - READ CAREFULLY - RETAIN FOR FUTURE REFERENCE
Single UK
Lot Number
B344241419CLUK00
1
Advertisement

Related Manuals for Cosmopolitan COSMOLiving 4241419CLUK


Summary of Contents for Cosmopolitan COSMOLiving 4241419CLUK
- Page 1 4241419CLUK(Grey Velvet) 4242919CLUK(Green Velvet) Upholstered Daybed and Trundle Single UK Weight Limit: Thank you for purchasing from Dorel UK! Daybed: 400 Lb / 181 Kg Trundle: 250 Lb / 113 Kg DO NOT RETURN TO THE STORE ! If parts are missing or damaged, we will gladly ship your replacement parts free of charge.
- Page 2 Warranty Information Read Before Beginning Assembly ● Call our toll free number if you need assistance. Dorel UK warrants this product to be free from defects in material and workmanship ● Work in a spacious area and near where the unit will be used, preferably on a and agrees to remedy any such defect.
- Page 3 Parts Replacement Parts, Call 01942 524100 This item is packed in 2 boxes! All parts listed on this page are in Box A. If Box B is missing please contact your Retailer. There are inner box(es) that include components required to complete this assembly. Armrest Armrest Wooden Slat...
- Page 4 Parts Replacement Parts, Call 01942 524100 This item is packed in 2 boxes! All parts listed on this page are in Box B. If Box A is missing please contact your Retailer. There are inner box(es) that include components required to complete this assembly. Back Rest Front Panel Front Panel...
- Page 5 Parts Replacement Parts, Call IMPORTANT: Below part numbers list is unique to your product. 01942 524100 Please keep it on hand when calling for replacement parts. Part Number 4241419CLUK 4242919CLUK Part Label (Gray Velvet) (Green Velvet) UK00003X UK00008X UK00004X UK00009X UK00005X UK00010X UK00006X...
- Page 6 Hardware Pack:Daybed Hardware Pack #: T4330439N-00 1/4" X 3/4" 1/4"X 1 3/16" X 16 1/4"X 1 9/16" X 12 5/16"X 2 1/4" Allen Key 4mm Please do not completely tighten all the hardware, until the entire assembly is complete, unless otherwise indicated in the step-by-step instructions.
- Page 7 Hardware Pack: Trundle Hardware Pack #: T4144719LS-01 1/4" 1/4" X 3/4" 1/4"X 1 3/8" 1/4"X 1 9/16" Allen Key 4mm Please do not completely tighten all the hardware, Wrench until the entire assembly is complete, unless otherwise indicated in the step-by-step instructions.
- Page 8 The following instructions will illustrate how to assemble the Daybed from Step 1 to Step 6. Please use the Daybed Hardware Pack: T4330439N-00. Attach Z x 4 to C and D with Do not completely tighten the Screw to C and D, leave half of the Bolts, leave half of thread exposed.
- Page 9 Attach V and W to A with Small holes on V & W should be facing upward.
- Page 10 Hang A on C & D as illustrated below, don't completely tighten the BOLT until STEP 4 is complete.
- Page 11 Flange of bracket on E must be located on the inside of the bed. Attach E & F to C and D with Then properly tighten all the Bolts . Slat holes on part E & F should be facing upward.
- Page 12 5.1 Attach B to E with 5.2 Attach K to A with Holes on part K should face upward. X 12...
- Page 13 6.1 Insert O into X; 6.2 Press X into K, repeat the same procedure for the opposite side of the bed with a new O and X to press X into E. 6.3 Insert ends of both slat O into Y, then press Y into F as illustrated.
- Page 14 Caster holes on H towards upward. The following instructions will illustrate how to assemble the Trundle from Step 7 to Step 11. Please use the Trundle Hardware Pack: T4144719LS-01. 7.1 Lay H x 2 on the floor with holes towards upward as illustrated.
- Page 15 Attach I x 2 & J to H x 2 with using ❹ ❻ using...
- Page 16 ❶ Attach P x 2 & N x 2 to H x 2 with In order not to damage your product, please orient lever to the inside of the trundle as illustrated. Caster N should be assembled on the side near Part J.
- Page 17 Turn over the frame assembled from STEP 9. ❸ Attach G to J with Check if slat holes on I & J are all on the top side in this STEP.
- Page 18 11.1 Insert O into X; 11.2 Press X into J, repeat the same procedure for the opposite side of the trundle with a new O and X to press X into I; 11.3 Insert ends of both slats O into Y, then press Y into I as illustrated.
-
Page 19: Helpful Hints
Helpful Hints To use Trundle: How to lock caster? How to unlock caster? Pull out the trundle completely from underneath daybed. Once positioned, make sure casters are locked by pushing down the lever " " as illustrated "How to lock caster!". - Page 20 Weight Limit: Helpful Hints Helpful Hints Daybed: 400 Lb / 181 Kg Trundle: 250 Lb / 113 Kg ● Move your new furniture carefully, with two people lifting and carrying the unit to its new location. ● Your furniture can be disassembled and reassembled to move.
Need help?
Do you have a question about the COSMOLiving 4241419CLUK and is the answer not in the manual?
Questions and answers