Table of Contents
Advertisement
Advertisement
Table of Contents

Related Manuals for SRM PC8


Summary of Contents for SRM PC8
- Page 1 User Manual...
-
Page 2: Table Of Contents
User Profile..............18 Viewing data while riding ............19 Uploading files over WiFi............20 Connecting to USB ..............23 Updating Firmware ..............23 PC8 DeviceAgent................24 Troubleshooting ................. 25 Copyright and Trademarks ............25 Statement of Compliance ............26 Warranty..................27 Safety instructions ..............27... -
Page 3: Introduction
INTRODUCTION Welcome to the next generation of SRM Power! In your hand is the best training partner you will ever know. The PowerControl 8, developed by cyclists for cyclists, will push you harder, take you further, and enhance your training experience from this moment forward. The PC8 continues SRM’s legacy as cycling’s... -
Page 4: What's In The Box
WHAT’S IN THE BOX? Download cable (14” or 102”) PowerControl 8 Handlebar clip Additional accessories (Complete bundle): Heartrate Belt SRM HR USB Wall Charger (115/220V AC) Speed Sensor... -
Page 5: Getting Started
GETTING STARTED Before using the PowerControl 8 (PC8) for the first time, some basic steps need to be completed. For more details on all available options, please refer to the respective chapters in this guide. • Charge the PC8 to 100%: Connect the magnetic charging/download cable to the PC8, and a USB power source. -
Page 6: Startup
SRM DeviceAgent software (default setting is 10min.). Once the PC8 starts up there is the choice to start a New Ride, Change the Bike Profile or Continue the current ride. Starting a New Ride will close the last ride and reset all values to zero. -
Page 7: Icon Definitions And Keys
Data is written to memory Wi-Fi Enabled GPS signal quality and satellite fix Screen lock PC8 is locked and will not automatically wake up with PC8 Auto ON function. PRO: Short key press: Interval / Zones / Actual Ride Overview... -
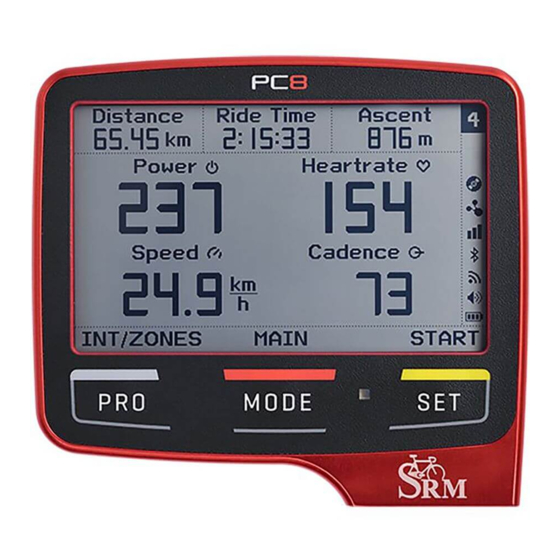
Page 8: Ride Screens
RIDE SCREENS To cycle through the available screens, press the MODE key. The PC8 will automatically return to the 1st Ride Screen (Main) after a time period. NOTICE The automatic return feature can be disabled with the DeviceAgent software. To customize the screens individually refer to the DeviceAgent - see the “PC8 DeviceAgent“... -
Page 9: Main Menu
MAIN MENU To access the PC8 Main Menu press and hold the PRO (Int/Zones) key for 2 seconds. Navigate to the desired screen/option by using the MODE (Next) and SET (Select) keys. To return to the previous menu or return to the Ride Screen use the PRO (Exit/Back) key. -
Page 10: Pairing
Pairing ANT+™ PowerMeter Sensor Select PowerMeter with SET (Select) key. Press SET (Search) again to search for an available sensor. The Search field will display a status bar while the PC8 searches for the PowerMeter. NOTICE The PowerMeter must be turned on to be recognized by the PC8. - Page 11 If no connection can be established - see the “Troubleshooting“ section on page 25. After a Speed Sensor has been paired with the PC8, the wheel size can be set by pressing MODE (Wheel Size). Pairing ANT+™ Heartrate Sensor To pair an ANT+™...
-
Page 12: Zero Offset
Auto-Zero functionality can be turned ON/OFF by selecting AUTO-ZERO and pressing the SET (Change) key. The PC8 factory setting for Auto-Zero is ON. The PowerMeter and PowerControl will sync to update a new Zero Offset value during your ride to insure the utmost accuracy of measurement. - Page 13 Press MODE and SET in the main Ride Screen to access the Zero Offset screen directly. Press SET (Set) to send a calibration request to the PowerMeter. The SRM PC8 will display if the calibration process failed or succeeded. NOTICE Calibrate the PowerMeter with no torque applied.
-
Page 14: History
History To view history of the last twenty eight recorded rides and your total ride values on the PC8, select History from the Main Menu. Rides Select Rides and press SET (Select) to enter the list of all rides. Press MODE (Next) to cycle through them. To view the details of a ride press SET (Select). -
Page 15: Total Values
Total Values Select Total Values to view a total of distance, ride time and energy for all rides done with the PC8. Press MODE (Next) to switch to the Total Values of the current bike profile in use. Resetting the values is done by pressing SET (Delete) key and confirming by selecting YES/NO. -
Page 16: Settings
Settings To view and modify the Settings on the PC8, select Settings from the Main Menu. Sensors To view and modify sensor settings, select Sensors from the Settings Menu. Makes changes to the desired sensors with the SET (Change) key. When leaving the menu with the PRO (Back) key the settings are automatically saved. -
Page 17: System
System To view and modify system settings, select System from the Settings Menu. • Signal Sounds allows for PC8 sounds to be turned on or off. • Backlight default setting is OFF. Auto will switch on the backlight based on light intensity. For energy saving the backlight will switch off after some time when there is no movement. -
Page 18: Data
24. Weight can be set manually or measured with an ANT+™ weight scale. The PC8 will connect to a weight scale and receive the weight and other information automatically. To apply the new values press the SET (Set) key. -
Page 19: Viewing Data While Riding
VIEWING DATA WHILE RIDING Reviewing intervals Intervals recorded during the current ride can be reviewed by pressing PRO (Int/Zones). Press the MODE (Next) key to reverse cycle through all available intervals starting with the most recent one. Viewing Training Zones To view the Training Zones press the SET (Zones) key in the Interval Review screen. - Page 20 CONFIGURE WIFI CONNECTION WIFI configuration can be done through the PC8 itself utilizing WPS connectivity or through PC8 DeviceAgent on a PC/MAC. NOTICE WPS (WIFI Protected Setup) allows for direct connections between the router and PC8. This allows for easier WIFI setup without the need to manually enter credentials.
- Page 21 Setup wifi connections with PC8 DeviceAgent • Connect PC8 to the computer - see the PC8 DeviceAgent section on page 23 for more information on downloading the latest version. • Navigate to the Settings tab and select WIFI • Enable WIFI mode •...
-
Page 22: Uploading Files Over Wifi
UPLOADING FILES OVER WIFI Sending files from PC8 at end of ride • To manually end a ride and upload the file short press PRO + SET, a notification will ask “DO YOU WANT TO RESET CURRENT RIDE?” Press PRO (YES). -
Page 23: Connecting To Usb
CONNECTING TO USB Connect the PC8 via USB download cable to your PC or MAC. The PC8 will appear as a USB mass storage device named SRM_PC8. Activities can be found in the folder / SRM/Activities. ! CAUTION Never delete any folder or format the SRM_PC8 device to prevent data loss. -
Page 24: Pc8 Deviceagent
The PC8 DeviceAgent will load and display the current settings of your PC8 automatically. The current settings can always be re-loaded by pressing the Load from PC8 key in the status bar. After configuring the PC8 using the PC8 DeviceAgent, press Save to PC8 to save any changes that were made to the PC8. -
Page 25: Troubleshooting
My PC8 does not find my ANT+™ device Make sure the sensor you are trying to pair with the PC8 is within range (max 12 feet), and turned on. Please refer to the manual of the respective sensor for details on how to turn a sensor on. If the sensor has been in use previously (e.g. -
Page 26: Statement Of Compliance
Caution: Changes or modifications to this unit not expressly approved by the party responsible for compliance (SRM) could void the user’s authority to operate this equipment. This equipment has been tested and found to comply with the limits for a Class B digital device, pursuant to Part 15 of the FCC Rules. -
Page 27: Warranty
SRM PowerControl & SRM accessories: are warrantied to be free from defects in materials or workmanship for two years from the date of purchase. Within this period, SRM will, at its option, repair or replace any components that fail in normal use. Such repairs or replacement will be made at no charge to the customer for parts or labor, provided that the customer shall be responsible for any necessary transportation cost. - Page 28 SRM USA SRM OCEANIA 720 W. Monument St. 1 Laurel Lane Colorado Springs, CO 80904 Linwood, Christchurch 8011 New Zealand Phone: 719.266.4127 Phone: +64 (3) 355 9467 usa@srm.de oceania@srm.de © 2017 SRM GmbH Version: PC8 USER MANUAL 1_5...
Need help?
Do you have a question about the PC8 and is the answer not in the manual?
Questions and answers