Table of Contents
Advertisement
Quick Links
Advertisement
Table of Contents

Related Manuals for Atmos MISSION2


Summary of Contents for Atmos MISSION2
- Page 1 User Manual © 2022 ATMOS Co., Ltd.. All rights reserved...
-
Page 2: Table Of Contents
MISSION2 User Manual 3.2 No Fly Time and Surface Interval 3.3 Scuba Mode 3.3.1 Scuba Preparation (Ready) Screen and Operation Table of Contents 3.3.2 Scuba Settings 3.3.3 Scuba Screen Layout and Alarms 1. Getting Started 3.3.4 Scuba Log 1.1 Diving Safety 3.3.5 Dive Plan... - Page 3 MISSION2 User Manual 5.3 Swimming Mode 5.3.1 Swim Preparation Screen (Ready) and Operation 5.3.2 Swimming Terminology: 5.3.3 Swimming Settings 5.3.4 Swimming Screen Layout and Alarms 5.3.5 Inaccurate Information 5.4 Ski / Board 5.4.1 Ski / Board Preparation (Ready) Screen and Operation 5.4.2 Ski / Board Terminology:...
-
Page 4: Getting Started
Never leave the computer in a vehicle exposed to the sun. ● To ensure safe and proper use, please read the user ● Do not wear your MISSION2 in hot springs, hot tubs, or manual before using the MISSION2. saunas. -
Page 5: Removing / Replacing The Strap
Toggle Bluetooth connection: On/Off Button B (press): Activity Menu / Confirm Button C (press): Down / Scroll Enabled Widgets Button C (hold): Access Stopwatch Button D (press): Return / MISSION2 SETTINGS Menu Button E (press): Turn Backlight On/Off Button E (hold): Power Off... -
Page 6: Power On/Off
MISSION2 User Manual ● The lithium battery in the MISSION2 can be damaged if 1.4.2 Power On/Off it is fully discharged. The MISSION2 has an internal Power On: protection mechanism which will disconnect the battery 1) Press and hold button E for 2-3 seconds or connect the before it is fully discharged. -
Page 7: Smart Notification
first time use. mode will toggle the BlueTooth connection on/off. c) Select Profile → Add device → Pair a new device. d) Select the MISSION2 from the list of detected devices. Enter the 5-digit Pin code shown on the 1.6 Smart Notification MISSION2 to complete the connection. -
Page 8: Firmware Update
1) Using a PC/MAC, go to the ATMOS website: https://www.atmos.App/ and download the latest MISSION2 firmware (Support > Firmware Update). 2) Place the MISSION2 into firmware update mode: Go to SETTINGS → UPDATE. Enable Notifications: 3) Connect the MISSION2 to the PC/Mac using the USB 1) Go to SETTINGS →... -
Page 9: Customize Watch Face With Photos
Change Watch Face via the ATMOS App ○ Displays a compass face as well as Sunrise & 1) While paired with the MISSION2, go to the All Devices Sunset times and Altitude information screen in the ATMOS App and select the MISSION2. -
Page 10: Sleep Monitoring
MISSION2 User Manual ● Cold weather may cause lower blood circulation and Note: The MISSION2 is not a medical grade device. The heart impact readings. Keeping hands and feet warm will rate data should not be used as a reference for medical improve the occurrence of the heart rate. -
Page 11: Steps & Calories
2) While on the Step & Cal screen, press button B to display 2.3 Steps & Calories the weekly calories and steps averages. The target value will be displayed on the middle line. The MISSION2 will count your daily steps and calculate calories burned. -
Page 12: Outdoor
The MISSION2’s compass is magnetically oriented and is subject to interference from nearby electric fields, magnets, and metal objects. Please avoid wearing another computer, compass, or metal objects next to the MISSION2. Calibration is recommended before every dive to ensure the best experience. -
Page 13: Tides
Open the ATMOS App and connect to the Compass Calibration MISSION2. When a compass calibration is necessary, the MISSION2 will c) On the App’s Your Device screen, select Tides automatically display an infinity “∞” pattern. Move the device d) Use the current location acquired through the in the same pattern to calibrate the compass. -
Page 14: Stopwatch
The default dive mode for auto-on is Scuba. The default mode While in Watch mode, press and hold button C for 2-3 seconds. can be changed in the MISSION2’s SETTINGS. The set default is shown by the icon at the bottom of the screen in Watch mode. -
Page 15: No Fly Time And Surface Interval
flying or otherwise ascending to altitudes above 300m / can be enabled prior to the activity start. 1,000ft. The MISSION2 utilizes this guidance. However, your actual dive profiles (e.g., single dive vs. repetitive dives, shallow 3) Press button B button to start the activity. -
Page 16: Scuba Settings
MISSION2 User Manual 3.3.2 Scuba Settings PPo2 Oxygen Partial Pressure: Adjustable between 1.2 - 1.6. (default: 1.4). This setting affects While on the activity Ready screen, press button C to enter the Maximum Operation Depth (MOD). mode SETTINGS. Conservatism HIGH (GF 35/75) -
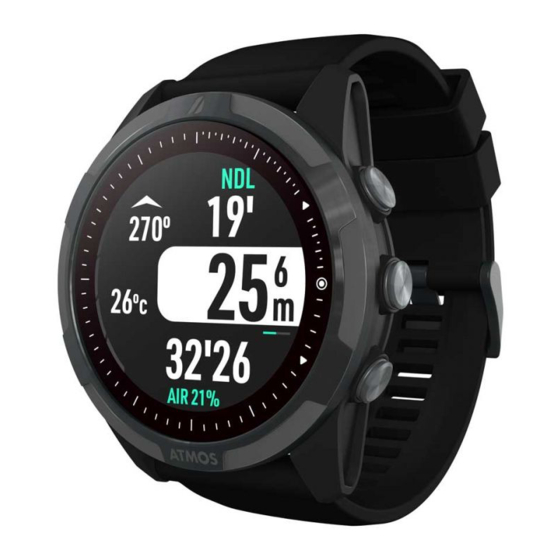
Page 17: Scuba Screen Layout And Alarms
MISSION2 User Manual 3.3.3 Scuba Screen Layout and Alarms NITROX - adjustable 22-40%. Tank Volume Set the dive tank volume and initial pressure Predive (bar/psi). At the dive conclusion, a prompt to enter residual pressure will appear. Upper-left: Compass heading Entered values are used to determine the (the infinity symbol will be... - Page 18 MISSION2 User Manual During the Dive Mark Compass Heading During the dive, press button B to Upper-left: Compass heading access the mark heading screen. Left: Ascent rate bar (m/ft) Press button B to mark the heading. Left: Water temperature Press button A to unmark the Upper-right: NDL (No heading.
- Page 19 If the DEPTH ALARM notifies the diver rate continues for over 5 seconds, when the user-set dive maximum the MISSION2 will notify the diver depth has been reached. with a “SLOW DOWN” fast ascent alarm.
- Page 20 MISSION2 User Manual Safety Stop Safety Stop Clear SAFETY STOP notifies the diver SAFETY CLEAR notifies the diver that the Safety Stop depth has when the safety stop is been reached. The default 3 completed. minute Safety Stop begins once the diver has ascended to 6m (approx.
- Page 21 When the NDL is exceeded, MISSED STOP appears when the decompression stops may be diver has ascended above the required. If so, the MISSION2 will Deco Stop ceiling depth. display a "DECO NEEDED" alarm. Warning: If MISSED STOP The NDL indicator will be appears, you should safely replaced by "DECO"...
-
Page 22: Scuba Log
SETTINGS → 10m/min (33ft/min) LOGBOOK → SCUBA * includes decompression stops Graphs: calculated by the MISSION2 Press button B to display * excludes any Safety Stop time. the timeline. Press button A or C to advance the time line. -
Page 23: Dive Plan
3.3.5 Dive Plan such as Scuba or Gauge, do not Freedive until the 24 hour The MISSION2 Dive Plan feature is used to estimate the No no-fly time has passed. This interval will help ensure that Decompression Limit (NDL) time for the next dive. -
Page 24: Freedive Settings
MISSION2 User Manual Ascent Alarm Ascent Alarm notifies the diver Depth mode Dynamic Apnea mode when the set depth has been reached. Time Alarm Time Alarm display notifies the diver when the dive time interval has been reached. (10 sets) -
Page 25: Freedive Screen Layout And Alarms
MISSION2 User Manual Backlight Adjust the backlight status During the Dive (Always On), brightness level and wrist activation. Upper-right: Stopwatch (button A: Start/Reset) Reset Setting Restore activity mode settings to factory defaults Mid-right: Current depth Bottom-right: Dive time 3.4.3 Freedive Screen Layout and Alarms... - Page 26 MISSION2 User Manual During Surface Interval During the Dive Press button A to end. Upper-left: Current count of consecutive dives Left: Water temperature Upper-right: Stopwatch timer Mid-right: Surface interval time Bottom-right: Press button C to scroll through maximum time, maximum depth, heart rate, time,...
-
Page 27: Gauge Mode
MISSION2 User Manual 1) From the main Watch screen, enter the activity Ready During Surface Internal mode by pressing button B and then selecting the activity type. The surface interval (SI) time will continue to The GPS icon will blink until the GPS position has been accumulate. -
Page 28: Gauge Screen Layout And Alarms
MISSION2 User Manual 3.5.3 Gauge Screen Layout and Alarms (1 set) Depth Alarm: Depth Alarm notifies the diver Predive every minute when the maximum depth has been reached. Upper-left: Compass heading (1 set) Dive Site 4.1.2 Dive Site Mid-left: Water temperature... -
Page 29: Gps
Acquiring a GPS signal function is dependent upon successful GPS positioning at the 1. Ensure that the MISSION2 is in an open area with an conclusion of the dive. unobstructed view of the sky. Make sure the watch face is pointed to the sky. -
Page 30: Dive Site
MISSION2 User Manual After the dive log is synced to the ATMOS App, the Entry and Exit points will be displayed on the dive site map. The arrow 3. My List: View your added Dive Sites down icon is the water Entry location, and the arrow up icon is the water Exit location. -
Page 31: Activities
MISSION2 User Manual When the GPS signal is interrupted, the GPS LOSS alarm will 2) Press button C to enter the mode SETTINGS. As a best appear until the signal is re-received. Once the signal is practice, it is recommended that settings be verified re-obtained, GPS GET will be briefly displayed. -
Page 32: Running Terminology
(duration) has been reached. CAD: Cadence - the number of steps per minute. Auto Pause When movement stops, the MISSION2 will automatically pause the activity until movement resumes. Lap Count: Record split pace by distance or time as a tool for runners to control or adjust their pace. -
Page 33: Running Screen Layout And Alarms
MISSION2 User Manual 5.1.4 Running Screen Layout and Alarms Automatic Lap Count The lap will be counted Running Main Screen automatically when the set time or distance has been reached. Upper-mid: Heart rate First field: Distance Second field: Running time Third field: Pace... -
Page 34: Cycling (Bike) Mode
5.2 Cycling (Bike) Mode Auto Pause Cycling mode provides two modes: Bike (outdoor) and Bike Auto Pause enabled: when Indoor. movement stops, the MISSION2 will automatically pause the activity 5.2.1 Cycling Preparation (Ready) Screen and until movement resumes. Operation Bike Mode:... -
Page 35: Cycling Terminology
MISSION2 User Manual Lap Count: Record the speed of the segment by distance or 2) Press button C to enter the mode SETTINGS. As a best time, as a tool to control or adjust the speed. practice, it is recommended that settings be verified Wheel Diameter: Enter the wheel diameter of the bicycle. -
Page 36: Cycling Settings
700 × 40C 2200 set time has been reached. 27 × 1-1/8 2155 700 × 44C 2235 Auto Pause When movement stops, the MISSION2 will automatically pause the activity until 27 × 1-1/4 2161 700 × 45C 2242 movement resumes. Wheel Enter the wheel diameter (mm) of the bike. -
Page 37: Cycling Screen Layout And Alarms
MISSION2 User Manual Backlight Adjust the backlight status (Always On), Cycling sub-screen brightness level and wrist activation Press button C to toggle Reset Setting Restore activity mode settings to factory between the main activity defaults screen and the activity sub-screen. -
Page 38: Swimming Mode
After this distance is resumes. set, the MISSION2 will use the same setting the next time you swim in Pool mode. If the distance changes, go to the mode SETTINGS to change it. -
Page 39: Swimming Terminology
MISSION2 User Manual 2) Press button C to enter the mode SETTINGS. As a best Pool Mode Open Water practice, it is recommended that settings be verified before each activity. 3) Press button B to start the activity. Open Water Mode:... -
Page 40: Swimming Settings
MISSION2 User Manual 5.3.3 Swimming Settings Backlight Adjust the backlight status (Always On), brightness level and wrist activation. While on the Ready screen, press button C to enter the mode SETTINGS. Reset Setting Restore activity mode settings to factory defaults... -
Page 41: Inaccurate Information
MISSION2 User Manual Open Water Main Screen Pause and Save While on the main Swim Upper: Heart rate screen, press button D to First field: Distance pause the activity. Second field: Swimming Press button A to resume time(without turning) the activity Third field: 100m pace... -
Page 42: Ski / Board
5.4 Ski / Board Skiing Snowboarding Due to the characteristics of the battery, using MISSION2 in a sub-zero environment may encounter a situation where it cannot be powered on. It is recommended to power it on before entering an extremely cold environment. Avoid rinsing it with hot water when returning from a sub-zero environment to avoid damage caused by thermal expansion. -
Page 43: Ski / Board Screen Layout And Alarms
Bottom: Battery status and Duration: Count the lap automatically when the time of day set time has been reached. Auto Pause When movement stops, the MISSION2 will Ski / Board Sub-screen automatically pause the activity until movement resumes. Press button C to toggle... - Page 44 MISSION2 User Manual Automatic Lap Count Auto Pause The lap will be counted Auto Pause enabled: when automatically when the set movement stops, the time or distance has been MISSION2 will automatically reached. pause the activity until movement resumes. Manual Lap Count...
-
Page 45: Storage And Maintenance
Products are warranted to be free from defects in materials or workmanship for one year from the date of purchase. To obtain * To store your MISSION2, fully charge the computer then turn warranty service, an original or copy of the sales receipt from the MISSION2 off. -
Page 46: Servicing
ONLY. Any solvents may damage the MISSION2 dive computer. ATMOS service center. Service of the MISSION2 may only be done at ATMOS or by an 4) The problem is wear on the case, glass, battery, or band; authorized service center. - Page 47 MISSION2 User Manual Memory/ History 100 logs SENSORS Languages EN, KO, JA, ZH-CN, ZH-TW ✔ (GPS, GLONASS) Metric and Imperial units ✔ Barometric Altimeter ✔ Operating Temperature 0° C to +45° C / +32° F to +113° F (±2°C) Digital Compass ✔...
-
Page 48: Contact
Residual Tissue Loading ✔ Reset Taiwan - Headquarters ► ATMOS Co., Ltd. Digital Dive Log ATMOS App (iOS / Android) 16F-7, No. 258, Liancheng Rd., Zhonghe Dist., New Taipei City 235, Taiwan (R.O.C.) SPORT +886-2-82271899 info@atmos.App ✔ (indoor / outdoor) Running ✔...
Need help?
Do you have a question about the MISSION2 and is the answer not in the manual?
Questions and answers