Table of Contents
Advertisement
Quick Links
1. Start using MISSION2
1.1 Diving Safety
● Please read the user manual before using MISSION2 to ensure safe and proper use.
● The manual is based on the default settings of MISSION2.
● All dive gear will fail. It is not a question of whether it will fail, but when it will fail.
There may also be bugs in the firmware. Do not use MISSION2 as your only diving
instrument. You should have a detailed diving plan before each dive.
● Diving involves risk. Only trained divers should use the MISSION2. Dive computers
are not a substitute for training. Do not use the MISSION2 on any dive beyond your
certification level. Diving with an incorrect assessment of your ability and physical
condition can result in injury or even death.
● MISSION2 is designed for recreational diving. Do not use MISSION2 for commercial
diving applications.
● It is assumed that the diver's ascent rate is 10m/min(33ft/min). Ascending
significantly faster than this will impact decompression calculations.
● Please follow the decompression stops advised by MISSION2. Violation will increase
the risk of decompression sickness, which may lead to serious injury or death.
● The MISSION2 is a precision instrument. Take care to protect your computer from
damaging shocks or chemical exposure. Store your MISSION2 out of direct sunlight
and avoid exposure to excessive heat or leaving it in a vehicle exposed to the sun.
● Do not wear your MISSION2 in hot spring pools or saunas.
● After each day of diving, rinse the MISSION2 thoroughly with fresh water. Do not use
high-pressure sprays to avoid damage to buttons or sensors. If the device is covered
with dirt, soak it in fresh water. Do not use any solvents or detergents.
● Please use the Screen Guard included in the package. Replacement screen guards
may be purchased from an authorized dealer.
● The dive computer is a personal device. Sharing shall be avoided as it may cause
divers to misjudge diving information and cause serious injury.
1.2 What's in the box?
* MISSION2
* Charging Cable
* Scratch Guard*2
* Silicone strap
Advertisement
Table of Contents

Related Manuals for Atmos MISSION2


Summary of Contents for Atmos MISSION2
- Page 1 ● All dive gear will fail. It is not a question of whether it will fail, but when it will fail. There may also be bugs in the firmware. Do not use MISSION2 as your only diving instrument. You should have a detailed diving plan before each dive.
- Page 2 * Warranty card 1.3 Removing/replacing the strap In addition to the originally provided long straps, MISSION2 has short straps available for purchase. If you need to adjust the length of the strap, you can replace strap according to the following instructions.
- Page 3 1.4.2 Power On/Off Power On: Press and hold backlight button E for 3 seconds, or connect MISSION2 to the charging cable. Power Off: Press and hold button E for 3 seconds while in watch mode. 1.4.3 Charge & Save Battery Please make sure the charging points are clean and dry.
- Page 4 2. MISSION2 MENU → SETTING → SMART CONNECT → CONNECT TO MOBILE PHONE: (iOS & Android) ON 3. In the App: Select your MISSION2. Enter the 5 Pin code shown on MISSION2 to complete the connection. ※ Long press button A on the main screen to switch the Bluetooth on and off Unpair 1.
-
Page 5: Firmware Update
Download PC tool: 1. MISSION2: Setting > Firmware update - the firmware update screen will appear 2. Connect MISSION2 with the PC via USB charging cable, and the FIRMWARE folder will appear. 3. Go to ATMOS official website: https://www.atmos.app/ to download the latest firmware 4. -
Page 6: Heart Rate Measurement
※ To ensure accuracy, MISSION2 should be worn correctly and should not be worn on the wrist joints. ※ When exercising or in daily use, MISSION2 should be snugly worn on the skin of the wrist to avoid uneven reflection of the light beam. Objects such as long-sleeved clothing or... -
Page 7: Sleep Monitoring
● The heart rate sensor should be kept clean. Note: ※ MISSION2 is not a medical device, so the heart rate data should not be used as a reference for medical use or medical diagnosis. ※ When the heart rate function is enabled, it is less energy efficient. - Page 8 * Press button B again on the steps and calories screen to enter individual step and calories information page. MISSION2 will display the weekly calories and steps average with the target value in the middle line.
-
Page 9: Altitude Calibration
Settings > Widget > Step & Calories Enter steps and calories. 2.4 Outdoor MISSION2 will display sunrise and sunset times, altitude, and air pressure at current location with a graphic compass * Enable Outdoor: Settings > Widget > Outdoor: On 2.4.1 Sunrise &... - Page 10 MISSION2. Calibration is recommended before every dive to ensure the best experience. Compass Calibration ※ Select compass option, follow the instructions, move MISSION2 in an “∞” pattern. The bearing and OK will be displayed until the compass calibration is complete. 2.5 Tides Tide information can be obtained after MISSION2 is connected to the App * Enable Tides: MISSION2 Settings >...
- Page 11 Thus, the tidal information is for reference only! Steps: 1. Open the APP and pair the watch with the APP 2. Please ensure the mobile phone has GPS turned on, and allow ATMOS App to obtain location information. 3. ATMOS App > Tides 4.
-
Page 12: Alarm Clock
Step 2 - Please ensure the mobile phone has GPS turned on, and allow ATMOS App to obtain location information. Step 3 - Go to the weather widget, the weather data will be obtained and displayed 1. Open the APP and pair the watch with the APP 2. -
Page 13: Dive Mode
SETTING. MISSION2 will display the selected dive mode when you enter water. ※ The default dive mode can be set to "Off" - when it is off, MISSION2 will not automatically turn on dive mode, and no icon will appear at the bottom of the time screen. - Page 14 3.2 Scuba Mode 3.2.1 Scuba Preparation Screen and Operation * The GPS will start blinking and positioning. It will stop blinking and display a green light once the positioning is complete. * The heart rate function is disabled by default during dive * Press button C to enter the Advanced setting.
- Page 15 Tank Volume Set the tank volume for diving, and enter the residual pressure to obtain the SAC after the dive to be displayed in the ATMOS App Optical heart rate The heart rate function is disabled by default during diving, and can be...
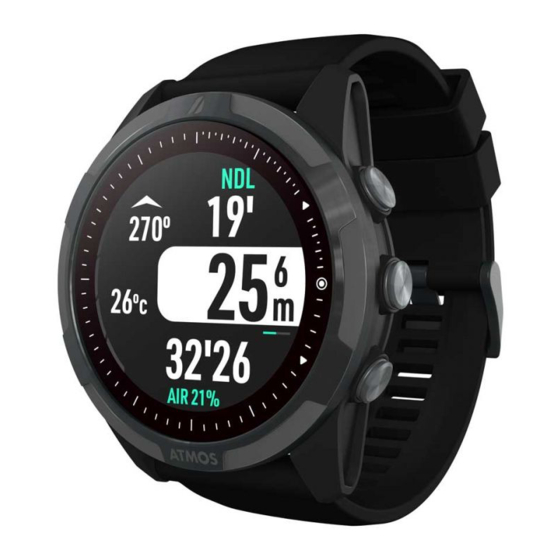
- Page 16 3.2.3 Scuba Screen Layout and Alarms Predive Upper-left: Compass heading (Infinity will be displayed when the compass shall be calibrated) Mid-left: Water temperature Upper-right: NDL (No Decompression Limit) (- - will be displayed if NDL is greater than 99+) Mid-right: Current depth Bottom-right: MOD - (Maximum Operation Depth)&HR Bottom-right: 21% = AIR / 22-40% =...
- Page 17 * Use button B to mark heading * Use button A to unmark heading Fast Ascent When the ascent speed exceeds 13m/min, the ascent rate bar will turn red, and MISSION2 will notify with a "Fast Ascent Alarm". if it continues for 5 seconds. Time Alarm...
- Page 18 Time Alarm display notifies the diver when the Dive Time has been reached. Depth Alarm Depth Alarm notifies the diver every minute when the maximum depth has been reached. Battery Low Battery Low Notifies the diver when battery power is low. Safety Stop The safety stop can be switched on and off, and can be set according to...
- Page 19 Safety Stop Pause The depth of the safety stop is 3-7 meters, beyond which the countdown will stop and a "Safety Stop Pause" reminder will appear. Safety Stop Clear Safety Clear notifies the diver when the safety stop is completed. NDL below 3mins LOW NDL notifies the diver every minute when the remaining NDL time is...
- Page 20 After the NDL is up, it will enter the decompression state, and MISSION2 will notify the user with a "decompression stop need" reminder. The NDL indicator will be replaced by "Deco Stop", notifying the stop depth (6m) and decompression stop time (3 min).
-
Page 21: Scuba Log
CNS Oxygen Toxicity CNS Alarm appears when central nervous system toxicity loading percentage is greater than 85%. Time-to-Surface (TTS) TTS can be viewed in minutes by pressing button C. It is the sum of all decompression stops and ascent times on the current dive. -
Page 22: High Altitude
Example: If you continue to dive to 23m after a 45-minute surface internal, you will have a 22-minute NDL 3.2.6 High Altitude MISSION2 will automatically read the air pressure at current location. It will calibrate the depth value according to the altitude at high altitude. Simply adjust the freshwater/seawater settings is enough. -
Page 23: Freedive Mode
3.3 Freedive Mode The Freedive mode provides two choices: freedive (Depth mode) and pool (Dynamic apnea mode). ! ! ! If there is residual nitrogen in the body after scuba/gauge dive, do not freedive until the no-fly time is over. 3.3.1 Freedive Preparation Screen and Operation Depth mode Dynamic apnea mode... -
Page 24: Depth Mode
Time Alarm Time Alarm display notifies the diver when the Dive Time has been reached. (10 sets) Surface Internal Select between Default, Custom, and Off Reminder Default: "Surface Internal Completed" reminder will appear when the surface internal reaches twice the dive time Dive Site See 4.1.2 Dive Site Freshwater/Seawate... - Page 25 Upper-right: Stopwatch (Button A: Start/Reset) Mid-right: Current depth Bottom-right: Dive time Upper-left: Dive count Left: Water temperature Press button E: Turns the backlight On/Off. Information displayed when returning to surface After returning to the surface, the maximum depth, dive time, and dive count will be displayed During surface internal Upper-left: current count of consecutive...
- Page 26 Upper: Heart rate Mid: Sets|Dive time Mid: Surface Internal time Bottom: Battery and time Press button A to start During the dive Press the button A to end End of dynamic apnea Enter distance During surface internal SI continues to accumulate The blue frame sets will increase with the number of dynamic apnea...
-
Page 27: Gauge Mode
3.4 Gauge Mode Gauge mode does not perform decompression calculations. It only displays depth, time, water temperature, and ascent rate with the functions of depth gauge and underwater timer. ! ! ! Scuba Mode will be locked for 24 hours after using gauge mode to dive. During the time, diving under Scuba Mode will only enable the Gauge Mode, please rest for 24 hours before scuba diving. - Page 28 Freshwater/Seawate Depth correction based on Freshwater/Seawater The density of salt water is about 3% higher than that of fresh water, and the depth of fresh water will be deeper under the same pressure value Optical heart rate The heart rate function is disabled by default during diving, and can be enabled according to personal needs Backlight Adjust the backlight constant brightness, brightness level and...
- Page 29 GPS is being positioned, and the icon will stop blinking when the positioning is complete. Water enter will be recorded when diving after GPS positioning. Water exit: MISSION2 will automatically locate and record the water exit before the end of dive.
- Page 30 Dive Site function can be accessed in Scuba, Freedive, Gauge Mode's advanced setting prior to descent after the GPS positioning is complete. 1. Nearby Sites: Show 5 nearby dive sites in the ATMOS database. 2. Add: Add new set of dive sites named by date and with GPS location * You can also...
- Page 31 4.2 Onshore GPS Outdoor sports: GPS positioning shall be completed before running, cycling, swimming, and ski/boarding, performing sports without GPS positioning will affect the accuracy of logging and calories. When the GPS signal is interrupted, the GPS LOSS alarm will appear until the signal is re-received.
-
Page 32: Running Mode
5. Activities 5.1 Running Mode Running mode provides two choices of running (outdoor mode) and treadmill (indoor mode). 5.1.1 Running Preparation Screen and Operation Running Mode: The GPS will start blinking and positioning. It will stop blinking and display a green light once the positioning is complete. - Page 33 Time lap count: Count the lap automatically when the set time has been reached. Auto Pause When you stop running, MISSION2 will automatically pause, and the time will not continue to count. Stride Enter the stride distance - the default value is converted from the...
- Page 34 Press button C in the main running screen to go to the sub-screen, and press button C again to return to the main screen The upper-left, upper-right, bottom-left, and bottom-right field information can go to the setting field to adjust the information you want to see, such as climb, temperature, altitude, etc.
-
Page 35: Cycling Mode
If you turn on the auto-pause function, when you stop moving forward, it will automatically pause, the time will not continue to be calculated, and it will automatically continue until you advance again. Pause and save Press button D on the main running screen, and the pause screen will appear Press button A to return to the main screen Press button C to save and exit... - Page 36 5.2.2 Cycling Terminology: Speed: the distance traveled per hour, for example: the cyclist with a 25KM hourly rate, which means that he completed 25km in 1 hour. Cadence CAD: The number of rotations. For example, one foot passing the same position on the circumference 90 times in one minute will be 90 RPM.
- Page 37 26 × 1.75 2023 700 × 20C 2086 26 × 1.95 2050 700 × 23C 2096 26 × 2.00 2055 700 × 25C 2105 26 × 1-3/8 2068 700C Tubular 2130 26 × 2.10 2068 700 × 28C 2136 26 × 2.125 2070 700 ×...
- Page 38 Time lap count: Count the lap automatically when the set time has been reached. Auto Pause When you stop running, MISSION2 will automatically pause, and the time will not continue to count. Wheel diameter Enter the wheel size of the bike...
- Page 39 go to the setting field to adjust the information you want to see, such as climb, temperature, altitude, etc. Automatic Lap Count The lap will be counted automatically when the set time or distance has been reached. Manual Lap Count Press button A to manually count the lap Auto Pause If you turn on the auto-pause function,...
-
Page 40: Swimming Mode
5.3.1 Swimming Preparation Screen and Operation Pool Mode: When using MISSION2 for the first time, please follow the manual to select the length of the pool or customize the distance. After setting the distance, MISSION2 will use this setting the next time you swim. If the distance changes, go to the Setting to change. - Page 41 PACE/100M: 3 minutes and 21 seconds to complete 100m SWIM TOTAL: Accumulated number of strokes SWOLF: a measure of swimming efficiency Calculation: "The number of strokes to complete a lap + the number of seconds to complete a lap" = SWOLF value. The lower the SWOLF, the higher the efficiency. 5.3.3 Swimming Setting Press button C in swimming preparation screen to enter the Advanced Settings.
- Page 42 Upper: Heart rate First field: distance Second field: Number of laps and swimming time Third field: 100m pace Bottom: Battery and time Open Water Main Screen Upper: Heart rate First field: distance Second field: Swimming time - (without turning) Third field: 100m pace Bottom: Battery and time Pool and Open Water sub-screen Press button C in the main swimming...
- Page 43 5.4 Ski/Board ※ Due to the characteristics of the battery, using MISSION2 in a sub-zero environment may encounter a situation where it cannot be powered on. It is recommended to power it on before entering an extremely cold environment.
- Page 44 Time lap count: Count the lap automatically when the set time has been reached. Auto Pause When you stop running, MISSION2 will automatically pause, and the time will not continue to count. Optical heart rate Heart rate sensing function can be enabled according to needs...
- Page 45 Factory Reset Restore settings to factory defaults 5.4.4 Ski/board Screen Layout and Alarms Ski/board Main Screen Upper: Heart rate First field: distance Second field: time Third field speed Bottom: Battery and time Ski/board sub-screen Press button C on the main ski/board screen to go to the sub-screen, and press button C again to return to the main screen...
- Page 46 The lap will be counted automatically when the set time or distance has been reached. Manual Lap Count Press button A to manually count the lap Auto Pause If you turn on the auto-pause function, when you stop moving forward, it will automatically pause, the time will not continue to be calculated, and it will automatically continue until you advance...
-
Page 47: Storage And Maintenance
MISSION2 thoroughly with fresh water. * To store your MISSION2, fully charge the computer then turn the MISSION2 off. Store your MISSION2 in a cool, dry place, protected from damaging shocks, heat, humidity, and away from sunlight * MISSION2 uses lithium battery which has a characteristic of continuously discharging. - Page 48 equipment generates, uses and can radiate radio frequency energy and, if not installed and used in accordance with the instructions, may cause harmful interference to radio communications. However, there is no guarantee that interference will not occur in a particular installation. If this equipment does cause harmful interference to radio or television reception, which can be determined by turning the equipment off and on, the user is encouraged to try to correct the interference by one or more of the following measures:...
Need help?
Do you have a question about the MISSION2 and is the answer not in the manual?
Questions and answers
Зависли при обновлении ПО
To fix the Atmos MISSION2 stuck during a software update:
1. Restart the Device: Restart the MISSION2 and attempt the update again.
2. Re-enter Firmware Update Mode:
- Go to SETTINGS → UPDATE to place the MISSION2 into firmware update mode.
3. Reconnect to PC/Mac:
- Connect the MISSION2 to your PC/Mac using the USB charging cable. Ensure it is detected as a USB drive.
4. Re-copy Firmware File:
- Download the latest firmware from the ATMOS website.
- Open the firmware zip file and copy the `firmware update.bin` file into the FIRMWARE folder of the MISSION2.
5. Disconnect and Restart:
- After the `.bin` file is copied, disconnect the USB cable and allow the device to restart.
If the issue persists, contact the authorized ATMOS service center for assistance.
This answer is automatically generated