
Related Manuals for AENO GH1S


Summary of Contents for AENO GH1S
- Page 1 AENO Premium Eco Smart Heater Installation and Operation Manual Articles: GH1S (-IT, -CH, -UK), GH2S (-IT, -CH, -UK) Version 1.0.3 | August 2022...
-
Page 3: Introduction
ASBIS). All other similar trademarks and names, as well as logos and other symbols are the property of their respective owners *. All materials under AENO tradename contained therein are protected in accordance with international and local laws including Acts on Copyrights and related rights. -
Page 4: Responsibility And Technical Support
If you have any technical questions, please contact your local ASBIS representative or the technical support department at aeno.com. The most common issues are described in Section 7 (Troubleshooting) of this document. -
Page 5: Conformance To Standards
To protect the environment and human health, please dispose of used electrical and electronic equipment according to approved safe disposal guidelines © ASBISc Enterprises PLC.. All rights reserved Document version: 1.0.3, aeno.com Page 5 of 68... -
Page 6: Limitations And Warnings
Do not repair the device on your own as this may result in electric shock or other injury and will void the manufacturer's warranty Document version: 1.0.3, aeno.com © ASBISc Enterprises PLC. All rights reserved Page 6 of 68... - Page 7 Producer of raw materials for packaging was certified by the Forest Stewardship Council (FSC Producer of raw materials for making packaging confirms responsible forest management © ASBISc Enterprises PLC.. All rights reserved Document version: 1.0.3, aeno.com Page 7 of 68...
- Page 8 19. Do not use the device in a combustible, explosive and/or dusty environment, as well as in areas where corrosion of its materials is possible. Document version: 1.0.3, aeno.com © ASBISc Enterprises PLC. All rights reserved Page 8 of 68...
- Page 9 WARNING! Any damage to the device as a result overturning or falling will void the manufacturer's warranty. © ASBISc Enterprises PLC.. All rights reserved Document version: 1.0.3, aeno.com Page 9 of 68...
-
Page 10: Table Of Contents
2.1.8 Ceiling Mounting ............................36 2.2 Initial Power On ..............................37 2.3 Manual Control ..............................37 2.4 Remote Control via the AENO App ....................... 38 2.4.1 App Installation .............................. 38 2.4.2 Registering a New Account ......................... 38 2.4.3 Logging into an Existing Account ....................39 2.4.4 Eco Smart Heater Activation Process .................. - Page 11 Table 2 – Power button LED indication ............. 17 Table 3 – Basic Technical Specifications ............19 Table 4 – Typical problems and solutions ............66 © ASBISc Enterprises PLC.. All rights reserved Document version: 1.0.3, aeno.com Page 11 of 68...
-
Page 12: General Description And Specifications
• The use of non-toxic materials in production; • Minimum size of the control unit and matching accessories with the color of the heating panel. Document version: 1.0.3, aeno.com © ASBISc Enterprises PLC. All rights reserved Page 12 of 68... -
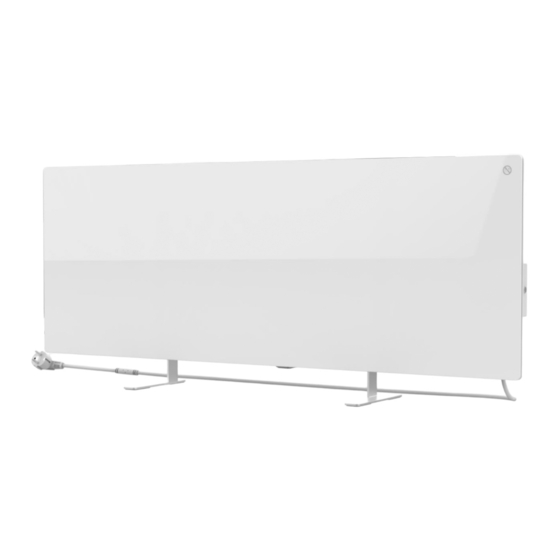
Page 13: Figures And Tables Figure 1 - Appearance
AENO Premium Eco Smart Heater Installation and Operation Manual Figure 1 – Appearance © ASBISc Enterprises PLC.. All rights reserved Document version: 1.0.3, aeno.com Page 13 of 68... -
Page 14: Figure 2 - Buttons, Ports And Indicators
WARNING! It is forbidden to block the venting hole of the device. ❶ ❷ ❸ ❹ ❺ ❻ Figure 2 – Buttons, ports and indicators Document version: 1.0.3, aeno.com © ASBISc Enterprises PLC. All rights reserved Page 14 of 68... - Page 15 Sensor that measures the ambient air temperature and ensures accuracy ❻ when maintaining the required heating temperature Holes for Holes for wall mounting mounting bolts Leg for floor installation* Bracket for wall mounting* © ASBISc Enterprises PLC.. All rights reserved Document version: 1.0.3, aeno.com Page 15 of 68...
-
Page 16: Figure 3 - Mounting Accessories
Resetting the fault condition (blinking red) more than 3 seconds and switching to the Off mode Press and hold the power button for Switching to activation mode in the AENO 4 to 10 seconds mobile app Press and hold the power button for... -
Page 17: Labeling Rules And The Date Of Manufacture
The date of manufacture is indicated on a sticker on the individual packaging and is also encoded in the serial number specified on the box and the device body. The serial number is formed as follows: NNNNNNYWWXXXXX, © ASBISc Enterprises PLC.. All rights reserved Document version: 1.0.3, aeno.com Page 17 of 68... - Page 18 If there is no marking, the device is equipped with a standard plug type E/F The possibility of remote control: S = Smart device activated via the AENO app If there is no marking, the device is operated manually only Model number of the AENO...
-
Page 19: Types Of Electrical Outlets And Plugs
Premium Eco Smart Heater Installation and Operation Manual 1.3 Types of Electrical Outlets and Plugs Since electrical outlet standards may vary from country to country, there are several versions of the AENO heater plugs depending on the country of sale. GH1S GH1S-IT... - Page 20 Designed for indoor installation only. Installation height (wall Not higher than 1 meter from the floor mounting) Case Material Heating plate: tempered glass Control unit: PC plastic Document version: 1.0.3, aeno.com © ASBISc Enterprises PLC. All rights reserved Page 20 of 68...
-
Page 21: Scope Of Delivery
6. Quick Start Guide – 1 pc. 7. Warranty Card – 1 pc. Figure 4 – Package contents * The images of accessories are for illustrative purposes only. © ASBISc Enterprises PLC.. All rights reserved Document version: 1.0.3, aeno.com Page 21 of 68... -
Page 22: Packaging And Labeling
Manufacturer of devices. Weight of the carton: • Net weight: 8.7 kg; • Gross weight: 10.9 kg. Document version: 1.0.3, aeno.com © ASBISc Enterprises PLC. All rights reserved Page 22 of 68... -
Page 23: Installation And Operation
It is not recommended to install the device in areas with a high level of noise and a high-frequency interference. Reinforced concrete floors may reduce the distance of wireless signal transmission. See below possible installation locations for the Eco Smart Heater. © ASBISc Enterprises PLC.. All rights reserved Document version: 1.0.3, aeno.com Page 23 of 68... -
Page 24: First Installation And Setup
Also, do not disconnect the device from the mains for 5 minutes after resetting to factory settings. Document version: 1.0.3, aeno.com © ASBISc Enterprises PLC. All rights reserved Page 24 of 68... -
Page 25: Unpacking And Preparing For Installation/Mounting
1 meter away from heater installation area. 3. To drill holes in the wall, please use the special template supplied with the heater. © ASBISc Enterprises PLC.. All rights reserved Document version: 1.0.3, aeno.com Page 25 of 68... -
Page 26: Floor Installation (Option 1)
AENO Premium Eco Smart Heater Installation and Operation Manual 2.1.3 Floor Installation (Option 1) Figure 6 – Mounting on legs (on the floor) Document version: 1.0.3, aeno.com © ASBISc Enterprises PLC. All rights reserved Page 26 of 68... - Page 27 (i.e. the inlet of the power cable to the control unit shall be from below). © ASBISc Enterprises PLC.. All rights reserved Document version: 1.0.3, aeno.com Page 27 of 68...
- Page 28 AENO Premium Eco Smart Heater Installation and Operation Manual Document version: 1.0.3, aeno.com © ASBISc Enterprises PLC. All rights reserved Page 28 of 68...
-
Page 29: Horizontal Wall Mounting (Option 2)
2.1.4 Horizontal Wall Mounting (Option 2) 1. Select the desired orientation of the heater on the wall (horizontally). 2. Screw mounting brackets to the rear surface of the panel correctly. © ASBISc Enterprises PLC.. All rights reserved Document version: 1.0.3, aeno.com Page 29 of 68... -
Page 30: Figure 7 - Installation Of The Brackets
3. Drill 2 holes in the wall using the special paper template supplied with the device, and then screw in the hooks. Horizontal orientation of the template Document version: 1.0.3, aeno.com © ASBISc Enterprises PLC. All rights reserved Page 30 of 68... -
Page 31: Figure 8 - Preparing Of The Wall (Horizontal Mounting)
The process of screwing in the hooks Figure 8 – Preparing of the wall (horizontal mounting) 4. Carefully hang the heater on both hooks at a time. © ASBISc Enterprises PLC.. All rights reserved Document version: 1.0.3, aeno.com Page 31 of 68... -
Page 32: Vertical Wall Mounting (Option 3)
When mounted on the wall, the installation height should not exceed one (1) meter. 2.1.5 Vertical Wall Mounting (Option 3) Vertical orientation of the template Document version: 1.0.3, aeno.com © ASBISc Enterprises PLC. All rights reserved Page 32 of 68... -
Page 33: Figure 9 - Preparing The Wall (Vertical Mounting)
AENO Premium Eco Smart Heater Installation and Operation Manual The process of screwing in the hooks Figure 9 – Preparing the wall (vertical mounting) © ASBISc Enterprises PLC.. All rights reserved Document version: 1.0.3, aeno.com Page 33 of 68... -
Page 34: Figure 10 - Vertical Installation (Wall Mounting)
NOTE During mounting, make sure that the hooks are securely tightened and oriented strictly vertically. Document version: 1.0.3, aeno.com © ASBISc Enterprises PLC. All rights reserved Page 34 of 68... -
Page 35: Wall Mounting With 4 Hooks (Additional Fixation)
Then follow the instructions for assembling the heater as outlined in par. 2.1.4 or par. 2.1.5 above. Hang the device on 4 hooks at a time. © ASBISc Enterprises PLC.. All rights reserved Document version: 1.0.3, aeno.com Page 35 of 68... -
Page 36: Hardwiring Option
The device must be installed in such a way as to provide its adequate ventilation and location of the temperature sensor unhidden, i.e. exposed to the room air. Document version: 1.0.3, aeno.com © ASBISc Enterprises PLC. All rights reserved Page 36 of 68... -
Page 37: Initial Power On
See Table 1 above for more information on the functions of the power button. Please unplug the power cable from the electrical outlet in order to de-energize the heater completely. © ASBISc Enterprises PLC.. All rights reserved Document version: 1.0.3, aeno.com Page 37 of 68... -
Page 38: Remote Control Via The Aeno App
Register a new account or log in to an existing account. 2.4.2 Registering a New Account • Launch the AENO app and tap the “Sign Up” button. • Accept the terms of the user agreement and the Privacy Policy. •... -
Page 39: Logging Into An Existing Account
Try registering an account with a different email address if your firewall has blocked the email. If none of the above tips are helpful, please contact our support team via the contact form on aeno.com. In the request, please provide your email address and the timestamp of your registration. •... - Page 40 3. Enter the Wi-Fi network password to which the device will be connected (you can choose another network if it is of 2.4 GHz). 4. Wait for the device to be connected to the app and tap “Next”. Document version: 1.0.3, aeno.com © ASBISc Enterprises PLC. All rights reserved Page 40 of 68...
- Page 41 1. After logging into your account, tap the “+” icon in the “Home” tab. 2. Select the Auto Search tab at the top of the screen. 3. Provide the AENO app with all requested accesses. 4. Wait for the heater to be detected and tap the “Next” button.
- Page 42 3. Turn on the heater by pressing its power button once. The LED indicator light will turn green. 4. Then press and hold the power button until the LED starts blinking purple. Document version: 1.0.3, aeno.com © ASBISc Enterprises PLC. All rights reserved Page 42 of 68...
- Page 43 7. Enter the Wi-Fi network password to which the device will be connected (you can choose another network if it is of 2.4 GHz). 8. Wait for the device to be connected to the app and tap “Next”. © ASBISc Enterprises PLC.. All rights reserved Document version: 1.0.3, aeno.com Page 43 of 68...
-
Page 44: Control Panel Of The Eco Heater
• Set the desired room temperature; • Turn the device on and off and select its operating mode; • Set timers and view power consumption statistics; • Change the settings. Document version: 1.0.3, aeno.com © ASBISc Enterprises PLC. All rights reserved Page 44 of 68... -
Page 45: Operating Mode Selection
The step for changing the desired temperature value is 1 °C. © ASBISc Enterprises PLC.. All rights reserved Document version: 1.0.3, aeno.com Page 45 of 68... -
Page 46: Setting The Heater Schedule
Start time, • Repetition by day of the week, • Entering a user note that will be displayed in the list of schedules and push notifications, Document version: 1.0.3, aeno.com © ASBISc Enterprises PLC. All rights reserved Page 46 of 68... -
Page 47: Setting The Countdown Timer
(24) hours. The time step is 1 hour. To set the countdown timer, tap the “Timer” tab in the control panel of the heater. © ASBISc Enterprises PLC.. All rights reserved Document version: 1.0.3, aeno.com Page 47 of 68... -
Page 48: Energy And Power Statistics
In the Statistics section, you can view the following information: • Current power consumption and consumed energy of the heater; • Energy consumption and power statistics diagrams for the day or the month; Document version: 1.0.3, aeno.com © ASBISc Enterprises PLC. All rights reserved Page 48 of 68... -
Page 49: Changing Settings
To open the additional settings screen, tap the icon in the upper right corner of the device control panel. In the additional settings panel, you can perform the following: © ASBISc Enterprises PLC.. All rights reserved Document version: 1.0.3, aeno.com Page 49 of 68... - Page 50 Update device: Check and install the latest updates for the device or activate the automatic update; • Delete device: Remove the device from the mobile app. Document version: 1.0.3, aeno.com © ASBISc Enterprises PLC. All rights reserved Page 50 of 68...
- Page 51 Premium Eco Smart Heater Installation and Operation Manual Shared Access In the AENO app, a device can only be connected to one account. However, the user may share this device with other users. Through sharing, other users can control the device,...
- Page 52 Tap on the line with the added account in this section to set the validity period for the access or to cancel sharing. This device will appear in the granted access section of the “Home” tab in this user account. Document version: 1.0.3, aeno.com © ASBISc Enterprises PLC. All rights reserved Page 52 of 68...
-
Page 53: Scenarios And Automations
Premium Eco Smart Heater Installation and Operation Manual Create Group From the AENO app, you can manage individual devices or groups of devices. To group devices, tap “Create group” and select the desired heaters from the list. Then, tap “Save”. NOTE Only devices of the same type can be grouped. - Page 54 Schedule: The scenario will run at a specific time. Here you can also set the days of the week to repeat this scenario. Document version: 1.0.3, aeno.com © ASBISc Enterprises PLC. All rights reserved Page 54 of 68...
- Page 55 Device status: The selected event will occur. For example, the heating type will be changed or the panel heating temperature will increase to 100 °C. © ASBISc Enterprises PLC.. All rights reserved Document version: 1.0.3, aeno.com Page 55 of 68...
- Page 56 If necessary, add an additional condition and/or action by tapping “+” in the corresponding block. • Tap “Save”. • Enable the created automation, if necessary. • It can also be activated later in the “Automation” section. Document version: 1.0.3, aeno.com © ASBISc Enterprises PLC. All rights reserved Page 56 of 68...
- Page 57 Tap “Next” at the top of the screen. • If necessary, add an additional condition and/or action by tapping “+” in the corresponding block. • Tap “Save”. © ASBISc Enterprises PLC.. All rights reserved Document version: 1.0.3, aeno.com Page 57 of 68...
-
Page 58: Child Lock Mode
The button itself will be locked. There are two following ways to disable the Child Lock mode: 1. Remotely via the AENO app. 2. Manually by pressing the power button 5 times for 4 seconds. 2.6 Remote control via voice assistants To control the heater via the Google Assistant or Amazon Alexa app, it must first be activated in the AENO app. -
Page 59: Maintenance And Repair
For details on the replacement and repairs of the AENO heater, please contact your local Company representative or the Tech Support Department at aeno.com. © ASBISc Enterprises PLC.. All rights reserved Document version: 1.0.3, aeno.com Page 59 of 68... -
Page 60: Warranty Obligations
• the need to replace consumables and wear parts that have become unusable as a result of their natural wear and tear. Document version: 1.0.3, aeno.com © ASBISc Enterprises PLC. All rights reserved Page 60 of 68... -
Page 61: Aeno Tm Service Centers
Installation and Operation Manual 4.1 AENO Service Centers For a list of cities where the manufacturer's service is available, visit aeno.com. 4.2 Warranty Service Procedure If you discover a suspected fault or defect in the device, you should contact an... - Page 62 Document version: 1.0.3, aeno.com © ASBISc Enterprises PLC. All rights reserved Page 62 of 68...
-
Page 63: Storage, Transportation And Disposal Of Devices
(including supplied batteries (if any), components containing mercury, etc.). © ASBISc Enterprises PLC.. All rights reserved Document version: 1.0.3, aeno.com Page 63 of 68... - Page 64 For the device disposal purposes, it shall be returned to the point of sale or to the local processing center. For detailed information on recycling of the present device, please contact your waste management company. Document version: 1.0.3, aeno.com © ASBISc Enterprises PLC. All rights reserved Page 64 of 68...
-
Page 65: Other Information
Тел.: +357-25857090 asbis.com Info on Certificates and Declarations Certificates Declarations The addresses of the service centers can be found at aeno.com under “Service and Warranty”. © ASBISc Enterprises PLC.. All rights reserved Document version: 1.0.3, aeno.com Page 65 of 68... -
Page 66: Troubleshooting
Panel overheating or the Press the power button the heater blinks red mains voltage surge 5 times for 4 seconds Panel or room temperature sensor error Document version: 1.0.3, aeno.com © ASBISc Enterprises PLC. All rights reserved Page 66 of 68... -
Page 67: Glossary
(including supplied batteries/rechargeable batteries any), components containing mercury, etc.) © ASBISc Enterprises PLC.. All rights reserved Document version: 1.0.3, aeno.com Page 67 of 68...
Need help?
Do you have a question about the GH1S and is the answer not in the manual?
Questions and answers