Advertisement
Quick Links
Advertisement

Related Manuals for Fleurco R006


Summary of Contents for Fleurco R006
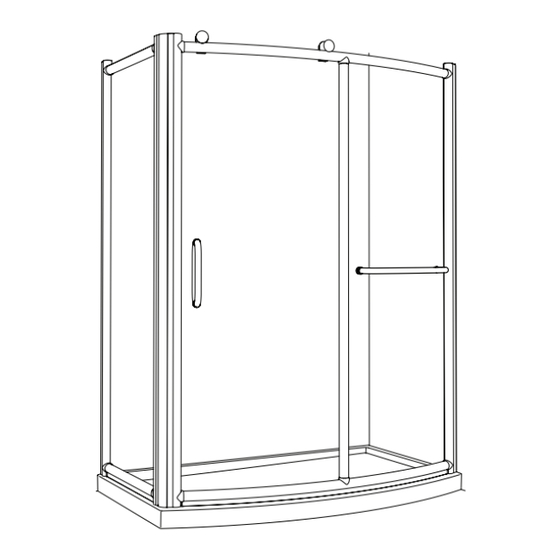
- Page 1 INSTRUCTION MANUAL / GUIDE D’INSTALLATION R006 05 / 2013...
- Page 2 Follow the installation steps require for the model / Suivre les étapes d’installation dans l’ordre selon le modèle Possible configurations / Configurations possible TOOLS AND MATERIAL REQUIRED / OUTILS ET MATERIAUX REQUIS BLOCK LONG NOSE LOCKING PLIER DRILL 1/4˝& 1/8˝ DRILL BITS SILICONE SCREWDRIVERS BLOCK...
-
Page 3: General Instructions
Please keep this manual and product code number for future reference and replacement parts ordering if necessary. Veuillez conserver ce manuel et le code de produit pour des références futures, et au besoin, la commande les pièces de rechange. GENERAL INSTRUCTIONS INSTRUCTIONS GÉNÉRALES •... - Page 4 INSTALLATION MANUAL / GUIDE D’INSTALLATION FRM2-472 FRM2-460 INSTALLATION OF COMPONENTS / INSTALLATION DES COMPOSANTES FRM2-448 STEP / ÉTAPE 1 STEP / ÉTAPE 5 • Base positioning • Secure the wall jambs • Frame assembly • Fix and return panel • Sécuriser les jambages assembly •...
- Page 5 INSTALLATION MANUAL / GUIDE D’INSTALLATION PARTS LISTING / LISTE DES PIÈCES HARDWARE / QUINCAILLERIE ITEM PARTS - PIÈCES FRMRP2-3648 WALL JAMB / JAMBAGE ANGLED WALL JAMB / JAMBAGE EN ANGLE EXPANDER / EXTENSEUR DOOR PANEL / PANNEAU DE PORTE SIDE PANEL / PANNEAU FIXE BOTTOM CONNECTOR / CONNECTEUR DU BAS VERTICAL GASKET / JOINT VÉRTICAL VERTICAL COLUMN / MONTANT VÉRTICAL...
- Page 6 INSTALLATION MANUAL / GUIDE D’INSTALLATION POSITIONNING ON THE THRESHOLD / POSITIONNEMENT SUR LE SEUIL DE LA BASE Use a measuring tape to mark the center of the threshold of the base. INTERIOR Using 1 3/8” screws (x2), fasten the SHOWER SIDE INTÉRIEUR DE expander to the bottom track by placing the LA DOUCHE bottom connector between the bottom track and expander.
- Page 7 INSTALLATION MANUAL / GUIDE D’INSTALLATION FIXED & RETURN PANEL ASSEMBLY / ASSEMBLAGE DES PANNEAUX FIXE & DE RETOUR TOP TRACK RAIL DU HAUT TOP CONNECTOR CONNECTEUR DU HAUT / INTERIOR SHOWER SIDE INTÉRIEUR DE LA DOUCHE BOTTOM CONNECTOR / CONNECTEUR DU BAS INTERIOR SHOWER SIDE INTÉRIEUR DE...
- Page 8 GUIDE D’INSTALLATION / INSTALLATION MANUAL HANDLE AND INSTALLATION / INSTALLATION DE LA POIGNÉE Install the handle on the door panel as shown. Use the hex key to install the towel barr on the fix panel as shown. Installer la poignée sur le panneau de porte comme illustré ci-dessous. Installer à l’aide d’une clé hexagonale la barre à serviette sur le panneau fixe comme illustrée ci-dessous. 2a-1 2a-2 2b-2 2b-1...
- Page 9 GUIDE D’INSTALLATION / INSTALLATION MANUAL DOOR ASSEMBLY / ASSEMBLAGE DE LA PORTE Use a mallet to install the magnetic gasket and the side gasket on the door panel. Ensure the textured side of the glass panel is located towards the outside of the shower. Install the rollers on the door panel so that the rollers point towards the outside of the MAGNETIC GASKET / shower. The vertical handle must always be...
- Page 10 INSTALLATION MANUAL / GUIDE D’INSTALLATION WALL JAMB INSTALLATION / INSTALLATION DU JAMBAGE Place the door inside the shower area and cover the base to avoid scratches. Place the wall jambs against the wall so that the holes are located towards the interior of the shower. Center the opening of the wall jambs on the lines marked previously. Ensure verticality with a level. Mark the holes position with a pencil using the holes of the wall jambs for reference. Drill the holes in the wall with Ø1/4’’ drill bit. To install the shower door on ceramic tiles, use a Ø1/4’’ drill bit for ceramic tiles. Insert one drop of silicone in each hole bored in the wall before inserting the wall plug (x8) on both side.
- Page 11 INSTALLATION MANUAL / GUIDE D’INSTALLATION WALL JAMB INSTALLATION (CONTINUED) / INSTALLATION DU JAMBAGE (SUITE) INTERIOR SHOWER SIDE INTÉRIEUR DE LA DOUCHE TOP VIEW VUE DU HAUT INTERIOR SHOWER SIDE INTÉRIEUR DE LA DOUCHE INTERIOR INTERIOR SHOWER SIDE SHOWER SIDE INTÉRIEUR DE INTÉRIEUR DE LA DOUCHE LA DOUCHE...
- Page 12 INSTALLATION MANUAL / GUIDE D’INSTALLATION SECURE THE WALL JAMBS / SECURISER LES JAMBAGES Level the top track and bottom track, by using locking pliers . Clamp the expanders with their wall jambs.* Secure the expanders with the wall jambs and the central colum by using the 3/8” self COVER THE PLIER’S drilling screws (x12) and screw caps (x12). TEETH BEFOREHAND TO AVOID SCRATCHING THE ALUMINUM PARTS. Assurer le niveau des cadres et serrer les RECOUVREZ LES DENTS DE extenseurs avec leur jambage à...
- Page 13 GUIDE D’INSTALLATION / INSTALLATION MANUAL DOOR INSTALLATION / INSTALLATION DU PANNEAU DE PORTE Place the top rollers of the door panel INTERIOR on the top track and push on the bottom SHOWER SIDE INTÉRIEUR DE sliders to engage them into the bottom LA DOUCHE track.
- Page 14 GUIDE D’INSTALLATION / INSTALLATION MANUAL ACCESSORIES INSTALLATION / INSTALLATION DES ACCESSOIRES Use a mallet and a block to install the vertical gaskets on each side of the fix and retun panels between the expanders and the glass panels and between the vertical coulmn and the glass panels. The gaskets must be installed inside the shower. Utiliser un maillet et un bloc pour insérer les INTERIOR INTERIOR joints d’étanchéité SHOWER SIDE SHOWER SIDE de chaque côté du INTÉRIEUR DE INTÉRIEUR DE LA DOUCHE LA DOUCHE panneau fixe et du panneau de retour...
- Page 15 INSTALLATION MANUAL / GUIDE D’INSTALLATION ACCESSORIES INSTALLATION (CONTINUED) / INSTALLATION DES ACCESSOIRES (SUITE) Use a screw 1/2” to install the bumper that is located on the bottom track opposite to the opening of the door. Place the expander caps on the expanders. Visser la butée sur le rail inférieur INTERIOR SHOWER SIDE du côté panneau fixe avec une...
- Page 16 INSTALLATION MANUAL GUIDE D’INSTALLATION SEALING / CALFEUTRAGE Silicone the outside of the frame between the wall and the wall jamb, along the bottom rail, below the fix panel and at the bottom of the return panel if applicable. Wait 24 hours before using the shower to allow the silicon to dry. Calfeutrer avec du silicone l’extérieur du cadre entre le mur et le jambage, le long des rails inférieurs, en bas du panneau fixe et en bas du panneau de retour si applicable. Attendre 24 heures avant de faire fonctionner la douche pour laisser le silicone séché.
Need help?
Do you have a question about the R006 and is the answer not in the manual?
Questions and answers