
Related Manuals for CRAFTMASTER STAINLESS KEGGERNUAT

Summary of Contents for CRAFTMASTER STAINLESS KEGGERNUAT
- Page 1 KEGGERNUAT Two-Head Semi-Automatic Keg Washer Opperation Manual CRAFTMASTER STAINLESS RANCHO CORDOVA, CA (916) 750 - 4677 craftmasterstainless.com...
-
Page 2: Table Of Contents
TABLE OF CONTENTS CAD DRAWINGS PARTS AND COMPONENTS ELECTRICAL REQUIREMENTS CHECKING AND CHANGING POLARITY OPERATION GUIDE AND SAFETY COMPRESSED AIR AND CO2 REQUIREMENTS SOFTWARE OVERVIEW CHANGING PRESET PARAMETERS CLEANING STAGES RECOMENDED DEFAULT PARAMETERS OMRON TEMPERATURE CONTROLLER - HEATING ELEMENT PRESSURE CONTROL INSTRUMENT - CO2 FILL PRESSURE OMRON MANUAL Check out our quick start guide video series. -
Page 3: Cad Drawings
CAD DRAWINGS KEG WASHER 35” DIMENSIONS HEIGHT 66 IN WIDTH 35 IN DEPTH 32 IN DRY WEIGHT 395 LB ** VIDEOS AVAILABLE ON YOUTUBE **... -
Page 4: Parts And Components
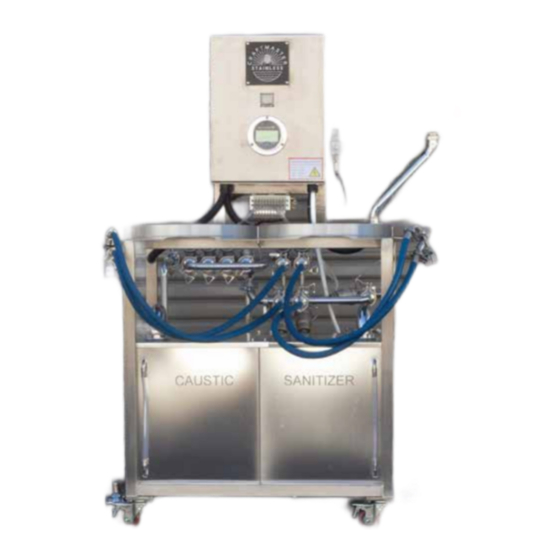
PARTS AND COMPONENTS Main Control Panel Main Power Switch Omron Temperature Controller Pressure Control Instrument Solenoid Control Manifold Keg Loading Platform Caustic Reservoir Reservoir Drainage Valve Secondary Control Panel Siemens Touch Screen Emergency Stop Inlet Pressure Regulator Micromatic Keg Coupler Sanitizer Reservoir Sight Tube ** VIDEOS AVAILABLE ON YOUTUBE **... -
Page 5: Electrical Requirements
ELECTRICAL REQUIREMENTS Electrical work presents significant risk to one's health and safety. All electrical work should be performed by a licensed professional. Voltage : 208 - 240V Current : 50 Amps Phase: 3 - Phase Hertz: 60Hz Plug Type: L15 - 30 Voltage : 208 - 240V Current :... -
Page 6: Checking And Changing Polarity
CHECKING POLARITY Due to nature of three phase electronics and di erences in how outlets are wired, it is necessary to check the polarity of your keg washer before using it. Incorrect polarity causes the motor to spin in the wrong direction. Operating your keg washer with the incorrect polarity will cause damage to your washer and possible risk to ones health and safety. - Page 7 CHANGING POLARITY GROUND 1. You will need a phillips head screwdriver to complete this task. 2. Expose the wires by opening the plug up. Unscrew the two screws on the face of the plug, as well as the two screws located on the back. 3.
-
Page 8: Operation Guide And Safety
OPERATION GUIDE AND SAFETY Kegwashers operate with high pressure, chemicals, and hot temperatures. Always wear appropriate P.P.E. when operating. In case of error, press the Emergency Stop. Turn o unit. Disconnect power source, air, co2, water supply, and kegs. Depressurize the system by opening a coupler pointed down and away. -
Page 9: Compressed Air And Co2 Requirements
AIR AND CO2 REQUIREMENETS Capacity : Min 80 Gal CFM Rating : 14 CFM @ 90 PSI Output Pressure : 90 PSI Air Water Seprator : Highly Recommended Capacity : Bulk Source CFM Rating : 14 CFM @ 90 PSI Output Pressure : 90 PSI Air Supply... -
Page 10: Software Overview
SOFTWARE OVERVIEW When you turn on your washer the Keggernaut will automatically load the software. The program will load to the main page. When the washer is running, this page will inform you on current progress through the di erent cleaning stages and give visual feedback on what components are currently in use. - Page 11 SOFTWARE OVERVIEW The parameter select page shows the settings for a given preset. The fourteen cleaning stages are listed in order in which they occur. You will see the name of the stage and numerical value. The numerical value is the amount of seconds that stage will run.
-
Page 12: Changing Preset Parameters
CHANGING PRESET PARAMETERS 1. To make a change to a preset, navigate to the settings page. 2. Locate the preset you would like to change. Press the button above the icon that depicts the name of the preset. 3. This will load the parameter select page for that preset. (Pic A) You will see the name of the cleaning stages and numerical values. -
Page 13: Cleaning Stages
CLEANING STAGES This stage is going to release and drain any remaining fluids in your kegs. It is recommended that you drain your kegs as much as possible before hooking them to the washer ensuring this stage can work e ciently. If you are noticing fluid is still evacuating the kegs as this stage completes, then you are going to want to increase the duration on the parameter select page till nothing is coming out. - Page 14 CLEANING STAGES This stage is going to deliver powerful pulses of hot caustic to each keg. You should be able to feel the pulses through the top of the kegs as it alternates pulses. Depending on how soiled your kegs are, you will need to adjust this stage on the param- eter select page to ensure thorough cleaning.
- Page 15 CLEANING STAGES This stage discharges the water from the second clean rinse. Make sure the keg is empty of water before moving to the next stage. Extend the time on the parameter select page until you have no more discharge at the end of the stage.
- Page 16 CLEANING STAGES This stage is used by individuals that need to use steam rather than sanitizer in their cleaning process. This stage is not necessary for normal use. Set this stage to zero seconds to bypass it. Steam Holding is the second stage for those sterilizing with steam. This stage is also not necessary for normal use.
-
Page 17: Recomended Default Parameters
RECOMMENDED DEFAULT PARAMETERS Below are recommended default starting values for the fourteen cleaning stages. These are only recommendations. It is strongly recommended that you water test the washer and make adjustments to maximize your e ciency and meet the necessary sanitation specifications you have chosen. -
Page 18: Omron Temperature Controller - Heating Element
OMRON TEMPERATURE CONTROL UNIT PV : The present value or PV is the number on the top and is the current temperature being read by the thermo gauge located in the caustic holding reservoir. SV: The set value or SV is the number located below the PV. -
Page 19: Pressure Control Instrument - Co2 Fill Pressure
PRESSURE CONTROL INSTRUMENT The Pressure Control Instrument monitors the pressure in the system and allows you to set the fill pressure for CO2 in your kegs. The PCI will show the current pressure by defualt. It also has four set pressures. -
Page 20: Omron Manual
OMRON MANUAL ** VIDEOS AVAILABLE ON YOUTUBE **... - Page 21 OMRON MANUAL ** VIDEOS AVAILABLE ON YOUTUBE **...
- Page 22 OMRON MANUAL ** VIDEOS AVAILABLE ON YOUTUBE **...
- Page 23 OMRON MANUAL ** VIDEOS AVAILABLE ON YOUTUBE **...
Need help?
Do you have a question about the KEGGERNUAT and is the answer not in the manual?
Questions and answers