Table of Contents
Advertisement
Quick Links
Advertisement
Table of Contents

Related Manuals for pathway Pathport PWPP HH P1 XLR5F


Summary of Contents for pathway Pathport PWPP HH P1 XLR5F
- Page 1 Running Firmware version 6.2 or later User Guide October 2021 © 2021 Acuity Brands, Inc. • One Lithonia Way, Conyers GA 30012 Pathway Connectivity | #103 - 1439 17th Ave SE Calgary, AB Canada T2G 1J9 Phone: + 1 866 617 3074...
- Page 2 Enabling an open protocol that does not use encryption or authentication - These protocols could be eavesdropped or spoofed by malicious parties. You are strongly encouraged to use Pathway ssACN, and secure access to your network, both physically and technologically. To use unsecured protocols,...
-
Page 3: Table Of Contents
C O N T E N T S ABOUT PATHPORT HAND HELD - PWPP HH P1 XLR5F ....1 PROTOCOLS SUPPORTED ..............1 DMX512 �����������������������������������������������������������������������������������������������������������������1 ETHERNET PROTOCOLS �������������������������������������������������������������������������������������1 REMOTE DEVICE MANAGEMENT (RDM) ������������������������������������������������������������2 INSTALLATION INSTRUCTIONS ............2 INSTALLATION ENVIRONMENT ............3 POWER ....................3 REPLACING THE BATTERY ���������������������������������������������������������������������������������3 PANEL LAYOUTS ................4 FRONT PANEL ..................4 LCD �����������������������������������������������������������������������������������������������������������������������4... - Page 4 LOCAL CONFIGURATION ONLY - Using PWPP HH P1 without Pathscape .....................22 PATHWAY ssACN (Secure sACN) ............24 DOMAIN AUTO ssACN PASSWORD ������������������������������������������������������������������24 CUSTOM ssACN PASSWORD ���������������������������������������������������������������������������24 CHOOSING PATHWAY ssACN AS NETWORK PROTOCOL ....25 MANAGING PATHWAY ssACN PASSWORDS ���������������������������������������������������26 SOFTWARE (PATHSCAPE) CONFIGURATION ........29 NETWORK SETUP ................29 DEVICE PROPERTIES ................30 PATHWAY SECURITY DOMAIN ��������������������������������������������������������������������������30...
- Page 5 OUTPUT PORT PROPERTIES .............36 BASIC PROPERTIES ������������������������������������������������������������������������������������������36 DEVICE INFO ������������������������������������������������������������������������������������������������������37 STATUS ���������������������������������������������������������������������������������������������������������������37 DMX512 PORT PROPERTIES ����������������������������������������������������������������������������37 PORT PATCH ������������������������������������������������������������������������������������������������������38 NETWORK DMX PROPERTIES ��������������������������������������������������������������������������39 SIGNAL LOSS �����������������������������������������������������������������������������������������������������39 RDM PROPERTIES ���������������������������������������������������������������������������������������������40 INPUT PORT PROPERTIES ..............41 BASIC PROPERTIES ������������������������������������������������������������������������������������������41 STATUS ���������������������������������������������������������������������������������������������������������������41 DMX512 PORT PROPERTIES ����������������������������������������������������������������������������42 PORT PATCH ������������������������������������������������������������������������������������������������������42 NETWORK DMX PROPERTIES ��������������������������������������������������������������������������42 SIGNAL LOSS �����������������������������������������������������������������������������������������������������43...
- Page 6 DMX PORT MONITOR ����������������������������������������������������������������������������������������51 RDM TOOLS �������������������������������������������������������������������������������������������������������52 TEST DMX OUTPUT �������������������������������������������������������������������������������������������53 APPENDIX 1: ELECTRICAL, COMPLIANCE & OTHER INFORMATION ......................55 ELECTRICAL INFORMATION ..............55 COMPLIANCE ..................55 PHYSICAL .....................55...
-
Page 8: About Pathport Hand Held - Pwpp Hh P1 Xlr5F
Final Draft 20, or the ANSI approved versions of sACN. Pathway ssACN (Secure sACN): A new protocol developed by Pathway Connectivity that incorporates many features of ANSI E1.31 sACN, but adds a layer of secure authentication. See later in the manual for details on Pathway ssACN. October 2021... -
Page 9: Remote Device Management (Rdm)
REMOTE DEVICE MANAGEMENT (RDM) ANSI E1.20 Remote Device Management (RDM) is an industry standard, also published by ESTA, which allows remote configuration of last-mile DMX devices, using the same wire pair that carries the DMX signal. Like DMX, RDM requires a separate dedicated controller to generate the signal packets the PWPP HH P1 will route. -
Page 10: Installation Environment
The rear-mounted hanging bracket accepts a 1/2” (12.5mm) bolt, and is intended to be suspended using a standard C-clamp or similar pipe hanger. A separate anchor point is provided for a secondary safety. The bracket may be installed in 90 degree increments as needed. -
Page 11: Panel Layouts
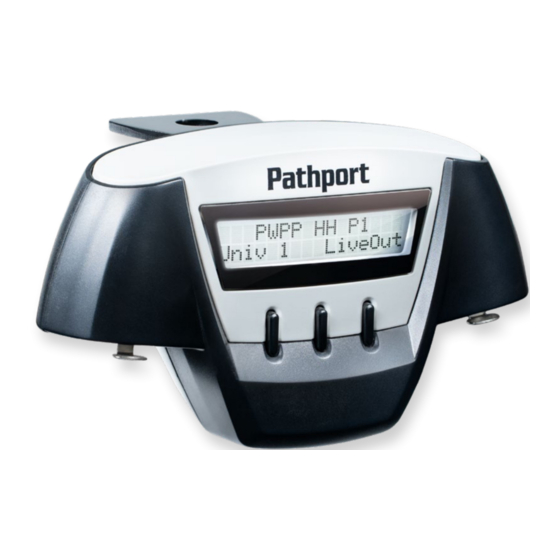
Safety Attachment Ring Hangi PANEL LAYOUTS FRONT PANEL LCD Screen RJ45 Ethercon 3 Button Interface XLR5F DMX Connector The Pathport Hand Held has a 2-line, 16-character backlit LCD. PWPP HH P1 Univ1 LiveOut The upper line of the display will show the gateway’s name (if set in Pathscape), or the device’s IP address. The lower line will show the Universe number or patch name and the DMX status. -
Page 12: Rj45 Ethercon
See further sections for information on battery timeout and menu navigation. RJ45 etherCON On the left side of the device is the RJ45 etherCON port, which will accept a standard male RJ45 or Neutrik etherCON connector for connecting to the lighting network. The PWPP HH P1 can be powered via PoE. The amber LED next to the RJ45 port will glow with link activity. -
Page 13: Configuration
The PWPP HH P1 may be configured from the front panel using the LCD and three-button interface. However, we recommend using our free software tool, Pathscape, when possible. To download Pathscape, visit the Pathway website. For instructions on how to set properties and send transactions to devices, refer to the Pathscape manual. -
Page 14: Security
1. When using products shipped after January 1, 2020, Pathscape will require a single password to allow configuration of all the devices on your network. Since the release of Pathscape V4, all Pathway Connectivity products can be upgraded to firmware version 6.x. It is suggested you upgrade your devices to take advantage of the most recent security improvements. -
Page 15: Security Domains
SECURITY DOMAINS To simplify the process of managing security on your network, Pathscape introduced the concept of a “Security Domain”. Below we will describe how to create a Security Domain and add or remove devices from it. In the Device tab of Pathscape there is a column that shows you the name of the devices’... -
Page 16: Creating A Security Domain
CREATING A SECURITY DOMAIN • After starting Pathscape, the online devices will populate the Device View. • Choose the Security Domain view from the Select View dropdown • Each device running V5 or later firmware will have a Red “Ready to Secure” value in the Security Domain column. •... - Page 17 • Enter the new Domain Name and Administrator and User passwords, then click Next. • The Administrator can change passwords, change the Security Domain’s name, factory default devices, manage Device Restore Points and add or remove devices from the domain. •...
- Page 18 • The next window will show the Recovery Key. This key will allow you to recover Security Domain access should the passwords be lost or forgotten. It is extremely important to keep a record of this Recovery Key, as this is the only time it will be shown to you. Print the Recovery Key.
- Page 19 • In order to proceed, you must click the checkbox acknowledging you have printed or saved the Recovery Key in some way. Managers of the facility should store this key in a safe place, keeping in mind that anybody with this key can change both the Administrator and User passwords at any time.
- Page 20 • Enter the User password for the Security Domain that was just created, and click Finish. As security parameters are verified, the amber padlocks will turn green and the properties of those devices will be read/ writable. Log In button will change to the Log Out button, and the name of the domain Once logged into a domain, the currently logged into will appear next to it.
-
Page 21: Administering A Domain
ADMINISTERING A DOMAIN To administer a domain, click on the Administration button on the Security Toolbar, or click the Security menu and select Administration. Enter the Admin password for the Security Domain, and the Domain Administrator Utilities window will appear. The Domain Admin Utilities window is broken down into to main sections, Manage Security Domain and Manage Devices. - Page 22 The number in parentheses after the domain name is the number of devices that are in that domain. In the example above, there are 12 devices in the “pathway” domain. This will help you identify which is the old domain. Log into the old domain using the old password and remove the devices.
- Page 23 CHANGE DOMAIN NAME Click this button to change the name of the current Security Domain. Enter a new name for the current domain, and click Change Domain Name. The window will close, and you will be logged out of the current domain, and the Domain Name will be changed to the new value.
- Page 24 REMOVE Click this button to remove devices from the current Security Domain. Click on the checkboxes next to the devices you want to remove from the Domain, and click the Remove Devices button. To remove all the listed devices, click the top checkbox next to the Domain Name which will auto-check all the devices’ checkboxes.
-
Page 25: Manage Devices
V4 or below or devices that opted out of security, select the device and choose Factory Default in the Device menu. Search the Pathway website for Factory Defaulting Ethernet Devices for detailed instructions. At the bottom of the window, you may optionally Wipe Device Restore Points from all checked devices. See below for details on Device Restore Points. -
Page 26: Recovering A Domain
RECOVERING A DOMAIN If you lose the Administrator password (or it was maliciously changed without your consent), you can recover the domain, retaining its configuration and set new passwords. • From the menu, choose Security > Recover Domain. • The Reset Device Security window will open. •... - Page 27 • Type in a new Administrator Password, and click Finish. • Now you can log into the Domain Administration Utilities Panel using the new Admin password you just specified. At this point you can set a new user password as well, using the Change Passwords button, as explained above.
-
Page 28: Retaining Device Settings From Unknown Domains
Without logging in to a Domain, all devices that appear with amber padlocks are read-only. Save a show file, and the configuration of all devices is saved. You can then factory default the devices using the prescribed method. See the Pathway website, under Support > Reference Articles > Factory Defaulting Ethernet Devices for detailed instructions. -
Page 29: Pathscape
“Local Domain”. The menu item for Pathway ssACN may still be displayed in this mode, and you may be able to set this item to “Enabled”, but note that Pathway ssACN will not function in Local Configuration / Read Only mode. - Page 30 You are enabling an open protocol that does not use encryption or authentication. These protocols could be eavesdropped or spoofed by malicious parties. You are strongly encouraged to use Pathway ssACN, and secure access to your network, both physically and technologically. To use unsecured protocols, you must acknowledge that you have read this statement and accept these risks.
-
Page 31: Pathway Ssacn (Secure Sacn)
PATHWAY ssACN (Secure sACN) Pathway ssACN (Secure streaming ACN) is a protocol developed by Pathway using much of ANSI E1.31, but adds a layer of authentication. This feature requires device firmware version 6.0 or later. Receiving devices, like Pathport DMX/RDM gateways, share a secret password with known controllers in the venue, to verify the data source before driving the lighting rig. -
Page 32: Choosing Pathway Ssacn As Network Protocol
Security Domain. CHOOSING PATHWAY ssACN AS NETWORK PROTOCOL To use Pathway ssACN and ensure the security of the entire network, you must specify all relevant devices to use Pathway ssACN. In the relevant devices’ base device properties, there are two sections called Network DMX Receive Protocols and Network DMX Transmit Protocol. -
Page 33: Managing Pathway Ssacn Passwords
Pathway ssACN, you will not need to do any password management or further configuration. If you are using custom Pathway ssACN passwords, you will need to tell those devices transmitting Pathway ssACN what password to use, as well the devices that are receiving it what passwords to accept. - Page 34 Use the Pathway ssACN RX Password Editor to add custom passwords the selected device should accept. To enter a new password, click the Add Password button. A blank entry will be added to the window. Double-click on the row and enter your custom password into the text field.
- Page 35 The ssACN TX Password field will appear. Enter the custom TX password you want this device to use. NOTES ABOUT PATHWAY ssACN A device can only have one TX password at a time. You cannot transmit with multiple TX passwords.
-
Page 36: Software (Pathscape) Configuration
Wherever possible, we recommend using a PC with Pathscape to configure your PWPP HH P1. For in-depth information on using Pathscape, see the Pathscape manual. Pathscape is available for macOS and Windows from the Pathway website. If using a PC with Pathscape is not possible or practical, see the section Front Panel UI and Menu later in this manual. -
Page 37: Device Properties
The following fields are shown in the Device Property Panel in Pathscape. Some are editable, while others are read-only. NOTE: If all properties are read-only (grayed out and uneditable), make sure you are logged into the correct Security Domain. PATHWAY SECURITY DOMAIN DOMAIN NAME The name of the Security Domain the device is currently assigned to. -
Page 38: Device Info
DEVICE INFO DEVICE TYPE The device type for the currently selected device. NETWORK INTERFACE Shows the name of the NIC (Network Interface Card) the device is communicating to the machine running Pathscape on. FIRMWARE VERSION Shows current operating firmware version. See the Firmware Update section on how to update the firmware. Read-only. SERIAL NUMBER Factory-set unique identifier. -
Page 39: Network Properties
NETWORK PROPERTIES IP ADDRESS Internet Protocol address (IPv4) of the Gateway. SUBNET MASK User-configured subnet mask. Typically, 255.255.255.0 but must be set according to general networking rules. GATEWAY Specify network gateway address if necessary. PWPP HH P1 - Manual October 2021... -
Page 40: Network Partner (Lldp)
If the upstream switch supports Link Layer Discovery Protocol (LLDP), the port the current device is connected to will be shown here. Read-only. NETWORK DMX RECEIVE PROTOCOLS PATHWAY ssACN Check this box to enable Pathway ssACN. Click the Manage RX Passwords button to configure ssACN Passwords. See the Security section earlier in the manual for details. PRIORITY SUPPORT Use the drop-down menu to choose whether the PWPP HH P1 respects the sACN priority (1-200) in the Universe header. - Page 41 You are enabling an open protocol that does not use encryption or authentication. These protocols could be eavesdropped or spoofed by malicious parties. You are strongly encouraged to use Pathway ssACN, and secure access to your network, both physically and technologically. To use unsecured protocols, you must acknowledge that you have read this statement and accept these risks.
-
Page 42: Network Dmx Transmit Protocol
Strand ShowNet will use transmit using standard, unsecured E1.31 sACN. E1.31 sACN will use transmit using standard, unsecured E1.31 sACN. Pathway ssACN will use Pathway’s secured sACN for transmitting to the network. ssACN PASSWORD Applies only if Pathway ssACN is chosen in the drop-down menu above. -
Page 43: Pathport Port Properties
PATHPORT PORT PROPERTIES Pathport Gateway subdevices are DMX Ports . Gateways have between 1 and 8 ports. Port Direction may be Input (receive DMX512 and put Network DMX on network) or Output (convert Network DMX from one of the four supported protocols to DMX512). -
Page 44: Device Info
SUBDEVICE NOTES A user-configured text description field, shown in the Device window (if the Notes column is displayed). DEVICE INFO DEVICE TYPE Shows the Device Type for the currently selected device/subdevice. In this case, the subdevice is a DMX Port. Read-only. STATUS NETWORK DMX Shows status of the Network DMX source for this Output Port. -
Page 45: Port Patch
DMX512 OUTPUT SPEED ANSI E1.11 compliant devices should be able to receive at Maximum speed (42 Hz), but some devices may require you to lower the number of DMX512 packets per second. The slowest rate is 30 Hz. Values are Maximum, Fast, Medium and Slow. -
Page 46: Network Dmx Properties
NETWORK DMX PROPERTIES sACN PER-CHANNEL PRIORITY In the base Gateway device’s Network DMX Receive Protocols, there is a property Priority Support which determines if the Gateway respects the priority (1-200) in the Universe header. This property extends that to each slot in the universe. It is off by default. -
Page 47: Rdm Properties
RDM PROPERTIES Pathscape is a very powerful RDM controller that allows you to identify RDM devices and set properties like mode and starting address. E1�20 RDM ENABLE Enabled (Default). When disabled, no Alternate Start Code packets will be sent on the DMX512 link. Non-RDM compliant devices may react badly to RDM packets. -
Page 48: Input Port Properties
INPUT PORT PROPERTIES BASIC PROPERTIES SUBDEVICE NAME A user-configured, soft label for the port. By default, based on the number of ports on a gateway, the ports are labeled A through H. It is good practice to label a port based on where the DMX512 cable is coming from. (i.e. “Console Port 3” or “House Lights”). -
Page 49: Dmx512 Port Properties
DMX512 PORT PROPERTIES DMX512 ENABLE For debugging purposes or otherwise, you may want to disable a DMX port. All other properties will remain unchanged. Apart from the fact that the line is still terminated, this is electrically equivalent to unplugging the DMX512 cable. Use the drop-down menu to select Enabled or Disabled. -
Page 50: Signal Loss
TRANSMIT PRIORITY When E1.31 sACN or Pathway ssACN is put on the network, it will be tagged with a priority level. At output ports, multiple sources will HTP levels if their priorities match, otherwise they will arbitrate. The default TX priority per Port is 100. Valid priorities are between 1 and 200 where 200 is the highest priority possible. -
Page 51: Updating Device Firmware
The most recently released firmware is bundled with the most recent version of Pathscape. To ensure you have the most up- to-date firmware available for upgrading, ensure you have downloaded the most recent version of Pathscape from the Pathway site, https://www.pathwayconnect.com. -
Page 52: Factory Default
FACTORY DEFAULT In the event of a loss of communication with the device, it is possible to reset it to factory settings. To factory default the PWPP HH P1, press any button twice to enter the main menu, which will show Gateway Config as the first menu item. -
Page 53: Front Panel Ui And Menu
If set to Local Configuration Only (Read-only) mode or the security features are Disabled, some functionality will not be available such as Pathway ssACN. Pathway ssACN needs the device to be part of a Security Domain in order to authenticate and send traffic on that protocol. -
Page 54: Setting Security Mode
Press the left button to select SECURE. You will then have full access to the menus. • In Local Configuration / Read Only mode, Pathway ssACN (Secure sACN) is not available. To use other standard (unsecured) protocols, you must manually enable them (see below). As explained above, you cannot use Pathscape to configure the device in this mode. -
Page 55: Using The Front Panel Ui
This menu allows the user to Factory Default the device, allow the use of Unsecured RX protocols, setting the Network DMX TX Protocol, and setting which RX Protocols to receive (Pathport, ShowNet, ETC Net2, Art-Net, E1.31 sACN, and Pathway ssACN). - Page 56 Enable or Disable (default) the receiving of E1.31 sACN. If Allow UnsecureRX is E1.31 sACN RX Disabled, enabling this will have no effect. Enable (default) or Disable receiving of Pathway ssACN. Pathway ssACN RX: October 2021 PWPP HH P1 - Manual...
-
Page 57: Port Config
PORT CONFIG Port Config NEXT This menu allows the user to configure the DMX port direction, Universe or patch, and DMX speed. Menu Item Description Set the DMX direction for the DMX Port. Port Direction Choose DMX Input or DMX Output (default). Allows selection of the patch for the DMX Port. -
Page 58: Network Config
NETWORK CONFIG Network Config NEXT This menu allows the user to configure the IP Address, Subnet Mask and Gateway settings for the device. Menu Item Description Manually sets IP address (IPv4). Use UP and DOWN buttons to edit each octet. Currently selected octet will flash. Press IP Address NEXT button to move to next octet. - Page 59 For example, pressing the UP button once will move the starting slot to 2, which will move the displayed DMX levels to the left. 2: 75 00 50 00 DOWN Here, slot 2 is the first slot (at 75%), followed by slots 3 (at zero), 4 (at 50%) and 5 (at zero). Press the UP or DOWN button to view relevant DMX slots.
- Page 60 Start Addr : 1 Start Addr : 1 → EDIT DOWN NEXT Use the UP or DOWN buttons to change the DMX start address of the device, and pressing NEXT allows the new address to be saved. Once saved, press ESC to return to the device list. To cycle to the next RDM device, press the NEXT button and repeat the above steps to edit the DMX start address if needed.
- Page 61 PWPP HH P1 - Manual October 2021...
- Page 62 COMPLIANCE • ANSI E1.11 DMX512-A R2013 • ANSI E1.20 RDM - Remote Device Management • ANSI E1.31 - streaming ACN, Art-Net, Strand ShowNet, Pathway ssACN • ANSI E1.33 RDMnet - RDM over IP • IEEE 802.3af Power-over-Ethernet • California Title 1.81.26, Security of Connected Devices PHYSICAL •...
Need help?
Do you have a question about the Pathport PWPP HH P1 XLR5F and is the answer not in the manual?
Questions and answers