Advertisement
Quick Links
Advertisement

Related Manuals for CIC Frilled Lizard


Summary of Contents for CIC Frilled Lizard
- Page 1 Manual Assembly Instruction &...
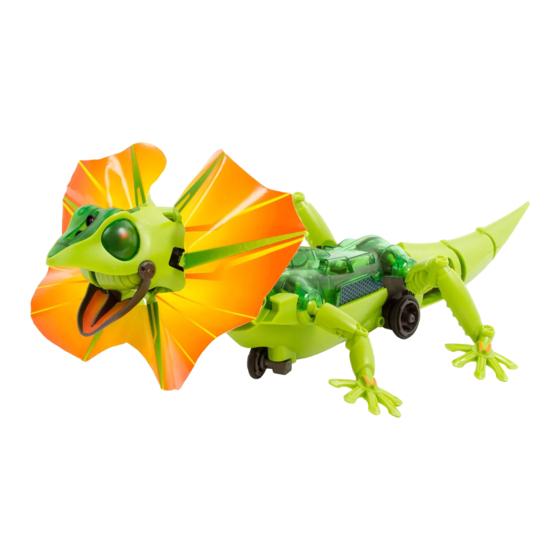
- Page 2 Frilled Lizard Robot KIT Product Introduction Frilled Lizard Robot has an infrared sensor that is programmed to “escape” or “follow-me”. If the infrared sensor is activated in the “escape” mode the robot will automatically act “shocked!”, spreading its frill, dropping its jaw, illuminates its bicolor LED eyes and will scurry away from you until it escapes to a safe distance.
- Page 3 Round Shaft Round Shaft PC Board Motor With Connector Motor With Connector Black Black W / Long Wires W / Short Wires Battery Holder With Connector PC Board With Connector DC 6V Frill Adhesive Tape (Spare part : 1 pc) Sticker Spare Parts...
- Page 4 Plastic Parts Cut the plastic parts when they are required. Spare Part Do not cut them in advance. 5 12 Spare Parts Tip:cut off the burrs before assembly burr burr burr...
- Page 5 Head Module Assembly...
- Page 6 P2(Red) W / Short Wires (Short) Black Side View...
- Page 7 Black Make sure “ “ to be faced up to you, it is to assist you in assembling C8 correctly. B4x6...
- Page 8 Make sure adhesive tapes come with thin glued films while tearing off. Cut the frill as below illustration. *Includes an extra frill...
- Page 9 The opposite (no printing) No stickers on the printing side. side to be faced up. Front Back...
- Page 10 Pull...
- Page 11 Note: Frill is not pictured below to clearly illustrate assembly.
- Page 12 PUSH...
- Page 15 Push...
- Page 16 Body Module Assembly (Yellow) P10(Long) (Purple) Do not mix up C4 & C3, make sure C4 for assembly. very important!
- Page 17 P4(White) W / Long Wires...
- Page 18 Hammer slightly.
- Page 19 Important! (Middle) Do not mix up C4 & C3, make sure C3 for assembly.
- Page 21 P7x2...
- Page 22 (AAA)x4...
- Page 24 Top View Note:Make sure that the wheels are not too tight or too loose. Important!
- Page 26 Black...
- Page 27 P7x2 Black Black...
- Page 28 Side View...
- Page 31 Finished...
- Page 32 Stickers...
- Page 33 How To Play Neck adjustable angle...
- Page 34 Funway Escape mode Shocked !! Bluffing ! escape~...
- Page 35 Funway Follow-me mode Bluffing attacker by popping up its frill. Follow me like a pet.
- Page 36 Warning Be gentle to hold your Lizard Robot, any improper manners (as below figs) might cause its malfunction.
- Page 37 Trouble Shooting 1.Ensure all wirings are correct. (please refer to page 26,27) 2.If the lizard robot does not work, please check if batteries are placed in correct polarity. (please refer to page 21) Also make sure the connector of battery compartment plug to PC board no problem.
- Page 38 Batteries are to be inserted with the correct polarity. Do not attempt to recharge non-rechargeable batteries. Rechargeable batteries are only to be charged under adult supervision. Rechargeable batteries are to be removed from the toy before being charged. Copyright © 2015 CIC. All rights reserved 4350008921...
Need help?
Do you have a question about the Frilled Lizard and is the answer not in the manual?
Questions and answers
How do you recognize the numbered parts
The numbered parts of the CIC Frilled Lizard can be recognized by their labels in the mechanical and plastic parts list. The manual provides part numbers such as P1 (Pinion Gear, White), P2 (Gear, Red), P3 (Gear, Yellow), and P4 (Gear, White). Additionally, the plastic parts are labeled with numbers and letters (e.g., C4, C22) that correspond to specific assembly steps. Some parts also have orientation markings to assist in correct assembly.
This answer is automatically generated