Advertisement
Quick Links
HOME SPORTS SET
Transformer 7D
DSKM-2-8.06.Т1.490.03-14
User's Manual EG-KSK-007
PROOF OF ACCEPTANCE
The sports set complies with the following applicable standards: STO 71030909-003-2009, GOST 25779-90, DIN EN 71-1:2006, DIN EN 71-
3:2002, DIN EN 71-8:2006 and recognized serviceable.
Manufacturing date «___»______________ 20 __. Packer____________________
Quality Control Department____________________
MANUFACTURER:
RECREATION AND SPORTS EQUIPMENT PLANT, CJSC
Montazhny proezd, 6, 428037, Cheboksary, Chuvash Republic, Russia
tel. /fax (8352) 222-123,
E-Mail:
mail@wallbarz.com
www.wallbarz.com
Advertisement

Related Manuals for Wallbarz Transformer 7D

Summary of Contents for Wallbarz Transformer 7D
- Page 1 HOME SPORTS SET Transformer 7D DSKM-2-8.06.Т1.490.03-14 User's Manual EG-KSK-007 PROOF OF ACCEPTANCE The sports set complies with the following applicable standards: STO 71030909-003-2009, GOST 25779-90, DIN EN 71-1:2006, DIN EN 71- 3:2002, DIN EN 71-8:2006 and recognized serviceable. Manufacturing date «___»______________ 20 __. Packer____________________...
- Page 2 Read the Data Sheet carefully for acquaintance with the rules of assembly, safe operation, maintenance, transport, and storage of Transformer 7D, hereinafter – the SET. Assembly, disassembly, and installation works of the SET should be carried out by at least 2 persons after studying the Data Sheet.
-
Page 3: General Data
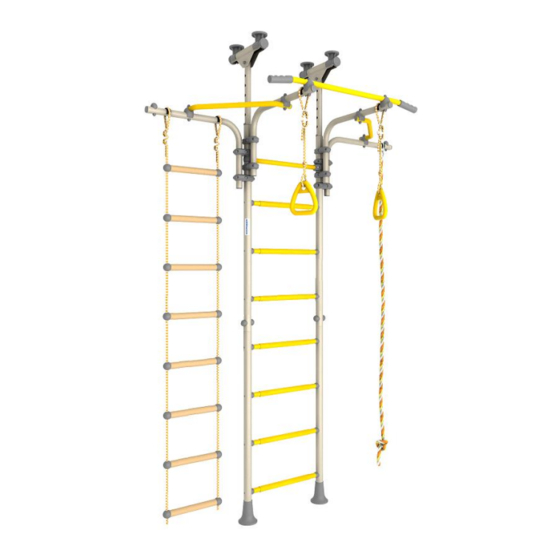
GENERAL DATA The Set is designed to be used inside living spaces for ATTENTION sports and playing exercises. CHILDREN USING THE SET MUST BE SUPERVISED BY ADULTS Due to the ongoing work on the products improvement changes may be made, which are not mentioned in the Da- ta Sheet. - Page 4 Safety zone Option 1 Option 2 Shock-absorbing cover (soft mat) Pic. 2 Product composition 3.1. Basic structure of the SET 3.1.1. The SET is a demountable frame structure made out of metal pipes; it is fastened between floor and ceiling by “thrust apart” meth- 3.1.2.
- Page 5 CONFIGURATION Table 2 Component parts № № Q-ty pieces. package № package Designation Picture Shaft DSK 03.036.00 Sealing DSK 05.075.00 Insert with plug 1.DSK 049.01-20 Casing DSK 05-011-20 Plug DSK 05-012-20 Bushing DSK 05-091.00-20 DSK 05-040-20 Insert DSK 05.110.00 Support DSK 05.107.00-20 Beam DSKМ...
- Page 6 Nut М8.6.016 Nut М16.6.016 Washer 8.01.016 Plug D10 Plug DSK 05.070.00-20 Cap №13 Wrench S=24х13 mm Hex wrench S=6 mm Hex wrench S=5 mm Accessories Movable frame DSKM-VO 92.56.Т1.490.00-20 See table 6 Rope DSK-VO 91.02.11-21 See table 3 Gymnastic rings DSK-VO 91.03.11-21 See table 4 Rope ladder...
- Page 7 Rope DSK-VO 91.02.11-21 Table 3 № № № Designation Pic. Q-ty pieces. PE package package 100.1 Rope assembled Bracket 100.2 DSK 2.051.00 Shaft 100.3 DSK 03.030.00 100.4 Screw М5-7gх 12.56 100.5 Washer 5.01.016 100.6 Washer 5.65G Gymnastic rings DSK-VO 91.03.11-21 Table 4 №...
-
Page 8: Transportation And Storage
TRANSPORTATION AND STORAGE 5.1 The SET is transported in its original package by any kind of transport which provides its safety. 5.2 Before the SET is installed it should be stored in its original package in a dry building with natural ventilation. 5.3 The original package of the SET should be used for transportation of the previously installed SET to another place. - Page 9 Pic. 3 07.11.2017...
- Page 10 8.5.2 Assemble upper supports and inserts Pic.4 07.11.2017...
- Page 11 8.5.3 Assemble ladder and inserts Install the inserts with supports into the ladder, put on caps item No. 14. Install supports item No. 24, sealings item No. 7. Pull the inserts up to the ceiling level, insert shafts item No. 2, then pull the inserts down. (Pic.5). 52 max 52 max Pic.5...
- Page 12 8.5.4. Installation of the set Install the set in thrust between the floor and ceiling by means of unscrewing bolts item No. 67. After the upper supports touch the ceiling make 1-3 rotations of bolt item No. 67 and fix it by nut item No. 77. Move the caps No.
- Page 13 8.6 Installation of Accessories 8.6.1 Assemble and install the pull-up frame on the stanchions of the SET according to Pic. 7. Option 1 Option 2 С Е А В Е С А С В Е D42mm Pic.7 Different sequence of assembly is possible. 07.11.2017...
- Page 14 8.6.2 Install the rope. 100.2 100.2 100.3 100.3 100.5 100.5 100.1 100.1 100.6 100.6 100.4 100.4 Pic.8 8.6.3 Assemble and install the gym rings. 101.2 101.2 101.2 101.2 101.1 101.1 101.1 101.1 Pic.9 07.11.2017...
- Page 15 8.6.4 Assemble and install rope ladder. 103.1 103.1 103.1 103.1 Pic.10 General view of the set with recommended position of accessories is shown in the Pic.1 8. 7 Mounting quality control. 8.7.1 Using the plummet make sure that the ladder is placed vertically in relation to the floor. In case of deviations, loosen the bolts item No.67, make sure the ladder is placed vertically (using the plummet) and fix the uprights between the floor and the ceil- ing by means of bolts.
-
Page 16: Inspection And Maintenance Instructions
EXERCISE AND PLAYING TIPS: Regular playing and exercising on the SET lead to improvement of general physical conditions of a child (posture, appetite, sleep). • To develop strength and physical dexterity the following exercises are recommended: on the vertical ladder – climbing up and down the ladder, abdominal press exercises; on the climbing rope - pulling up on hands, climbing up along the rope;...
Need help?
Do you have a question about the Transformer 7D and is the answer not in the manual?
Questions and answers