Table of Contents
Advertisement
Quick Links
Advertisement
Table of Contents

Related Manuals for Full Spectrum Laser muse FIBER GALVO


Summary of Contents for Full Spectrum Laser muse FIBER GALVO
-
Page 2: Table Of Contents
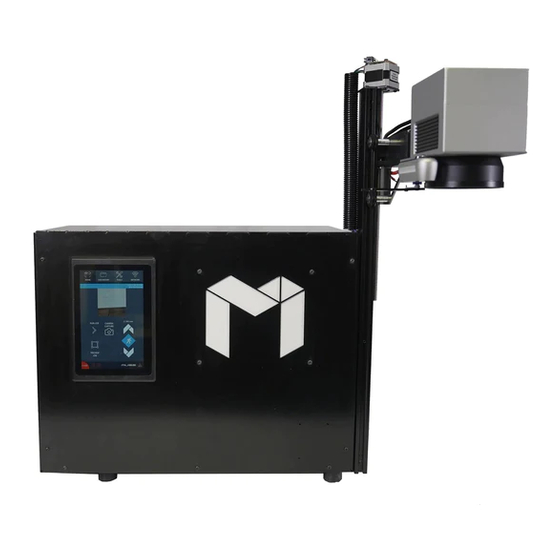
Table of Contents The Muse Fiber Galvo by Full Spectrum Laser Symbols and Definition Section I. Safety Setup Precautions Safety During Operations Fire Safety Electrical Safety Section II. Assembly and Setup Assembling your Muse Galvo Internet Connection Connect to Software Section III. -
Page 3: The Muse Fiber Galvo By Full Spectrum Laser
Power Switch Work Space Compliance Statement: The Full Spectrum Laser Muse Fiber Galvo Laser System is a Class 3B laser product, as defined in International Standard IEC 608251. The Full Spectrum Muse Galvo complies with 21 CFR 1040.10 and 1040.11, the Federal Performance Standards for Light Emitting Products, except for deviations pursuant to Laser Notice No. -
Page 4: Symbols And Definition
Symbols and Definitions Danger: Indicate[s] a hazardous situation which, if not avoided, will result in death or serious injury. Warning: Indicate[s] a hazardous situation which, if not avoided, could result in death or serious injury. Caution: Indicate[s] a hazardous situation which, if not avoided, could result in minor or moderate injury. -
Page 5: Section I. Safety
Section I. Safety Setup Precautions Follow all safety protocols and procedures before operating any machinery. It is the responsibility of the operator to ensure all safety precautions are correctly followed, and that the machine is properly assembled and in working order. ●... -
Page 6: Safety During Operations
General Safety Safety During Operation The output of the fiber engraving laser is fully contained in a Class 3 enclosure during normal operation. However, the output beam is accessible to the operator during normal operation, giving the total system an overall rating of Class 3B. -
Page 7: Fire Safety
Always keep a properly maintained and inspected 5lbs. or larger fire extinguisher on hand. Full Spectrum Laser recommends a Halogen or multipurpose dry chemical fire extinguisher. Halogen extinguishers are more expensive than a dry chemical, but offer certain advantages CAUTION! should you ever need to use an extinguisher. -
Page 8: Electrical Safety
The power supply is capable of releasing a current up to 45 mA. This power is sent to the discharge terminals on the laser tube itself. In order to prevent access to bare wiring your laser shipped in a protected box. Please notify Full Spectrum Laser support and immediately cease operations if the covers ever slip and expose bare wire. -
Page 9: Section Ii. Assembly And Setup
Section II. Assembly & Connectivity Assembling your Muse Galvo Warning! The Muse Galvo has a weight that exceeds 50lbs . It is recommended to carry the product with at least 2 people to avoid injury. 2. The laser head assembly will be inserted bottom up.Make 1. -
Page 10: Internet Connection
Section IV. Connectivity Ethernet Connection The Fiber Galvo software is browser-based, meaning no download is required. RetinaEngrave v3.0 (RE3) is locally hosted on the machine’s internal computer so it will function even without an internet connection. Using any computer, only an internet browser (such as Google Chrome) is needed to access RE3. The easiest method is to connect the Ethernet Cable that came with your Galvo. -
Page 11: Connect To Software
Connect to the Software RetinaEngrave v3.0 is a combination of a print driver and control software that communicates with, downloads jobs to, and controls the laser system. There is no download required for RetinaEngrave v3.0. With a local connection (achievable with Wi-Fi or the included Ethernet cable) your Muse Galvo will link with the software’s IP address Turn On Muse Galvo: Allow 30 seconds or so for the machine and touch screen to boot up. -
Page 12: Section Iii. Touchscreen Interface
Section III. Touchscreen Interface The touchscreen that comes on your Muse allows you to control the basic functions of your laser without needing a computer. Jobs are accessible through the touchscreen once loaded in from the RE3 interface. A rotary function comes on your machine, which can be engaged from the touchscreen itself or RE3. Before activation the rotary mode, make sure your optional Rotary attachment is connected properly. - Page 13 Network ⇨ Wi-Fi Allows the user to connect to the Wi-Fi. Fig. 24 Fig. 25 Network ⇨ IP Configuration Allows the user to set IP Address and DNS Server manually. Most of the things mentioned in this section can also be done from your phone using the mobile or web browser version on RE3.
-
Page 14: Focusing
Focusing Focusing must be done each time a new material is selected or when restarting your machine. Auto-focus: 1. Your Galvo came with a black anodized aluminum card that can be placed on your desired material under the laser head. Note: Make sure the QR code is visible on the camera during focusing. - Page 15 Laser Focus Test Once your machine is in the appropriate height we need to run the focus test. 1. Place a piece of paper or plastic above the selected material. 2. Select the laser focus icon.(See Fig.18) Fig.18 3. Make sure the appropriate lens size is selected before hitting the generate test pattern option. WARNING!! This will fire the laser! Make sure you are at least 12 inches away from the laser if you are not...
-
Page 16: Section Iv. Operations & Using Your Galvo
Section IV. Operations This section will guide you through using your Fiber Galvo. To get started, it is important to understand the meanings of “Vector Cutting” and “Raster Engraving” and their associated file types. General Functions Vector Cutting The most common feature when cutting with a laser engraver or cutter.When vector cutting, the laser follows the “vector lines”... -
Page 17: Project Workflow
Direct Printing PDF Files The easiest way to import any file type to RetinaEngrave v3.0 is to “drag ‘n drop” it directly into the workspace window or use the File> Import File. Another method would be to "Print" the PDF file which can send the data directly from your chosen design software into RetinaEngrave 3.0. - Page 18 Create Design Projects are created in design software and then imported to RetinaEngrave 3.0. A PDF file is mainly used for both raster and vector data due to its ease of conversion. For engraving, a JPEG file is best due to its bitmap files.
- Page 19 5. Focus Lens Your Galvo should be re-focused after changing a material. *Refer to Focusing Section* 6. Align Material to Engraving Area The material should be aligned to ensure the design is within the workspace and positioned straight. This can be done with a simple vision check while “jogging the perimeter”. By using the directional arrows on the touchscreen or the arrow keys on your computer, move the laser dot to the top left corner of your material.
-
Page 20: Section V. Retinaengrave V3
Section V. RetinaEngrave v3.0 Software Starting with RE3 Our machines are set apart from our competitors with our custom laser engraving software, known as RetinaEngrave v.3 or simply RE3. Using your new machine for the first time can seem intimidating but we've worked to make this guide as clear as possible regarding our software. - Page 21 2. Prepare the material you wish to engrave. If the material you are working with is new to you or untested, make sure you have enough material to test with to ensure your settings are correct before marking the final part/design. 3.Focus the laser to the material if you have not done so.
-
Page 22: Camera
Camera This camera uses multiple apertures simultaneously to create a 3D map of your workspace to get the most accurate data for your laser projects. Saving time and money on materials with the 3D camera system is a major benefit. Also the 3D camera allows you to do cool things like our trace feature in RE3. -
Page 23: Section Vi. Lens Calibration
Section IV. Lens Calibration NOTE: THE MACHINE IS SHIPPED PRE-CALIBRATED. DO NOT CALIBRATE UNLESS INSTRUCTED TO DO SO. WARNING! Make sure to avoid direct sunlight, glare, and/or bright lighting while operating the machine as they can impair the sensors. Remember to always wear protective eyewear while running the laser. Warning!! Calibration cannot be done in Rotary Mode. -
Page 24: Recalibration Process
Carefully twist counter clockwise to loosen the lens. Note: Try to avoid damaging the camera or camera shutter located on the side of the scanhead. Fig. 13 Avoid touching the glass surface of the lens to prevent scratches. Lens collar may loosens along the lens,if that occurs remove both together and separate once dismounted. -
Page 25: Mark Adjustment
Since the lens has been changed, we need to make sure the markings are adjusted to the new lens. Mark Adjustment Run the mark adjustment to verify that the calibration process was successful. Set a speed of 100mm/sec and input the lens size you are using. Place a piece of test material under the laser for marking. -
Page 26: Preview Adjustment
Preview Adjustment Mark a new, properly adjusted square Without moving the part you just engraved, press “Preview Square” Use the adjustment buttons so that the red dot trace perfectly overlaps the marked square. Select “Save Preview Adjustment. For more help, please check our video on focusing your laser and camera calibration @ https://www.youtube.com/watch?v=SZFqi_WLHBI Camera Shutter Replacement... - Page 27 3. The motor is connected to a tri-colored wire. Disconnect the wire before continuing. Fig. 30 Note: Some wires may be covered in hot-melt adhesive to prevent separation. 4. Remove the screws holding the motor in place ( see Fig. 28). 5.
-
Page 28: Troubleshooting & Applications
Troubleshooting & Applications Troubleshooting A large amount of problems customers face centers around laser focusing. These lasers must be with it’s focus range to function properly. Being outside of focus will yield no mark at all. Before calling tech support, please verify that you are in focus using the black card provided. -
Page 29: Applications
Marking Applications One should keep in mind that every material will react differently based on the settings used. Materials can have different grades or alloys will affect the engraving process. It is up to the user to determine their application and the best process for their needs. Many factors are involved when using the Galvo laser, such as speed, power, frequency, lens size, the power source (20W or 50W), focusing and material grade. -
Page 30: Samples
Examples With your new laser engraver, the sky's the limit. All you need to worry about is your own imagination. In order to help spark it we picked some projects others made to help show you the potential of your Fiber Galvo. -
Page 31: Free Projects & Extra Help
Free Projects & Extra-Help We hope that this manual helped make your Fiber Galvo experience more enjoyable. We know that sometimes getting started is hard. That’s why we offer free projects and other helpful tips and tricks on our website. If you wish to browse the free project list or to get more information just visit us at https://fslaser.com/laser-101/ Below we’ll show some samples of plans you can get from our website. -
Page 32: Warranty
Warranty Full Spectrum Laser will replace or repair any defective parts free of charge within the first 30 days. Ground shipping is free with overnight shipping available at extra charge. Full Spectrum Laser will replace or repair any defective part within the warranty period free of charge but shipping charges are the responsibility of the customer. -
Page 33: Customer Support
Customer Support If you have any questions about your machine don’t hesitate to contact us. We have a large number of resources available to make your first laser experience user-friendly.
Need help?
Do you have a question about the muse FIBER GALVO and is the answer not in the manual?
Questions and answers