Advertisement
Quick Links
Advertisement

Related Manuals for HARDKORR HKPBATTMONBT


Summary of Contents for HARDKORR HKPBATTMONBT
- Page 1 BLUETOOTH BATTERY MONITOR WITH 500A SHUNT INSTRUCTION MANUAL v1.0.5 - August 2022...
-
Page 2: Table Of Contents
Our aim is for you to be completely satisfied with your purchase, and therefore your new Hardkorr product is backed by a comprehensive 2-year warranty and an outstanding after-sales customer service team. We hope you will enjoy using this product for many years to come. -
Page 3: General Information And Safety Instructions
Do not operate the Battery Monitor or modify the installation unless you have read and understood this user manual. Pay particularly close attention to CAUTION and WARNING statements. Hardkorr recommends that the battery be installed by an appropriately qualified professional. - Page 4 SAFETY INSTRUCTIONS DISCLAIMER While caution has been taken to ensure the accuracy of the contents of this guide, Hardkorr assumes no responsibility for errors or omissions. Please note that specifications and product functionality may change without notice. WARNING • DO NOT alter or disassemble the battery monitor under any circumstances.
-
Page 5: Contents
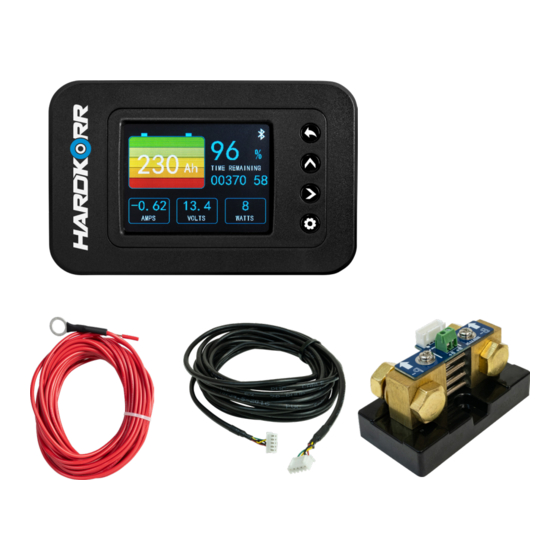
PACK CONTENTS LCD display module 100V/500A shunt 6m shielded cable 6m B+ wire Mounting indicator card Set of mounting screws and pad... -
Page 6: Specifications
SPECIFICATIONS Supply voltage 10-120V Battery capacity 10-1000Ah Max measured current 500A Power consumption < 1W Voltage accuracy ±1% Current accuracy ±1% Capacity accuracy ±1% Operating temperature -20°C to 50°C Bluetooth Weight (LCD screen) 1 10g Dimensions (LCD screen) 125 x 82 x 21mm IP rating IP20 Standards... -
Page 7: Overview
OVERVIEW Bluetooth Dynamic Charge Connection Indicator Capacity (%) Live Battery Capacity Time Remaining Live Current Live Power Live Voltage Max Capacity Voltage Quit Battery Capacity Select Modify Value Low Capacity Alarm Exhausted Enter/Set/Confirm Capacity Voltage... -
Page 8: Operation
INSTALLATION & OPERATION CONNECTING TO YOUR BATTERY 1. Connect the shunt to the LCD monitor using the supplied shielded cable. 2. Connect the shunt to the positive circuit of the battery by running the supplied cable from one of the two terminals marked “B+” on the shunt to the positive terminal on your battery. - Page 9 INSTALLATION & OPERATION CONNECTING TO MULTIPLE BATTERIES IN PARALLEL Connect to multiple batteries Busbar wired in parallel using busbars, as shown. All cables connecting batteries to the busbars -NEG +POS -NEG +POS B+ B+ must be of equal length. Ensure you use cables and busbars of -NEG +POS...
- Page 10 INSTALLATION & OPERATION INITIAL CONFIGURATION When you first install the battery monitor or connect it to a new battery, you will need to configure it to match the parameters of your battery. NOTE: you must ensure your battery is fully charged before you commence the battery monitor setup process.
- Page 11 FAQs & TROUBLESHOOTING Q. What types of battery will this battery monitor work with? A. This battery monitor will work with all types of batteries and battery banks between 8V and 100V, providing the settings are calibrated correctly. Q. Why is my monitor not working? A.
- Page 12 DOWNLOADING THE APP Navigate to the App Store for iOS devices or the Google Play store for Android devices and search for “Hardkorr Battery Monitor”. CONNECTING YOUR BATTERY MONITOR Check the back of your battery monitor’s screen for a label which contains your battery monitor’s device ID - it will start with “BTMON-HK”...
- Page 13 BLUETOOTH APP NAVIGATION The information available in the app is broken up into two tabs: State and History. The State tab shows the current State of Charge (expressed as a percentage and Ah), plus the live voltage, net current inflow (+) or outflow (-), power remaining (A x V) and an estimate of time remaining at current discharge level.
-
Page 14: Warranty
We will also reimburse you for the shipping costs you incurred in sending the goods back to us. Any products that we choose to replace or refund become the property of Hardkorr. If we do not accept your claim, we will advise you of the reason and hold your product for collection. - Page 15 DISCONTINUED ITEMS Discontinued items that are still under warranty will be reviewed by Hardkorr. If a discontinued item is covered under warranty it may be replaced by an equivalent or superior item. If an equivalent item is not available Hardkorr will determine terms of resolution on a case-by-case basis.
- Page 16 WWW.HARDKORR.COM...
Need help?
Do you have a question about the HKPBATTMONBT and is the answer not in the manual?
Questions and answers