Advertisement
Chateau LTE18 ax
Chateau LTE18
ax
Safety Warnings
Before you work on any equipment, be aware of the hazards involved with electrical circuitry, and be familiar with standard practices for preventing
accidents.
Ultimate disposal of this product should be handled according to all national laws and regulations.
The Installation of the equipment must comply with local and national electrical codes.
This unit is intended to be installed in the rackmount. Please read the mounting instructions carefully before beginning installation. Failure to use the
correct hardware or to follow the correct procedures could result in a hazardous situation to people and damage to the system.
This product is intended to be installed indoors. Keep this product away from water, fire, humidity, or hot environments.
Use only the power supply and accessories approved by the manufacturer, which can be found in the original packaging of this product.
Read the installation instructions before connecting the system to the power source.
We cannot guarantee that no accidents or damage will occur due to the improper use of the device. Please use this product with care and operate at your
own risk!
In the case of device failure, please disconnect it from power. The fastest way to do so is by unplugging the power plug from the power outlet.
It is the customer's responsibility to follow local country regulations, including operation within legal frequency channels, output power, cabling
requirements, and Dynamic Frequency Selection (DFS) requirements. All Mikrotik radio devices must be professionally installed.
Exposure to Radio Frequency Radiation: This MikroTik equipment complies with the FCC, IC, and European Union radiation exposure limits set forth for an
uncontrolled environment. This MikroTik device should be installed and operated no closer than 20 centimeters from your body, occupational user, or the
general public.
Quickstart
Please follow these quick steps to set up your device:
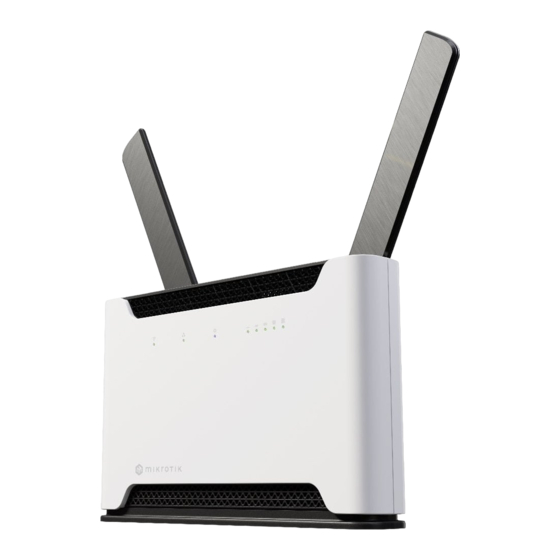
Connect an external antennas to the SMA connector (The antennas are provided in the package, see "
Insert a micro SIM card into the slot located under the device;
Antenna usage
");
Advertisement
Table of Contents

Related Manuals for Chateau LTE18 ax

Summary of Contents for Chateau LTE18 ax
- Page 1 Chateau LTE18 ax Chateau LTE18 ax Safety Warnings Before you work on any equipment, be aware of the hazards involved with electrical circuitry, and be familiar with standard practices for preventing accidents. Ultimate disposal of this product should be handled according to all national laws and regulations.
- Page 2 Connect your computer to one of the Ethernet ports; Connect the power adapter to the DC jack; Once the device is powered on and the PC is connected to the device, open https://192.168.88.1 your web browser to start the configuration; User name: a dmin and there is no password by default you will be logged in automatically to the...
-
Page 3: Expansion Slots And Ports
Expansion slots and ports Reset button. Powering DC jack 2.0 mm. Five Gigabit ports, supporting automatic cross/straight cable correction (Auto MDI/X). Either straight or crossover cable can be used for connecting to other network devices. USB type-A. SIM slot for Micro sim card. Mode button. - Page 4 Operating temperature -40°C to +65°C. Mounting The device is designed to be used indoors, by placing it on the desktop. We recommend using Cat5 shielded cable. When using and installing this device please pay attention to the Maximum Permissible Exposure (MPE) safety distance with a minimum of 20 cm between the radiator and your body.
-
Page 5: Reset Button
Wireless network activity. Ethernet port activity. System LED. 5G signal strength. Cellular connection technology based on the System LED color: Red: GSM Yellow: 3G Blue: LTE Green: 5G NSA Violet: 5G SA Led not blinking: Not registered SIM slot usage SIM card slot is designed to use with Micro SIM cards. - Page 6 Removing back cover to access PCB In case there is a need to access PCB, the back cover can be removed. Remove center screw; Use a small screwdriver to pry open backplate in marked spots; Continue to pry it open by going up; At the end lift off the whole backplate.
-
Page 7: Operating System Support
Operating system support The device supports RouterOS software version v7. The specific factory-installed version number is indicated in the RouterOS menu /system resource. Other operating systems have not been tested. To avoid pollution of the environment, please separate the device from household waste and dispose of it in a safe manner, such as in designated waste disposal sites. - Page 8 LT Aš, Mikrotīkls SIA, patvirtinu, kad radijo įrenginių tipas S53UG+5HaxD2HaxD-TC&EG18-EA atitinka Direktyvą 2014/53/ES. Visas ES atitikties deklaracijos tekstas prieinamas šiuo interneto adresu: https://mikrotik.com/products LV Ar šo Mikrotīkls SIA deklarē, ka radioiekārta S53UG+5HaxD2HaxD-TC&EG18-EA atbilst Direktīvai 2014/53/ES. Pilns ES atbilstības deklarācijas teksts ir pieejams šādā interneta vietnē: https://mikrotik.com/products MT B'dan, Mikrotīkls SIA, niddikjara li dan it-tip ta' tagħmir tar-radju S53UG+5HaxD2HaxD-TC&EG18-EA huwa konformi mad-Direttiva 2014/53/UE.
- Page 9 This MikroTik device meets Maximum TX power limits per ETSI regulations. For more detailed information see Declaration of Conformity above / Dieses MikroTik-Gerät erfüllt die maximalen Sendeleistungsgrenzwerte gemäß ETSI-Bestimmungen. Weitere Informationen finden Sie oben in der Konformitätserklärung. Nähere Informationen finden Sie oben in der Konformitätserklärung / Cet appareil MikroTik respecte les limites de puissance TX maximale via les réglementations ETSI.
Need help?
Do you have a question about the LTE18 ax and is the answer not in the manual?
Questions and answers